Grow · fall deciduous ornamental tree planting
Plant a Deciduous Ornamental Tree After Leaf Fall at the Root Flare
Use leaf fall as the first timing gate, then verify workable soil, expose the true root flare, prepare a wide firm-bottomed hole, and establish the tree through winter.
Published Last updated
In this guide
- Treat leaf fall as a gate, not a deadline
- Make the tree and site agree before delivery
- Expose the structural roots before measuring the hole
- Prepare a wide saucer on a firm center
- Handle each stock type by its roots
- Set the tree first, then remove the packaging
- Backfill, water, and mulch as one root-zone operation
- Use staking, pruning, and protection only for a diagnosed need
- Carry establishment through winter and the first growing season
- Steps
Treat leaf fall as a gate, not a deadline
A deciduous tree that has shed its leaves has reduced above-ground demand, so leaf fall is a useful biological cue for planting. It is only the first cue. The soil must still be workable, the root ball must be moist and sound, and the forecast must leave time for the soil around the roots to settle before a hard freeze. The Morton Arboretum describes fall as a good planting season while advising roughly six weeks before the ground freezes for new root establishment. Read that interval as Chicago-region guidance, then compare it with the actual freeze pattern and soil condition at your site.
A November date does not carry the same meaning in every climate. In a cold inland garden, frozen or waterlogged ground can close the window soon after leaf drop. In a milder region, deciduous planting may continue much later. University of Minnesota Extension separates deciduous and evergreen timing and emphasizes that plants need to enter dormancy; the practical decision is therefore a sequence of evidence: leaves have fallen naturally, buds remain closed, the root ball has not frozen, excavated soil crumbles instead of smearing, and irrigation remains available.
Postpone when the tree cannot move directly from protected storage into a prepared hole. A dry root ball left in wind, an open hole filling with rain, or frozen clods packed around roots turns a favorable season into a poor installation. Heel in or hold nursery stock only under supplier and regional guidance. If a large field-grown tree needs a tree spade, rigging, or traffic control, use an experienced contractor; Minnesota Extension specifically recommends specialized help for tree-spade work because equipment and process hazards exceed a typical home planting.
Make the tree and site agree before delivery
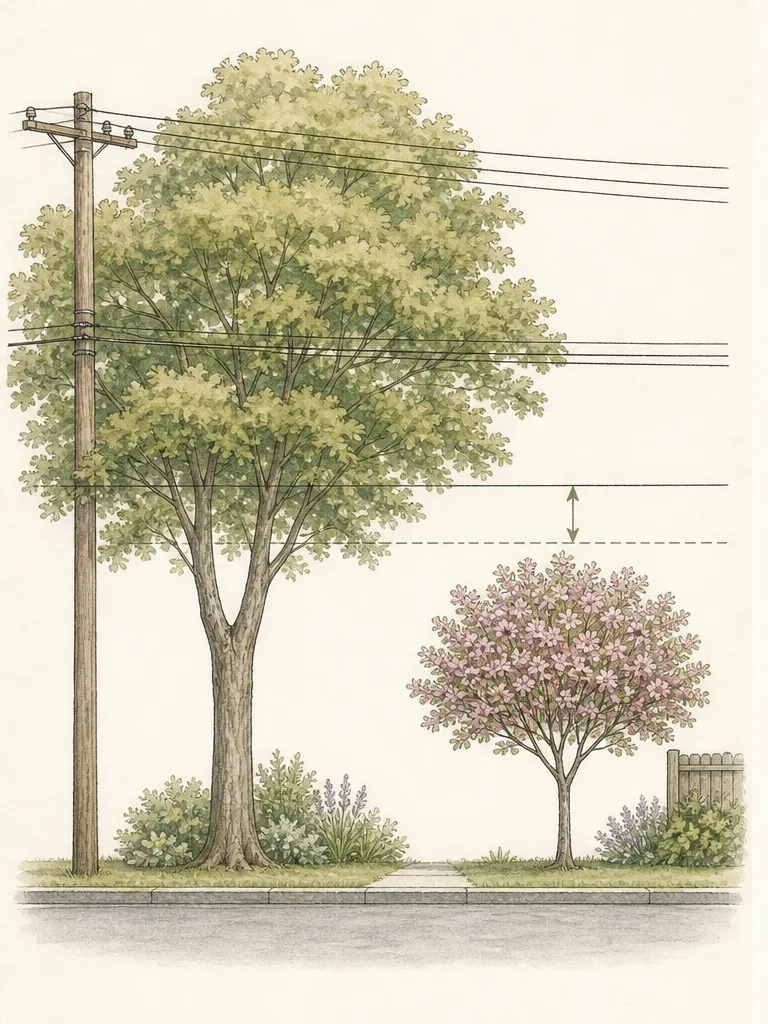
Confirm the exact species or cultivar, expected mature height and spread, hardiness, soil reaction, drainage, light, and moisture demand. Measure the future crown against buildings, eaves, paths, sight lines, overhead wires, and neighboring plants. Mark underground utilities through the applicable local service before digging. A tree selected mainly for current pot size can become a permanent conflict even when the planting technique is flawless.
Read the receiving soil after rain as well as in ordinary weather. Persistent standing water, construction rubble, a buried hardpan, or runoff directed toward a foundation needs a site solution before the tree arrives. Colorado State's planting protocol includes a raised setting for wet soils, but that scoped modification does not make a saturated basin suitable for every ornamental tree. Match the species to the real drainage pattern and move the planting position when water and roots cannot be reconciled safely.
Inspect the tree while it is fully supported. Look for a stable trunk-to-root-ball connection, a sound graft if present, correctly attached branches, and no major bark wounds. Identify whether the stock is container-grown, balled-and-burlapped, or bare root, because root correction and packaging removal differ. Reject a crumbling ball, a trunk that rocks independently in field soil, extensively dried roots, or a container root system that cannot be corrected without leaving too little viable root tissue.
Expose the structural roots before measuring the hole
Nursery soil can cover the true root flare, so the apparent top of a pot or burlapped ball is not a reliable depth reference. While the root system is supported, remove loose medium near the trunk until the widening flare and upper structural roots can be identified. Distinguish them from a graft swelling and from small adventitious roots that formed above the original root system. The planting-hole depth is measured from this corrected upper-root level to the firm bottom of the ball.
For a precise executable method, this article adopts Colorado State University's landscape-tree protocol. Probe three to four inches out from the trunk and locate at least two structural roots in the upper one to two inches of the corrected ball; for fibrous-rooted trees such as maples, crabapples, lindens and similar stock named by that source, find the top structural root within the upper inch. The protocol then places the corrected root-ball surface one to two inches above surrounding grade. These measurements belong to that source's landscape context and are not transferred automatically to bare-root trees or another project specification.
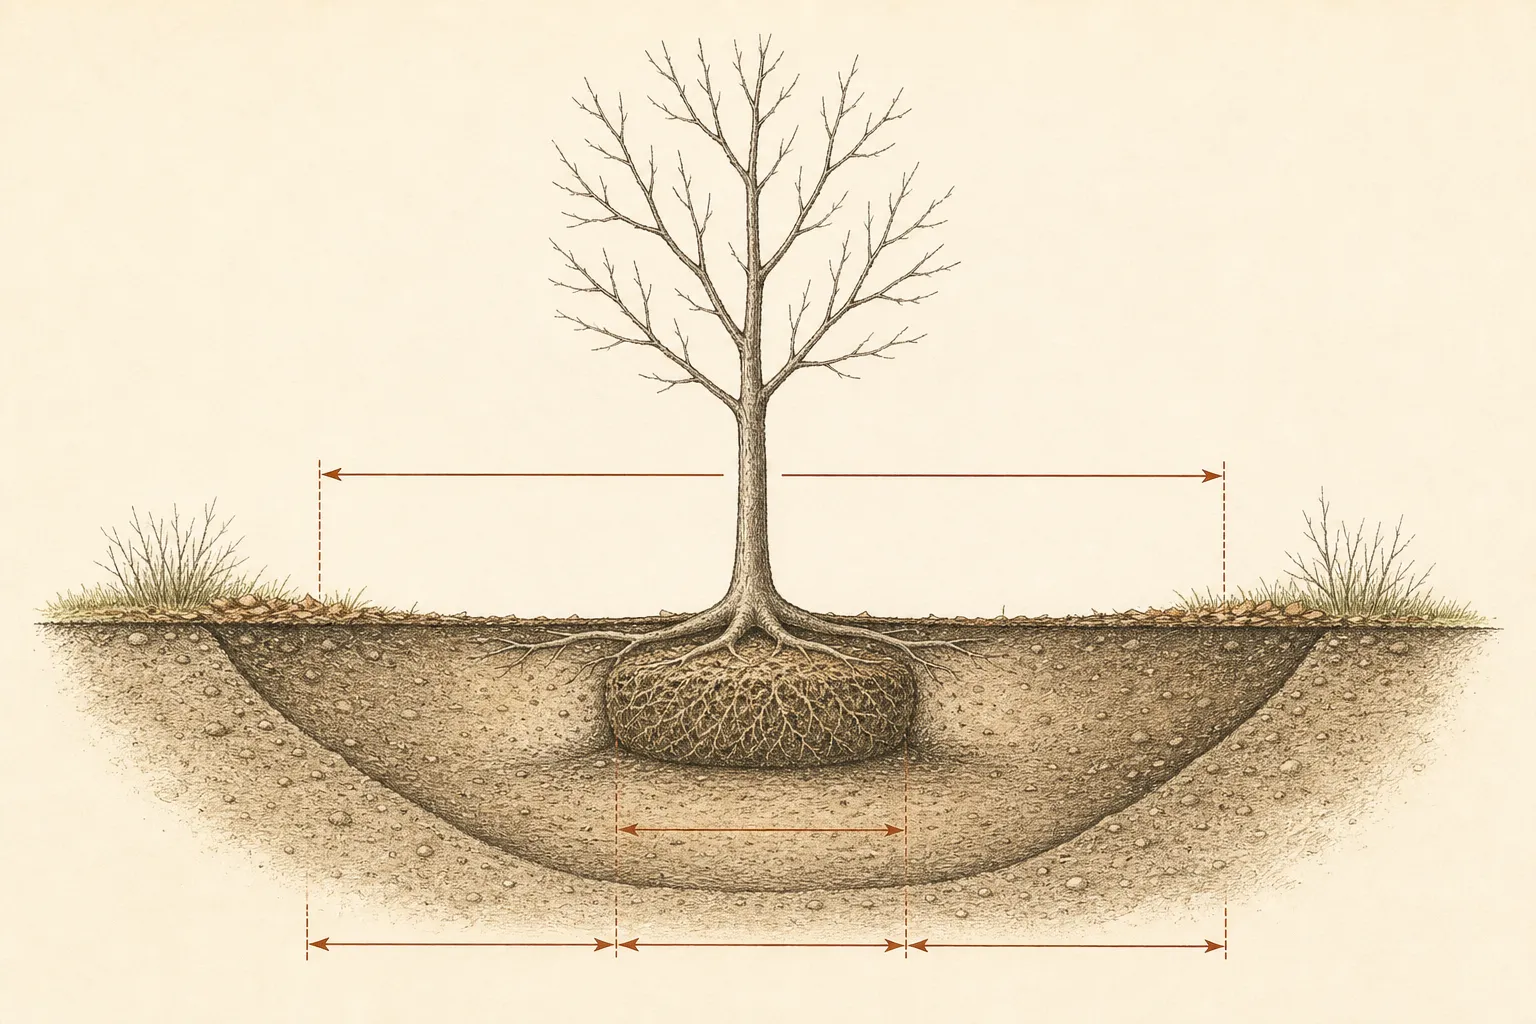
Root defects become visible during this inspection. Container trees may carry circling, kinked, descending, or matted roots. Colorado State reports that four vertical slits alone do not adequately correct circling roots and describes shaving the outer one to one-and-a-half inches from container balls. That is a substantial operation: use it only where the root system and stock type match the protocol, keep the remaining ball moist, and reject a tree whose defects would require destructive removal beyond a sound root system.
Prepare a wide saucer on a firm center
Dig to the corrected depth and leave the central bearing soil undisturbed. The root ball must not sit on a cushion of loose amended soil that can collapse after watering. If the hole becomes too deep, replace suitable excavated soil and compact that base before the tree is lowered. A board or tool handle laid across the surrounding grade provides a simple fixed reference for checking both hole depth and the final root-flare position.
Under the adopted Colorado State method, the surface opening is a shallow saucer three times the root-ball diameter. A twenty-four-inch ball therefore receives a seventy-two-inch-wide surface opening. Sloping sides encourage roots toward better-aerated upper soil and give the installer working room. The Morton Arboretum gives a two-to-three-times width range, while Minnesota calls for a hole at least one to two feet wider than the root system. These are regional frameworks, not numbers to average; this procedure uses the Colorado specification and states it plainly.
Keep excavated topsoil free of sod, plastic, rubble, and deeply buried subsoil that should not return around roots. Broad soil correction may be appropriate when a test and a site plan support it, but a rich pocket inside unchanged native soil can create a sharp water and texture transition. Colorado State permits only modest, thoroughly mixed organic amendment in its discussion and warns against common twenty-five-to-fifty-percent organic backfills. The safe default for this method is usable site soil returned without fertilizer or concentrated amendment against roots.
Handle each stock type by its roots
Move container and balled stock from beneath the root mass. The trunk, branches, twine, and basket rim are not lifting handles. Keep the root system shaded and evenly moist while the hole is prepared, and protect the bare crown from wind during every pause. Large balls can weigh far more than their appearance suggests; use a rated cart, dolly, straps, or mechanical lift and keep people away from pinch and roll paths.
For bare-root stock, spread sound roots over a firm mound or arranged soil surface according to the nursery form, keeping roots moist and uncurled. Remove only dead, broken, or badly damaged root ends with clean tools. For container stock, remove the entire container and correct circling roots before final placement. For balled-and-burlapped stock, keep the structural wrapping intact during lowering so the field-soil ball does not fracture, then remove obstructive material after the ball has been stabilized.
Orient the tree for branch clearance and its strongest structural face without twisting a heavy ball by the trunk. A mark on the ball or trunk can help preserve orientation during lifting. Look at the tree from the principal garden views and from the direction of prevailing access, but let root grade control the final position. A visually pleasing lean that leaves the root ball tilted or one side buried is not a finished planting.
Set the tree first, then remove the packaging
Lower the root system onto the firm center and check the exposed structural-root level against the board spanning finished grade. Lift the ball back out to correct a low setting; loose soil pushed under one side while the full weight remains in the hole is likely to leave an unstable wedge. In the adopted protocol, the corrected top is one to two inches high, with a higher tapered treatment reserved for the source's wet-soil modification. No soil is placed over the root-ball surface to hide that elevation.
Add only enough backfill around the lower ball to prevent rotation. Then remove every tie, strap, rope, and loop from the trunk. Remove plastic, synthetic burlap, nylon twine, and the accessible upper wire or fabric that crosses upper roots. Natural burlap and wire-basket recommendations differ among institutions: the Morton Arboretum calls for as much removal as practical with a low-profile-basket exception, Minnesota allows some material below the ball, and Colorado specifies clearing at least the upper twelve inches or upper two-thirds, whichever is greater.
This article keeps one executable rule by following the Colorado protocol: after stabilization, clear all stem ties and synthetic covering, then cut natural burlap and basket wire from the upper twelve inches or upper two-thirds of the ball, whichever removes more, including accessible sides in that zone. Turn controlled wire ends away from roots and people and remove fasteners. If the ball begins to fracture before that work is complete, stop and obtain project-specific direction rather than burying an unrecorded change.
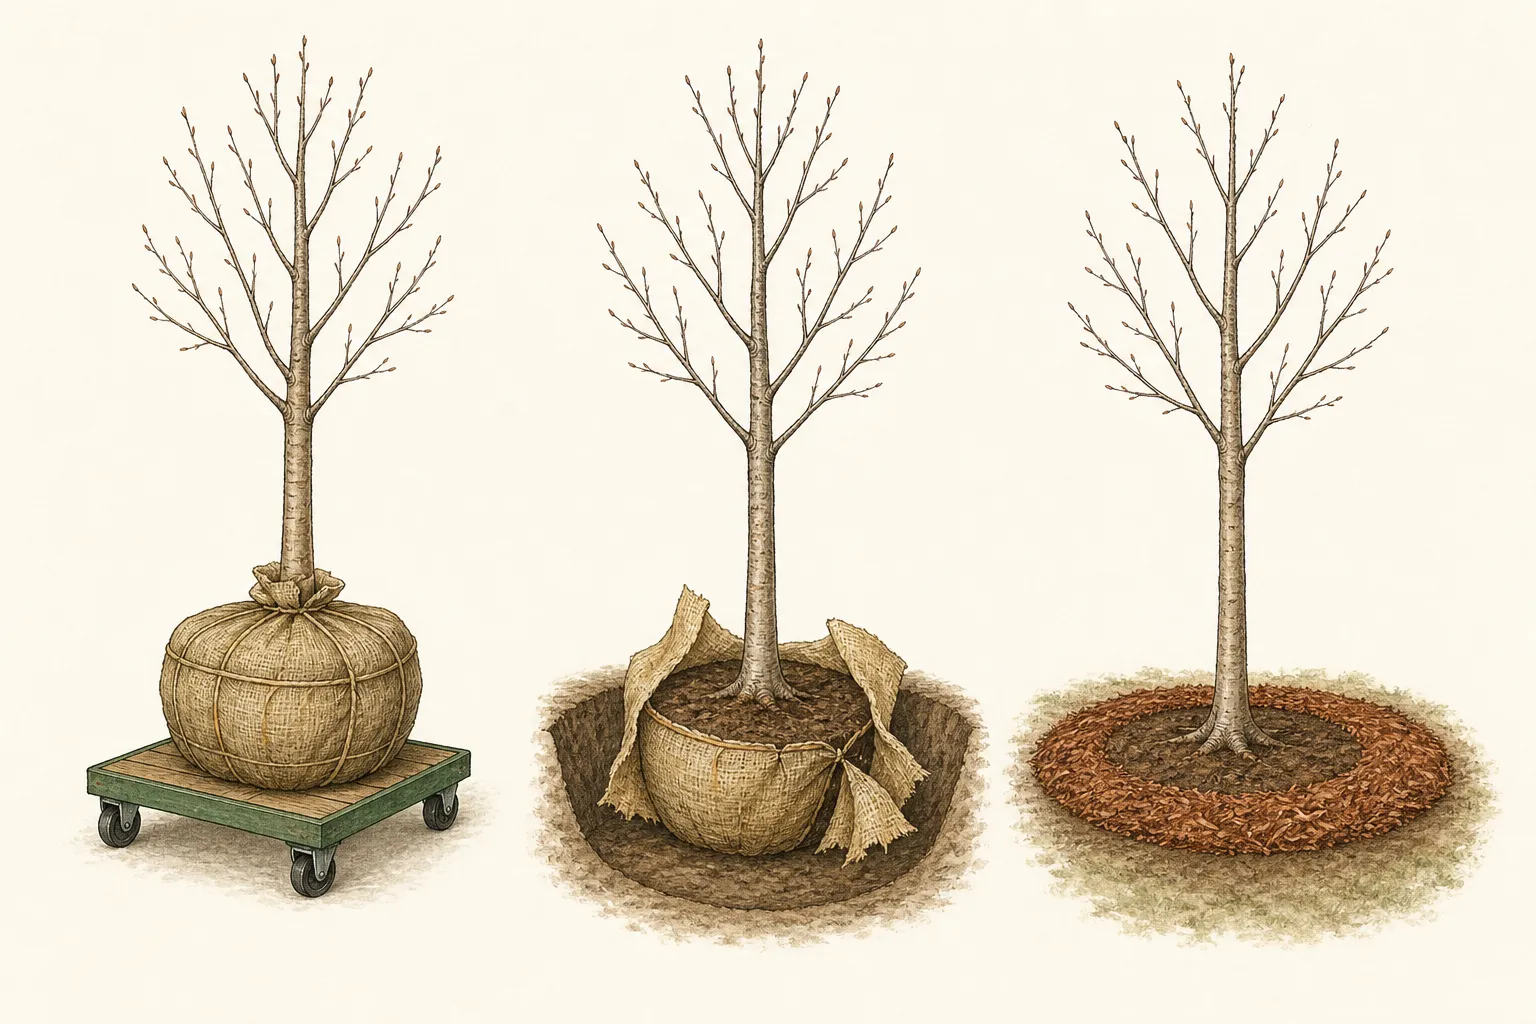
Recheck the flare, upper roots, and trunk alignment after packaging removal. Root-ball collapse, hidden soil over the flare, or a trunk that now moves independently signals a stock or handling failure. Take a photograph while the upper ball is still visible. That record is useful later if mulch migrates, grade settles, or someone questions where the original flare was placed.
Backfill, water, and mulch as one root-zone operation
Return usable excavated soil in lifts, settling it into large voids without pounding wet clay into an airless mass. Keep checking that the trunk remains upright and the exposed flare stays above grade. Stop at the root-ball surface. Soil, compost, and sod placed across the top can impede water movement into the ball and bury bark even when the outer grade looks neatly level.
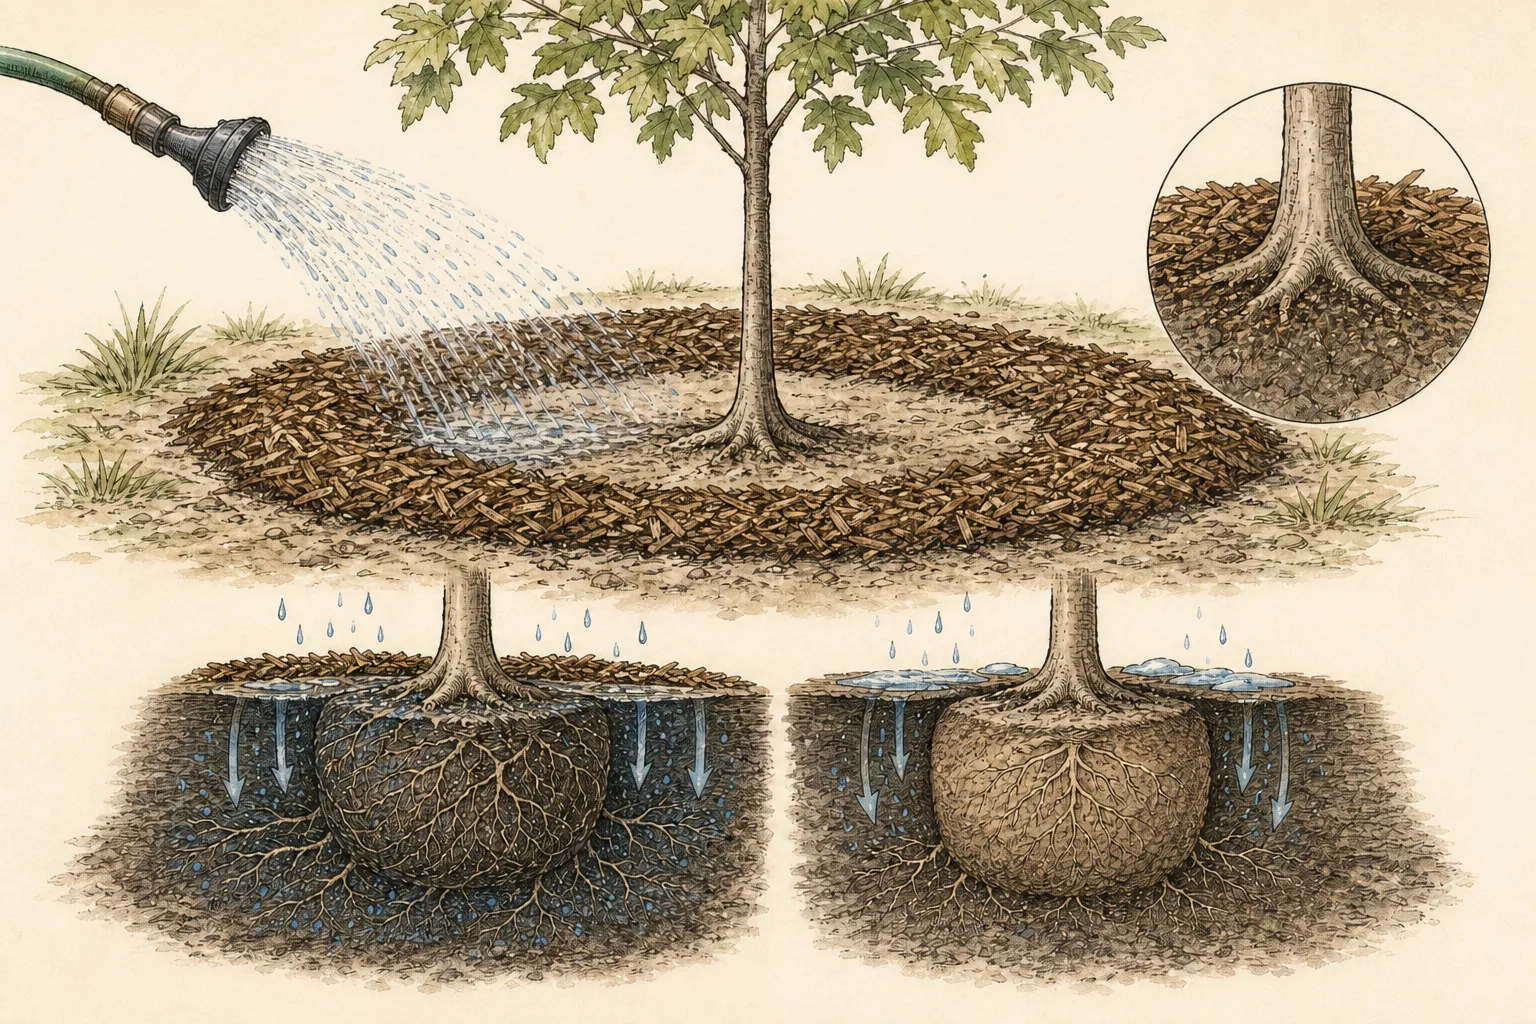
Water slowly during or immediately after backfilling so the original root ball and surrounding soil both become moist. A quick wet surface does not prove that the center of a field-soil or container ball received water. Probe both zones after drainage and adjust future applications to rainfall, wind, temperature, soil texture, and the exact tree. Persistent ponding calls for a drainage reassessment; adding more water to a saturated hole compounds the root-oxygen problem.
Spread an organic mulch layer across the planting area and beyond the ball where practical, then taper it to bare soil at the trunk and flare. The mulch is a surface layer for moisture moderation and protection from turf equipment, not a mound or retaining collar. Keep irrigation hardware, edging, and string trimmers away from bark. A broad, visible root zone makes later moisture checks and settlement corrections much easier.
Use staking, pruning, and protection only for a diagnosed need
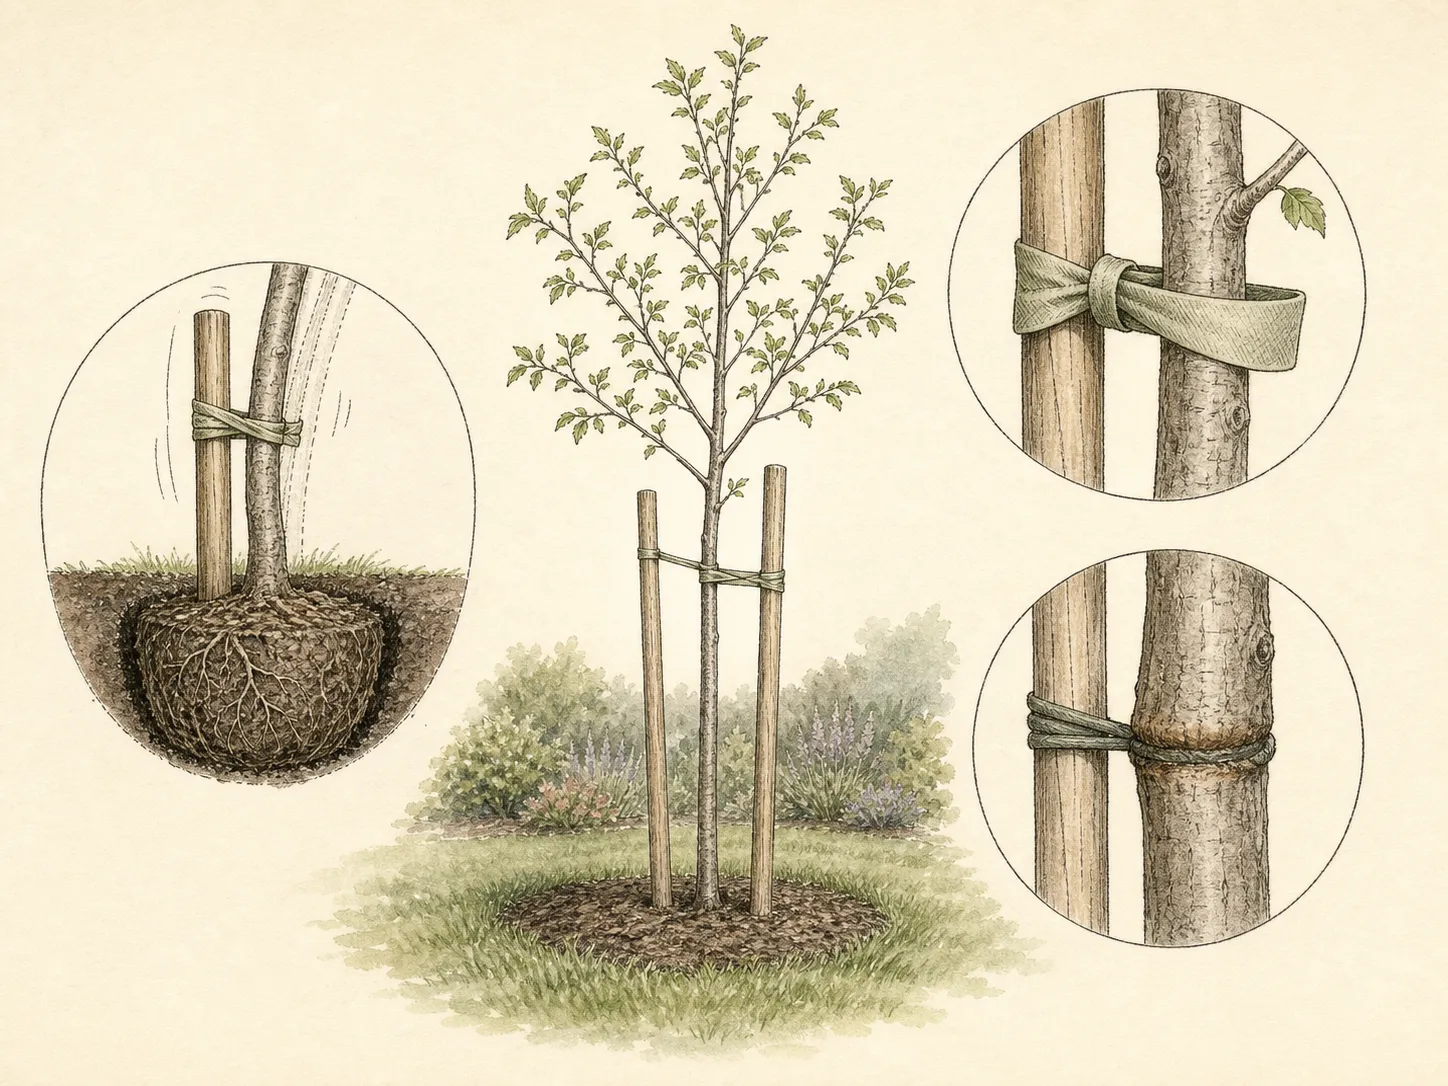
A correctly set root ball often stabilizes a modest ornamental tree without staking. Stake only when the root ball moves in the actual wind exposure or the site presents another documented stability need. Use a regional method with broad flexible ties, allow appropriate trunk movement, keep hardware off bark, and set a removal date. A stake cannot repair a loose ball, buried flare, severed trunk connection, or unsuitable planting site.
At planting, remove branches that are broken, dead, or dangerously damaged. Preserve healthy canopy instead of trying to balance root loss with routine top reduction. Nursery form and future structural training can be assessed after establishment under species-appropriate pruning guidance. Fall pruning is also constrained by species disease risks and flower-bud timing; the planting session is not permission to reshape the crown broadly.
Choose trunk guards or wildlife barriers from the actual hazard. A guard against mower injury differs from protection against deer rubbing, rabbit feeding, sunscald, or rodents under snow. Keep any material ventilated, correctly sized, and inspectable, and prevent ties or edges from contacting the flare. Remove temporary protection on schedule so it does not trap moisture, hide injury, or constrict an expanding trunk.
Carry establishment through winter and the first growing season
Check moisture until the soil freezes and again whenever winter conditions permit in regions where thawed soil and dry weather coincide. The leafless crown uses less water than a summer canopy, yet newly planted roots remain confined and can dry in a windy, snow-poor winter. Sample beneath mulch inside the original ball and just outside it. Water only when those checks show need and apply it early enough to soak in before a freeze.
Inspect after the first deep watering, a heavy rain, freeze-thaw cycles, and strong wind. Look for a buried flare, settlement, a rocking ball, standing water, exposed roots, loosened guards, and rubbing ties. Correct grade and hardware problems while they remain small. Bud swell in spring is encouraging, but leaves alone do not confirm root establishment; continue moisture checks across the first full growing season.
Record the plant identity, source, stock type, root corrections, planting date, flare height, packaging removed, irrigation method, and photographs. The record separates a planting defect from later weather stress and gives future gardeners a reason for the visible grade. Success is not the first flush of leaves. It is a tree whose flare stays visible, ball remains stable, roots enter surrounding soil, and watering intervals lengthen only as site evidence supports the change.
Steps
- Level
- moderate
- Time
- One full planting session after site preparation, plus winter and first-season checks
- Tools
- Measuring tape and straight board, Spade and shovel, Narrow probe for locating structural roots, Knife or pruning saw appropriate to container-root correction, Heavy shears and bolt cutters for wrapping, Watering hose or slow-delivery watering equipment, Rated cart, dolly, straps, or mechanical lift as required, Work gloves and eye protection
- Materials
- Site-compatible deciduous ornamental tree, Usable excavated soil, Water, Organic mulch, Tree label and planting record, Staking or trunk protection only when a specific need is confirmed
- 1Open the fall planting gate
Proceed after natural leaf fall only when buds remain closed, roots and root ball are unfrozen, soil is workable rather than smeared or saturated, and the forecast leaves a realistic establishment interval. The Morton Arboretum's roughly six-week pre-freeze guidance is a Chicago-region reference, not a universal November deadline.
- 2Verify the tree and receiving site
Match the exact species or cultivar to hardiness, light, drainage, soil, mature crown and root space. Mark utilities and resolve conflicts with buildings, paving, wires and sight lines. Inspect stock type, trunk-to-root stability, bark, branches, root moisture and the condition of the container or field-soil ball before digging.
- 3Find the real root-flare level
Remove excess nursery medium while the roots are supported. Under the adopted Colorado State protocol, probe three to four inches from the trunk and expose at least two structural roots in the upper one to two inches, or the top structural root in the upper inch on named fibrous-rooted stock. Measure from that corrected level.
- 4Dig the source-bounded hole
Prepare a shallow saucer three times the root-ball diameter under the adopted protocol, leaving the center firm and undisturbed. A twenty-four-inch ball receives a seventy-two-inch surface opening. Correct an overdeep hole with firmly packed suitable soil, keep rubble and sod out, and retain usable site soil for backfill.
- 5Correct roots for the stock type
Keep bare roots moist and spread them without curling. Remove a container completely and correct circling roots; Colorado State's container protocol shaves the outer one to one-and-a-half inches where applicable. Keep structural B&B wrapping during lowering. Reject defects that cannot be corrected while preserving a viable root system.
- 6Set and stabilize at the flare
Lift beneath the roots or ball, lower onto firm soil and check grade with a straight board. In the adopted protocol the corrected upper-root level finishes one to two inches above grade. Lift out to correct low or tilted stock, orient the crown, and add only a shallow lower ring of backfill for stability.
- 7Clear packaging from stems and upper roots
Remove all trunk ties and synthetic material after the ball is stable. Following Colorado State's executable rule, cut natural burlap and basket wire from the upper twelve inches or upper two-thirds of the ball, whichever is greater, including the accessible sides. Control sharp wire and stop if the soil ball fractures.
- 8Backfill to the root-ball surface
Return usable excavated soil without a rich amended pocket, settle major voids gently, and keep soil off the root-ball top. Water both the ball and surrounding soil slowly. Stop and reassess persistent ponding. Add no fertilizer unless a soil test and plant-specific regional recommendation support it.
- 9Mulch and diagnose support needs
Spread mulch broadly while tapering it to nothing at trunk and flare. Stake only if the properly placed ball moves, with flexible ties and a removal date. Prune only dead, broken or dangerously damaged wood, and use a ventilated guard only for an identified mower, wildlife or winter-injury risk.
- 10Inspect through winter and year one
Check moisture in the original ball and adjacent soil until freeze-up and during suitable winter thaws, then through the first growing season. Recheck settling, flare exposure, alignment, water movement, ties and guards after storms and freeze-thaw cycles. Record the stock, corrections, grade and aftercare decisions.
Plants in this guide
Related reading
Sources
- The Science of Planting Trees. Colorado State University Extension. Source record · Accessed 2026-08-20.
- How to Plant Trees and Shrubs. The Morton Arboretum. Source record · Accessed 2026-08-20.
- Planting and Transplanting Trees and Shrubs. University of Minnesota Extension. Source record · Accessed 2026-08-20.