Grow · water newly planted tree
Water a Newly Planted Tree Through Summer Heat
Check the original root ball and surrounding soil separately, apply slow water across the planting zone, and adjust for rain and drainage while keeping the root flare visible.
Published Last updated
In this guide
- Confirm planting depth and drainage before setting a schedule
- Resolve grade and drainage before calibrating irrigation
- Water the root ball and backfill as two connected zones
- Measure before repeating the schedule
- Respond to heat without drowning roots
- Use mulch as a surface buffer, not a trunk covering
- Read wilt and scorch in context
- Check stakes, wraps, and irrigation hardware
- Expand the monitored zone as roots establish
- Escalate when the pattern exceeds ordinary establishment stress
- Keep a short establishment record
- Coordinate watering with professional follow-up
- Steps
Confirm planting depth and drainage before setting a schedule
A watering routine cannot compensate for a buried root flare or a planting hole that remains saturated. Locate the first major roots and confirm they sit near the finished grade. Pull mulch and loose soil away from the trunk flare. If the trunk enters the ground like a pole with no visible widening, investigate planting depth before building a permanent basin around the wrong level.
Check how water leaves the site. Heavy soil, compacted subsoil, an impervious container remnant, or a low planting pocket can hold water around roots. Probe after irrigation and rain, noting odor, soil texture, and how long saturation persists. Do not drill a narrow drain or add gravel reflexively; those changes can worsen water behavior. Seek local guidance for a persistent drainage failure.
Identify tree size, root-ball type, planting date, soil, exposure, and irrigation source. A small bare-root tree, container tree, and large balled-and-burlapped tree do not contain the same initial root volume. Remove synthetic twine, wire, and burlap according to current planting guidance. Any material left around the root system affects where water can enter and where roots can expand.
Resolve grade and drainage before calibrating irrigation
Find the root flare and inspect drainage before treating canopy symptoms as a request for more water. Measure delivery and probe the original ball, surrounding soil and expanding root area. Use those readings to set the next check. A buried flare or saturated hole needs correction; increasing the run time cannot compensate for either condition.
Water the root ball and backfill as two connected zones
New roots begin in the original root ball and must grow into surrounding soil. Both zones need compatible moisture. Apply water slowly over the root ball and a little beyond its edge so the interface does not become a dry wall. A sprinkler wetting a large lawn may leave the dense root ball dry, while a hose aimed only at the trunk can saturate the center and leave new outward roots unsupported.
Use a hose at low flow, watering wand, bucket with small holes, or drip arrangement that distributes water evenly. Measure output once with a timed container test rather than guessing from hose appearance. Move emitters as roots expand and check that they have not clogged. A spiral of tubing is useful only when its wetting pattern reaches the soil beneath, not when water runs off mulch or down one crack.
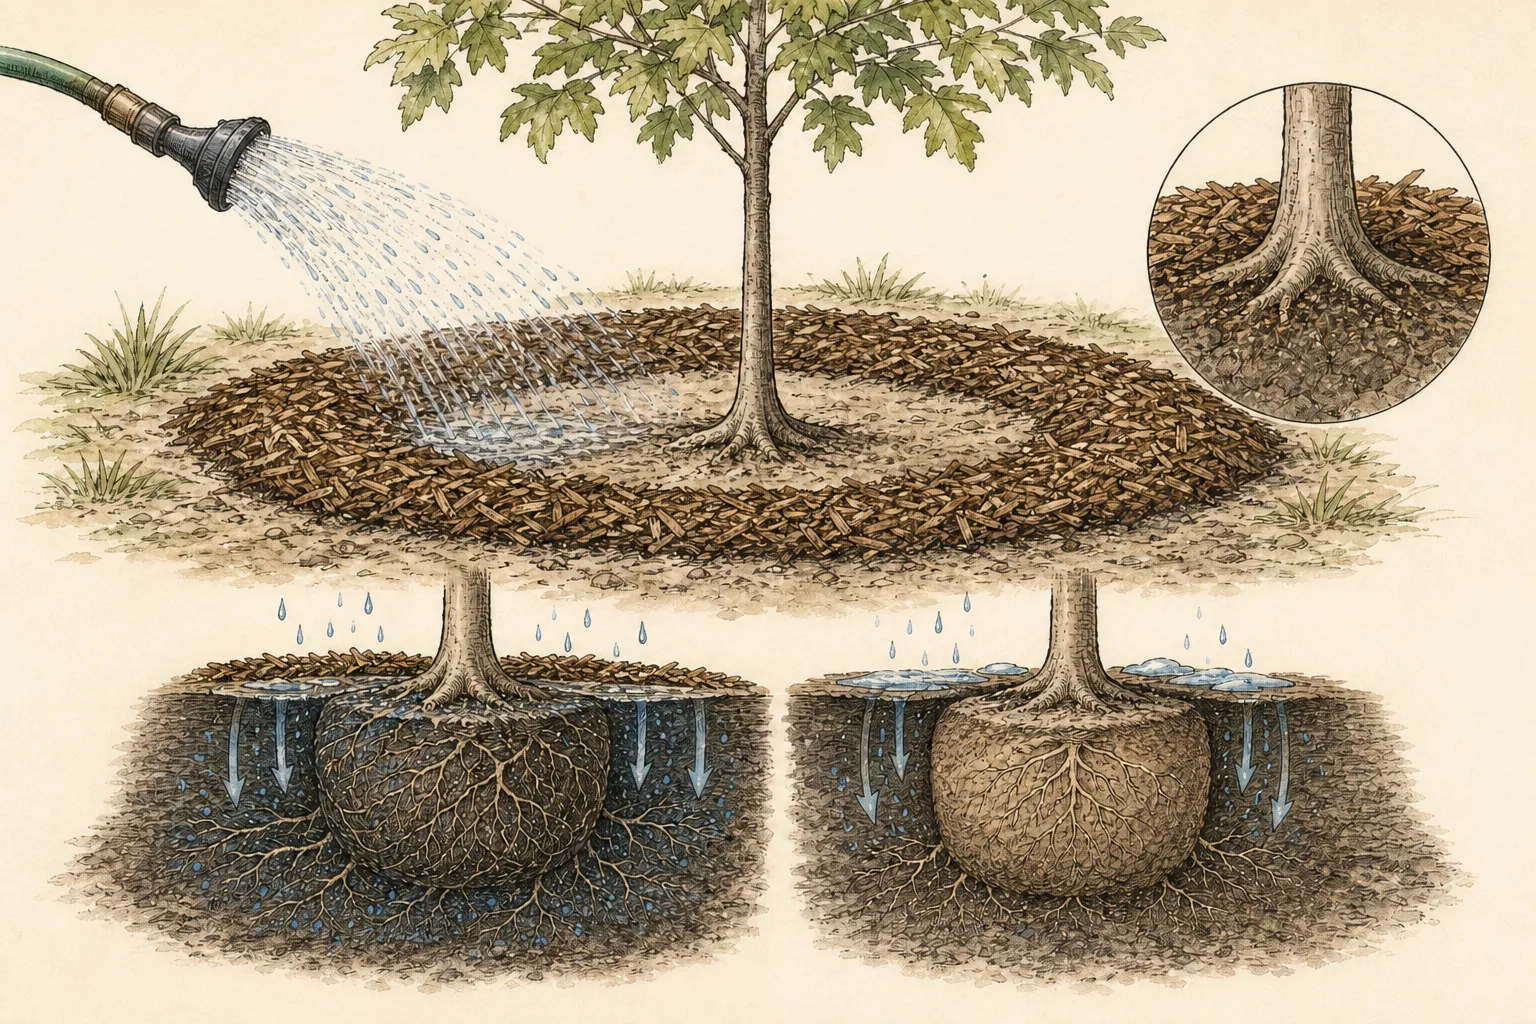
Build no permanent soil volcano or deep berm against the trunk. A shallow temporary basin at the outer root-ball edge can help on suitable sites, but it must not collect repeated rainfall in poorly drained soil. Keep the root flare visible and avoid directing water onto bark. The target is soil occupied by roots, not the trunk surface.
Measure before repeating the schedule
Probe several inches into the original root ball, at the interface, and in the surrounding soil. Use a narrow trowel, soil probe, or finger where roots are not damaged. Moisture can differ sharply among these points. Check before watering and again after the first application to learn how the soil responds. A damp mulch surface is not evidence that the root ball changed.
Water when the root zone is beginning to dry but before the tree reaches repeated severe wilt. The interval changes with heat, wind, tree size, soil, rainfall, and canopy. Fixed advice such as daily forever or weekly regardless of weather ignores those variables. Use local Extension starting guidance, then adjust from measured moisture and drainage.
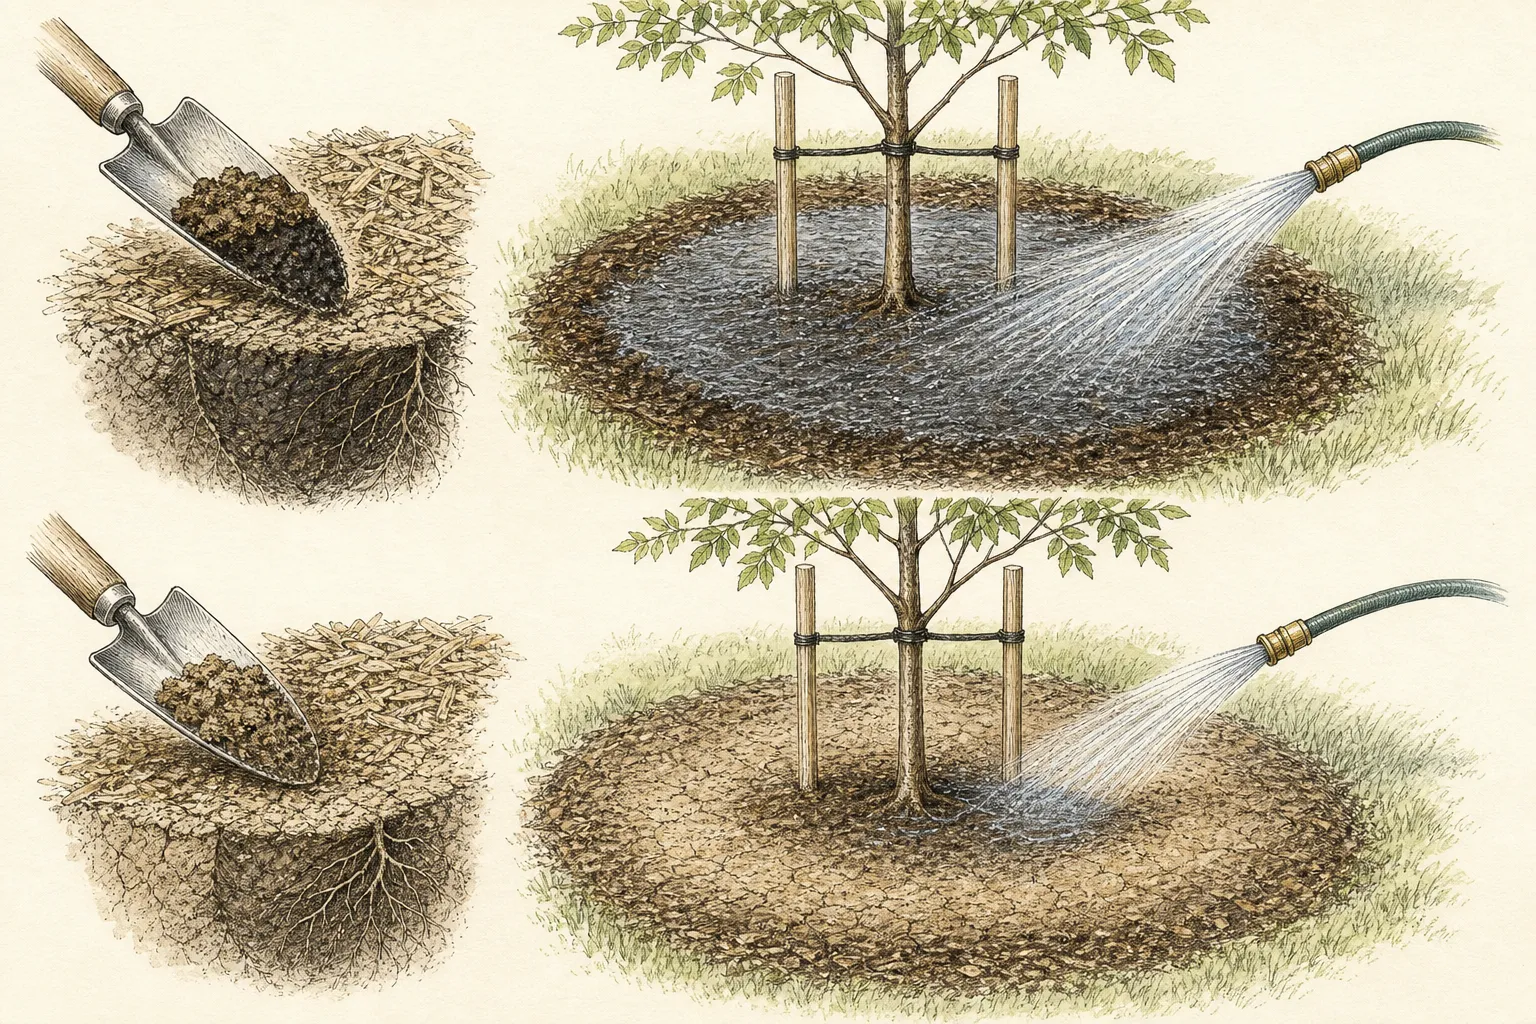
Record rain with a gauge. A short cloudburst may run off dry compacted soil, while slow rain can wet deeply. Probe after the event instead of subtracting a guessed amount from the schedule. Automatic irrigation should pause when soil remains adequately moist and resume only after the monitored zone begins to dry.
Respond to heat without drowning roots
Hot windy conditions increase canopy water loss, especially before roots extend beyond the planting area. Check more often, but change frequency from evidence rather than doubling every application. Slow water during the cool part of the day and allow it to soak. Repeated shallow splashes encourage surface moisture while the deeper root ball may remain dry.
Temporary afternoon shade can protect a small newly planted tree during exceptional exposure when installed without rubbing bark or enclosing the canopy. Do not wrap foliage in plastic or attach material tightly to the trunk. Maintain normal light suited to the species. A shade measure buys time for root establishment; it does not correct a tree planted in a permanently unsuitable climate or aspect.
Avoid fertilizing a heat-stressed new tree. Rapid shoot growth can outpace the limited roots, and salts can worsen water uptake. Follow soil-test and local establishment guidance. Preserve healthy foliage, control competing weeds, and focus on stable moisture and root-zone temperature. New root growth is the priority even when top growth appears modest.
Use mulch as a surface buffer, not a trunk covering
Spread a broad moderate layer of organic mulch over the planting zone, thinning it to bare soil at the trunk flare. Count existing mulch before adding more. The layer reduces evaporation and mower competition, but deep piles can keep bark damp, hide girdling roots, and shelter rodents. A broad flat ring is more useful than a narrow volcano.
Expand the ring as practical so turf does not take water and nutrients immediately beside the new roots. Remove grass carefully at the surface; do not till through roots. Keep string trimmers and mower decks away from bark. Mechanical injury can interrupt transport and create decline that resembles drought despite regular watering.
Lift mulch at inspection points and look for dry soil, saturation, roots, rodents, and fungal decomposition. Restore it loosely after checks. Do not interpret harmless fungal threads in mulch as tree root disease without affected tissue. Soft bark, odor, crown dieback, or persistent wetness needs a separate diagnosis.
Read wilt and scorch in context
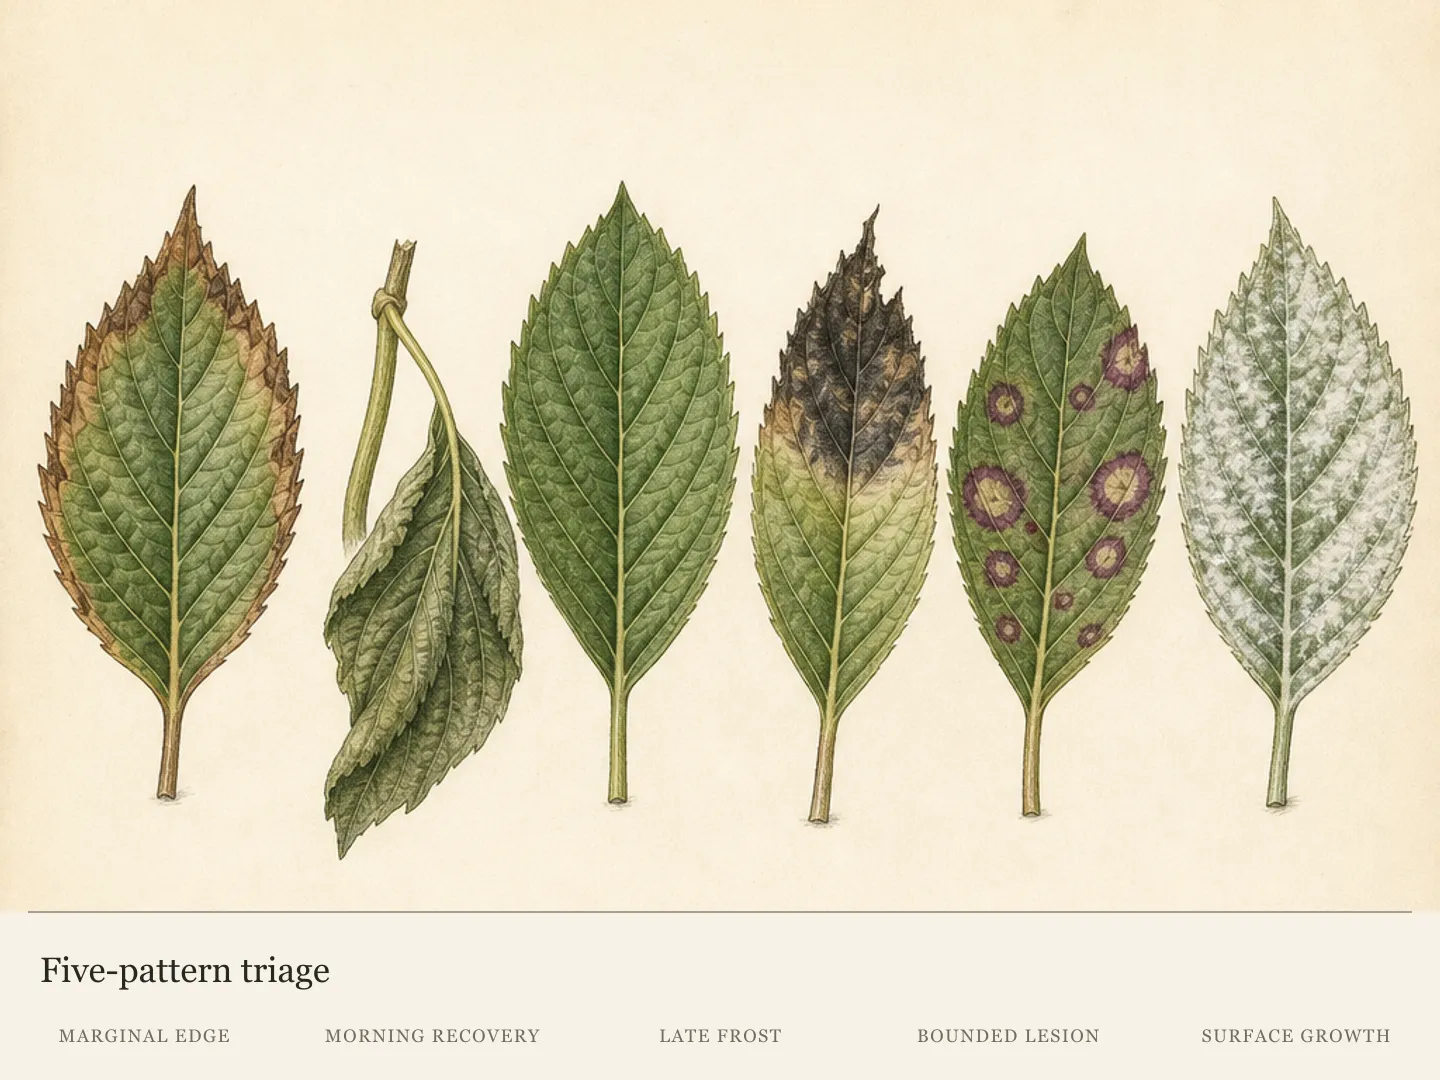
Midday leaf droop during intense heat can occur even when soil is moist, and some species recover by evening. Check the root ball before watering again. Persistent wilt into the cool morning, crisp expanding margins, leaf drop, or dieback increases concern. Pair the canopy symptom with moisture, drainage, planting depth, root condition, and weather.
Too much and too little water can both produce wilt and yellowing because roots fail to supply the canopy. Saturated soil may smell sour and remain glossy or sticky; a dry root ball can shrink from surrounding soil and resist wetting. Apply water in stages to a dry ball. For saturation, stop irrigation and obtain local help with the drainage or planting issue.
Do not prune live canopy to balance roots after planting unless branches are broken, hazardous, or directed by professional guidance. Leaves produce the energy needed for root growth. Removing scorched leaves for appearance can reduce remaining function. Mark injured tissue and judge only new expansion; existing brown margins will not become green.
Check stakes, wraps, and irrigation hardware
Many new trees do not need staking when the root ball is stable. Where staking is required, ties should allow trunk movement and be broad enough not to abrade or girdle. Inspect after storms and rapid growth. Remove stakes on the locally recommended schedule rather than forgetting them beneath foliage. A tight tie can cause decline even when watering is correct.
Keep hose loops, drip tubing, and bags from rubbing the trunk. Refill watering bags only according to their instructions and confirm they drain completely. A leaking bag that remains against bark or an empty clogged emitter provides false reassurance. Move hardware as roots expand and remove it before winter or equipment use when appropriate.
Tree wraps and guards have specific purposes and risks. They can hide moisture, insects, and bark injury if left indefinitely. Use them only where locally recommended and inspect underneath. Watering equipment should never require a permanent hidden band around the trunk.
Expand the monitored zone as roots establish
During the first seasons, roots extend into the surrounding soil. Move the watering pattern outward gradually while still checking the original ball. New root growth does not jump instantly to the drip line of the canopy. A broadening ring of monitored soil is more realistic than abandoning the root ball after a few weeks or watering only the trunk for years.
Reduce supplemental frequency as the tree establishes and rainfall meets need, but continue during prolonged heat or drought according to species and local guidance. Establishment can take more than one season, especially for larger trees. Use annual growth, canopy density, and root-zone moisture to guide the transition. A rigid first-year-only rule may stop too early.
Maintain the mulch ring and protect it from compaction. Do not build raised beds or dense perennial plantings over the new root zone during establishment. Additional roots and irrigation demands complicate monitoring. Introduce compatible underplanting later, in small pockets, only after the tree’s grade and root system are stable.
Escalate when the pattern exceeds ordinary establishment stress
Seek local diagnostic or arboricultural help when wilt persists despite verified moisture, roots remain saturated, the root flare is deeply buried, bark cracks or oozes, leaves show a distinct disease pattern, or dieback advances through branches. Bring planting records, photographs, moisture observations, and product history. Do not stack fertilizer, fungicide, and more water while the cause remains unclear.
A certified arborist is appropriate for structural issues, large-tree hazards, and planting corrections that may require lifting or root-flare work. Verify credentials and ask for the diagnosis and expected outcome. A warranty replacement may be sensible for a severely compromised new tree, but the site and planting method must be corrected before repeating the installation.
Close the watering route when evidence identifies herbicide injury, trunk damage, root disease, or a failed planting structure. Water remains part of normal care, but it is no longer the sole remedy. The value of the moisture record is that it prevents both drought assumptions and saturation from obscuring the actual problem.
Keep a short establishment record
Record planting date, tree size, root-ball type, flare position, soil texture, watering output, rain, and moisture at three points. Add photographs from the same angle monthly. The record can be a simple table. Its purpose is to reveal intervals and trends, not create a daily gardening burden.
Compare leaf expansion, shoot growth, and canopy retention with moisture observations. A tree that stays stable during a heat period under a longer interval may no longer need the earlier frequency. A tree that repeatedly dries in the root ball despite wet backfill needs a delivery correction. Let the record change the system.
At the end of the season, inspect mulch, stakes, hardware, root flare, and any exposed roots. Plan next year’s broader watering zone and remove obsolete equipment. A newly planted tree becomes established through repeated evidence-based adjustments, not through one amount repeated until the calendar declares the process complete.
Coordinate watering with professional follow-up
Schedule a post-planting inspection when the installer or arborist provides one. Bring the moisture record and ask them to verify flare position, stability, tie condition, and root-ball contact. A short evidence-based visit can correct a settling or hardware problem before canopy decline becomes pronounced.
Clarify warranty responsibilities without letting them delay urgent care. Record watering, rain, and photographs according to the agreement, but continue safe root-zone monitoring. Do not alter the planting structure destructively before the responsible professional sees it unless an immediate safety hazard requires action.
Keep recommendations in writing and reconcile conflicts with current local Extension or arboricultural standards. One person’s fixed weekly amount may not reflect the site’s soil and weather. The final plan should specify how moisture observations change the interval and who handles drainage or planting-depth corrections.
Steps
- Level
- moderate
- Time
- 20 to 40 minutes per watering and inspection
- Tools
- Soil probe or narrow trowel, Hose or watering wand, Rain gauge, Timer and measuring container
- Materials
- Organic mulch, Adjustable emitters or watering device if used
- 1Expose the flare and test drainage
Confirm the first major roots sit near grade, remove mulch from the trunk, and probe for persistent saturation. Identify root-ball type, planting date, soil, and hardware. Correct a buried flare or failed drainage with local professional guidance before relying on a schedule.
- 2Measure the water delivery
Time hose or emitter output into a known container, then distribute water slowly over the root ball and slightly beyond. Check whether it penetrates both zones instead of running down gaps, off mulch, or through one emitter point.
- 3Probe three connected zones
Check moisture inside the original root ball, at its edge, and in surrounding soil before and after watering. Record rain and heat. Repeat only when the monitored zone begins to dry, adjusting the interval for weather and drainage instead of using a fixed calendar.
- 4Maintain a broad flat mulch ring
Remove turf at the surface, spread a moderate mulch layer, and leave the flare and bark open. Lift mulch at inspection points and keep mowers, trimmers, rodents, and irrigation hardware away from the trunk.
- 5Read canopy symptoms with soil evidence
Compare midday and morning wilt, mark scorch, and preserve live foliage. Dry and saturated roots can both wilt. Rewet a dry ball in stages; stop irrigation and seek drainage help when soil remains saturated. Diagnose patterns that do not fit water stress.
- 6Audit stakes and devices
Loosen broad ties, test root-ball stability, confirm bags and emitters drain, and remove rubbing hardware. Follow local timing for stake removal. Do not let wraps, tubing, or ties become hidden moisture traps or girdles.
- 7Broaden the zone and record establishment
Move watering outward as roots expand while continuing to check the original ball. Record output, rain, moisture, and monthly canopy condition. Reduce supplemental water from evidence, maintain the root zone, and escalate persistent decline with the full planting record.
- 8Use a post-planting inspection
Ask the installer or certified arborist to verify flare position, root-ball stability, ties, and soil contact using the moisture record. Correct settling and hardware early, and document recommendations instead of relying on a fixed verbal watering amount.
- 9Preserve warranty evidence and tree safety
Keep dated rain, irrigation, and canopy photographs, clarify who corrects drainage or depth, and avoid destructive changes before review unless safety requires them. Continue measured root care while the administrative question is resolved.
- 10Close each check with a next date
Record the next moisture inspection from current soil and forecast, not a fixed recurring assumption.
Related reading


Sources
- How to Care for Newly Planted Trees. Iowa State University Extension and Outreach. Source record · Accessed 2026-08-19.
- Meeting the Watering Needs of a Newly Planted Tree. Penn State Extension. Source record · Accessed 2026-08-19.
- Watering Newly Planted Trees. Texas A&M Forest Service. Source record · Accessed 2026-08-19.