Gardens · rain garden moisture zones
Design a Residential Rain Garden by Wet, Moist, and Upper-Edge Zones
Map how runoff enters, settles, and leaves a residential rain garden, then compose wet, moist, and upper-edge plant groups that remain legible between storms.
Published Last updated
In this guide
- Begin with runoff, not a plant palette
- Read the garden after real rain
- Confirm that the basin can empty
- Give the wet zone a durable framework
- Use the moist shoulder as the visual bridge
- Let the upper edge belong to the surrounding garden
- Make the overflow part of the composition
- Compose with repetition and seasonal structure
- Install from fixed grades outward
- Maintain by zone and revise from evidence
- Fit five plants inside an already approved wet planting zone
- Design ideas
Begin with runoff, not a plant palette
A residential rain garden is a shallow landscaped depression that receives runoff and lets water soak into the ground. Its ornamental success depends on that hydraulic job remaining visible and functional. Before choosing flowers, identify the roof, driveway, walk, or lawn that supplies water; trace the inlet; locate the lowest storage area; and decide where excess water can leave without approaching a foundation, neighboring property, septic area, utility, or unstable slope. Local stormwater and utility guidance governs the final location.
Treat existing drainage as evidence rather than an inconvenience to conceal. Runoff that already crosses the property may carry sediment, move quickly, or bypass a proposed basin. Watch several ordinary storms and at least one heavier event if the season permits. A garden drawn from one dry-day impression can put its thirstiest plants on a rim that rarely wets or place ordinary border perennials where water repeatedly stands. The zones must describe actual water behavior, not a decorative set of rings.
Keep the project residential in scale. If the site receives concentrated flow from a large paved area, remains saturated, lies near a structure, or cannot release overflow safely, pause for local professional advice. A simple planted depression and an engineered bioretention system are not interchangeable. This design approach assumes a suitable home-landscape site whose soil, setbacks, utilities, and discharge route have been checked under applicable local rules. Planting cannot compensate for unsafe siting or inadequate drainage design.
Read the garden after real rain
Place weatherproof markers at the inlet, deepest point, first area to drain, last area to remain glossy, and the intended overflow. Photograph from one fixed viewpoint as the storm begins, soon after it ends, and again as the surface clears. Repeat this on different dates. The useful map is not simply wet versus dry: it shows where flow arrives with force, where fine material settles, where moisture remains without visible water, and where the upper edge returns quickly to ordinary border conditions.
Translate those observations into three broad planting zones. The wet zone occupies the lowest or most frequently inundated pockets. The moist zone is the shoulder that is wetted by storms but spends more time drained. The upper edge sits above routine ponding and may dry first, especially beside paving, wind, or reflected heat. Boundaries will be irregular. Let contours follow evidence, and allow one species to cross a boundary only when authoritative regional guidance supports its full moisture range.
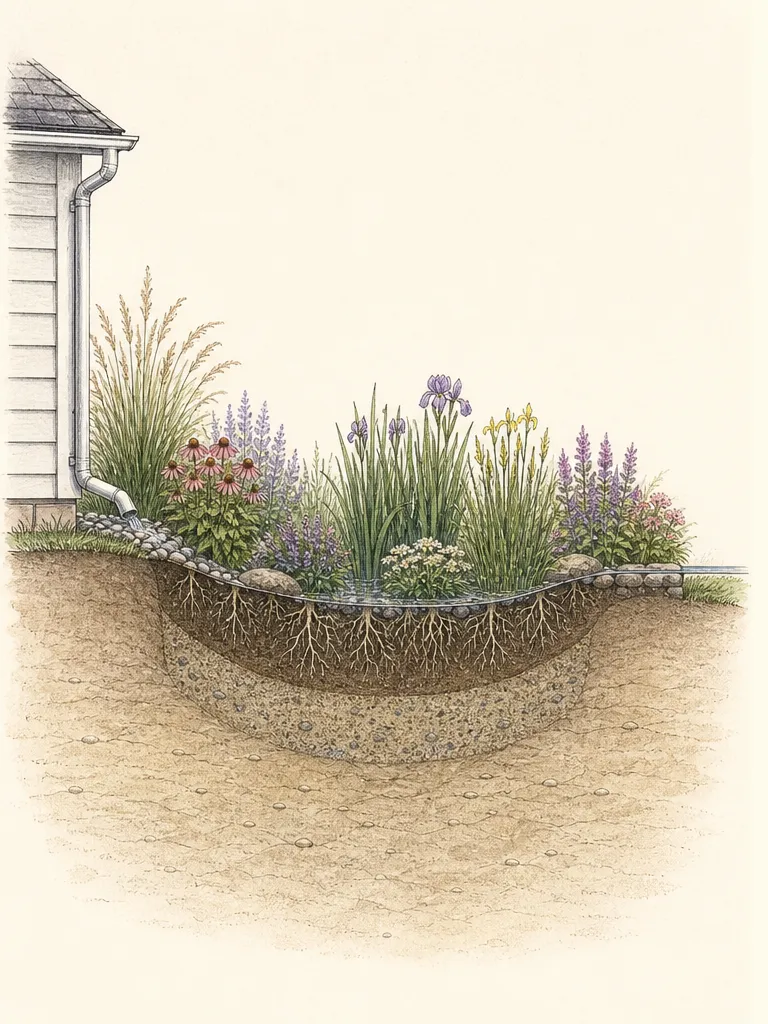
Do not assume every point at the same elevation behaves alike. Compaction, buried construction debris, clay lenses, tree roots, downspout velocity, and shade can produce small wet or dry pockets. Probe the soil after rain and compare several locations before finalizing the plan. Where a tiny anomaly would demand a completely different irrigation regime, it may be better to correct the flow or leave a gravelly inspection patch than to build the entire composition around one unreliable spot.
Confirm that the basin can empty
Use the infiltration method recommended by your local Extension or stormwater authority at the actual proposed site. Soil behavior can change over short distances, so a successful test elsewhere in the yard does not prove the basin location. Observe the hole through the full local test period, record recent rainfall, and note whether compacted subsoil or a seasonal water table affects the result. The purpose is to reject an unsuitable location before excavation, not to force a preferred shape into soil that cannot accept it.
A rain garden is not a permanent ornamental pond. Plants for its lower zone may tolerate temporary standing water, but they also need to live through drained intervals between storms. If water persists beyond the local design standard, reconsider the site, size, soil profile, or need for an engineered outlet. Do not add a thin layer of purchased soil and assume the underlying limitation has disappeared. The pathway through the existing profile matters more than the appearance of the finished surface.
Check slope and finished grade at the same time. A level basin floor distributes storage more evenly than a tilted bottom that keeps one end continually stressed. On a gentle slope, a stable downhill berm may be part of the design, but it must not block a safe overflow. Preserve topsoil separately if excavation proceeds, avoid driving equipment over the future planting bed, and stop if digging exposes utilities, unexpected fill, seepage, or roots whose loss would damage an established tree.
Give the wet zone a durable framework
Design the lowest zone with plants regionally recommended for both periodic inundation and the drained conditions that follow. Use rooted clumps and fibrous forms to make the basin readable when flowers are absent. Sedges, rushes, moisture-tolerant grasses, and robust flowering perennials can provide that framework, but a name appearing on a national rain-garden list is not enough. Confirm local hardiness, native or noninvasive status, light, soil texture, and the specific moisture code attached to the species.
Keep the direct inlet partly open for inspection. A small stone or dense-rooted receiving area can make erosion and sediment visible before they disappear beneath foliage. Set the first ornamental group beyond the point of strongest flow, where crowns will not be scoured or buried. Repeat one or two reliable forms along the basin rather than packing the bottom with isolated novelties. The visual calm helps a gardener notice a new bare channel, deposited silt, or a plant that has begun to spread beyond its assigned pocket.
Plan mature height from the principal view. Tall wet-zone plants can anchor the back or center of a large basin, but they can also hide the inlet, block a path sight line, or overwhelm a small front yard. Draw foliage height and flowering-stem height separately. Some graminoids make a low leafy clump with much taller seasonal stems; others remain substantial all year. Use the nursery label for a named cultivar and authoritative species references for the straight species, because their mature outlines may differ.
Use the moist shoulder as the visual bridge
The moist zone usually offers the broadest design opportunity because it receives storm water yet drains sooner than the basin floor. Build it from plants that prefer moist or mesic soil and can tolerate the site's ordinary intervals between rain. This is the place to repeat the wet zone's leaf shapes in drier-adapted species, carry a flower color uphill, and overlap bloom seasons. A bridge based on form makes the hydrologic transition look deliberate instead of dividing the garden into three unrelated collections.
Reserve enough open soil around young plants to see whether runoff cuts across the shoulder. Temporary annual color is less useful here than a clear view of establishment. Mulch, where locally recommended, should remain stable under flow and clear of crowns; loose material that floats into the basin can bury small plants and clog the inlet. On a newly shaped site, surface erosion control and patient establishment matter more than an instant full border. The first season is a test of both grading and planting.
Group plants by mature spread and behavior. A slowly enlarging clump can sit beside a stable path edge, while a rhizomatous colony former needs a boundary where its movement can be observed and edited without disturbing the basin. Self-seeding can add natural rhythm, but only if seedlings are identifiable and unwanted spread is practical to manage. Check current regional invasive guidance for every species and cultivar; rainwater should not become a route for moving an aggressive ornamental downstream.
Let the upper edge belong to the surrounding garden
The upper edge is not a miniature wetland. It usually sits above routine ponding and may experience the ordinary moisture pattern of the adjacent border, with extra wetting only during large storms. Select plants for that measured condition, including sun exposure, reflected heat, wind, and soil drainage. Upland or mesic species often make better choices than plants sold under the broad label moisture-loving. A drought-tolerant plant may work only where the rim truly drains; it should not be repeated down the slope for visual symmetry.
Use the edge to connect the basin to paths, lawn, shrubs, or an existing perennial bed. Lower mounds can preserve sight lines at a walk, while one repeated upright form can mark the rain garden from across the yard. Keep maintenance access and the overflow free of arching leaves at mature size. A clipped lawn crescent or a narrow surface path may be more useful than a continuous floral rim if it allows sediment removal, weeding, and inspection without stepping into saturated soil.
Draw a generous transition rather than a hard botanical stripe. Allow selected upper-edge plants to descend slightly where observations show they remain healthy, and let a moisture-flexible shoulder plant climb toward the rim. The overlap softens the contour while preserving the logic of the zones. Do not move a species merely to complete a color pattern if its roots would occupy the wrong hydrologic position. The garden reads as coherent when repeated forms respect water, not when every band is equally wide.
Make the overflow part of the composition
Every rain garden needs a known route for water that exceeds its temporary storage. Shape that route before planting and protect it from erosion according to local guidance. The overflow should discharge toward a safe pervious area, never toward a building, neighboring lot, or vulnerable slope. Keep the sill legible as a slightly lower, stable point on the rim. If a gardener cannot find it after foliage matures, routine maintenance cannot confirm that it remains open.
Frame rather than disguise the overflow. Place low, durable plants to either side, repeat their texture elsewhere on the upper edge, and leave the center free of woody crowns or dense runners. A flat stone, gravel strip, or reinforced turf may be appropriate where local practice allows it, but it must serve flow rather than imitate a decorative dry creek that leads nowhere. Draw the overflow in section with the basin floor, berm, surrounding grade, and destination so its elevation relationship is understood.
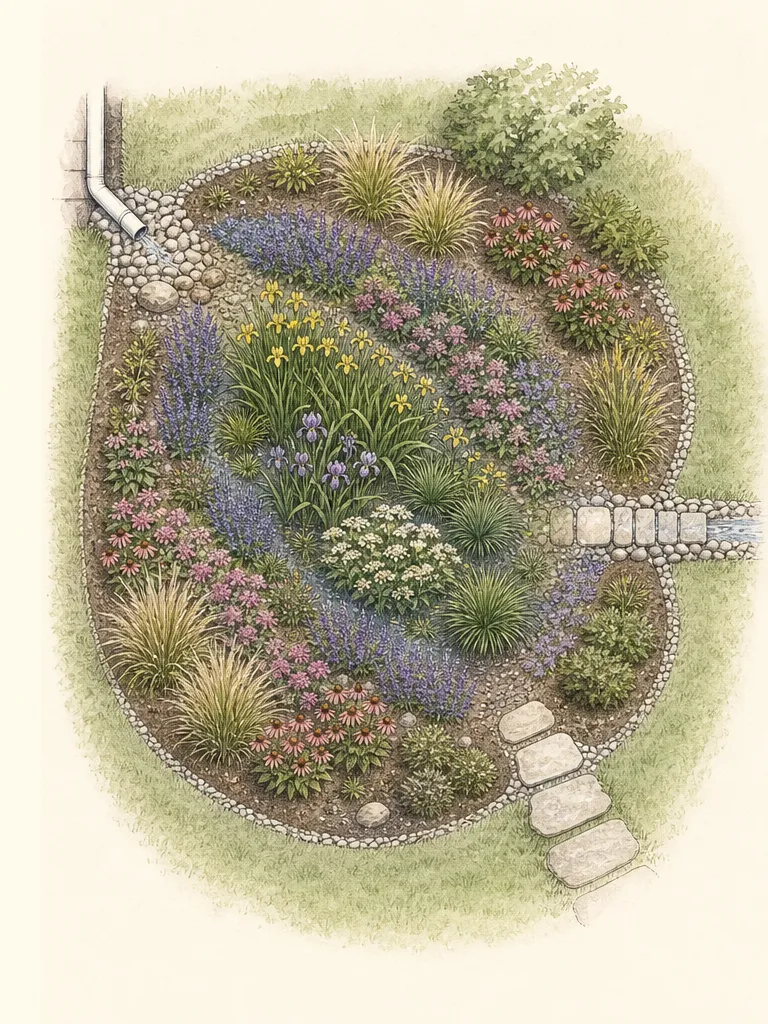
Recheck the route after mulch application, plant growth, freeze-thaw movement, and heavy rain. Sediment, fallen stems, leaves, or edging can quietly raise the outlet and push water elsewhere. Correct the obstruction without deepening the sill impulsively; a grade change can alter storage and discharge. If overflow repeatedly erodes, bypasses the planned route, or approaches a protected area, stop treating it as a planting problem and seek local stormwater advice about the underlying design.
Compose with repetition and seasonal structure
Choose a small set of structural roles before choosing a long species list: a low matrix, an upright repeated accent, a broad-leaved contrast, and one or two seasonal flower groups. Assign each role separately within the moisture zones. For example, the wet floor and upper rim may both carry an upright rhythm, but with different species suited to their water regimes. Repeating posture rather than forcing one plant everywhere gives the garden unity while honoring the site's gradient.
Plan for the months between peak flowers. Seed heads, persistent stems, grass foliage, and the basin's clean outline can hold the composition in autumn and winter. In spring, visible crowns and open access help reveal winter damage or sediment. Avoid relying on one late-emerging species for the entire lower zone, which can leave bare soil when runoff is most active. Mix compatible growth calendars so some rooted cover is present without creating a dense tangle that hides hydraulic features.
Use local plant references to make a final matrix listing each candidate's moisture tolerance, light, mature height and spread, growth behavior, seasonal role, and regional status. Reject any plant with a missing answer that matters to its zone. A nursery photograph shows a moment; the matrix describes the whole job. When a cultivar is selected for compactness, color, or sterility, keep its exact name on the plan and verify those traits rather than applying the species description indiscriminately.
Install from fixed grades outward
Finish the level basin, stable berm, inlet, and overflow before setting pots. Then place plants at mature spread while they are still in containers, beginning with access and hydraulic clearances. View the layout from the house, street, and maintenance route. Move a group now rather than after roots knit. Keep crowns at the correct grade for each species; do not bury low plants to make a smooth contour or perch upper-edge plants on isolated mounds that shed water away from their root balls.
Plant by zone and label every group. Water root balls thoroughly at installation even in the wet zone, because storm timing may not match establishment needs. Direct temporary irrigation to new plants while continuing to observe natural flow. Do not assume repeated ponding supplies even moisture inside a container-grown root ball. Remove nursery ties and tags that could girdle stems, but preserve a durable map with botanical names, cultivars, source, and planting date for later editing.
Apply only the surface treatment suited to local rain-garden practice and the expected velocity. Keep crowns, inlet, and overflow visible. Stabilize any exposed soil promptly, yet avoid filling the basin with loose decorative material that can migrate. The installed garden should still show its three-dimensional form: a clear receiving point, level storage, planted shoulder, upper edge, and outlet. If ornament obscures that sequence on day one, maturity will make maintenance harder rather than easier.
Maintain by zone and revise from evidence
During establishment, inspect after storms and during dry intervals. Weed before roots spread through young clumps, replace erosion at its cause, clear deposited sediment from the inlet, and keep the overflow open. Check soil moisture below the surface instead of watering the entire basin on a calendar. The upper edge may need supplemental water while the floor remains moist. Zone-based care prevents a struggling rim plant from causing unnecessary irrigation of species already receiving enough water.
Read plant failure as location evidence. A wet-zone plant that repeatedly declines after long dry intervals may belong in a narrower low pocket or may be unsuitable for the site's rainfall pattern. An upper-edge plant that rots after storms may sit below the true rim. Compare it with healthy plants of the same taxon before changing the whole palette. Move or replace during a suitable season, and update the zone map so the lesson is retained.
Photograph the same viewpoints each season and after unusually large storms. Record changes in shade, compacted access, mulch movement, plant spread, inlet scour, and overflow. As clumps mature, divide or edit them before they close inspection routes. A successful residential rain garden is not the fullest possible depression. It is a legible garden whose wet, moist, and upper-edge communities remain attractive while water can still enter, settle, infiltrate, and leave safely.
Fit five plants inside an already approved wet planting zone
This planting example assumes that a rain-garden designer has already established a safe inlet, overflow and drain-down performance. Within its sunny, moisture-retentive 12-by-8-foot planting zone in Pennsylvania Zone 6, allocate two Muenchhusia moscheutos plants 4-foot circles and three Lobelia cardinalis plants 2-foot circles. NC State's profiles support the species' moist-to-wet preferences; the area is not a prescription for basin size, excavation depth or runoff capacity.
Take coordinates in feet from the front-left corner. Put hibiscus at (3, 5) and (9, 5), and cardinal flower at (2, 1.5), (6, 1.5), and (10, 1.5). The circles stay within the rectangle without overlapping. Reserve the remaining space for access and the verified water route, moving or removing a plant if either requirement crosses its footprint.
The five-plant count applies only while the mapped moisture zone remains suitable through summer. A portion that dries between storms may need a different plant; a portion that fails its approved drain-down check needs drainage review before planting. Keep late-emerging hibiscus positions marked so their empty spring spaces are not replanted. These coordinates demonstrate a plant allocation after hydrologic design, never a substitute for it.
Design ideas
- Style
- Naturalistic residential basin with repeated foliage roles across visible moisture bands
- Space
- A shallow home-landscape depression receiving roof, walk, driveway, or lawn runoff
- Climate
- Temperate residential garden with episodic stormwater, drained intervals, and locally verified soil, light, hardiness, and overflow conditions
- 1Draw the water path first
On a scaled plan, mark the runoff source, inlet, low storage area, moist shoulder, upper rim, protected overflow, utilities, structures, and maintenance route. Add plants only after those fixed elements are clear. Use arrows for observed flow rather than assumed flow, and revise the drawing after more than one storm so a single unusual event does not define every zone.
- 2Repeat one posture across zones
Choose an upright, arching, or mounded visual role and assign a different locally suitable plant to carry it in each moisture zone. The repeated posture connects the composition while each root system occupies a compatible hydrologic position. Keep the species names separate on the plan so maintenance never mistakes visual similarity for identical water needs.
- 3Frame an open inlet
Place two durable groups beyond the point of strongest inflow and leave a small inspection surface between them. The opening makes sediment and erosion visible, while the paired planting turns necessary clearance into a deliberate threshold. Do not put a prized crown directly in the flow path or bridge the inlet with a runner that will trap debris.
- 4Build a broad mesic shoulder
Give the moist middle zone more area than either extreme when site observations support it. Repeat modest drifts that share light and soil needs, then let selected groups overlap the wet floor or upper rim only within their documented moisture range. This broad bridge produces a garden rather than three narrow botanical stripes.
- 5Keep the overflow low and visible
Use low foliage on both sides of the outlet and preserve a stable open center. Echo the same plants elsewhere on the rim so the clearing belongs to the design. Check their mature spread against the full overflow width, and reserve a direct approach from the maintenance path for removing leaves and sediment.
- 6Use structure before peak bloom
Combine persistent graminoid clumps, sturdy seed heads, and one broad-leaved contrast so the basin has form before and after flowers. Confirm that retained stems will not collapse across the inlet or outlet. Place late-emerging plants among earlier rooted companions rather than leaving the most erosion-prone zone visually and physically empty in spring.
- 7Leave one monitoring path
Reserve a narrow surface route from the ordinary garden edge to the inlet and overflow without crossing the wettest soil. Keep mature leaves and flower stems from closing it. The route should allow a gardener to inspect flow, pull young weeds, and remove sediment without compacting the basin or stepping through crowns after every storm.
- 8Photograph the three drainage moments
From one fixed point, photograph the basin while runoff is entering, after visible water has receded, and when the upper edge has returned to its ordinary dry condition. Mark which plant groups occupy each visible moisture state. Repeat after seasonal canopy change so replacements and expansions follow observed performance rather than the memory of one dramatic storm.
Plants in this guide
Related reading

Sources
- Building a Rain Garden. University of Minnesota Extension. Source record · Accessed 2026-08-19.
- Soak Up the Rain: Rain Gardens. U.S. Environmental Protection Agency. Source record · Accessed 2026-08-19.
- Rain Gardens. Rutgers Cooperative Extension of Camden County. Source record · Accessed 2026-08-19.
- Lobelia cardinalis. North Carolina State Extension. Source record · Accessed 2026-09-09.
- Muenchhusia moscheutos. NC State Extension. Source record · Accessed 2026-09-09.