Tools · soaker hose versus dripline
Choose a Soaker Hose or Dripline by the Root Zone, Not the Package
Compare how porous hose and discrete emitters wet soil, then choose the system whose pressure, spacing, filtration, and maintenance fit the actual bed and plants.
Published Last updated
In this guide
- Compare water placement before comparing price
- Choose soaker hose for simplicity within its limits
- Choose dripline for measured spacing and zoning
- Include the head assembly and maintenance in the tool decision
- Measure output instead of relying on runtime
- Lay lines for inspection and plant growth
- Use mulch without losing the system
- Plan for source water and clogging
- Compare total ownership over several seasons
- Make the final choice from a field trial
- Audit a completed zone with plants in place
- Keep a small-zone comparison record
- Tool notes
Compare water placement before comparing price
A soaker hose is porous along much of its length and releases water as a band whose output can vary with pressure, length, elevation, and hose condition. Dripline contains emitters at defined intervals, often pressure-compensating within stated limits, and creates separate wetting zones that can overlap. Neither system waters an entire bed automatically merely because tubing passes through it.
Map the root zones, plant spacing, soil texture, slope, and bed shape. A dense straight vegetable row or hedge may suit a continuous line, while widely spaced shrubs and containers may benefit from targeted emitters. Mixed perennial beds often need several parallel lines to cover mature crowns. The drawing should show soil to be wetted, not a decorative tubing route along the bed edge.
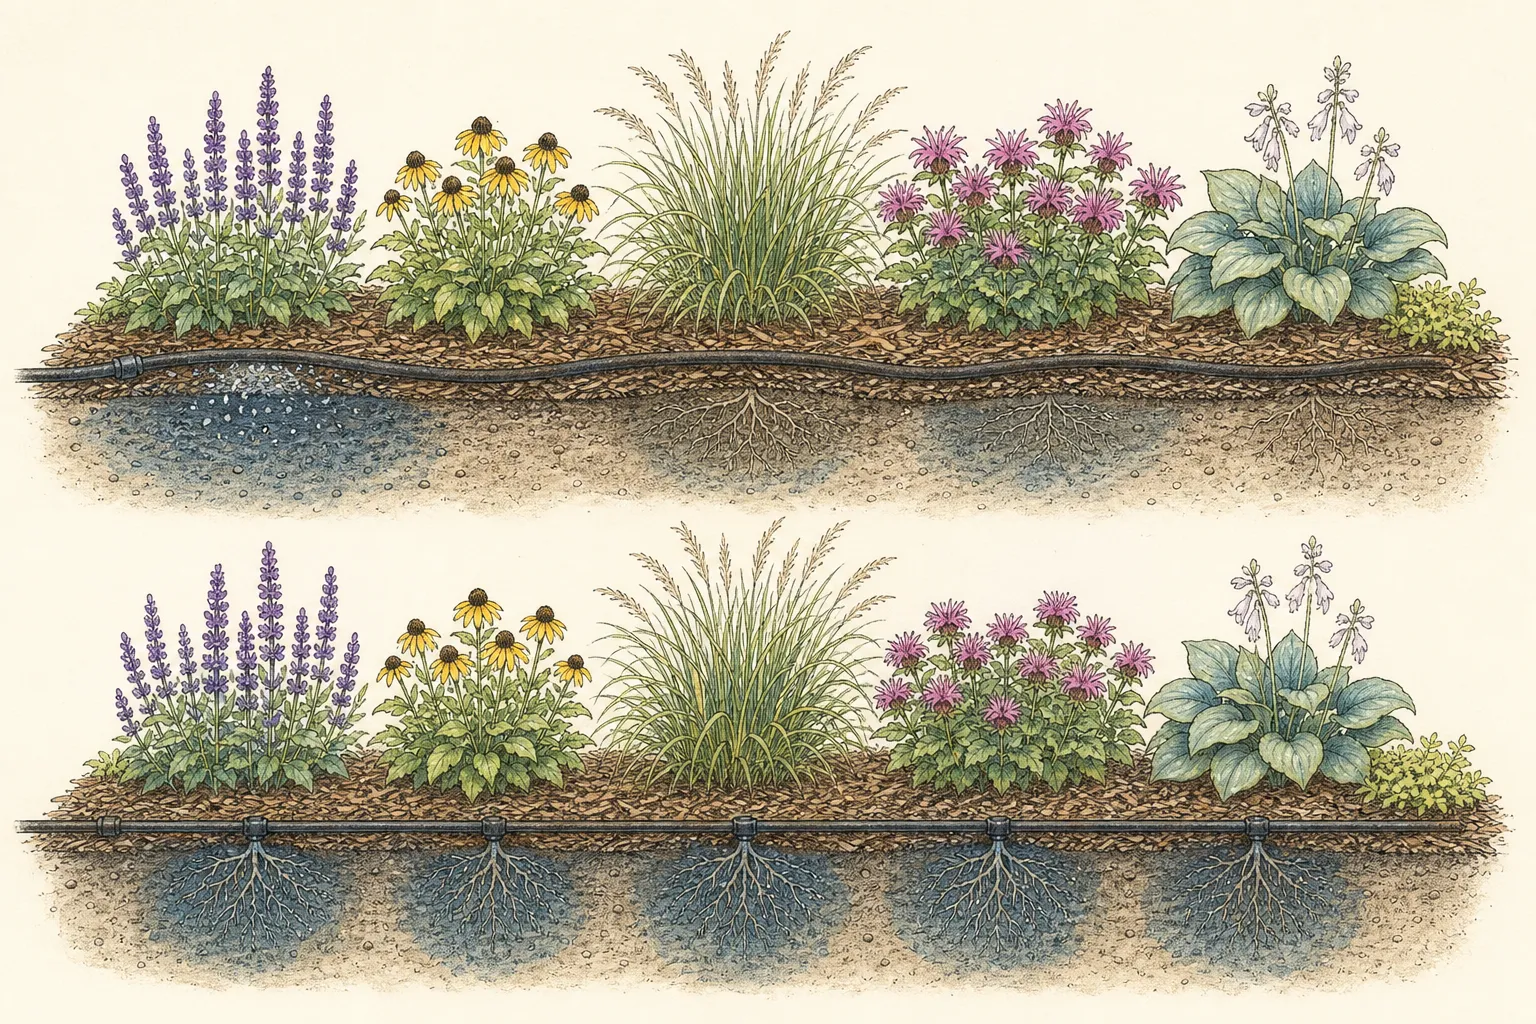
Test infiltration with a short trial. Run the system, then dig narrow observation holes at emitter points, between lines, and at the root-zone edge. Sandy soil tends to move water downward more quickly; finer soil may spread laterally but risks slow drainage. Local soil structure and compaction matter. The wet surface pattern alone cannot reveal depth or uniformity.
Choose soaker hose for simplicity within its limits
Soaker hose can be quick to lay through a short level bed and is easy to understand when the gardener can observe its entire length. It works best at low appropriate pressure and in manageable runs. Output commonly declines along long lines or uphill sections. Follow manufacturer limits and divide large areas into zones rather than extending one hose until the last plants receive little water.
Quality and material vary. Some hoses kink, split, clog, or release unevenly as they age. Burying deeply makes inspection and repair difficult; a light mulch cover protects from sun and reduces evaporation while keeping the route recoverable. Do not place the hose against crowns or trunks. Use broad loops around shrubs only when the wetting band matches the active root zone.
A soaker hose is not automatically exempt from filtration, pressure control, or backflow protection. Water source and local plumbing requirements determine the head assembly. High pressure can cause uneven spraying or failure, and dirty water can block pores. The low purchase price should be compared with replacement frequency and the labor of finding dry segments under mulch.
Choose dripline for measured spacing and zoning
Dripline provides known emitter spacing and flow specifications, which makes design more predictable when used within pressure and length limits. It suits straight rows, grids, and repeated landscape zones. Pressure-compensating emitters can improve uniformity on modest changes in elevation, but they are not unlimited. Read the technical chart for line length, inlet pressure, and elevation.
Place parallel runs so wetting patterns overlap across the planted root zone. One line down the center of a wide perennial bed may leave outer crowns dry. A ring around a newly planted shrub must move outward as roots expand. In clay soil, begin with wider intervals only after a trial confirms lateral spread; in sand, closer emitters or lines may be needed.
Discrete emitters can clog and may be difficult to see under mulch. Use a filter appropriate to the outlet size and water source, flush line ends, and inspect plant response. Dripline offers control only when the emitters remain open and the layout is updated as the garden matures.
Include the head assembly and maintenance in the tool decision
A complete system may need a backflow preventer, filter, pressure regulator, timer, header tubing, valves, flush ends, and fittings. Requirements vary with the water source and local codes. Assemble components in the correct order for the product and keep them accessible. Do not hide a filter under a permanent surface where it cannot be cleaned.
Match zones by plant water need, exposure, soil, and hardware flow. A sunny annual bed and established drought-tolerant shrub border should not share one runtime merely because the faucet is nearby. Calculate total zone flow against supply capacity. Open zones separately when pressure falls or output becomes uneven.
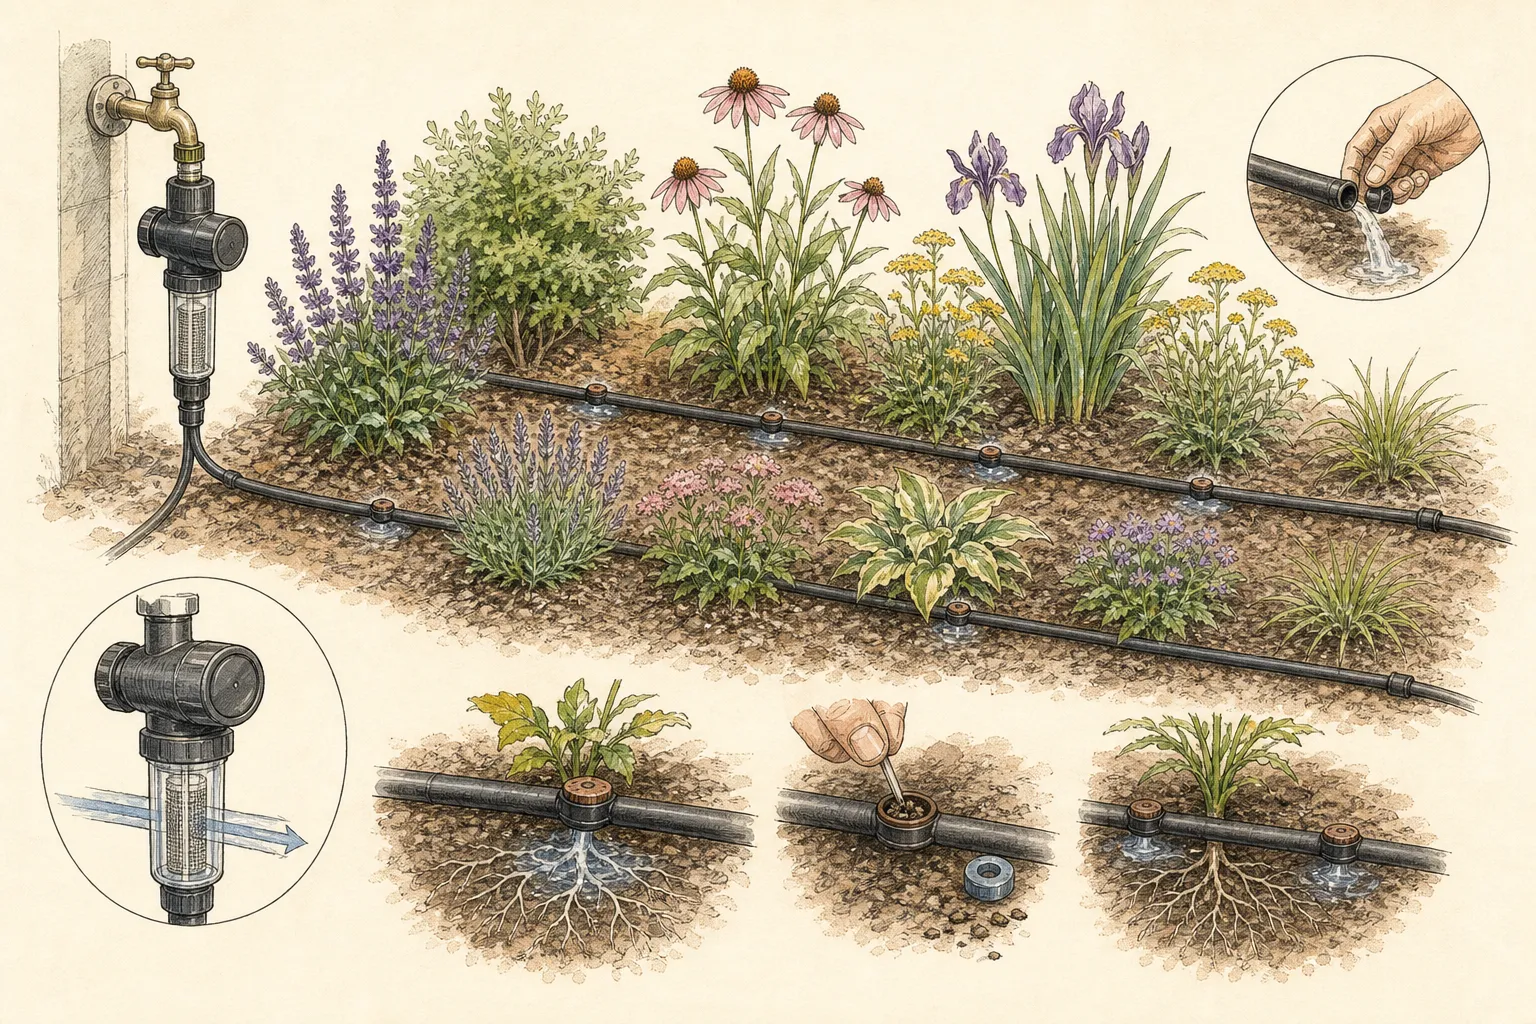
Choose repair availability before committing to proprietary fittings. Keep spare connectors, plugs, and emitter parts labeled. A system that cannot be repaired locally may leave a whole bed dry after one crack. Standardized parts and a simple map reduce both cost and the temptation to abandon leaking tubing in place.
Measure output instead of relying on runtime
Runtime has no meaning without flow and soil response. Measure emitter output into containers where possible, or use catch tests and meter readings appropriate to the system. Then verify moisture depth with a probe. Ten minutes on one line may equal an hour on another. Record pressure, zone, and date so later changes can be diagnosed.
Use a timer as a repeatable switch, not the decision-maker. Adjust or pause for rainfall, temperature, plant stage, and measured soil moisture. Smart controllers need accurate setup and functioning sensors. A connected app does not detect a cut line, blocked emitter, or root ball that sheds water unless the gardener still inspects the bed.
Start with longer less frequent applications suited to the plant and soil, avoiding runoff, then refine from observation. New transplants may need more frequent checks while established deep roots can use a broader wetted volume. Do not use one schedule for seeds, annuals, shrubs, and trees simply because one tube reaches them all.
Lay lines for inspection and plant growth
Pin tubing to the soil surface with enough slack for temperature and movement, avoiding sharp bends. Keep it away from trunks, crowns, and digging lines. Photograph and map routes before covering lightly with mulch. Mark connectors and flush ends. Future division, bulb planting, and edging should not begin with a hidden line strike.
Use gradual curves and compatible fittings. Do not heat, glue, or force components outside their instructions. On slopes, run lines along contours where design permits and use regulated or compensating components. Secure downhill ends against movement. A kinked hose can reduce the whole downstream zone.
Protect tubing from rodents, pets, mower equipment, ultraviolet exposure, and foot traffic. A shallow surface placement makes repair easier but requires visible path discipline. In winter climates, drain and store or blow out components only according to manufacturer and local guidance; compressed air adds hazards and is not appropriate for every system.
Use mulch without losing the system
Place irrigation beneath a moderate organic mulch so water reaches soil and tubing is shaded, but keep access points marked. Old plus new mulch determines total depth. Do not bury emitters in dense soil or pile mulch over plant crowns. Lift the layer at test points and restore it after checking.
Watch for roots growing around outlets and ants or debris affecting emitters. Move lines as plants spread. A ring fixed at the trunk of a young tree becomes poorly placed as active roots extend. Porous hose pressed beneath a dense crown may keep the base wet while outer roots remain dry.
Mulch slows evaporation, so revise schedules after installation. The correct adjustment comes from soil moisture and plant response, not a fixed reduction. After heavy rain, pause and inspect low areas. Drip can overwater quietly because foliage stays dry and the wet soil remains hidden.
Plan for source water and clogging
Municipal, well, rainwater, and pond sources carry different pressure, sediment, mineral, and biological concerns. Select filters and emitters rated for the source. Untreated surface or reclaimed water may have legal and health restrictions, especially around edible crops. Follow local regulations and current guidance.
Flush the main and lateral lines at installation and scheduled intervals. Open the end into a safe area and run until water clears, following product instructions. Clean filters without sending captured debris back into the line. Use approved treatments only when recommended for the system; household acids and bleach mixtures can damage parts and create hazards.
Diagnose a dry plant from the outlet outward. Check the emitter, line pressure, wetting depth, root ball, and plant health. Replacing an emitter will not repair root rot or a hydrophobic transplant plug. Conversely, adding runtime to a clogged zone can saturate every functioning emitter while the blocked plant remains dry.
Compare total ownership over several seasons
Price the head assembly, line, fittings, stakes, filter replacements, repairs, timer, and labor. Soaker hose may be economical for a short temporary bed and expensive when replaced often. Dripline may cost more initially and remain adaptable when mapped and maintained. Choose for the life of the planting, not the cheapest roll.
Consider seasonal change. Annual beds are reworked and may favor removable simple lines. Perennial borders need mapped routes that tolerate division and expansion. Containers may use individual emitters with frequent observation. One property can use more than one system when zones have different geometry and maintenance.
Record installation date, manufacturer specifications, zone flow, filter service, line repairs, and observed wetting. Review yearly. A reliable irrigation tool is one the gardener can inspect, understand, and modify. Hidden complexity that nobody maintains is less efficient than a simpler system checked regularly.
Make the final choice from a field trial
Install a short representative section before purchasing the full system. Include the actual slope, soil, mulch, and plant spacing. Run at expected pressure and inspect depth and lateral spread. Test the far end. The trial can reveal that one soaker loop is sufficient, that dripline needs closer spacing, or that hand watering remains simpler for a tiny mixed bed.
Score each option for uniformity, adjustability, visibility, repair, winter handling, source compatibility, and cost. Give maintenance extra weight. A precise system that exceeds the gardener’s willingness to flush filters and check emitters will not remain precise. The best tool matches both roots and operator.
Keep the unsuccessful trial components for an appropriate different zone or return them under seller policy; do not bury them as evidence of sunk cost. Document the winning layout and build one zone at a time. Verify each zone before expanding so a design assumption does not multiply across the whole garden.
Audit a completed zone with plants in place
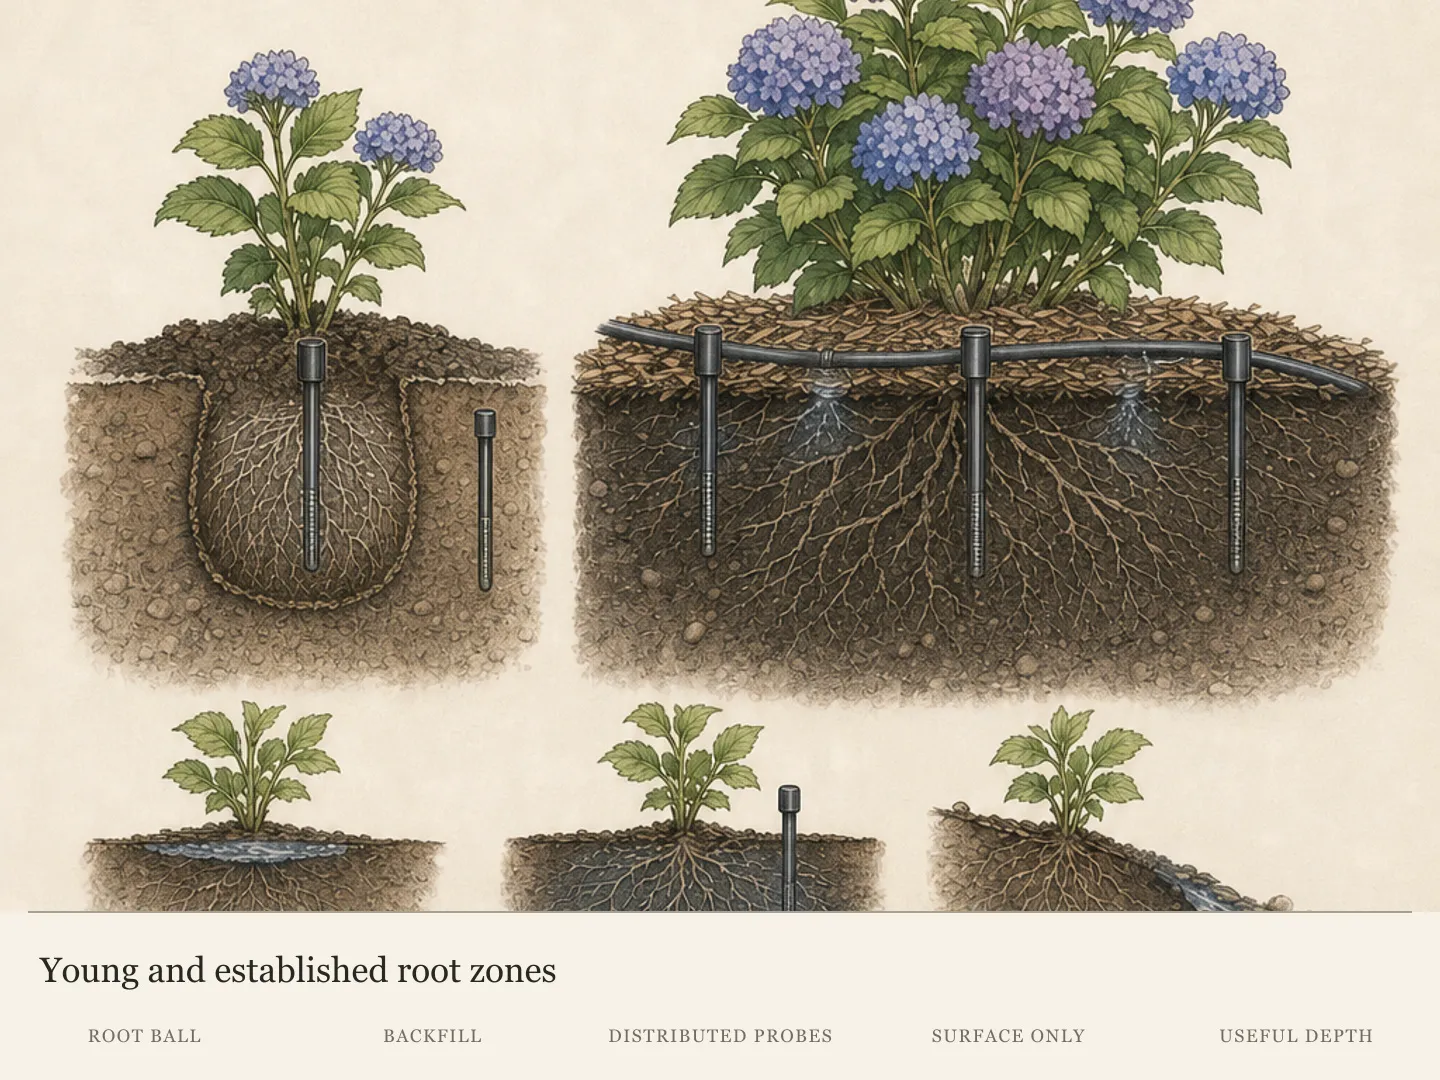
After installation, run the zone during ordinary weather and inspect each plant one day later. Compare the root ball, soil between emitters, and outer root-zone edge. A line can meet its technical output specification while missing a compact transplant plug or oversupplying a low pocket. Move or add an outlet only after the soil cross-section shows where coverage fails.
Repeat the audit after canopies expand and after mulch is renewed. Roots, shade, and evaporation change through the season. A zone that was balanced around small spring plants may need a wider wetted band in July. Keep line position and runtime changes in the map so later troubleshooting starts from the actual current system.
Use plant symptoms only with soil evidence. Wilt can reflect drought, saturation, root disease, or stem injury. Before increasing runtime, verify that the affected outlet flows and that the root zone is dry. This prevents one clogged emitter from causing every other plant on the functioning zone to be overwatered.
Keep a small-zone comparison record
For each trial line, record product, pressure specification, actual setup, line length, slope, soil, plant spacing, first/middle/last output observations, wetting depth and spread, runoff, filter service, repair access and total cost. Use the same representative zone to compare options. Do not fill in a common pressure or flow for both products: copy each specification from its manufacturer and enter the actual observations after the trial.
Tool notes
- Type
- Low-pressure garden irrigation systems
- Purpose
- Deliver measured water to planted root zones with less foliar wetting and surface evaporation than broad overhead watering
- Affiliate
- No commercial links
Maintenance
- Inspect the filter and pressure regulator at the beginning of the season and whenever zone output changes. Clean or replace components according to the manufacturer, recording pressure before and after service so a clogged filter is distinguished from a supply problem.
- Flush main and lateral line ends on installation and at scheduled intervals. Direct discharge to a safe place, continue until water clears, and close the ends securely. Never leave an open flush point where it erodes soil or drains against a building.
- Walk every zone while running. Look for spraying, dry hose segments, clogged emitters, loose fittings, animal damage, kinks, and runoff. Probe soil at the first, middle, and last outlets. Repair hardware before adding runtime that would overwater the functioning part.
- Lift mulch at marked emitters and connectors, remove roots or debris only as product guidance allows, and restore a moderate layer. Move rings and lines outward as roots and crowns expand. Update the route map after every change.
- Retest output and wetting at least seasonally and after pressure, source, filter, or layout changes. Timed cup output verifies hardware; a soil cross-section verifies placement. Keep both results with zone specifications and plant changes.
- Drain, disconnect, store, or winterize according to climate and manufacturer instructions. Remove timers and vulnerable fittings from freezing conditions, avoid unsafe compressed-air practices, and cap open lines against debris before spring reconnection.
- At least monthly during active use, compare the first, middle, and last third of every zone. Measure representative outlets and probe their wetting depth. Correct pressure, blockage, and layout separately; do not hide declining uniformity by lengthening runtime for the whole zone.
- After adding or removing plants, redraw the wetted root zones and move tubing before roots and mulch conceal the old route. Cap unused outlets with compatible parts, avoid leaving open microtubes, and verify that the changed zone remains within its total flow and line-length specifications.
- Keep an annual parts inventory with filter element, regulator specification, tubing size, emitter flow, and compatible repair fittings. Replace ultraviolet-damaged or brittle components before failure, and label discontinued proprietary parts so a future repair does not combine fittings that only appear to match.
- At season close, compare water use and plant performance by zone. Retire a soaker hose whose output has become irreparably patchy, redesign drip spacing that never overlapped, and keep successful hardware for the geometry it serves. Do not preserve a poor layout merely because the components still pass water.
- Keep one end-of-season performance note for each zone: plant losses, dry pockets, saturation, repairs, and actual runtime. Use it before spring startup to decide whether the system needs a new layout, a component replacement, or only routine cleaning. A record prevents the same hidden defect from being rediscovered after plants are stressed.
- Before restarting after a long shutdown, open flush ends, inspect animal damage and brittle fittings, then pressurize one zone slowly. Confirm the regulator and filter hold without leaks before closing the ends and returning to scheduled operation.
Related reading


Sources
- Extension Gardener Handbook: Woody Ornamentals. NC State Extension. Source record · Accessed 2026-08-19.
- Conserve Water in Your Landscape. University of Maryland Extension. Source record · Accessed 2026-08-19.
- Irrigation Systems. Penn State Extension. Source record · Accessed 2026-08-19.