Grow · soil
Improving Heavy Clay Soil: Drainage, Compost, and Cover
Protect clay structure by waiting for workable moisture, correcting true drainage failures and building aggregation with compost, roots and surface cover.
Published Last updated
In this guide
- Diagnose texture, compaction and drainage separately
- Map where water enters, pauses and leaves
- Moisture determines whether cultivation helps
- Prepare a broad root zone, not an isolated pocket
- Use mature organic matter to build aggregation
- Keep rebuilt structure covered and rooted
- Reject shortcuts that do not match the diagnosis
- Judge progress across wet and dry cycles
- Steps
Diagnose texture, compaction and drainage separately
Improve heavy clay by working it only at crumbly moisture, adding mature organic matter across a broad bed, protecting the surface, and keeping traffic off the root zone. Begin by separating three conditions that can look alike at the surface: naturally fine texture, a compacted layer, and drainage failure. Each condition changes the order and scale of work.
Clay texture does not disappear after one amendment. Its small particles hold substantial water and allow air and water to move more slowly than in a sandier soil. The manageable goal is stronger aggregation, protected pore space, and a planted root zone that accepts water more steadily, not a claim that the mineral soil has become another texture.
Compaction is a structural condition created or intensified when pressure closes pore space, especially in wet soil. Look for resistance that begins at a consistent depth, sparse roots below that boundary, tire or foot traffic, and repeated tilling at one level. A compacted route may require traffic control as much as cultivation.
Drainage failure concerns the path water must take after entering soil. Compost can improve aggregation, aeration, and water acceptance within the bed, but it cannot create an outlet from a closed low basin. A site that receives runoff or lacks a lawful lower discharge needs that boundary addressed before amendment is treated as the main solution.
Texture check: if fine soil is slow throughout the bed without a distinct compacted band or trapped inflow, improve the broad root zone with mature organic matter at workable moisture and maintain cover. Do not expect a few bags of sand to change the soil type.
Compaction check: if resistance and shallow rooting follow a path or repeated working depth, first move traffic away. Loosen the affected unplanted area only when the soil crumbles. Working it wet or returning the same traffic can undo that improvement.
Drainage check: if water collects in a low pocket or keeps arriving from higher ground, trace the inflow and possible outlet first. Consider a suitable raised planting area or wetter-site plants where an outlet is unavailable. Compost alone cannot empty a closed basin.
Map where water enters, pauses and leaves
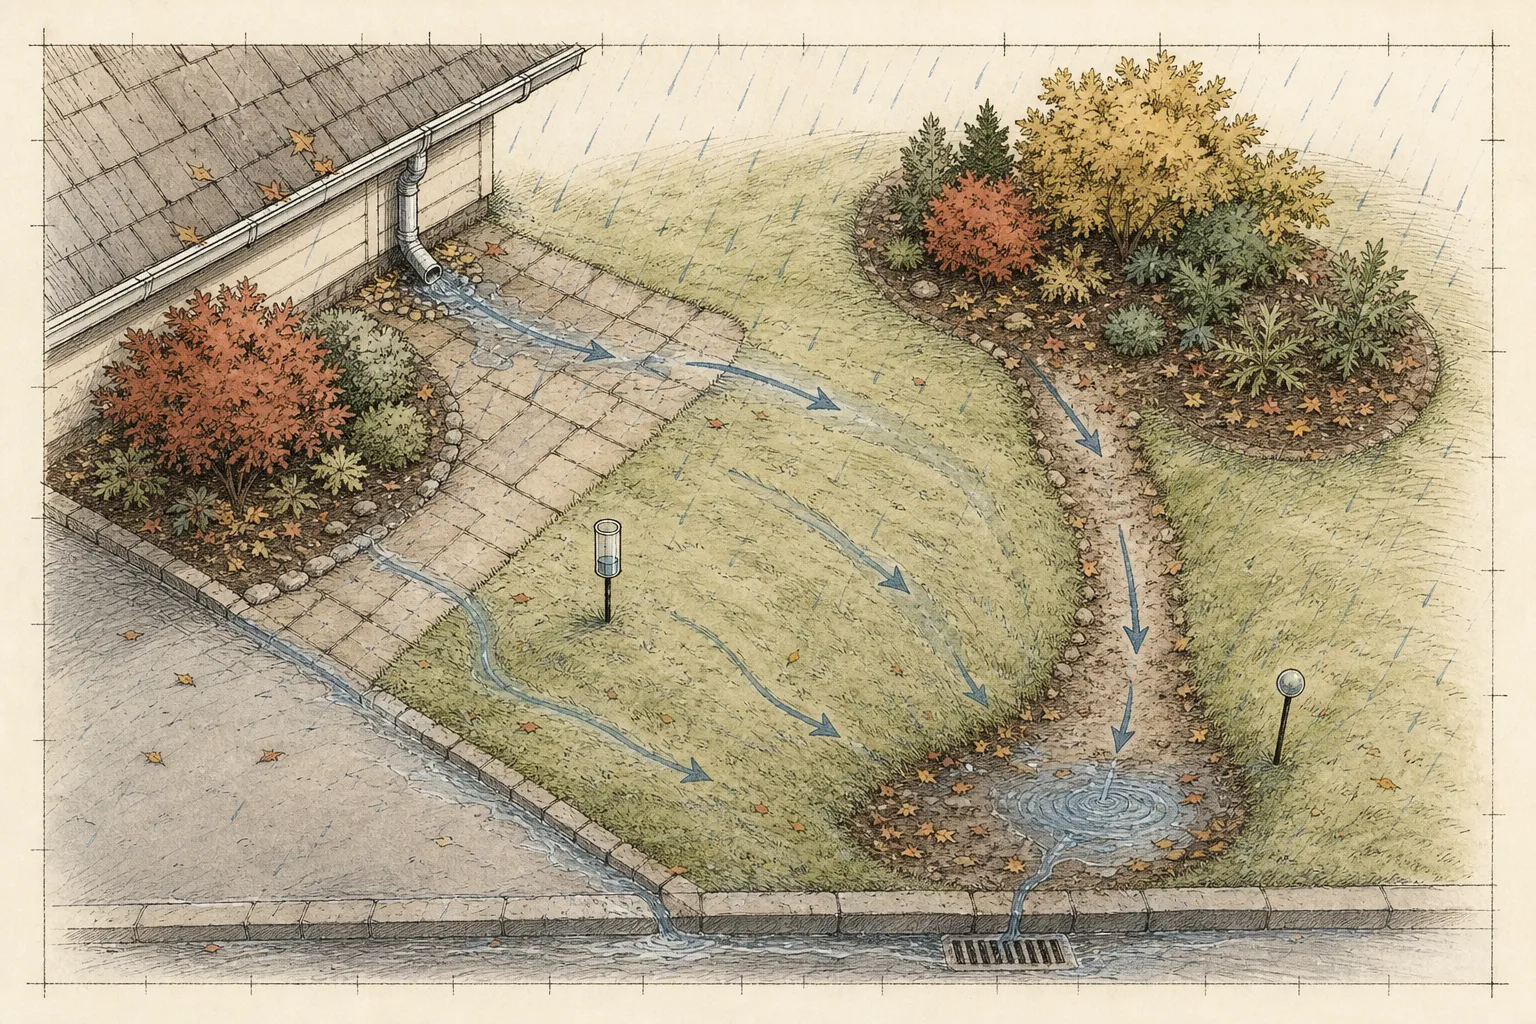
Inspect the bed during and after rain before buying amendments. Mark runoff entering from roofs, paving, compacted paths, and higher ground. Compare representative observation holes, noting where water gathers, how long the surface stays glossy or soft, and whether roots stop above an abrupt layer or continue into the subsoil.
The pattern matters more than one puddle. Widespread slow movement through otherwise level clay suggests a soil-structure problem, while a persistent low pocket or concentrated inflow points to site drainage. Resistance directly below a traveled surface supports compaction. Several conditions can occur in one bed, which is why zones should be mapped before treatment.
Trace a possible outlet as carefully as the wet spot. Redirecting avoidable roof or pavement runoff may reduce the load before any soil work begins. Grading or constructed drainage requires a suitable lower destination, buried-service checks, and compliance with local rules; professional design is appropriate where slopes, structures, property boundaries, or discharge make the route uncertain.
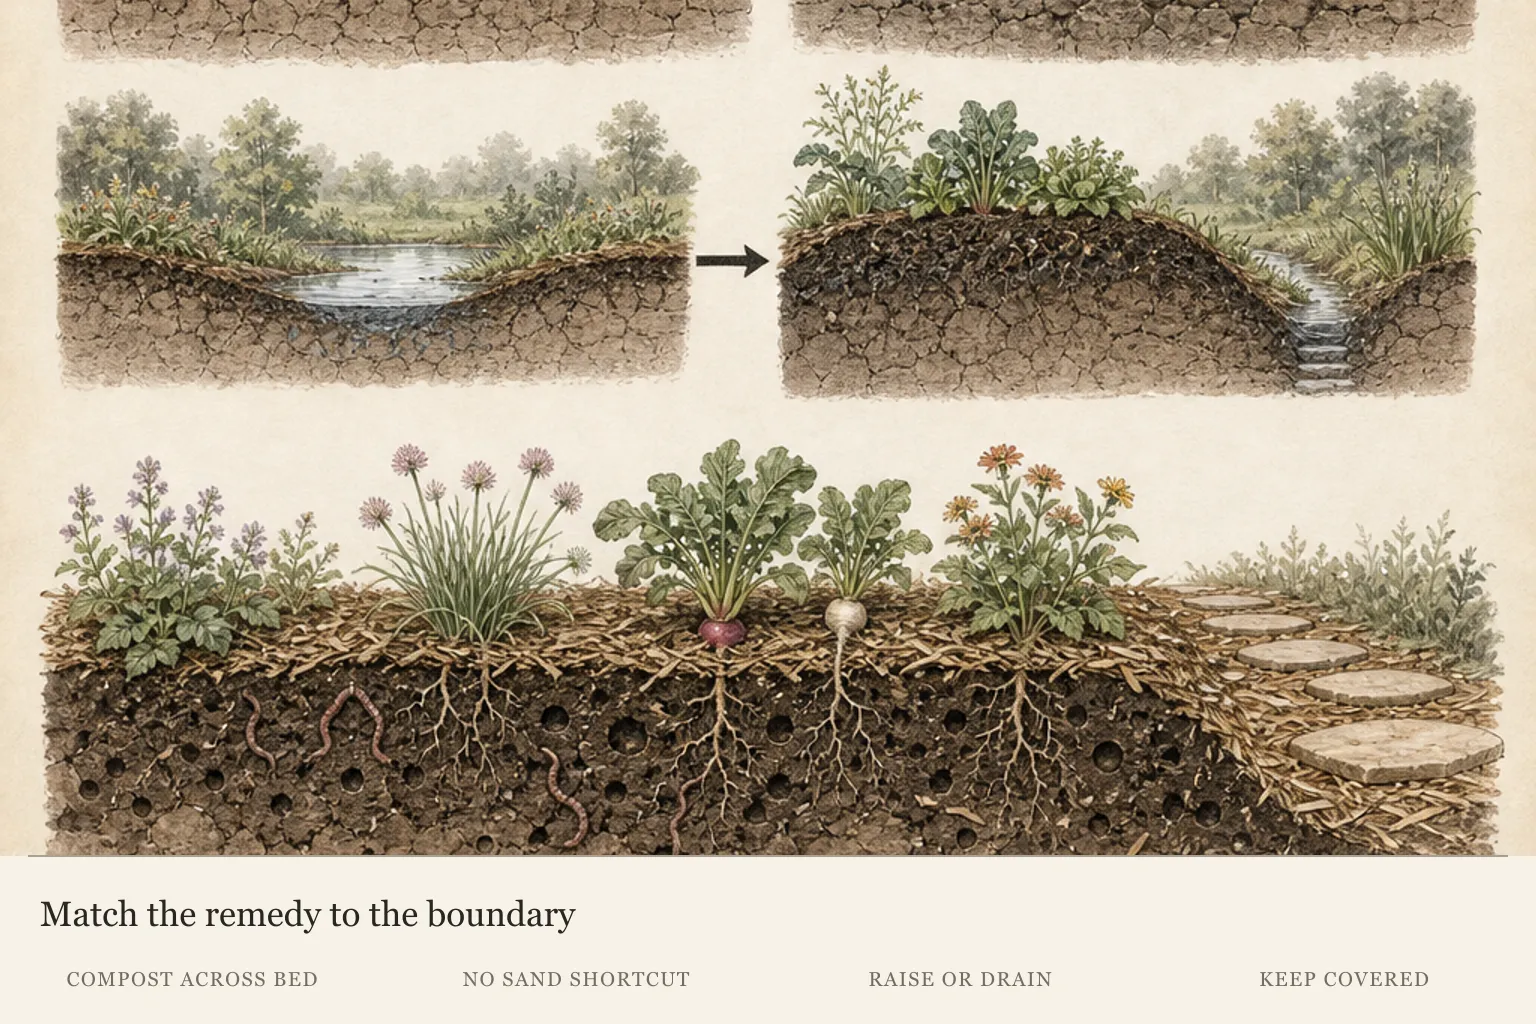
A closed basin may be better served by a raised planting area or a palette suited to wetter conditions. That is a planting decision, not an admission that compost failed. Moving drought-adapted herbs to a genuinely freer-draining place can be more durable than repeatedly amending a low site whose water has nowhere to go.
Moisture determines whether cultivation helps
Wet clay smears under a spade, fork, boot, or wheelbarrow and can reconsolidate as pressure closes pore space. Very dry clay fractures into hard angular clods that resist mixing and leave large gaps. Both states make the amendment difficult to distribute and can exchange one structural problem for another.
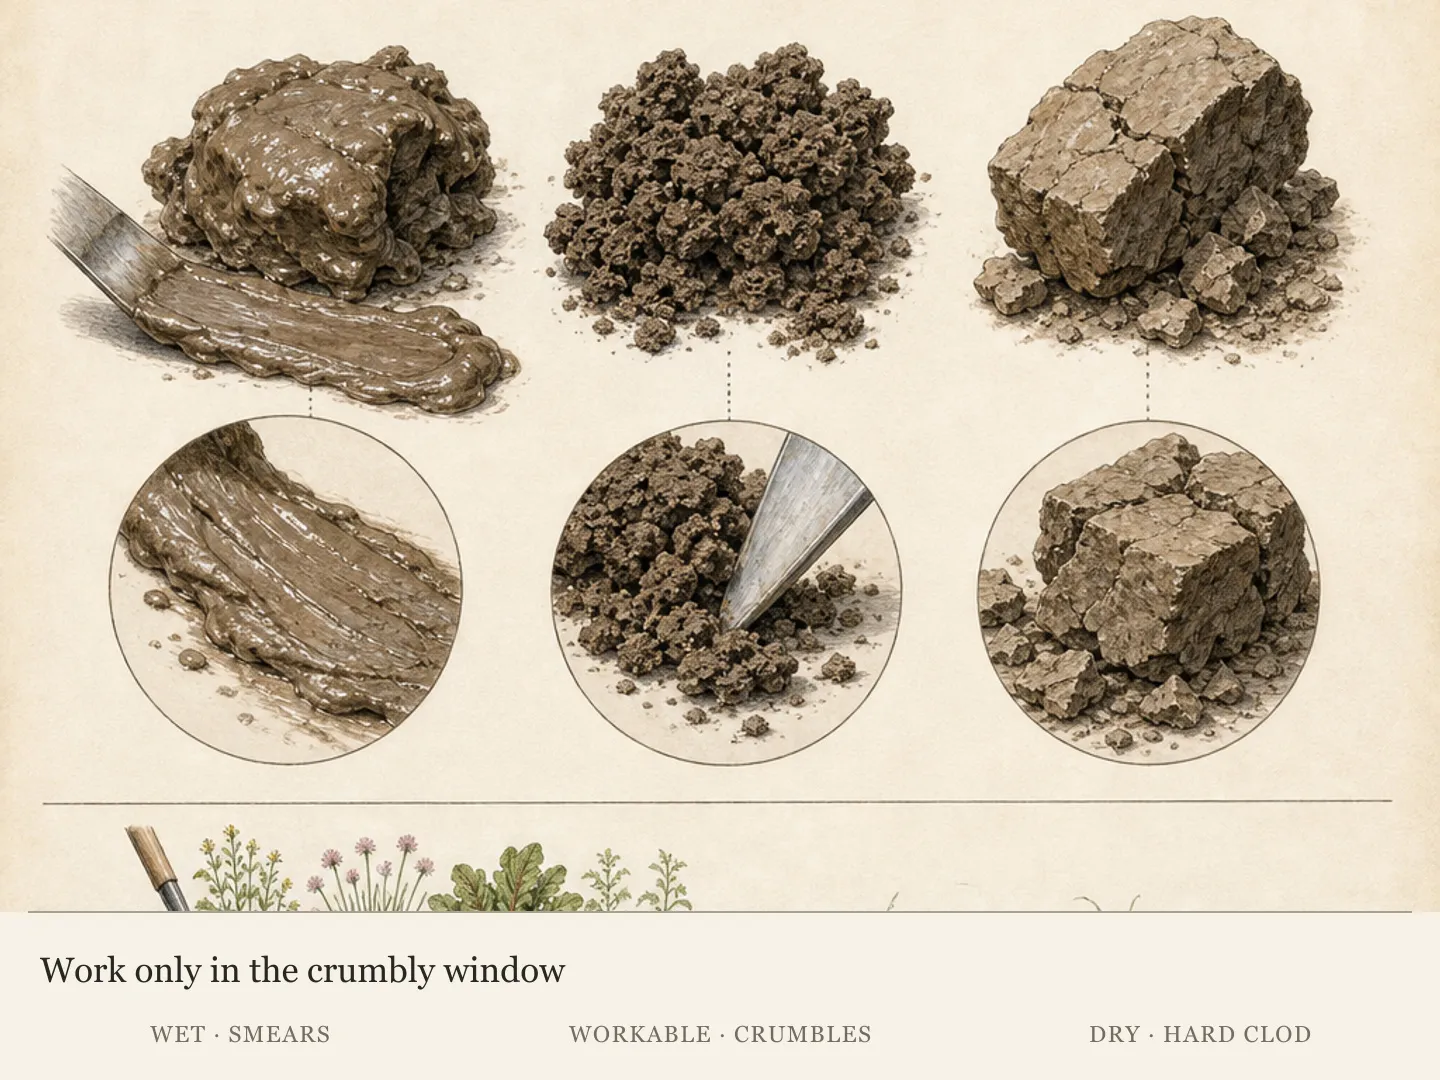
Test soil from the intended working depth, not a dry crust at the surface. Squeeze a small sample in the hand, then press it lightly with the fingers. The useful window has arrived when the sample holds briefly and then breaks into stable crumbs. A slick ribbon, shiny smear, or hard resistant block means the bed should wait.
Check more than one location because shade, runoff, plant cover, and compaction create uneven drying. The center may be workable while a low edge remains plastic and wet. Treat the wetter zone as a boundary, keep equipment off it, and return after its sample reaches the same crumb checkpoint.
Temporary boards can distribute foot and wheelbarrow loads along defined access routes, but they do not make saturated soil ready for cultivation. Keep travel on paths wherever possible and minimize passes through the bed. The workability test governs the soil operation; schedule pressure should not override what the sample shows.
Prepare a broad root zone, not an isolated pocket
An isolated planting hole filled with loose amendment creates an abrupt boundary inside intact clay. Water moving through the amended pocket may slow when it reaches the surrounding fine-textured soil. Prepare the connected bed or planting area broadly enough that roots and water are not confined to a small amended container in the ground.
Define the bed edge from the drainage map and intended planting, then remove traffic from that area. If a compacted layer has been identified, loosen only at workable moisture and avoid pulverizing the soil. The aim is to reconnect pore space and create room for compost, roots, and organisms to build aggregates through the upper root zone.
Do not promise that one cultivation pass permanently repairs compaction. Deep ripping or tilling can provide a short-term opening, while the same traffic and wet working conditions can close it again. Paths, load distribution, surface cover, and living roots are continuing controls that preserve the structure created during preparation.
Established perennial beds need a different boundary. Wholesale cultivation can damage existing roots and crowns, so use surface top-dressing between plants and protect their bases. Where the established planting remains in a drainage failure, reassess the site or plant choice before attempting to mix amendment through occupied soil.
Use mature organic matter to build aggregation
For an unplanted bed, Oregon State guidance offers roughly 1–3 in (2.5–7.5 cm) of composted organic matter worked into the upper 6–8 in (15–20 cm) with minimal passes. Treat these dimensions as a starting range for the preparation, not an amount to add automatically every year.
Spread mature, screened compost evenly across the broad bed before incorporating it. An even surface layer makes the limited mixing passes more consistent and avoids rich pockets beside unchanged clay. Use a fork or suitable cultivator at the verified moisture window, stopping once the amendment is distributed through the intended upper root zone.
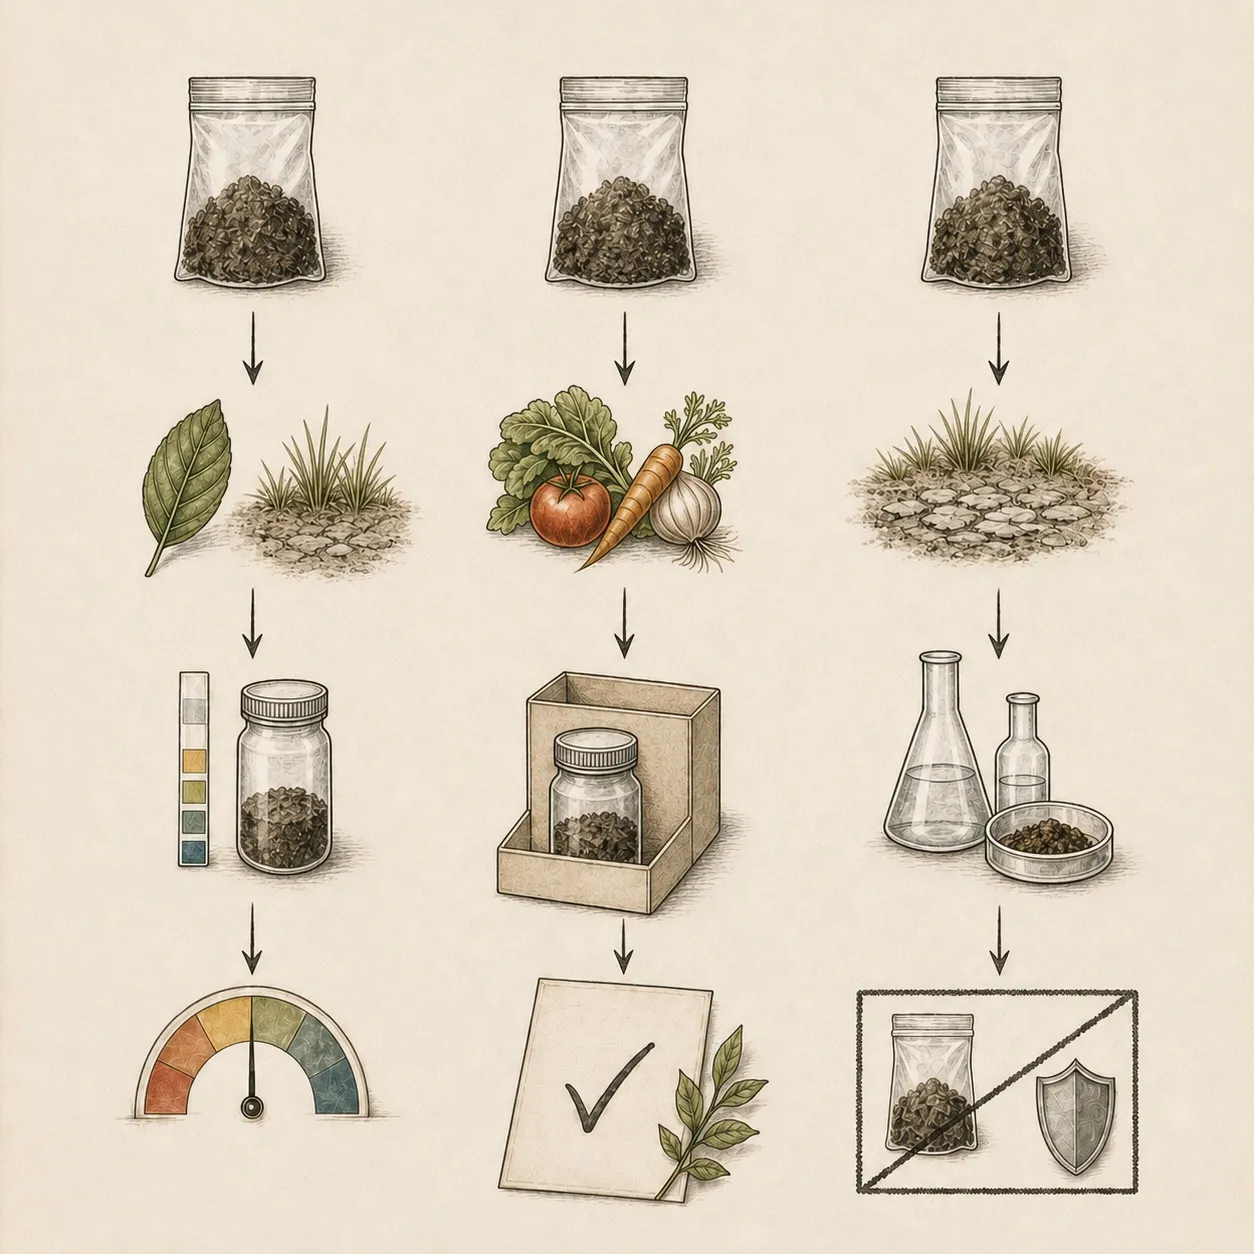
Compost contributes organic matter and nutrients, so quality and application history matter. Choose finished material from a known source, account for its nutrient contribution, and use a laboratory soil test to guide pH and fertility decisions. More compost is not a substitute for interpretation when the bed already carries adequate or excessive nutrients.
Inspect the result by breaking several clods rather than judging only the darkened surface. Clay and compost should form a mixed root zone without a deep homogeneous layer of purchased material. Large untouched masses call for limited additional mixing; a fine pulverized texture signals that the operation has gone too far.
Worked quantity example: assume an empty bed 10 ft long and 4 ft wide and a chosen compost layer 2 in deep, within the Oregon State preparation range. Convert depth to feet before multiplying: 10 × 4 × (2 ÷ 12) = 6.67 cubic feet, or about 0.25 cubic yard before handling losses. This is an illustrative purchase calculation, not a measured trial or a recommendation to add that amount to every bed; soil condition and nutrient history still determine whether compost is appropriate.
Keep rebuilt structure covered and rooted
Plant or cover the prepared bed so exposed aggregates are not left to direct rain and irrigation impact. Surface cover slows evaporation and shields soil from the splash that can detach particles, fill pores, and form a crust as clay and silt settle. Organic mulch can serve this role around plants when their stems and crowns remain open.
Living roots add a continuing biological structure that a one-time amendment cannot supply. A planted bed or region-appropriate cover crop keeps roots moving through the upper soil and supports organisms involved in aggregation. Match any cover crop to the climate, season, and next planting rather than introducing it as a generic extra step.
Keep permanent traffic on defined paths. Boards used during preparation can be removed or retained only where they belong to access, while the cultivated root zone remains free of routine footsteps and wheelbarrow wheels. Wet periods deserve particular restraint because pressure at that time causes the greatest structural setback.
Established borders can receive mature organic matter as a top-dressing between crowns, followed by appropriate surface mulch. Leave stems and plant bases uncovered and avoid digging through active roots. This slower surface approach respects the occupied bed while organic material, cover, and roots continue to influence the upper soil.
Reject shortcuts that do not match the diagnosis
A modest quantity of sand mixed into clay can create a denser, concrete-like mixture because clay particles coat the much larger sand grains and fill spaces between them. A few bags spread through an ordinary bed will not convert clay loam into sandy loam. Use organic matter, roots, and surface protection for structure-building within this scope.
Gypsum addresses particular sodic soil conditions; it is not a universal clay breaker. Lime, fertilizer, and other mineral amendments belong to measured pH, nutrient, or regional soil decisions. Select them from a relevant soil test or local recommendation, not from the visual fact that the bed contains clay.
Repeated tilling is another tempting shortcut. It can make the surface look fine for a short time while breaking aggregates, creating a dense layer at the same depth, and inviting more traffic into the bed. Use the fewest passes needed to incorporate the measured amendment, then let cover and roots carry the longer work.
A raised area can bypass a closed wet root zone only when its design, material, and plant choice suit the site; it does not repair drainage beneath the surrounding landscape. Likewise, compost cannot cancel a continual roof discharge. Keep the intervention tied to the mapped boundary that actually limits the bed.
Judge progress across wet and dry cycles
Evaluate the bed after rain and again as it dries. Useful changes include water entering more evenly, fewer persistent surface puddles where no closed basin remains, crumbs that survive handling, roots extending through the prepared zone, and a surface that resists crusting under cover. One observation in ideal weather is not enough to establish the pattern.
Compare treated and untreated or less-disturbed areas without changing their boundaries. Record where compaction resistance begins, how long mapped wet zones remain soft, and whether path edges are advancing into the bed. These observations reveal whether drainage work, traffic control, or soil preparation is responsible for a change.
Use the original drainage map as the observation sheet. Return to the same low points, path margins, and representative holes after comparable weather, and note the moisture state at working depth. A photograph can preserve surface crusting or ponding, while a written depth and location make root and resistance observations repeatable. Consistent checkpoints prevent a favorable dry-day impression from replacing the site pattern.
Expect structural improvement to continue over seasons as organic matter, cover, roots, and soil organisms interact. Reapply compost only after reviewing soil condition, nutrient history, and the purpose of another addition. A dark surface alone does not justify repeating the original preparation depth or amount.
Return to diagnosis when progress stalls. Persistent saturation points back to inflow or outlet limits; a recurring dense band points to traffic or repeated cultivation; weak plants with acceptable structure may need pH, nutrient, light, watering, pest, or disease assessment. The next action should answer the observed failure path rather than restart every treatment at once.
Steps
- Level
- moderate
- Time
- One garden session for assessment and amendment; structural improvement continues over seasons
- Tools
- hand trowel or soil probe, garden fork, rake, wheelbarrow, boards for temporary access
- Materials
- mature, screened compost from a known source, organic surface mulch, optional region-appropriate cover-crop seed
- 1Map the wet and compacted zones
After rain, inspect representative holes and mark runoff from roofs, paving, paths, and higher ground. Record persistent low spots, abrupt texture boundaries, rooting depth, and where resistance begins. Separate naturally slow clay, compacted travel zones, concentrated inflow, and a basin without an outlet because each condition changes the next action.
- 2Confirm workable moisture
Take samples from the intended working depth in several zones. Proceed only when each sample holds briefly and then breaks into stable crumbs with light finger pressure. Wait when soil ribbons or smears slickly, and wait or re-moisten appropriately when it resists as a hard angular clod. Keep equipment off wetter pockets.
- 3Protect access routes
Define permanent paths and use temporary boards where access is unavoidable so feet and wheelbarrows do not reconsolidate the root zone. Move materials from the path side, distribute loads, and suspend work if the route becomes soft or slippery. Preserve these traffic boundaries after planting, especially during wet periods.
- 4Address the drainage boundary
Redirect avoidable runoff where lawful and identify a suitable lower outlet before considering grading or constructed drainage. Check buried services and local rules, and obtain professional design where slopes, structures, property lines, or discharge are uncertain. Use a raised area or moisture-tolerant planting when a closed basin cannot be given a suitable outlet.
- 5Spread mature compost evenly
On an unplanted broad bed, spread roughly 1–3 in (2.5–7.5 cm) of mature, screened compost from a known source. Treat this as a preparation range, not an annual prescription. Account for nutrient history and soil-test guidance, and keep the layer even so isolated rich pockets do not interrupt the surrounding structure.
- 6Incorporate with minimal passes
Use a fork or suitable cultivator to mix the compost through the upper 6–8 in (15–20 cm) with as few passes as possible. Break representative clods to confirm distribution, then stop before aggregates are pulverized. In established beds, top-dress between crowns and avoid wholesale cultivation through living roots.
- 7Plant and protect the surface
Establish the intended planting or a region-appropriate cover crop, then cover bare soil with suitable organic mulch while leaving stems and crowns open. Keep traffic on paths. Surface cover protects aggregates from raindrop impact, and living roots continue the structural work beyond the initial cultivation session.
- 8Compare wet and dry checkpoints
After a full wet and dry cycle, inspect the same mapped zones for steadier water entry, persistent saturation, crusting, stable crumbs, rooting depth, and renewed compaction. Link each failure to its boundary: inflow or outlet, traffic, amendment distribution, or bare soil. Repeat compost only after reviewing soil condition and nutrient history.
Plants in this guide
Related reading

Sources
- Add Organic Matter to Improve Most Garden Soils. Oregon State University Extension Service. Source record · Accessed 2026-08-16.
- Improving Garden Soils with Organic Matter. Oregon State University Extension Service. Source record · Accessed 2026-08-16.
- Soil Testing for Lawns and Gardens. University of Minnesota Extension. Source record · Accessed 2026-08-16.
- Soil: The Dirty Secrets of a Living Landscape. Oregon State University Extension Service. Source record · Accessed 2026-08-16.