Grow · deciduous hedge dormant season planting
Plant a Deciduous Hedge During the Dormant Season
Set out a deciduous hedge as a maintainable garden boundary, respect regional bare-root planting windows, keep roots moist, and establish each shrub at the correct depth and spacing.
Published Last updated
In this guide
- Use dormancy as a condition, not a universal date
- Design the mature boundary before opening the soil
- Resolve the line, width, and spacing as one decision
- Prepare a continuous root zone, not a row of amended pots
- Keep bare roots alive from bundle to trench
- Set every root system at a readable finished grade
- Water the row as individual root systems
- Make first-year pruning a species-specific decision
- Keep the hedge line maintainable as it closes
- Steps
Use dormancy as a condition, not a universal date
A leafless hedge whip looks ready to plant, but dormancy is only one part of the decision. The soil must also be workable, the species must suit the site, and local guidance must support that planting window. The Royal Horticultural Society places deciduous hedge planting from leaf fall in mid-autumn through late winter in its UK context and says to postpone work in frozen or waterlogged soil. Iowa State and University of Minnesota Extension, writing for colder continental climates, direct gardeners to plant bare-root shrubs in spring before buds open. Those schedules describe different regional systems; they should not be averaged into one calendar.
Late-autumn planting is therefore appropriate where local extension or nursery guidance permits bare-root establishment before winter and where the ground remains workable. In a climate that routinely freezes early, a nursery may lift and store bare-root stock for spring planting instead. Follow the local window attached to the plant and region even when the shrubs are dormant in November. If the soil smears, holds standing water, or has frozen into clods, hold the plants correctly and wait. A hedge planted on the requested date but deprived of soil oxygen or root contact has not gained an advantage.
Confirm the stock type as well. Bare-root plants arrive without a soil ball and lose moisture quickly; container-grown and balled-and-burlapped shrubs have different handling needs and a wider possible planting season. This guide centers on small dormant deciduous shrubs or whips supplied bare-root because they are common and economical for a long run. Keep the order bundled, shaded, cool, and protected from wind until the line and soil are ready. Open only the plants you can place promptly, and preserve every cultivar or species label.
Design the mature boundary before opening the soil
A hedge is a row of individual shrubs only on planting day. Its useful form is the mature volume they will make together. Draw that volume in plan and elevation: intended height, width at the base, distance from the path or boundary, gate openings, sight lines, and the side from which pruning and weeding will occur. Leave enough room to maintain both faces without standing in a neighbor's property or cutting the hedge back to bare framework each year. The planting line belongs inside the future hedge, not on its finished outer edge.
Choose a species and hedge style together. A regularly clipped hedge needs shrubs capable of producing dense shoots under repeated cutting. An informal flowering hedge needs the mature spread and flowering habit of each species to remain visible. Iowa State separates those systems in its spacing advice: formal hedges use closer spacing, while informal shrubs are spaced in relation to mature size. Hawthorn, hornbeam, beech, and other traditional hedge plants bring different soil, climate, thorn, fruit, and maintenance requirements. Verify the selected species locally before ordering a continuous row. Study what the hedge will affect beyond its leaves. A dense boundary can shade an adjacent bed, compete with nearby perennials, narrow a walk, or trap access to a fence. Locate irrigation, drains, gates, and existing woody roots before setting the line. A mixed wildlife hedge and a formal front-garden screen can both be excellent, but they need different widths and pruning rhythms. Decide which job matters most, then select the plant and arrangement that can perform it without annual correction of a basic spatial mistake.
Resolve the line, width, and spacing as one decision
Set a taut string for the center line and mark every plant position before digging. A straight hedge reveals spacing errors immediately, while a gently curved hedge needs equal intervals measured along the curve rather than across the chord. Count the marks, compare them with the order, and reserve a few labeled plants for immediate replacements only if storage and planting conditions remain suitable. Moving flags is easy. Redistributing rooted shrubs after the row has settled is not.
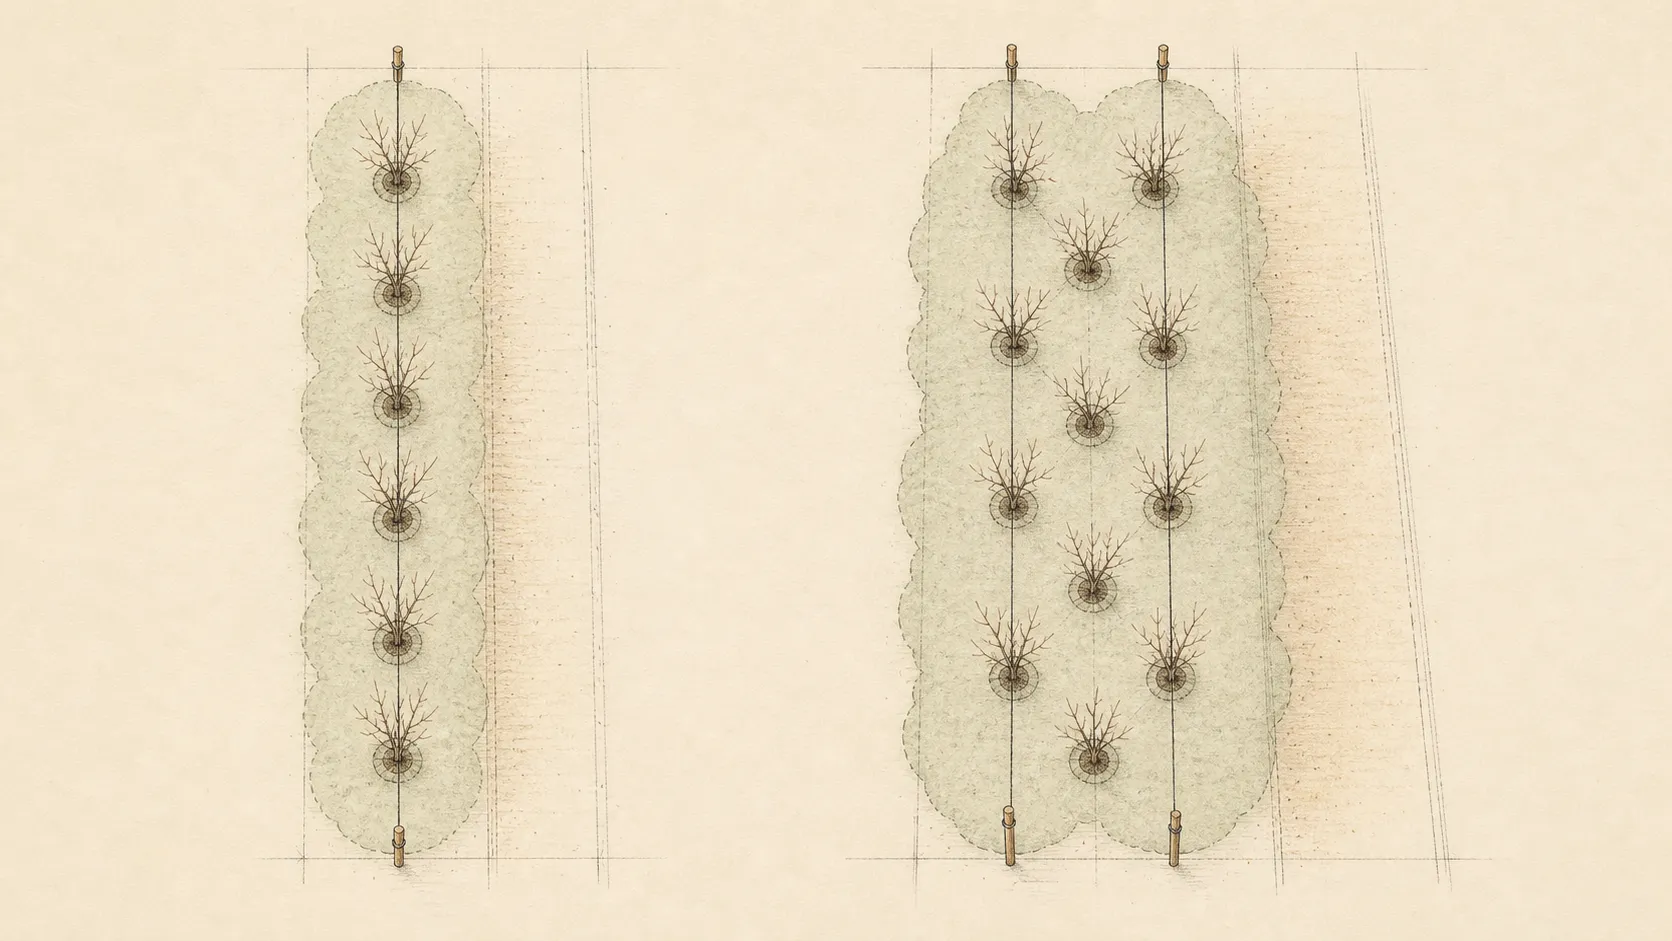
Retain the numerical guidance with its scope. The RHS gives 30–60 centimeters, or 1–2 feet, as a common within-row range depending on mature size, vigor, and target hedge size. For a hedge wider than 90 centimeters, it illustrates a staggered double row 45 centimeters apart with plants 90 centimeters apart within each row. Iowa State gives 1–2½ feet for formal hedges, then much wider ranges for informal medium and large shrubs. These figures describe different plants and design outcomes. Choose the range attached to the selected species, stock size, and hedge system; do not average all the numbers into an unsupported midpoint.
A double row is not automatically better. It produces a broader, denser base and uses more plants, soil width, and maintenance space. A single row often suits a narrow ornamental boundary and is easier to inspect, water, and prune from both sides. Where a supplier specifies plants per linear foot or meter, translate that instruction into visible marks and verify the total before roots are exposed. Consistency matters more than achieving an abstract density: the hedge should close at a predictable rate without forcing neighboring roots into an unnecessarily tight trench.
Prepare a continuous root zone, not a row of amended pots
Clear perennial weeds and loosen the whole hedge strip before the delivery arrives. The RHS recommends preparing a strip 60–90 centimeters, or 2–3 feet, wide and about one spade blade deep in its planting system. The important spatial lesson is continuity. A long-lived hedge needs roots to move beyond each original hole, so the surrounding soil must be workable across the row. Preserve the soil layers, break compacted faces, and remove debris that prevents roots from spreading. Keep the finished grade tied to the surrounding ground instead of building a soft, sinking trench.
Test drainage with observation, not a gravel layer. The RHS recommends delaying work in waterlogged ground and discusses a raised ridge or permanent drainage for sites that remain wet. Minnesota explains that gravel at the bottom can further reduce oxygen availability unless it connects to a functioning drainage system. If water persists in the prepared line, change the elevation, species, drainage plan, or planting date before the shrubs arrive. Use the excavated site soil as the main backfill. A richly amended pocket can settle differently from the surrounding grade and create an abrupt moisture boundary. The RHS specifically advises against placing organic matter at the bottom of the trench because decomposition can make shrubs sink. Minnesota similarly cautions against replacing the backfill with a highly amended medium that confines roots to the hole. Soil improvement, when a test and local guidance support it, should address the planting strip as a soil system rather than turn every whip into a buried container.
Keep bare roots alive from bundle to trench
Bare roots have no reservoir of potting mix. Minnesota Extension says they must remain moist and protected from sun and wind throughout handling. Stage the unopened bundle in a cool shaded place, prepare the planting line first, and carry small batches to the trench in damp wrapping. Moist protection is different from leaving roots submerged in a bucket for an indefinite period. The planting sequence should minimize exposure: unwrap, inspect, place, backfill, and water before moving far down the row.
If planting must pause, use the holding method supplied for the stock and climate. The RHS suggests a frost-free shed with roots covered by moist straw, paper, or potting compost for a delay, or temporary heeling-in with roots under at least 20 centimeters, or 8 inches, of soil. Label every bundle and heeled group. A mixed hedge loses its planned rhythm if bare sticks are separated from their identities, and a single-species run becomes difficult to warranty or replace when the batch information disappears.
Inspect roots one plant at a time. Keep sound fine roots; remove only tissue that is broken, dead, or diseased, using clean sharp pruners. The RHS and Minnesota sources both support trimming damaged roots rather than folding them into the hole. Do not shorten a healthy root system merely to fit a narrow opening. Enlarge the trench or hole so roots can radiate in their natural directions. A whip planted quickly with bent roots has traded a few minutes of digging for a permanent structural compromise below ground.
Set every root system at a readable finished grade
Find the nursery soil mark and the transition where the first structural roots leave the stem. The RHS places that root flare level with the surrounding soil. Minnesota tells gardeners to return bare-root stock to the depth at which it previously grew, using the darker stem mark as a clue, while giving tree-specific flare guidance for larger stock. For small hedge shrubs, keep the stem-root transition visible and account for settlement before backfilling. A deeper trench is not an invitation to bury more stem.
Spread the roots over firm soil so they extend outward without circling upward or folding back. One person can hold the whip upright against the string while another returns soil among the roots. For a short hedge, stop after several plants and sight along the row to check grade, vertical alignment, and spacing. For a long run, complete manageable sections so exposed roots do not wait while the entire trench is adjusted. The string controls the line; the root flare and nursery mark control depth.
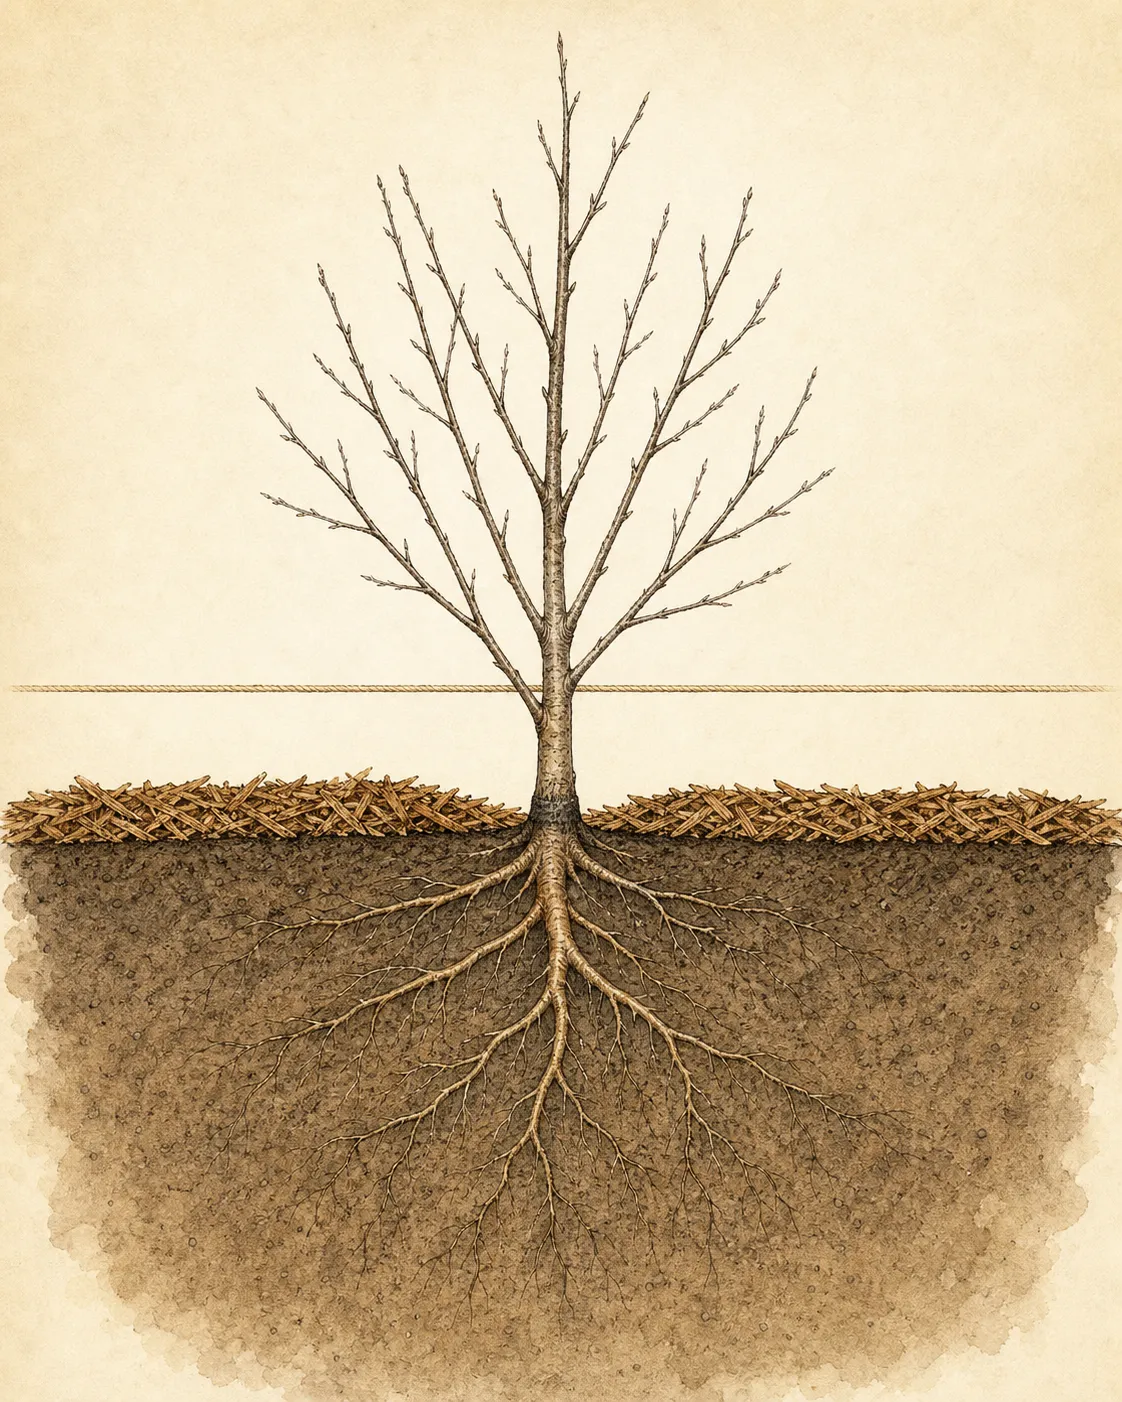
Backfill in stages with the excavated soil, working it gently among fine roots. Minnesota recommends using water during backfilling to settle soil and remove large air spaces. Firm with hands or light foot pressure on the surrounding soil, keeping force away from the stem and avoiding a polished, compacted surface. Recheck each plant after settlement. Add soil only where roots have become exposed, and lift and reset any whip that has sunk below its intended grade before the whole row is mulched.
Water the row as individual root systems
Water immediately after planting even when the shrubs are dormant. The purpose is to settle soil around roots and establish an even moisture profile, not to force growth. Observe how quickly water enters along the row. One section may drain through sandy fill while another remains wet beside compacted subsoil. Correct exposed roots or local settlement after watering and preserve the original grade. A single spray over the foliage does not test whether each root zone received water.
Apply an organic mulch over the prepared strip to moderate moisture and suppress weeds, but leave the stems and root flares visible. Iowa State recommends a 2–3 inch organic layer for hedge establishment; keep that layer level across the root zone instead of piling it into cones around whips. The RHS emphasizes maintaining a weed-free zone around new hedges and reliable watering through the first two years in its climate. Use soil moisture and rainfall, not a fixed ritual, to decide when to irrigate. Dormant roots can dry, and saturated roots can also fail. Protect the row only against a defined pressure. A wind-exposed site may need temporary shelter, and a site with known browsing may need species-appropriate guards or fencing. Keep protection wide enough that it does not abrade stems, trap wet debris, or disappear below the expected snow line. Stakes are usually unnecessary for small shrubs unless local conditions or the supplied system require them. Whatever is installed needs a removal date and an inspection route; a hedge should not grow unnoticed into ties, tubes, or wire.
Make first-year pruning a species-specific decision
Planting and pruning are related, but one universal cut cannot serve every deciduous hedge. Iowa State advises cutting bare-root deciduous hedge shrubs back to 4–6 inches in its formal-hedge guidance to stimulate low branching. That is a strong treatment with a clear design aim. It should not be copied onto an informal flowering hedge, a grafted ornamental, or stock supplied with a different establishment protocol. Use the nursery and local extension instruction for the species and desired form, and remove damaged branches regardless of the final training system.
For a formal hedge, early branching near the base matters because later shearing cannot easily fill a bare lower framework. For an informal hedge, preserving well-placed stems may protect the natural flowering structure. Mark the intended height and form in the garden record, then schedule the first formative work for the appropriate season. Keep the hedge slightly broader at the base if the chosen species and formal system use shearing, so lower growth is not permanently shaded by an overwide top.
Inspect the row from dormancy through the first growing season. Bud swell should be distributed along viable stems; delayed or patchy growth calls for a root-zone check before fertilizer. Confirm moisture at root depth, look for settling, expose any buried flare, and replace failed plants while spacing and labels remain clear. Iowa State recommends deep watering during the first one to two years and sparing fertilizer only if growth is weak. Establishment is measured by rooted, balanced growth across the row, not by pushing the longest shoots as quickly as possible.
Keep the hedge line maintainable as it closes
Weed control is part of planting, not an optional finish. Grass and perennial weeds compete directly in the narrow root zone where young hedge shrubs are trying to establish. Maintain the mulched strip, hand-remove invaders before they seed, and keep cutting tools away from thin stems. Replenish mulch only where it has thinned, preserving the visible stem bases. A continuous hedge becomes difficult to reach from inside, so solve weed and irrigation access while light still reaches the soil between plants.
Record losses by position and probable cause. Failure at one end of the run may reflect wind, reflected heat, poor watering reach, or a soil change. Random losses throughout a shipment point toward handling or stock quality. A wet pocket that loses several neighboring plants needs drainage or species correction before replacements are installed. Replace the cause with the plant whenever possible. Repeating the same method in the same failing pocket only makes the hedge uneven one season later. The finished first-year row will not yet look like a hedge, and that is useful. Individual stems, grades, gaps, and guards remain visible enough to inspect. Resist filling every interval with unrelated perennials or extra shrubs before the planned plants expand. The mature drawing governs the empty space. If the line, depth, water, mulch, and formative plan are sound, those modest dormant whips can develop into a coherent boundary without the garden paying for haste in buried stems, crowded roots, or an inaccessible outer face.
Steps
- Level
- moderate
- Time
- Half a day for a short prepared hedge; longer runs should be planted in root-safe sections
- Tools
- Tape measure and layout flags, String line and stakes, Spade or trenching shovel, Hand pruners cleaned and sharpened, Watering hose or cans, Wheelbarrow and mulch fork
- Materials
- Locally suitable dormant deciduous hedge plants, Damp root wrapping for plants awaiting placement, Organic mulch, Weatherproof plant labels, Species-appropriate guards only where browsing pressure is known
- 1Approve the regional planting window
Confirm that local extension guidance, the nursery, and current soil conditions all support dormant planting now. UK guidance may allow leaf-fall planting through late winter, while cold continental guidance may reserve bare-root shrubs for early spring. Postpone when soil is frozen, saturated, or smears under the spade. Identify the stock as bare-root, container-grown, or balled-and-burlapped, and use the handling rules for that form rather than treating every leafless shrub alike.
- 2Draw the mature hedge
Mark the intended height, base width, gates, path clearance, boundary setback, and the side needed for pruning and weeding. Select a species whose mature habit, site needs, and response to clipping match either a formal or informal design. Lay a string along the planting center and mark equal plant intervals measured along the line. Use one spacing system supported for the selected plant and hedge form; retain its units and do not average unrelated published ranges.
- 3Prepare one continuous root zone
Clear perennial weeds and loosen a strip wide enough for roots to move beyond each original position. Preserve the finished grade and check for compaction or persistent water before digging the final trench. Keep organic matter out of the trench bottom, use site soil as the main backfill, and solve drainage through elevation, species choice, or a functioning system rather than a decorative gravel layer. Count the position marks again before the bundle is opened.
- 4Protect and inspect the roots
Keep unopened plants cool, shaded, moist, and sheltered from wind. Carry only a small batch to the line in damp wrapping. Maintain labels, then inspect each plant and trim only broken, dead, or diseased root tissue with clean pruners. If work stops, follow local holding guidance; a short delay may use covered moist packing, while an appropriate heeling trench must cover the roots securely and preserve every identity until planting resumes.
- 5Set depth and root spread
Find the nursery soil mark and root-stem transition. Hold that reference at the intended finished grade while spreading roots outward over firm soil. Enlarge the opening when a healthy root will not fit without bending. Use the string for alignment, not depth. Backfill in manageable sections, work soil among fine roots, water to settle large air spaces, and correct sinking or exposed roots before moving to the next section of the row.
- 6Water, mulch, and map the row
Water every root zone immediately and observe differences in infiltration and settlement. Apply a level organic mulch across the prepared strip while keeping stems and root flares uncovered. Label the row, photograph the completed grade, and mark wet, dry, or wind-exposed positions for follow-up. Add guards or shelter only for a known site pressure and record when each temporary material will be inspected and removed.
- 7Choose formative pruning by species and style
Follow plant-specific nursery and local extension advice for the first cut. A formal bare-root hedge may receive a hard establishment cut to build low branching, while an informal flowering hedge may need well-placed stems retained. Remove damaged wood, then monitor bud break, soil moisture, mulch depth, weeds, and grade through the first season. Diagnose patchy growth from the root zone outward before feeding, and replace failures only after correcting the site or handling cause.
Plants in this guide
Related reading
Sources
- Hedges: Planting. Royal Horticultural Society. Source record · Accessed 2026-08-20.
- Selecting and Planting Hedges. Iowa State University Extension and Outreach. Source record · Accessed 2026-08-20.
- Planting and Transplanting Trees and Shrubs. University of Minnesota Extension. Source record · Accessed 2026-08-20.