Grow · autumn container grown perennial planting
Plant Container-Grown Perennials in Autumn Before the Soil Cools
Plant container-grown perennials in early autumn while the soil is workable: read the root ball, match the original depth, water thoroughly, and protect the crown before winter.
Published Last updated
In this guide
- Plant while the soil is workable, not by a fixed date
- Use the plant and the site to decide whether autumn is suitable
- Read the root ball before you dig the hole
- Prepare a clean bed and a hole that gives roots room
- Set the plant, water it in, and watch the crown
- Water through establishment and stop feeding on autopilot
- Mulch for the season without burying the crown
- Know when the correct action is to wait
- Inspect in spring and keep the planting record
- Steps
Plant while the soil is workable, not by a fixed date
Container-grown perennials can be planted in autumn when the bed is workable, the plant is suited to the site, and the root system has time to settle before the ground freezes. The short version is precise: choose a hardy perennial, match its light and moisture needs, set the rootball at the same soil level it had in the pot, loosen roots that circle the outside, water the planting thoroughly, and keep the crown visible. Autumn is a useful planting season because the soil may stay warm after the air cools, but the calendar never overrides frozen or waterlogged ground.
This guide is for healthy, container-grown ornamental perennials moving into beds and borders in a temperate Northern Hemisphere garden. It does not cover bare-root divisions, bulbs, tender plants that need winter storage, or a plant whose label gives a special shallow or deep planting rule. A coral bell, balloon flower, hardy geranium, or ornamental grass still needs its own mature size, hardiness, sun, soil, and moisture checked before the pot reaches the hole.
The timing boundary depends on climate. Iowa State University Extension and Outreach describes late August through September as a typical early-fall window in Iowa and recommends allowing at least four to six weeks before the ground freezes. University of Illinois Extension uses about six weeks before the first frost as a planning guide for its region. The Royal Horticultural Society gives a broader autumn-to-spring window for container-grown perennials when soil is not frozen or waterlogged. Use the local ground-freeze or first-frost pattern that matches your garden, then plant early enough for roots to establish.
Use the plant and the site to decide whether autumn is suitable
Read the label before choosing the planting hole. Confirm the mature height and spread, preferred soil moisture, sun exposure, hardiness information, and whether the plant is deciduous or evergreen. The small pot on a nursery bench is only the starting scale. Iowa State's perennial guidance puts right-plant-right-place decisions before digging because a plant that fits the season but fails the site will not become established simply through careful planting.
Walk the bed at the time the plant will grow there. Note whether a wall, tree canopy, paving edge, or roof runoff changes the light and moisture pattern. Full sun at a nursery can become afternoon shade beside a house; a damp-looking bed can drain quickly on a slope; a low pocket can remain saturated after rain. RHS recommends choosing the perennial for the actual location, and its planting guide notes that waterlogged ground displaces air around roots. Wait, improve the site, or select another plant when the basic conditions are wrong.
Autumn planting is a poor rescue for a weak or stressed purchase. Reject a plant with a collapsing crown, foul-smelling mix, severe wilting that does not recover after watering, or roots so damaged that the rootball will not hold together. A few torn leaves or a plant that has finished flowering are not automatic problems. Look for firm stems, a stable crown, and a root system that can make contact with the surrounding soil. Keep the plant watered in its container until the bed is ready; a pot left in late-season sun can dry faster than the planting site.
Read the root ball before you dig the hole
Arrange the pots on the soil surface before opening the bed. This lets you judge spacing, mature spread, sight lines, and the order of the planting while every plant is still movable. RHS advises arranging container-grown perennials first; the step is especially useful in autumn, when a new plant may carry little flower or foliage and the garden's future shape is easy to misread.
Remove one plant at a time. Water a dry pot before planting, squeeze the sides, and slide the rootball out while supporting the plant at the base. Inspect the outside and underside. Fine roots that hold the mix together are a good starting structure. Roots that run around the perimeter in a tight spiral need to be freed so they can enter the native soil. RHS recommends teasing circling roots in three or four places with the fingers; a very tight rootball may need a clean, shallow scoring treatment suited to the plant and the tools at hand.
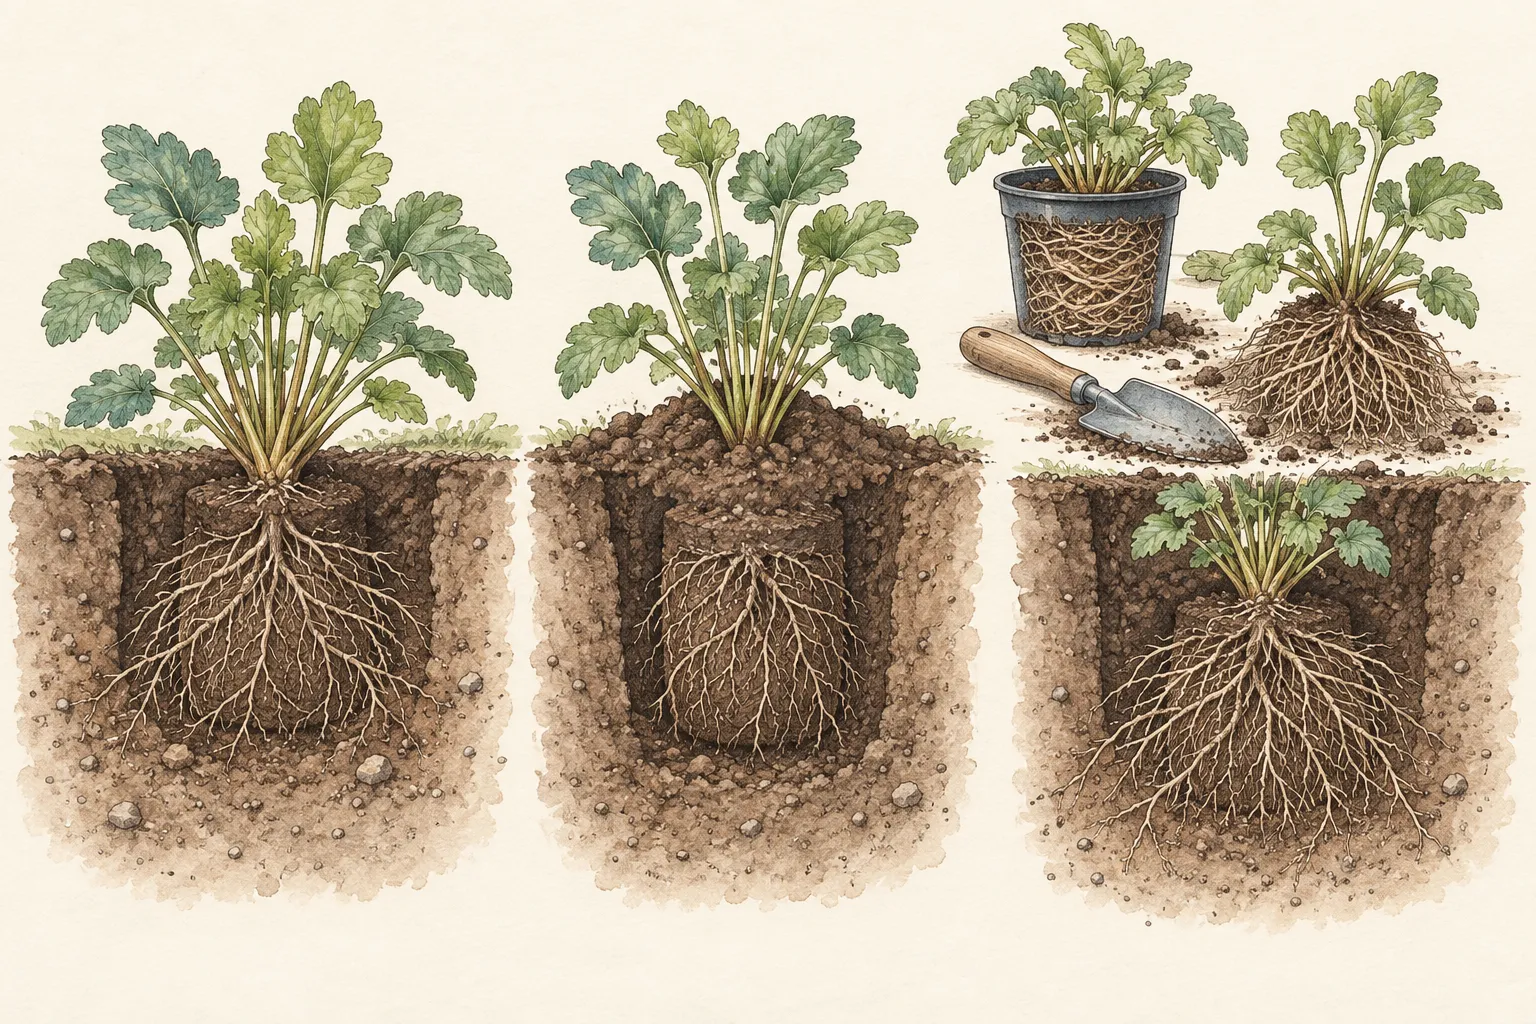
Find the original soil line before digging. The crown and stem bases should sit at the same level they occupied in the container unless the plant's own care guidance says otherwise. Illinois Extension warns that planting high can dry the roots, while planting low invites crown rot; its guidance also highlights iris, peony, and bleeding heart as plants with special shallow requirements. The drawing below separates the depth decision from the root decision because both matter: a loosened rootball planted too deep still fails, and a correctly leveled rootball that remains tightly circling still needs attention.
Prepare a clean bed and a hole that gives roots room
Clear annual weeds and remove persistent perennial weeds while they are visible. Mark irrigation lines and other buried services before using a spade. OSU Extension recommends identifying underground utilities and in-ground irrigation before digging, especially when a new bed or a deep soil correction is involved. A planting hole is not the right place to discover a cable or to bury a patch of bindweed roots beneath the new perennial.
Dig the hole at least twice as wide as the container, with a depth equal to the rootball's soil depth. Iowa State University Extension and Outreach makes the width and depth relationship explicit: the surrounding soil should be loosened enough for new roots to move sideways, while the plant remains at its original level. Set the excavated soil beside the hole so you can backfill with the soil that came out. Keep the crown, stems, and label in view as the hole is adjusted.
Improve the bed as a bed, not as a rich pocket around one rootball. When soil is compacted or unusually poor, OSU Extension describes incorporating three to four inches of compost into six to eight inches of soil by hand; use that advice within its regional soil context and according to the material's quality. Iowa State notes that amendments are unnecessary in most planting holes and recommends returning the soil that was removed. A deep layer of contrasting material can hold water or make the rootball sit high after settling. Correct drainage and structure across the planting area when the problem is broad.
Set the plant, water it in, and watch the crown
Place the prepared rootball in the center of the hole and check the soil line from several sides. The top of the rootball should be level with the surrounding ground, with the crown and stem bases clear. If the plant sits low, lift it and add soil beneath the rootball; if it sits high, deepen the hole carefully. Do not compress wet soil to force a final height. A straight stem is less important than an intact crown at the correct grade.
Backfill with the excavated soil, working it around the sides so there are no large air gaps. Firm with your hands, then water slowly and thoroughly to settle the soil and bring the roots into contact with the bed. RHS recommends watering even when the ground is moist and rain is forecast because the first watering settles the planting; OSU Extension also advises watering thoroughly after installation. Check the soil around the rootball after the water drains. If the plant has sunk, raise it promptly while the soil is still loose.
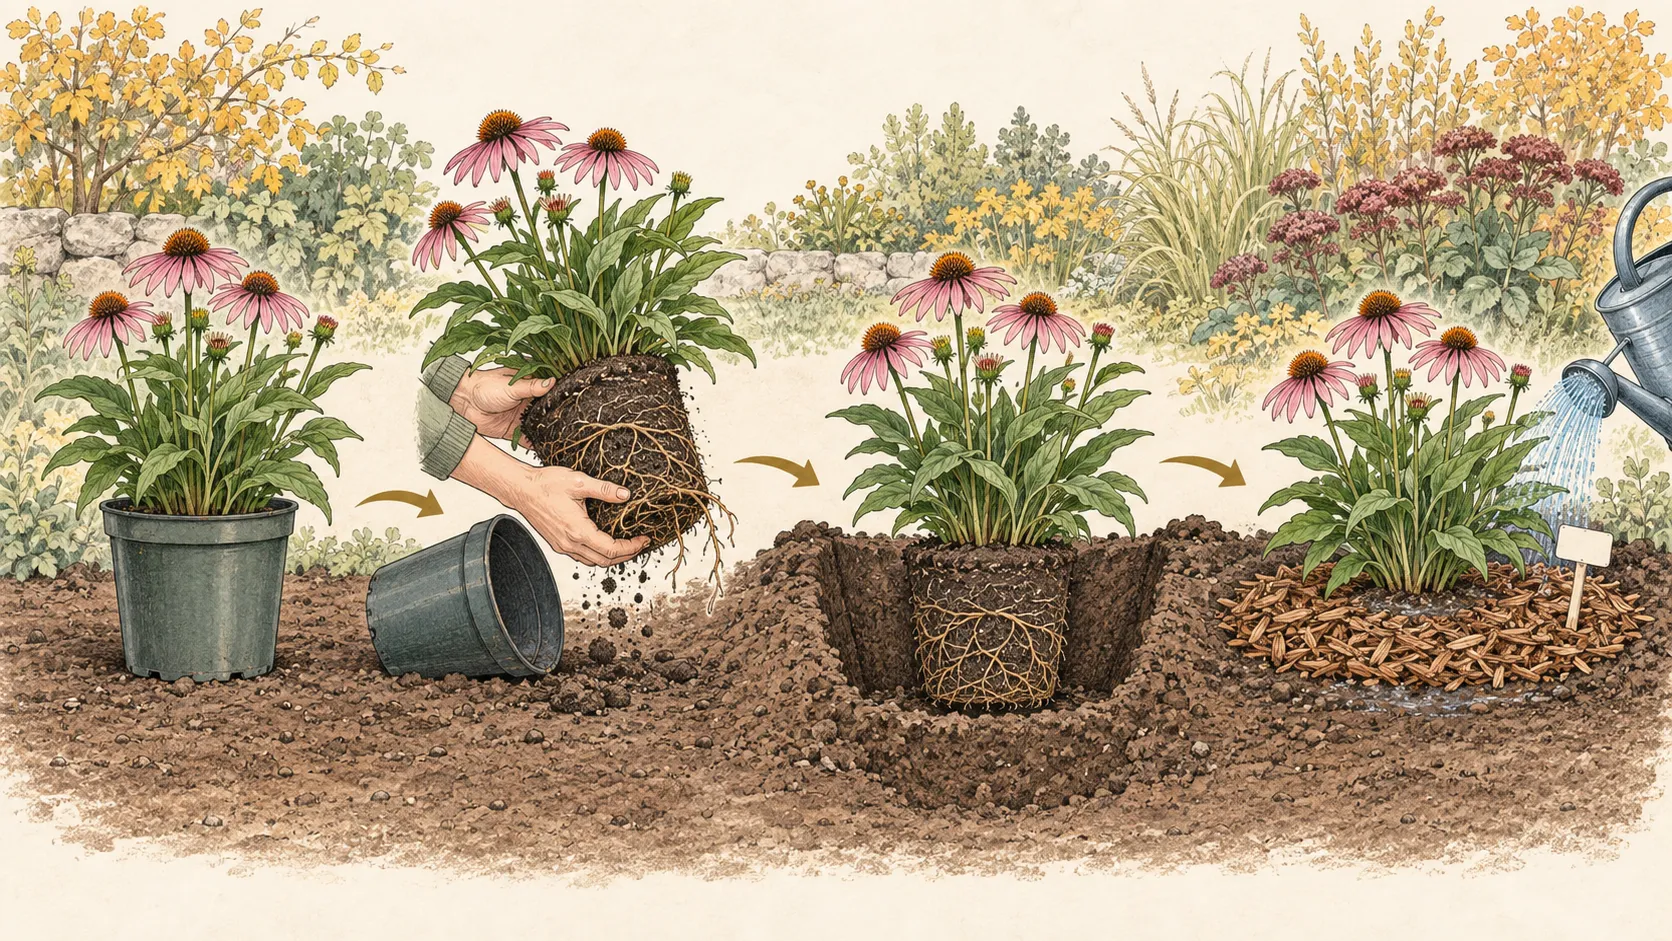
Finish with a broad, shallow basin only when the site drains freely and the basin will not collect runoff against the crown. Keep the crown at grade and make the plant easy to identify after its leaves die back. The sequence illustration shows the important change in state: pot, rootball, planted crown, and settled mulch ring. It is a planting job with a visible endpoint, not a buried pot that disappears into an uncertain mound.
Water through establishment and stop feeding on autopilot
Check the new perennial's root zone after planting and during dry spells. Rainfall at the garden level is useful evidence, but a roof shadow, dense canopy, or fast-draining slope can leave a new rootball dry while the rest of the bed looks wet. Water at the soil surface under the foliage and allow the water to enter the ground. The RHS recommends keeping perennials moist but not soggy in their first year, including those sold as drought tolerant.
Use the plant's condition and the soil's moisture to set the interval. A newly planted perennial should not be left to cycle from saturated to bone dry, but it also should not sit in a constantly full pocket. Iowa State University Extension and Outreach calls regular watering through the first growing season one of the most beneficial establishment practices. In an autumn planting, that may mean several checks before winter and a return to active watering in spring when growth resumes.
Do not add fertilizer simply because the planting happened late. Iowa State notes that most perennials do not need starter fertilizer, and RHS says feeding after the ground has been prepared is usually unnecessary unless yellowing or poor growth calls for a suitable liquid feed. University of Illinois Extension advises holding fertilizer for new fall transplants until spring. Compost used to improve a broad bed is a soil-structure decision; it is not a signal to push tender new top growth before winter.
Mulch for the season without burying the crown
Give the plant a clean, visible finish after the soil has settled. RHS recommends a 5–7 cm (2–3 in) mulch layer for perennials and a 10 cm (4 in) gap around the stems. Illinois Extension describes about 2 inches for a new perennial bed and says mulch should leave air around the crown. The shared principle is more important than a single depth: conserve moisture, moderate temperature, and suppress weeds while the crown remains exposed to air.
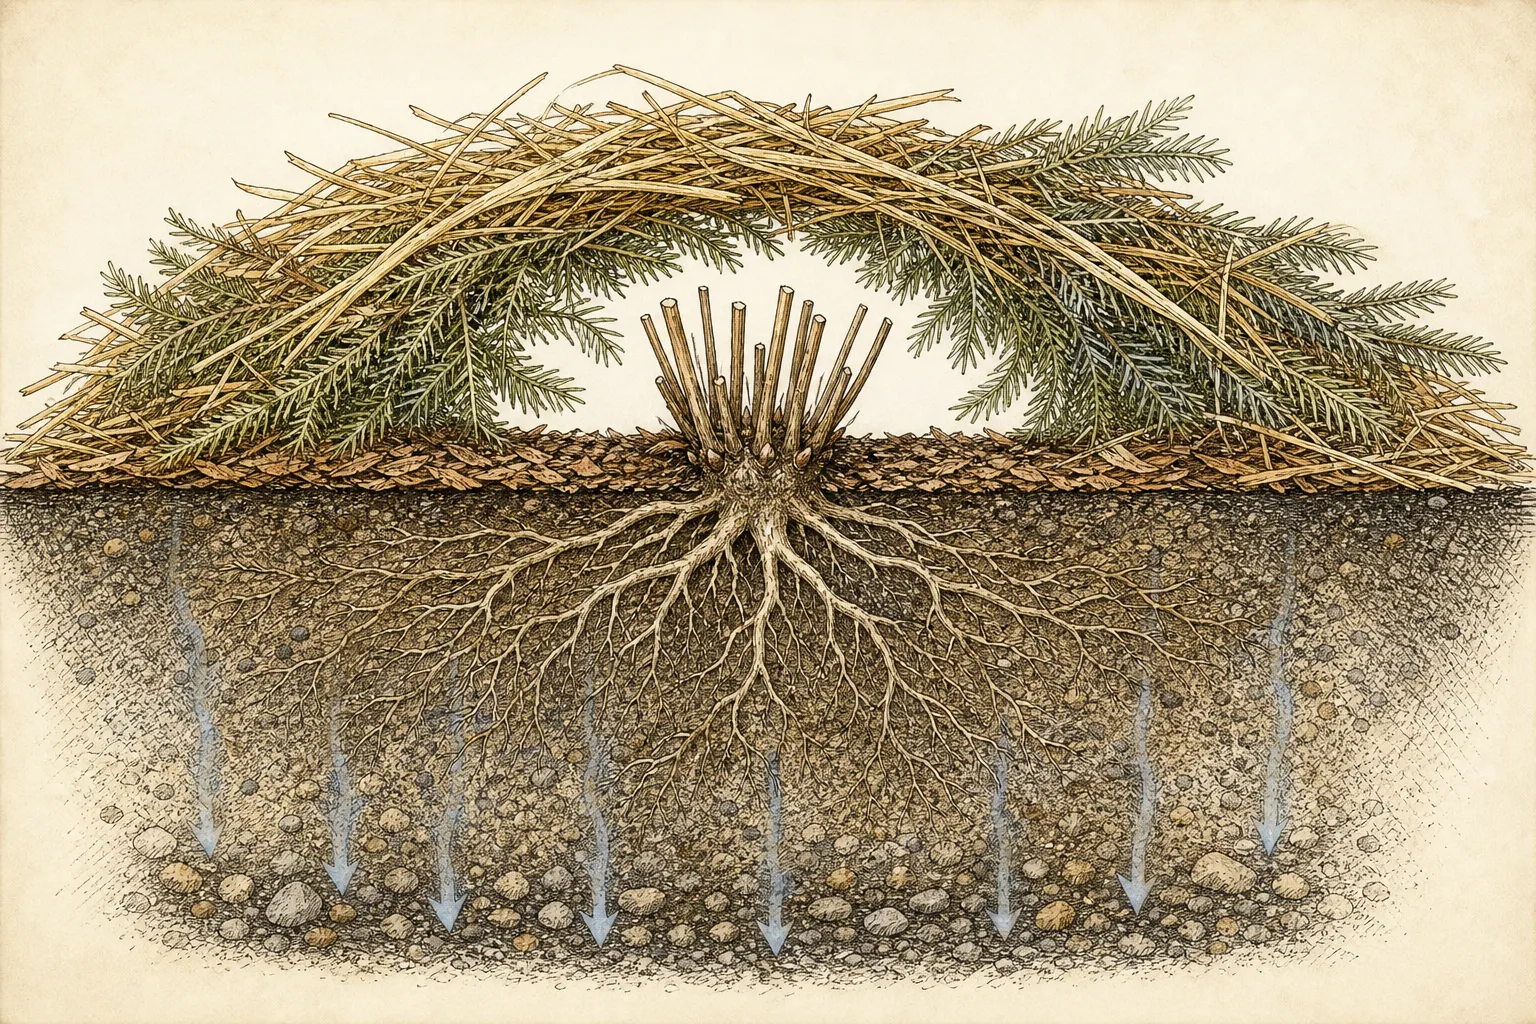
In colder regions, a late-autumn layer of loose material can reduce winter injury for a late planting, but it should be timed to local conditions. Iowa State University Extension and Outreach recommends a 4–6 inch straw layer over fall-planted perennials in its Iowa context, removed in early April. That is a regional winter-protection measure, not a reason to pile wet, dense mulch against every perennial in a mild climate. Follow local frost, snow, and drainage patterns.
Mark a deciduous perennial before the top disappears. OSU Extension recommends flags for herbaceous plants that die back in winter and keeping plant tags from girdling growing stems. A short stake placed outside the crown, a loose label, and a map prevent spring digging into a quiet plant. The label should record the cultivar, planting date, and any special depth or winter note; it should not be tied tightly to a stem that will expand.
Know when the correct action is to wait
Pause the job when the soil is frozen, waterlogged, or too wet to support a clean hole. RHS allows container-grown perennials to be planted at any time only when the ground is not frozen or waterlogged. Wet soil smears and compacts underfoot, while a frozen rootball cannot be seated accurately. Hold the pot in a protected position, keep the rootball evenly moist, and plant when the bed is workable again if the local season still gives the plant time to settle.
Wait for spring when the plant is tender for the region, recently forced into active growth, or sold with a winter-shelter requirement. A hardy perennial in a suitable site has a different autumn risk from a greenhouse-grown plant with little cold acclimation. The label and local nursery guidance decide the boundary. Do not turn a broad fall recommendation into a promise that every plant in every climate will overwinter.
Late planting also deserves a different plan when the first frost or ground freeze is close. Illinois Extension reports that late fall plantings can suffer frost heaving and loss because roots have had too little time to anchor. If the date is outside the source-bounded establishment window, pot the plant on, protect it according to its hardiness, and make a spring planting plan. A healthy delay is easier to recover from than a rootball left high, loose, or waterlogged in frozen ground.
Inspect in spring and keep the planting record
Return to the plant as the soil thaws. Check whether frost heaving has lifted the crown, whether runoff has exposed roots, and whether mulch has drifted over the growing point. Correct a small height problem while the soil is workable. Wait for normal emergence before deciding that a dormant perennial has failed; many plants show little above ground while the root system is still alive.
Compare spring growth with the autumn note. If the plant is weak, inspect moisture, light, crown depth, animal disturbance, and the fit between the plant and the site. A correct hole and first watering cannot compensate for a wet pocket, deep shade, tender cultivar, or rootball that dried before planting. The record makes those possibilities testable instead of leaving the failed plant as an unexplained absence.
The useful autumn sequence is compact: choose a plant that belongs in the site, leave enough time before local freezing, inspect and free the rootball, dig wide without changing the depth, water the soil into contact, keep the crown visible, and protect a late planting with regional judgment. Done at the right moment, container-grown perennials enter winter with their roots placed, their location marked, and their first spring decision already easier to read.
Steps
- Level
- easy
- Time
- 30–60 minutes per perennial, including site preparation and the first watering
- Tools
- Garden spade or border fork suited to the soil, Clean hand trowel for adjusting planting depth, Watering can or hose with a gentle rose, Gloves and a clean plant label, Short marker stake or flag for deciduous perennials, Sharp knife reserved for very tight rootballs when the plant guidance allows scoring
- Materials
- Container-grown hardy ornamental perennial, Compatible soil from the planting hole, Finished compost for a broad, compacted bed when needed, Loose mulch suited to the local climate, Plant map or weatherproof notebook for cultivar, depth, and planting date
- 1Check the autumn window
Confirm that the perennial is hardy for the site and that the local ground-freeze or first-frost pattern leaves enough time for establishment. Iowa guidance uses four to six weeks before ground freeze; Illinois guidance uses about six weeks before first frost. Do not plant frozen or waterlogged soil.
- 2Match the plant to the bed
Read mature height and spread, sun, moisture, soil, and winter requirements. Walk the bed for shade, runoff, roots, and paving heat. Hold or exchange a plant whose basic conditions do not match the location.
- 3Arrange before digging
Set the pots on the soil surface and adjust the group while every plant is movable. Use the label's mature spread to leave room for growth, access, and air around the future clump.
- 4Inspect and free the rootball
Water a dry pot, slide the plant out with support at the base, and inspect the roots. Tease circling roots in several places; use a clean shallow score only when the plant and root condition justify it.
- 5Prepare a wide, level hole
Remove weeds, identify buried services, and dig at least twice the container width. Match the hole depth to the rootball's soil depth so the crown and stem bases remain at the original grade.
- 6Backfill and water thoroughly
Set the rootball at its original level, return the excavated soil, firm it by hand, and water slowly until the soil settles around the roots. Recheck the height after drainage and lift the plant if it has sunk.
- 7Mulch and mark the plant
Apply a measured mulch layer suited to the region, leaving air around the crown and stems. Place a loose label or marker outside the root zone and record the cultivar, planting date, and depth note.
- 8Monitor through winter and spring
Check moisture during dry autumn intervals, stop treating the potting schedule as a rule, and add late winter protection only where local conditions call for it. In spring, inspect heaving, exposed roots, mulch drift, and normal emergence.
Plants in this guide
Related reading

Sources
- How to Plant Perennials. Iowa State University Extension and Outreach. Source record · Accessed 2026-09-09.
- Perennials: planting. Royal Horticultural Society. Source record · Accessed 2026-09-09.
- Establishing Perennials in the Early Fall. University of Illinois Extension. Source record · Accessed 2026-09-09.
- Fall planting offers long-term benefits for trees, shrubs and perennials. Oregon State University Extension Service. Source record · Accessed 2026-09-09.