Grow · new perennial first winter care
Winterize Newly Planted Perennials Without Smothering Crowns
Protect a new perennial’s first root zone from freeze-thaw heaving with well-timed loose insulation while keeping its crown at grade, airy, and drainable.
Published Last updated
In this guide
- Protect the first winter, not every hardy plant
- Finish establishment before freeze-up
- Clean selectively and preserve useful structure
- Wait until the soil is frozen
- Build a crown-safe blanket
- Check for heaving, wetness, and animal pressure
- Adapt the opening to different crown forms
- Remove the temporary layer in stages
- Steps
Protect the first winter, not every hardy plant
A newly planted perennial has had less time to anchor roots into surrounding soil. Its first winter concern is often not simply the lowest air temperature but repeated soil freezing and thawing that can lift a shallow root ball, open air gaps, and expose the crown. Iowa State Extension identifies frost heaving as a reason for winter mulch, while Oregon State explains that freeze-thaw cycles can damage root tissue and supports applying winter mulch after the ground has frozen lightly. A late planting therefore deserves observation and targeted buffering.
This is not a direction to bury every perennial bed under a deep layer. Oregon State notes that some perennials do better without extra winter mulch because wet soil can encourage root rot or loss of the center. Established crowns in well-drained soil may be safer with their ordinary settled mulch and intact stems. Focus extra protection on recent transplants, divisions, late-season purchases, exposed beds, and species known to heave. The decision is plant-by-plant and site-by-site, which prevents a vulnerable newcomer from becoming an excuse to smother an entire border.
The method also differs from routine mulching. Permanent mulch suppresses weeds and moderates soil during the growing season; a first-winter blanket is loose, timed after freeze-up, and removed or reduced in spring. Its job is to reduce rapid temperature swings and catch snow, not to warm the plant into continued growth. The crown—the junction where roots and shoots meet—must remain at its correct grade with air and drainage around it throughout the operation.
Finish establishment before freeze-up
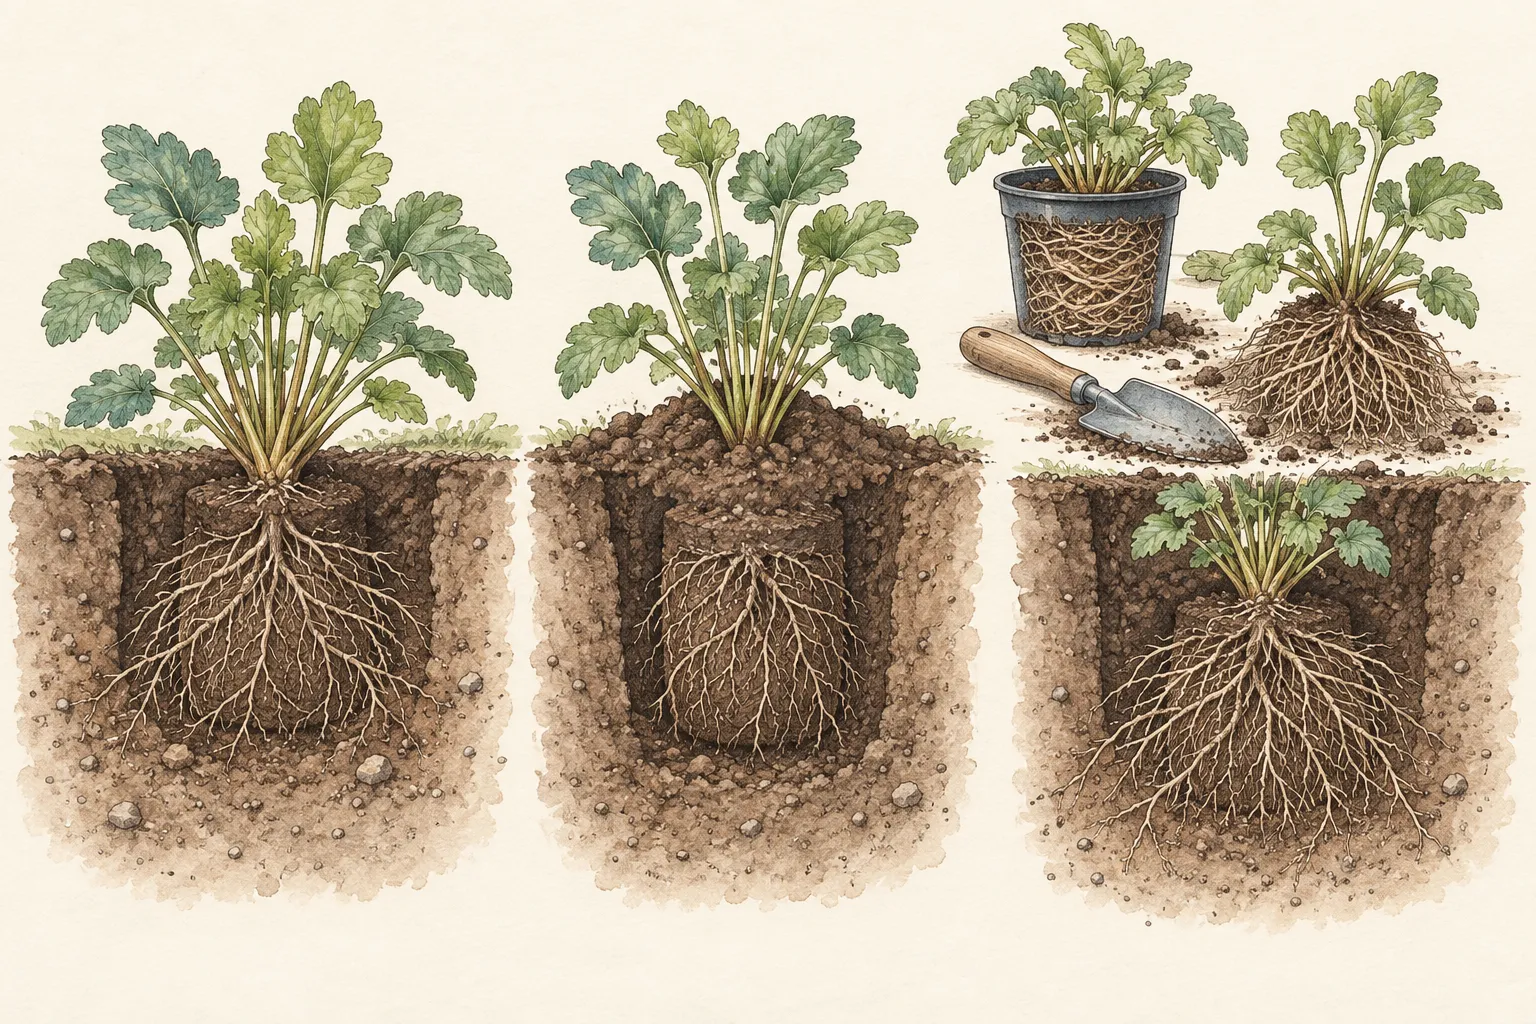
Check planting depth while the soil is still workable. The top of the original root mass should meet the surrounding grade unless the species has a specific deeper or shallower requirement. If loose backfill has settled and left roots exposed, lift and reset only when it can be done without tearing new roots; otherwise add soil around the root ball to restore grade without piling it onto the crown. A crown already buried by soil should be uncovered before any winter material is added.
Water deeply during dry autumn weather until the ground freezes. Illinois Extension emphasizes watering after planting, while Oregon State advises winter watering during snow-free dry spells when the thawed surface can accept it. Apply water to the root zone, let it infiltrate, and correct runoff or a persistent puddle. Do not compensate for poor drainage by withholding all water, and do not keep the bed continuously saturated in the name of establishment.
Stop fertilizing once active growth is ending unless a soil test and local recommendation establish a specific need. Winter protection cannot correct a plant placed outside its hardiness range, installed in incompatible drainage, or left pot-bound above grade. Mark the newest plants now, since dormant crowns disappear among stems and leaves. A low label or stake just outside the root ball lets you find the crown later without probing blindly through frozen soil.
Clean selectively and preserve useful structure
Remove foliage with confirmed disease, collapsed succulent tissue that is turning slimy, and seed heads from plants that spread aggressively. Bag material when local disease guidance recommends keeping it out of home compost. Iowa State advises removing diseased debris while leaving healthy material where it can provide winter interest and habitat. A clean winter bed does not need to be bare soil; the objective is to remove specific reservoirs of trouble, not erase every stem.
Leave sound standing stems when they are stable. They catch snow, mark the crown, and reduce the temptation to pile mulch directly into the center. If stems must be shortened because they are flopping over a path, leave visible stubs and use clean cuts. Do not yank dormant stems from a new division; pulling can disturb the still-shallow crown. Remove debris by hand rather than with a rake that hooks under the root ball.
Clear a small ring immediately around the crown. Wet leaves pressed into this center can exclude air and keep thaw water against buds. The ring need not be a broad circle of exposed soil; it is a readable breathing space that reveals the crown at grade. Note which plants make a dense basal rosette and keep their living leaves uncovered. Evergreen perennials require light and air and should not disappear under straw simply because neighboring herbaceous plants are dormant.
Wait until the soil is frozen
Apply the temporary blanket after the ground has frozen, not after the first crisp night. Iowa State explicitly recommends waiting until the soil freezes because early mulch can delay dormancy and create attractive shelter for rodents. The ideal moment is when the upper soil stays firm through the day and the plant is dormant, but before repeated deep freeze-thaw cycles or lasting snow make even placement difficult. Local timing varies; observe the bed instead of following a national date.
In regions where the soil rarely freezes, a deep winter blanket intended to prevent heaving may have little value and may increase crown moisture. Use ordinary crown-safe mulch and manage drainage instead. Where freeze-up is intermittent, prepare clean materials nearby and install them during the first sustained cold interval. A temporary layer can be adjusted after a thaw; it should never become a wet permanent mound merely because winter arrived unevenly.
The cited depth recommendations describe different applications and regions. Illinois suggests about two inches of settled mulch for a new bed and gives late-fall plantings an exception of roughly three to four inches of loose straw or evergreen boughs after soil freezes. Iowa describes about four inches for general winter protection and a deeper loose layer for especially tender or late-planted material. Do not average these into a universal five-inch rule. Use the smallest loose layer that buffers the local exposure, with Illinois’s crown air gap preserved.
Build a crown-safe blanket
Set loose straw or dry shredded leaves around the root zone, beginning outside the small crown ring. Fluff rather than compress the material so it holds still air and drains through. Shape a low, broad blanket instead of a volcano. The highest point should not be a wet plug over the plant center. For a late planting in a cold exposed site, build toward the locally appropriate loose depth; for a protected hardy plant, a shallower layer may be enough.
Lay a few evergreen boughs lightly across the surface to keep straw from blowing. Their branching creates a lattice without the weight of a board or tarp. Do not lash boughs tightly over a living rosette, and do not use an impermeable sheet that sends water into the crown opening. The body section illustration makes the intended geometry visible: roots sit below a buffered soil surface, insulation arches around the crown, and the center remains open at grade.
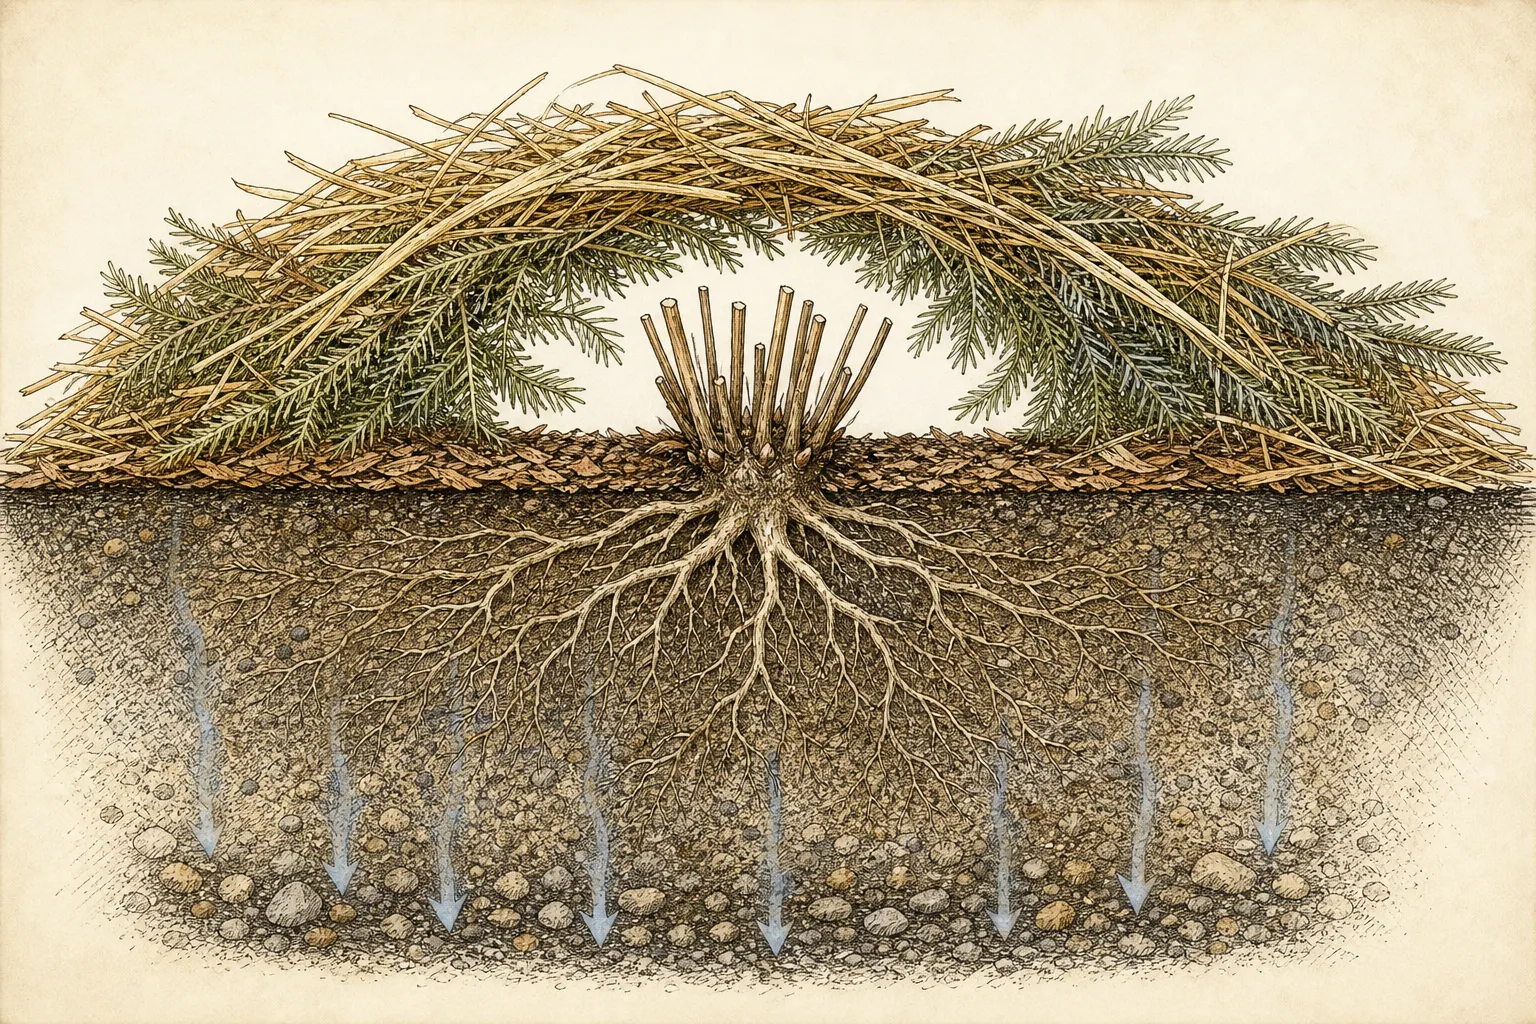
Extend the blanket beyond the root ball so the edge does not become a thermal seam directly over new roots. At the same time, preserve drainage routes downhill and keep material out of window wells, drains, and paved walking surfaces. On a sloping bed, place small boughs across the contour so they slow mulch migration without damming water. A well-built layer looks somewhat untidy and airy; a smooth compact mound is usually holding too much pressure and moisture.
Check for heaving, wetness, and animal pressure
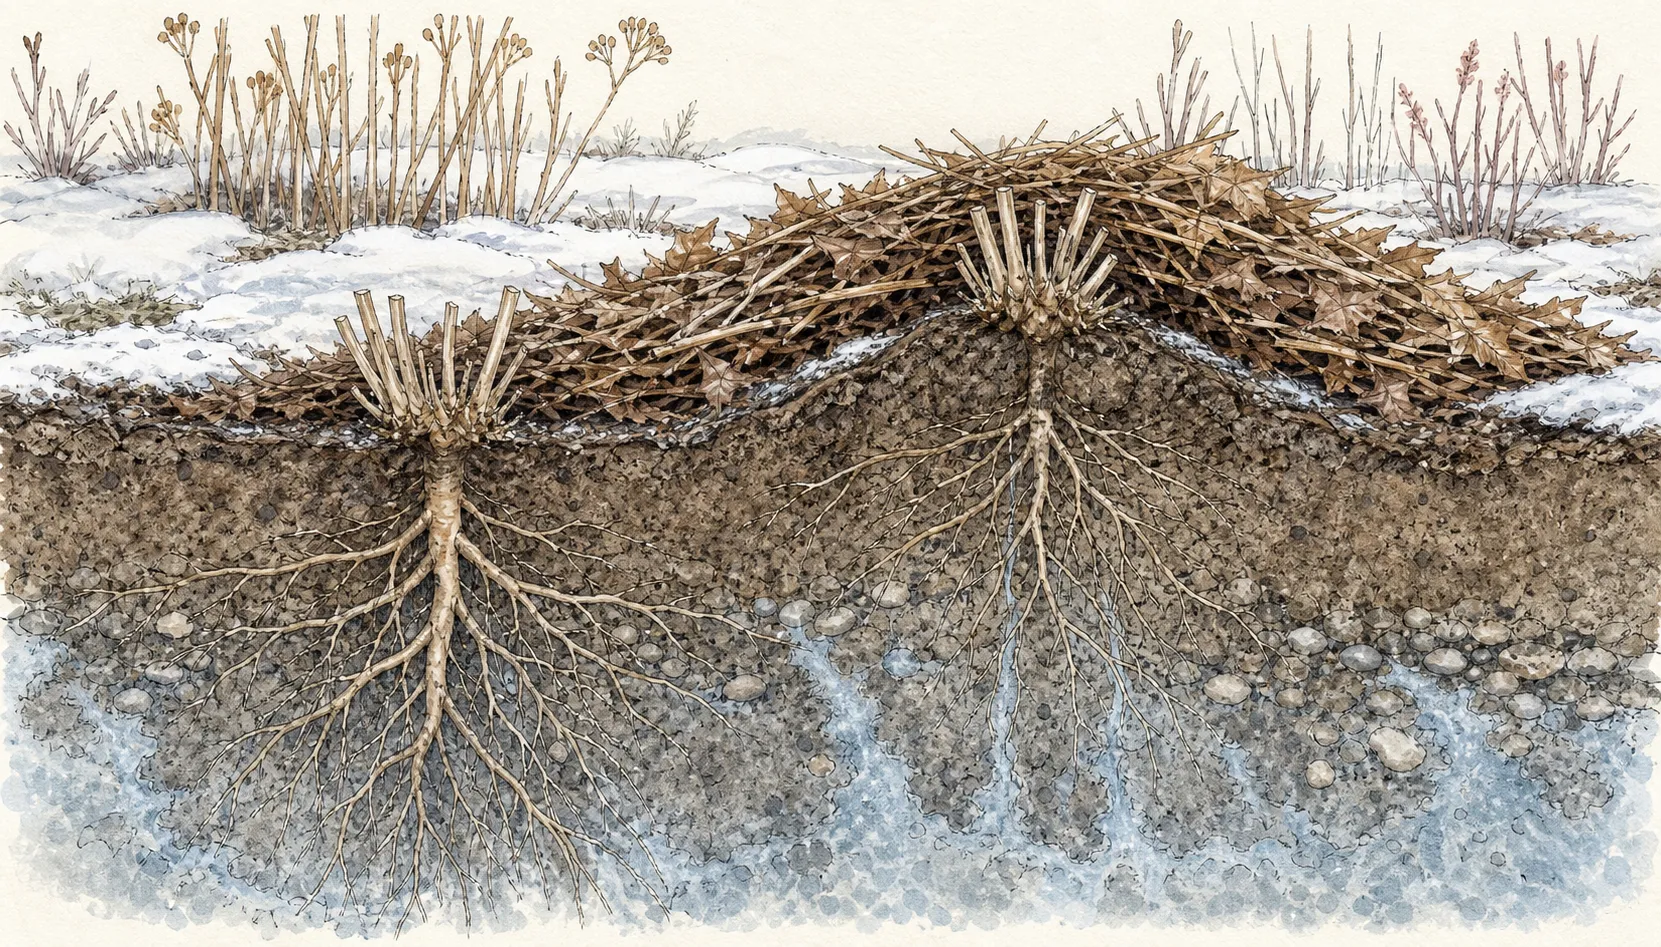
After the first major thaw, look without digging. A heaved plant may sit higher than neighboring soil, with a root-ball edge or pale roots visible. Do not force a frozen crown down. When the soil is workable, press it gently back into contact and restore loose cover around it. If the same plant rises repeatedly, investigate drainage, shallow planting, or an exposed edge rather than adding more and more material over the top.
Lift a handful of the blanket. It should be damp at times but springy, not a sour compact mat. Replace saturated leaves with drier loose material and reopen the crown ring. Rodent tunnels, clipped stems, or nests indicate that protection went on too early or became too enclosed. Reduce hiding space and use local, plant-safe management; do not scatter an unlabeled bait into habitat used by pets and wildlife.
Snow can be useful insulation, so leave a natural light cover in place. Do not shovel salty roadside snow onto the bed, and do not build an ice crust over crowns. If wind strips the area bare, reset boughs and redistribute existing material rather than burying plants under a new dense load. The overhead bed plan for this passage treats each crown as an open well within a continuous but drainable field, which is a better model than a separate tight cone on every plant.
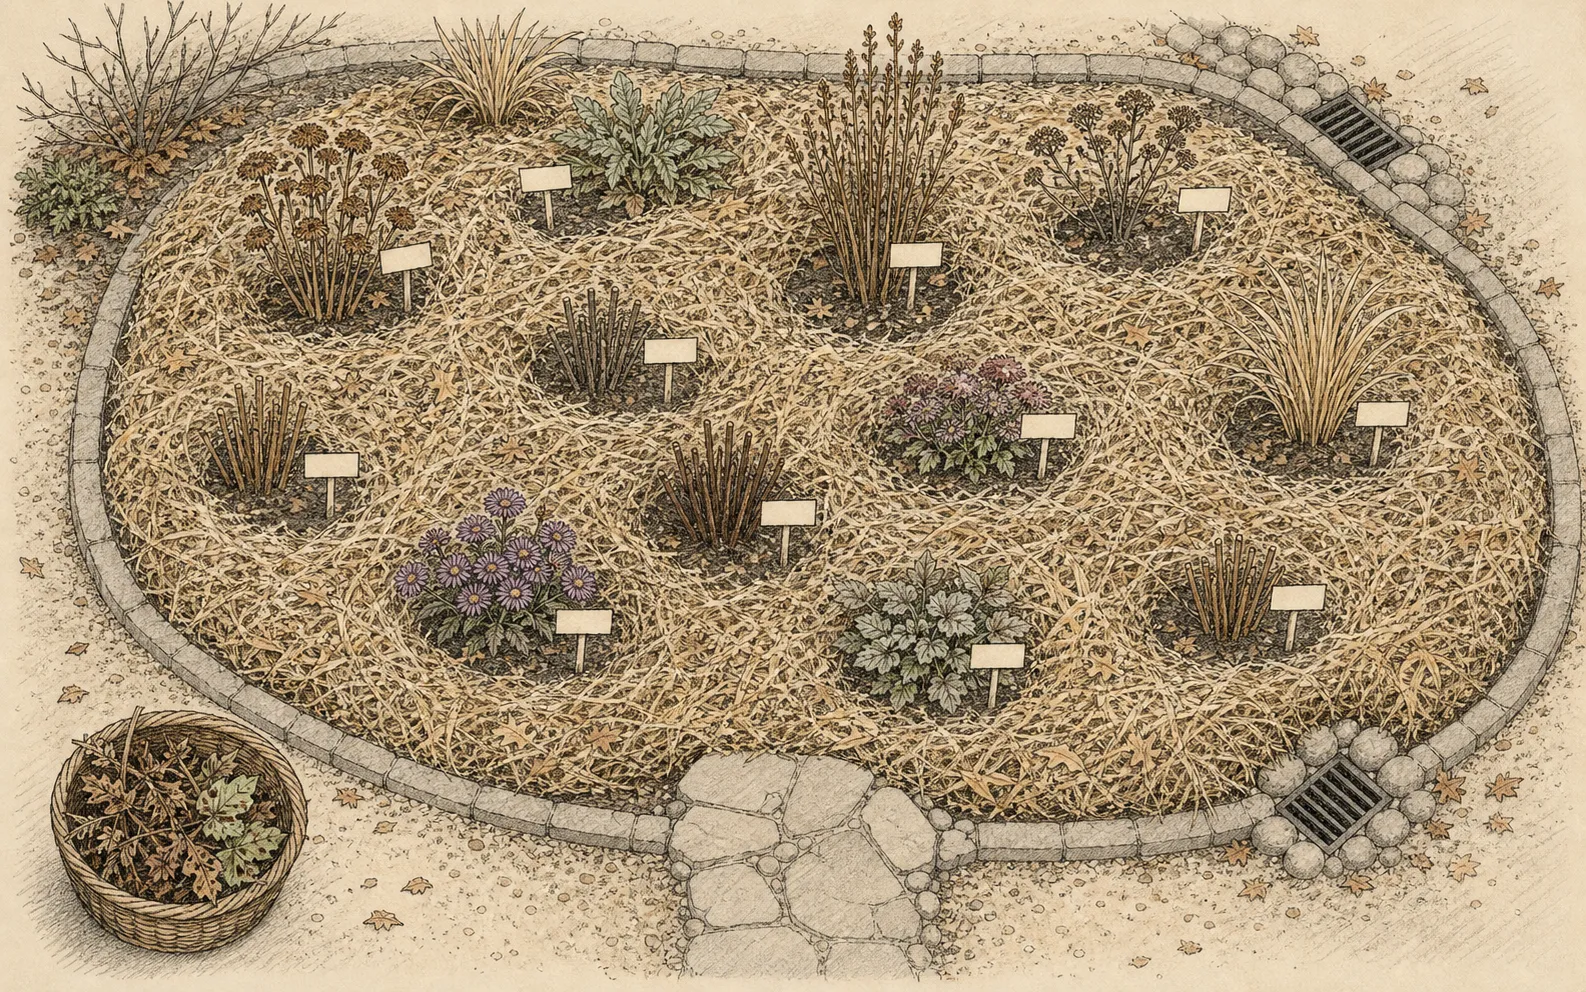
Adapt the opening to different crown forms
A dormant peony or hosta can have a compact center at soil level, while coral bells may hold a short woody crown above the surface and ornamental grasses retain a dense basal tuft. Preserve the form the plant had at correct planting depth. Do not press a raised crown downward to make it match a flat diagram, and do not fill a grass center with chopped leaves. The common principle is visible, drained growing tissue surrounded by a buffered root zone.
Evergreen and semi-evergreen perennials need a wider light opening. Keep hellebore, bergenia, heuchera, and other retained foliage above the blanket wherever local conditions allow, removing only damaged leaves individually. A broad bough can shade or crush a small rosette even when straw is correctly placed. Arrange retaining pieces around the plant instead, and check after snow slides from a roof or shrub onto the bed.
Crown-sensitive plants in heavy soil may need less organic cover and more attention to surface drainage. Draw the blanket back from any low spot that collects meltwater, then create a shallow outlet through surrounding mulch without cutting roots. Winter material cannot cure an unsuitable saturated site. Document plants that repeatedly soften or heave so spring work can address grade, soil structure, or relocation rather than repeating a deeper first-aid layer next autumn.
Treat very small plugs and fresh divisions as easy to lose as well as easy to heave. Mark them outside the crown ring, extend the loose blanket across their limited root zone, and count the markers before snow. Do not compensate for their size by placing a bucket or solid pot over each plant; an enclosure can trap moisture, block light from semi-evergreen foliage, and become a windborne object. A visible marker plus continuous airy cover is simpler to inspect.
Remove the temporary layer in stages
Begin loosening the winter blanket when severe cold is easing and repeated thaw allows the soil surface to breathe. Iowa State recommends early spring removal; the exact week depends on local conditions. Pull back the upper boughs first, then thin the loose material over several visits. New shoots should not grow long, pale, and bent beneath insulation. Keep a modest ordinary mulch layer outside the crown if it remains clean and appropriately shallow.
Leave the material nearby during a volatile week so it can be laid loosely back around—not on top of—emerging crowns for a hard freeze. This is temporary buffering, not an invitation to cover tender shoots with wet leaves. Check grade as the soil settles, press exposed root-ball edges into contact, and water if spring wind has dried the unfrozen root zone. Remove synthetic ties, netting, or markers that could constrict growth.
Finish by deciding whether the plant established normally. Firm crowns, expanding shoots, and roots that remain at grade indicate the protection did its job. Soft centers, persistent standing water, or repeated heaving call for drainage or siting correction rather than another season of deeper cover. The durable lesson is timing and geometry: hydrate before freeze, wait for frozen soil, buffer the root zone with a loose removable layer, and keep the crown visible enough to breathe and drain.
Steps
- Level
- easy
- Time
- About 10 minutes per plant after the soil has frozen
- Tools
- Watering wand, Hand rake, Hand pruners for diseased stems, Plant labels
- Materials
- Clean loose straw or shredded leaves, Evergreen boughs for a light retaining lattice, Small stakes or discreet markers
- 1Identify which plants need first-winter help
Prioritize late plantings, recent divisions, exposed sites, and locally marginal species. Leave established hardy crowns on ordinary care unless their site presents a specific risk.
- 2Correct grade and water before freeze
Keep each crown at its species-appropriate grade, fill gaps beside the root ball without burying the center, and water deeply during dry autumn weather until the ground freezes.
- 3Remove only problem debris
Take away diseased or slimy foliage and invasive seed heads while preserving sound stems. Clear a small readable ring around the crown and mark the new plant.
- 4Wait for sustained frozen soil
Hold the loose blanket until the upper soil remains frozen and the perennial is dormant. In climates without frozen ground, favor drainage and ordinary shallow mulch instead.
- 5Place loose insulation around the crown
Fluff straw or shredded leaves over and beyond the root zone, using a locally appropriate depth while leaving the crown opening airy and keeping live rosettes uncovered.
- 6Retain without sealing
Lay evergreen boughs lightly across the loose material, preserve downhill drainage, and avoid plastic, boards, dense leaf mats, or tight cones around individual plants.
- 7Inspect thaws and uncover gradually
Reset heaved plants only when soil is workable, replace saturated material, then thin the temporary cover in early spring before shoots stretch beneath it.
- 8Adjust openings to crown form
Leave evergreen rosettes and grass centers exposed to light and air, preserve naturally raised crowns at their correct grade, and position retaining boughs where they cannot crush foliage.
- 9Protect the bed drainage pattern
Keep meltwater routes, window wells, and path edges clear while extending insulation beyond new root balls. Draw material back from low wet spots instead of adding depth over a drainage failure.
- 10Record plants that remain unstable
Mark repeated heaving, soft crowns, or persistent standing water for a spring siting review. Do not make a temporary blanket progressively deeper when grade, soil, or plant choice is the underlying problem.
- 11Recheck after the first lasting snow
Look for boughs that have slid, crowns buried by drifting material, and drainage edges blocked by compacted snow. Make corrections only when the bed surface is safely accessible and avoid walking on frozen crowns or saturated soil.
- 12Leave a clean spring handoff
As the blanket thins, retain only clean ordinary mulch outside the crown, remove synthetic retainers and trip hazards, and note any exposed roots. Schedule grade or drainage corrections once the soil is workable rather than concealing them under summer mulch.
Related reading

Sources
- How should I prepare my perennial beds for winter?. Iowa State University Extension and Outreach. Source record · Accessed 2026-08-20.
- Planting and Care. University of Illinois Extension. Source record · Accessed 2026-08-20.
- Winter care of perennials in central Oregon. Oregon State University Extension Service. Source record · Accessed 2026-08-20.