Grow · mixed container heat watering
Build a Heat-Ready Watering Routine for Mixed Ornamental Containers
Read plant posture, pot weight and mix moisture together, then sort mixed ornamental containers into a heat-ready routine without putting every pot on one schedule.
Published Last updated
In this guide
- Turn the heat forecast into inspection windows
- Treat every pot as its own root zone
- Read three cues before opening the hose
- Sort the collection by observed dry-down
- Water the root ball, then verify the result
- Separate a dry channel from a saturated pot
- Lower avoidable heat without erasing plant needs
- Build a morning-and-evening feedback loop
- Steps
Turn the heat forecast into inspection windows
A hot forecast should change when you look at containers, not automatically make every pot receive water. Begin with an early check while leaves and potting mix have not yet been heated by the afternoon. Return near the end of the hottest period to notice which plants changed. The two observations reveal demand while leaving the decision tied to each root zone rather than to the weather icon alone.
List the containers that can lose water fastest: small or shallow vessels, porous terracotta, hanging baskets, pots filled with roots, and plants exposed to reflected heat or persistent wind. Oklahoma State notes that size, material and exposure alter water loss. Treat those features as reasons to inspect first. They do not prove that the mix is dry, and they do not convert a drought-tolerant plant into a moisture lover.
Choose safe working times. Do the lifting, probing and hose setup during cooler hours, keep a clear route across the patio, and stop when heat or a hot surface makes the task unsafe. A heat-ready routine protects the gardener as well as the plants. A container can wait for a safer inspection when the alternative is rushing, tripping over tubing or handling a heavy wet pot in dangerous conditions.
Make the second check comparative. A plant that looks unchanged and has moist mix may need nothing. A plant that droops only in peak heat but recovers by the next cool period needs a different interpretation from one that remains limp over dry mix. Record exceptions for several days. The purpose is not a permanent timetable; it is a local map of which pots deserve the earliest attention under this exposure.
Treat every pot as its own root zone
A coordinated display can hide several water regimes. One large container may combine a vigorous flowering annual, a restrained foliage plant and a trailing accent, while neighboring pots hold a woody perennial or a succulent. The visual grouping is not proof of compatible root needs. Read plant labels and the original design record, then mark combinations in which one plant repeatedly wilts while its companions remain firm.
Container volume changes the margin between adequately moist and dry. A small pot contains less mix and often changes quickly; a larger pot can remain moist below a dry-looking surface. Root fill changes that relationship over the season. A pot that behaved calmly in May can become a fast user after the canopy and roots occupy most of the available space. Update the routine as plants grow instead of preserving the spring interval.
Material and site contribute another layer. Porous containers can lose moisture through their walls, and dark vessels in strong sun can heat their root zones. Wind moves through hanging baskets and tall foliage, while pots under eaves may miss rain that reaches the garden. Note these conditions on a simple patio map. Their value is explanatory: they help you understand a reading, not replace the reading.
Correct structural faults before increasing frequency. Open blocked drainage holes, empty a cachepot that retains runoff, level a tilted container and check whether mix has shrunk away from the wall. A plant over a saturated lower zone can wilt, and a dry root ball can shed water through a gap. Repeating a schedule in either case strengthens the wrong condition. Restore drainage and contact so later cues describe a functioning pot.
Read three cues before opening the hose
Begin with the plant, but avoid waiting for collapse. Look for a subtle loss of leaf angle, a duller canopy or softer shoot tips compared with that same plant in the cooler morning. Severe wilt is a late cue, and some plants fold or droop temporarily under intense heat even when the root zone remains moist. Compare posture with soil before calling the symptom thirst.
Next, feel or probe the potting mix below the decorative surface. Iowa State and Illinois guidance use dryness in roughly the upper inch or two as a practical cue for many container plants, but a deep pot and a drought-adapted plant may need interpretation farther into the occupied roots. Move mulch aside, sample near the center as well as the rim, and learn what suitably moist mix feels like for this planting.
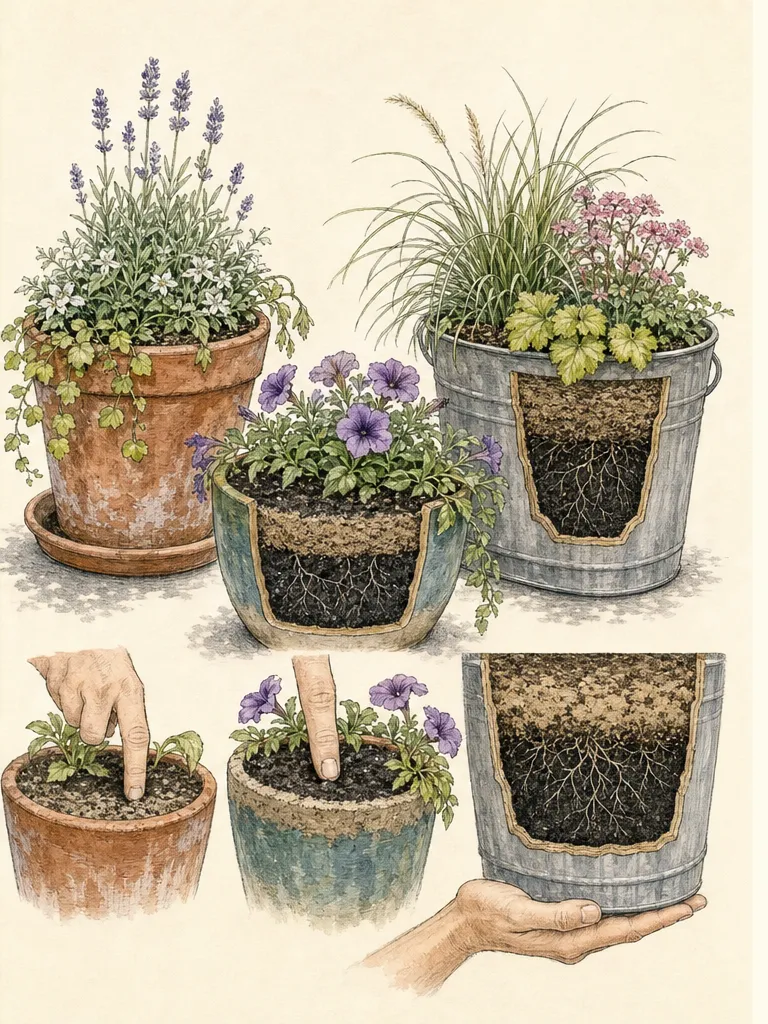
Use weight as a third cue only for a pot you can lift without strain or breaking its base. Tip or raise it slightly after a thorough watering and again near its normal watering point. The contrast can become a quick check, but it changes as the canopy grows and cannot safely be used on large ceramic, concrete or awkward hanging containers. For those pots, rely on a probe and plant response.
Act when the cues agree. A lighter safe-to-lift pot, dry mix through the relevant upper root zone and an early change in posture form a strong watering case. Moist mix and a heavy pot weaken that case even when leaves droop in afternoon heat. Conflicting cues call for a closer check of the center, drainage and roots. The routine works because disagreement triggers diagnosis instead of another automatic soak.
Sort the collection by observed dry-down
After several checks, assign pots to response groups: early-check, ordinary-check and dry-tolerant or slow-check. These are observation groups, not permanent botanical categories. A newly planted sun container may begin in the early group and move later as roots establish; a root-filled perennial may move the other way. Write the current group on a discreet tag so a helper does not water by pot color or plant height.
Keep plants together only where their light remains suitable. Grouping pots can reduce wind and shorten hose travel, but moving a full-sun flowering pot into deep shade can reduce bloom and produce weak growth. Place compatible early-check pots near the water source or in modest relief from the harshest reflected heat. Keep succulents and other dry-preferring displays out of a cluster that receives frequent attention merely for convenience.
Within one mixed pot, let the least tolerant compatible plant set the inspection priority, then verify the shared mix before watering. If one component repeatedly needs water while another declines in the resulting moisture, the planting is biologically mismatched. Do not solve that conflict with alternating guesswork. Move one plant at an appropriate time or rebuild the combination with partners that share a workable moisture range.
Leave a control point in every group. Choose one representative pot and note its freshly drained weight or probe feel, its normal watering cue and its next-morning response. Compare group members against that reference without assuming they are identical. The control makes rapid rounds possible while preserving exceptions. When a pot repeatedly diverges, remove it from the group and inspect root fill, drainage, exposure and plant identity.
Water the root ball, then verify the result
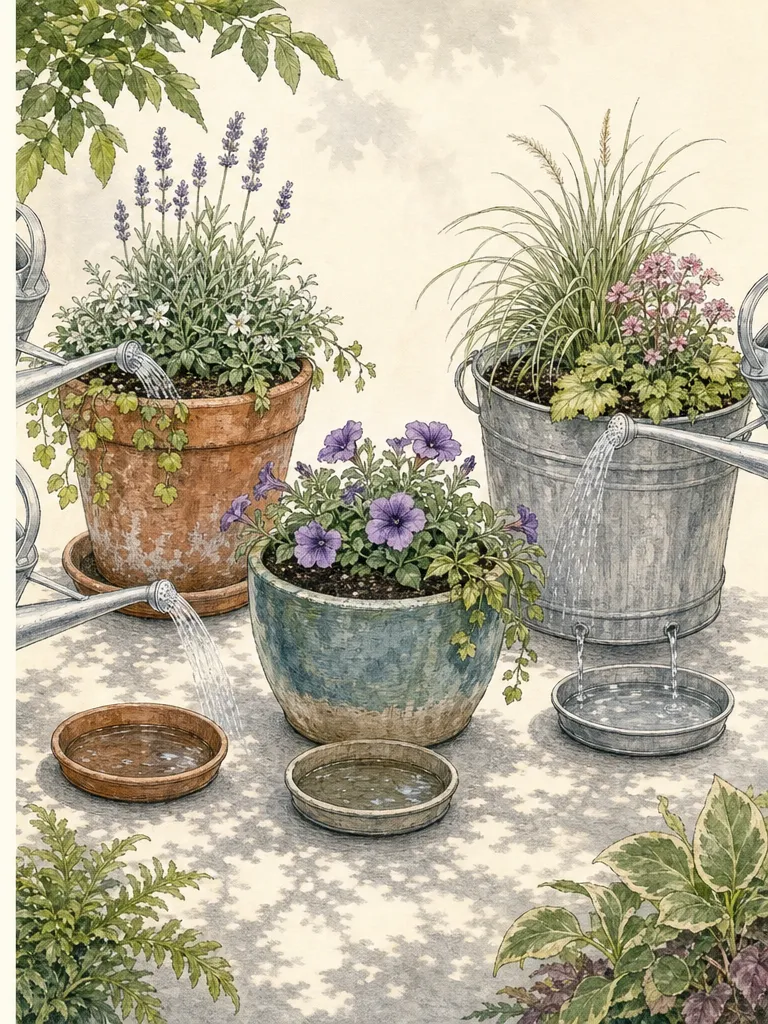
Water slowly across the mix surface rather than delivering one forceful stream at the stem. A watering wand or fine rose limits erosion and lets the surface accept water. Move around a broad container so the center and outer roots receive contact. Keep the application at soil level where practical. Wet foliage is not evidence of a wet root ball, and water bouncing from compacted mix can leave the occupied center dry.
Continue until excess begins to leave open drainage holes, as the three Extension sources advise for ordinary drained containers. That visible drainage shows that water traveled through some part of the profile, but it does not prove uniform wetting. A channel beside a shrunken root ball can produce immediate runoff. Watch whether the surface accepted water, pause when it ponds or escapes, and repeat gently where dry mix needs time to rehydrate.
Allow the pot to drain, then check again near the center. The mix should feel evenly rewetted through the active root area without standing water in a saucer or cachepot. If the rim is wet and the center remains dry, change the application pattern. If water remains trapped below, clear the outlet or remove the inner pot to drain. Verification turns runoff from a performance into evidence.
Return during the next cool period and compare posture. A plant that regains firmness after a verified watering supports the dry-root interpretation. Persistent wilt over suitably moist, draining mix does not justify repeating the same application. Look for heat injury, root congestion, stem damage or disease and seek local diagnosis when decline continues. The feedback check is what prevents a useful watering routine from becoming chronic overwatering.
Separate a dry channel from a saturated pot
Extremely dry soilless mix may pull away from the container wall. Water then races through the gap while the main root ball remains light and dry. Rewet in stages: apply a modest amount across the surface, wait for absorption and repeat. A small movable pot can be bottom-rehydrated under the method and duration supported by local guidance, then removed promptly to drain. Never leave an ordinary ornamental pot standing indefinitely in water.
A saturated pot presents the opposite evidence: persistent heaviness, wet mix at depth, standing runoff, yellowing or limp growth that does not improve after watering. Stop the schedule and restore drainage. Check that an inner nursery pot is not sealed inside a decorative vessel and that roots or debris do not block the holes. Do not add a layer of gravel as a substitute for an outlet; the root zone still needs a reliable path for excess water.
Salt accumulation can complicate the reading when frequent small applications wet only the top. Crust on the surface or leaf-margin burn may have several causes, so do not diagnose from one sign. Once drainage is sound, occasional thorough watering can move water through the profile; fertilizer changes should follow the product label and plant condition. More fertilizer is not a remedy for heat wilt, damaged roots or a hydrophobic center.
Use the correction as a new baseline. After rehydrating a dry ball or draining a saturated one, note the pot's weight, center moisture and plant posture. Inspect sooner until a normal wet-to-dry cycle becomes clear. A rescued pot should not be returned immediately to its old group because its behavior may have changed. The next few observations decide whether the fault was temporary or structural.
Lower avoidable heat without erasing plant needs
Reduce reflected heat where the setting, not the plant's light requirement, creates the problem. Move a compatible pot a short distance from a west-facing wall, shade the container wall with a breathable screen or place a larger stable pot where it interrupts reflected heat without covering foliage. Oklahoma State specifically notes that hot sunny hardscapes and small or porous containers can increase drying. Preserve the amount of light the plant needs to flower.
Do not wrap a pot in impermeable plastic or seal the mix surface to conserve water. Trapped heat and restricted gas exchange can create a different root problem, while hidden soil makes inspection harder. A modest organic surface layer may suit a large conventional container, but keep crowns and stems visible and confirm that the lower mix still drains. Omit it where the plant or small vessel needs a rapidly drying surface.
Protect hanging baskets from needless wind exposure only when the alternate position has suitable light and a safe support. Lowering a basket for a heat event can make watering and weight checks easier, but trailing stems must not lie on hot pavement. Secure hooks and brackets before adding the weight of water. Never stand under an unstable basket while testing drainage or reach above a safe working height with a full can.
Match future plant choices to the hottest stable conditions. If a container needs rescue every ordinary afternoon despite sound mix, adequate volume and correct watering, select ornamentals better suited to that exposure when the display is rebuilt. A routine should make healthy care legible, not defend a permanently incompatible combination through endless intervention. Keep the pot if it works; change the plant assignment when the site repeatedly wins.
Build a morning-and-evening feedback loop
Write a compact routine beside the patio map. In the cool morning, inspect early-check pots, read all three cues and water only confirmed dry root zones. During the hottest period, observe from shade and flag changes rather than making rushed assumptions. In the next cool window, recheck flagged pots and the morning control. This sequence responds to heat while preserving evidence across the day.
Record only facts that alter a decision: rain that reached the pot, a move into shade, a blocked outlet, a lighter weight, dry center mix, verified drainage and next-morning recovery. Do not turn the log into a demand to measure every leaf. Several concise entries reveal patterns quickly. When weather moderates, reduce inspection frequency from observed dry-down instead of continuing the heat routine by habit.
Review the groups after pruning, repotting, a growth flush or a change in exposure. Removing a large amount of foliage can reduce immediate water use; a new root-filled canopy can increase it. A moved pot receives different wind and light. Each change resets the comparison. Keep the same cues, but collect a fresh baseline before trusting an interval learned under the old plant-to-pot balance.
Success is not a patio in which every pot feels equally wet. It is a collection in which each compatible planting passes through a readable moisture cycle, severe wilt is uncommon, drainage remains open and the gardener knows what evidence will trigger the next action. The forecast continues to start observation. Plant, mix and pot cues finish the watering decision.
Steps
- Level
- easy
- Time
- Two short daily checks during heat, plus watering time only where cues confirm need
- Tools
- Watering wand or watering can with a fine rose, Wooden probe or narrow trowel, Patio map and pencil, Timer for unattended hose control
- Materials
- Weather-resistant group labels, Stable pot feet where drainage needs clearance, Breathable pot-wall shade where exposure permits
- 1Map the heat and the high-risk pots
Mark reflected afternoon sun, wind, eaves and the safe hose route. Flag small, shallow, porous, hanging and root-filled containers for the earliest inspection, while noting drought-adapted plants that should not inherit a moisture-loving schedule. Confirm that every pot can drain and that heavy containers will remain in place rather than be lifted for testing.
- 2Establish each pot's cue triangle
During a cool period, record normal plant posture, moisture below the surface and the freshly drained weight of only those pots that are safe to lift. Recheck near the ordinary watering point. Use the three cues together, because afternoon droop alone can occur over moist mix and a dry-looking surface can sit above a wetter lower profile.
- 3Create flexible response groups
Label early-check, ordinary-check and slow or dry-tolerant groups from observed dry-down. Cluster pots only when their light and airflow remain suitable. Treat every mixed planting as one shared root zone and remove a mismatched component later if one plant repeatedly needs conditions that make another decline. Reassign any pot whose behavior changes as roots and canopy grow.
- 4Water slowly across the occupied roots
Apply water at the mix surface with a gentle wand or can, moving around broad pots and pausing when runoff appears too quickly. Continue until water reaches open drainage holes, then let the container drain. Rewet a shrunken dry mix in stages rather than misting the surface or allowing water to race down a gap beside the root ball.
- 5Verify center moisture and drainage
After drainage, probe the center and rim. Confirm that the occupied root ball is evenly moist and that no saucer or cachepot holds standing water. Correct a dry center by changing placement and pace; correct persistent wetness by opening drainage and stopping the schedule. Do not count wet foliage, wet mulch or immediate channel runoff as proof of complete watering.
- 6Reduce only avoidable heat load
Move compatible pots away from reflected heat or shelter them from excessive wind while preserving plant-specific light. Shade a dark pot wall with a breathable barrier where useful, keep crowns and mix visible, and secure hanging hardware before watering. Replace chronically incompatible plants or undersized pots at an appropriate time instead of escalating rescue watering.
- 7Close the loop in the next cool period
Compare flagged plants with their earlier posture and recheck the root zone before adding water. Recovery after verified watering supports the original decision; persistent wilt over moist drained mix requires broader diagnosis. Update the map after weather, pruning, growth or relocation changes demand, and retire the heat routine when observed dry-down lengthens.
Plants in this guide
Related reading
Sources
- Watering. University of Illinois Extension. Source record · Accessed 2026-08-19.
- Care of Plants Growing in Containers. Iowa State University Extension and Outreach. Source record · Accessed 2026-08-19.
- Container Gardening. Oklahoma State University Extension. Source record · Accessed 2026-08-19.