Grow · renovate summer container
Revive a Leggy Summer Container Without Replacing Everything
Audit roots, light, water, and plant roles before pruning, then renovate the container in stages so healthy fillers and trailers can rebuild around a stable structure.
Published Last updated
In this guide
- Decide whether the container is tired or failing
- Keep sound plants and correct the cause of stretching
- Audit drainage, roots, and irrigation first
- Map each plant’s role and next job
- Edit the composition plant by plant
- Replace only what has truly failed
- Reset water use after foliage is removed
- Watch the first two weeks as a recovery test
- Prepare the renewed pot for the next weather stress
- Record why the original composition lost balance
- Use a temporary support while the canopy rebuilds
- Steps
Decide whether the container is tired or failing
A midsummer container often becomes uneven: one plant stretches, another stops flowering, and a vigorous trailer hides the rim. That can be normal growth, not total failure. Inspect each species, the whole composition, and the root zone before buying replacements. Firm crowns, green nodes, healthy roots, and new buds indicate material that can be renovated. Soft stems, broad decay, or complete root loss require removal and diagnosis.
Separate legginess from heat pause and insufficient light. Long internodes and growth leaning toward one direction point toward low or one-sided light. Small flowers and temporary slowdown during extreme heat may improve when weather moderates. A plant bleached on the exposed side may have too much abrupt sun. Rotate only when all species tolerate the new exposure; a mixed pot cannot be corrected from one plant’s preference alone.
Check whether the design has simply reached mature scale. A thriller that now dominates may need no pruning if the pot was intended to become bold, while a filler covering airflow and neighboring crowns needs editing. Compare the current plant footprints with their documented mature sizes. A container filled to look complete on planting day may now be crowded by design, not neglected by the gardener.
Keep sound plants and correct the cause of stretching
Inspect light, roots and drainage before choosing which plants to shorten, retain or remove. Reduce healthy growth in stages while keeping its intended role visible. Adjust water and feeding to the edited container, then allow marked nodes time to respond. Daily recutting can hide the difference between useful regrowth and a condition that remains unresolved.
Audit drainage, roots, and irrigation first
Lift the container if safe and inspect drainage holes and saucer. Water should pass through without the pot sitting continuously in runoff. Probe the center, rim, and lower mix. A dry core can coexist with water escaping down a gap at the pot wall, while a dense root mass can leave little mix to hold water. Record whether the pot moves from wilt to saturation within hours.
Slide out one failing edge plant only when it can be removed without tearing the whole planting. Look for firm light-colored root tips, dense circling, blackened mushy roots, or a dry root ball that never integrated with the surrounding mix. Do not dismantle healthy roots for curiosity. The purpose is to determine whether pruning can succeed, whether one plant should be replaced, or whether the entire container has become structurally root-bound.
Review fertilizer additions and irrigation water. Frequent liquid feeding can build salts, especially when water never drains fully. White crust, burned tips, and stunted roots need a different response from simple hunger. Follow product and local guidance for leaching or media correction. Do not add another dose because a leggy plant has pale lower leaves; light limitation, natural aging, and root stress can produce the same appearance.
Map each plant’s role and next job
Identify the structural plant, fillers, trailers, and any seasonal accent. Decide which role still works. Preserve a healthy vertical or mounded framework, shorten fillers that have opened, and thin a trailer only where it hides the rim or neighboring crowns. A renovation succeeds when the roles are readable again, not when every plant is cut to the same height.
Mark each plant at its living nodes and crown. Some annuals branch readily after cutting, while others recover slowly or bloom only from tips. Use species-specific guidance where response is uncertain. Deadheading, pinching, shearing, and removal are distinct operations. A plant that needs individual cuts should not be swept with shears merely because it shares a pot with a species that tolerates them.
Choose one visual priority for the next six weeks: a renewed flowering mound, preserved vertical foliage, or an open edge with strong trailers. The remaining season may not support a complete redesign from tiny transplants. Keep healthy mature material that serves the chosen priority and avoid replacing every quiet plant with another crowded impulse purchase.
Edit the composition plant by plant
Begin with dead flowers, broken stems, and clearly diseased tissue. Then shorten the most leggy healthy stems above strong leafy nodes, distributing cuts around the plant. Preserve enough foliage to power regrowth. A staged reduction of one-third at a time is safer than stripping every plant to a bare crown during heat, especially when their pruning tolerance differs.
Work from the outside toward the center so crowns and irrigation become visible. Untangle trailers instead of pulling them through one another. Cut at a node rather than leaving long bare hooks. If one plant has engulfed the others and cannot be reduced without exposing a woody empty base, decide whether its structural role still justifies the space. Removal can be cleaner than repeated severe pruning.
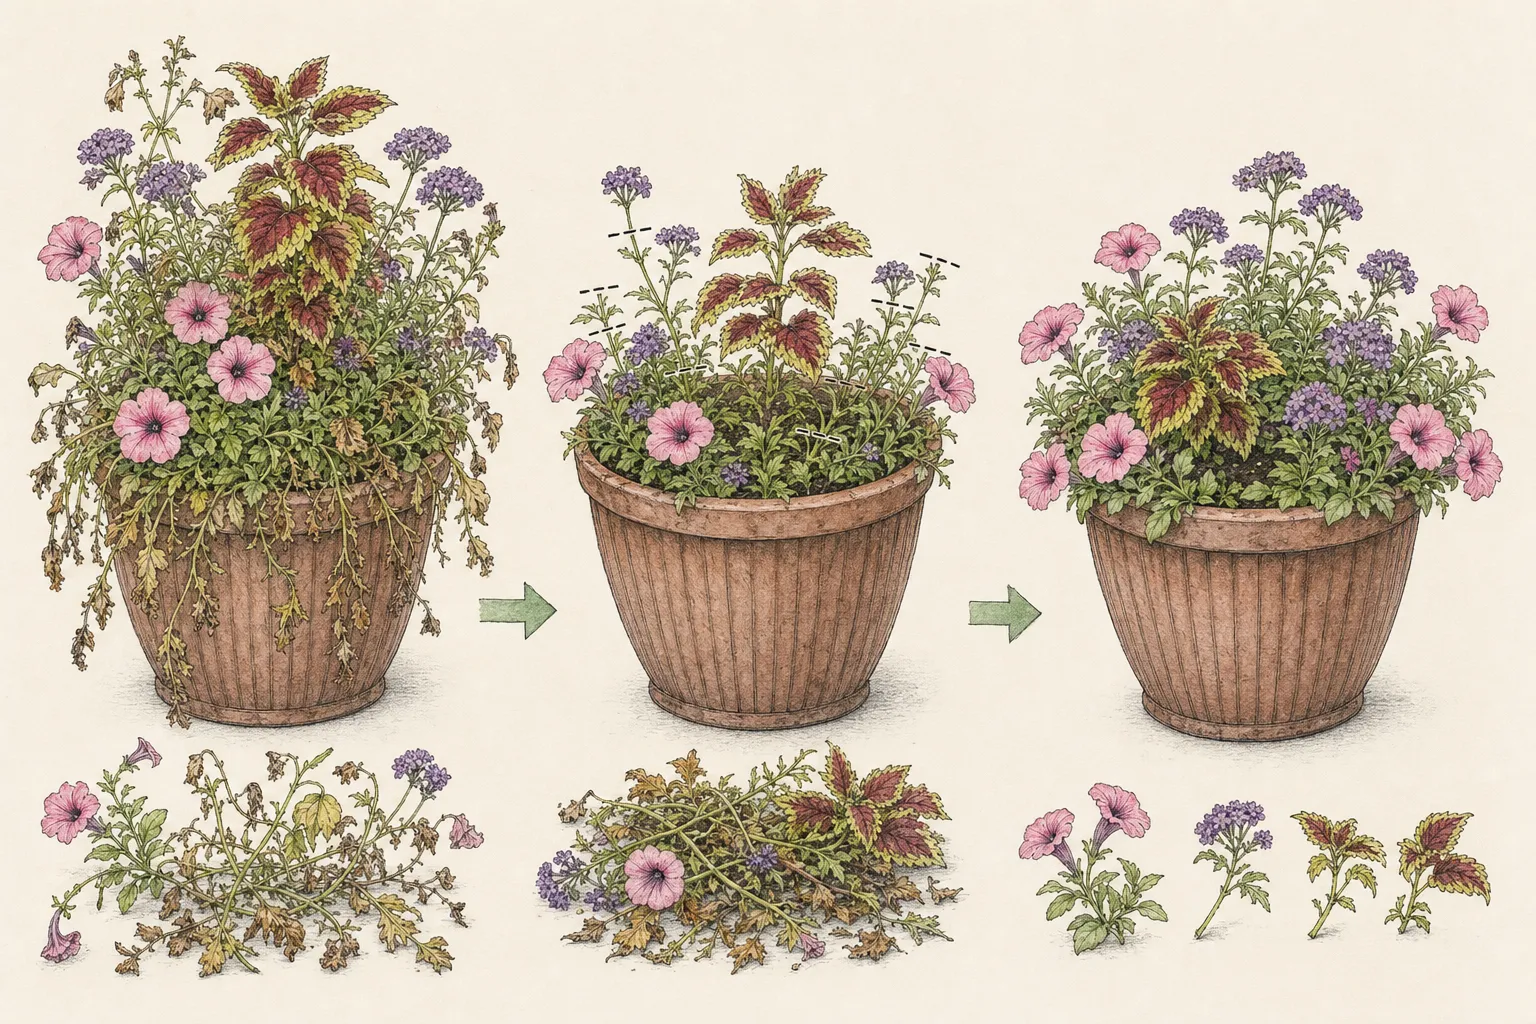
Release the stems after each small group of cuts and view the pot from normal eye level. The final outline should have air and directional balance, not a hedge-clipped dome unless every plant naturally supports that form. Keep labels or a quick sketch of species locations; midsummer renovation is easier when later regrowth can be attributed to the correct plant.
Replace only what has truly failed
Remove a plant when its crown or roots are dead, disease risk is unacceptable, or its needs fundamentally conflict with the surviving mix. Cut top growth first, then tease the root ball out in sections while supporting neighboring roots. Do not excavate a large hole through the entire container. If roots are inseparable, cut the failed plant at soil level and leave sound roots to decompose only when disease is not involved.
Choose a replacement with compatible light and water needs, an appropriate mature footprint, and enough remaining season to establish. Use a small transplant that fits the opening instead of forcing a large root ball into neighboring roots. Set it at the correct grade with fresh container mix around the pocket, then water that root ball directly until it integrates.
Leave the opening unfilled when no suitable plant is available. A small patch of clean mix can become negative space, a surface accent, or room for surviving plants to expand. Filling every gap immediately often recreates the original crowding. The container’s rim and material can be part of the composition instead of being hidden by foliage at all costs.
Reset water use after foliage is removed
Probe the mix after pruning. A reduced canopy may transpire less, so the old watering schedule can leave roots too wet. Water slowly only when the root zone needs it, making sure the central mix and any new transplant root ball are wetted. Let excess drain fully and empty saucers where appropriate. Do not use daily wilting of one sun-exposed plant as the sole signal for the whole pot.
Move the container only within the tolerance of every remaining plant. A few days of protection from extreme afternoon heat can aid a heavily renovated pot, but abrupt deep shade may lengthen new growth again. Preserve morning light and airflow. Large containers should be moved with safe equipment or left in place with temporary shade rather than dragged by the rim.
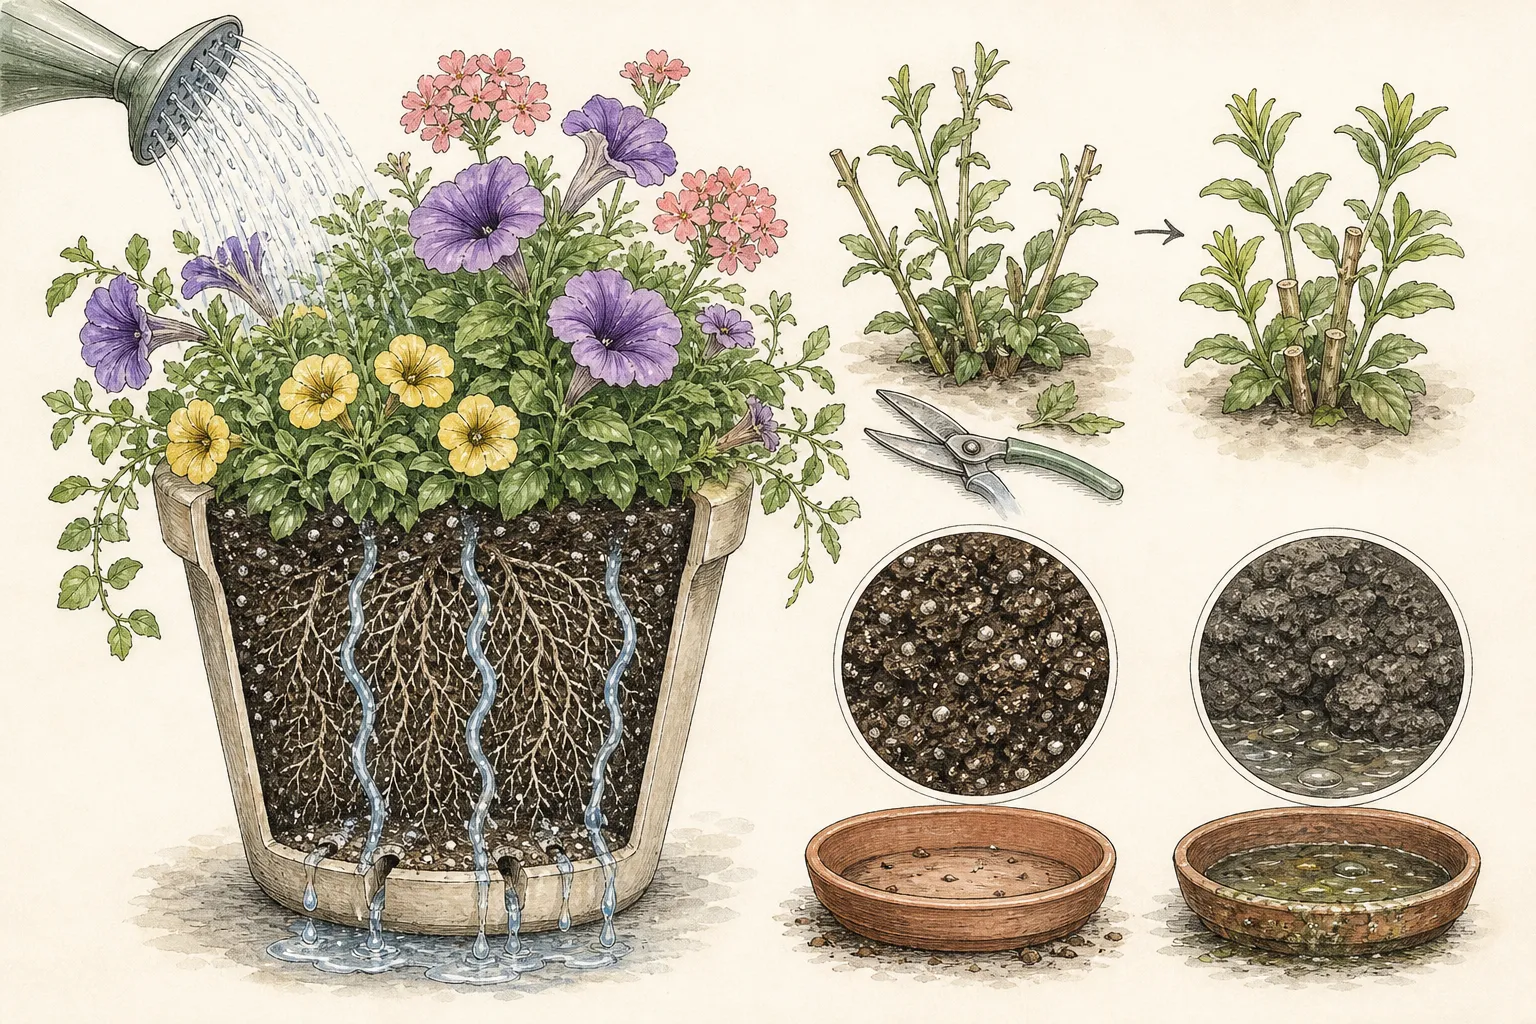
Hold fertilizer until new growth demonstrates functioning roots, unless a measured deficiency and product schedule indicate otherwise. Fresh cuts do not need an immediate high-nitrogen feed. When feeding resumes, use a labeled container-plant rate and account for any slow-release product already in the mix. Record the date so repeated additions do not become invisible.
Watch the first two weeks as a recovery test
Mark several retained nodes and photograph them every few days. Firm new shoots, stable leaf color, and the return of buds show recovery. Wilt that resolves overnight may follow handling, while persistent collapse, blackening, or expanding spots need diagnosis. Remove only new failures; do not keep recutting healthy shoots because the pot looks temporarily open.
Adjust ties and orientation as regrowth begins. A renewed filler may need one early pinch to branch, but repeated pinching delays flowers. Trailers can be redirected over an empty rim segment. Keep crowns visible and pull fallen petals from the mix surface. The goal is to guide the new architecture before it hardens, not to maintain a static outline every day.
Compare moisture at the successful and failing sectors. A replacement near the rim may dry faster, while a shaded center remains wet. Hand-water locally when needed instead of flooding the entire pot. Mixed containers always contain microclimates; renovation makes them visible enough to manage rather than pretending one reading represents every root ball.
Prepare the renewed pot for the next weather stress
Check stability, drainage, and supports before storms. A tall remaining plant may now catch wind without the old fillers bracing it. Add a discreet stake within the container only where roots can be avoided, or connect the pot to a stable external support when appropriate. Do not drive long hardware blindly through the root mass.
During heat, shade the container wall and water according to the mix, not the air temperature alone. Group compatible pots to reduce reflected heat while preserving circulation. Remove decorative cachepots that trap runoff. A renovated canopy can look fresh while roots still face the same heat and drainage conditions that caused decline.
As nights cool, stop forcing late soft growth and decide which plants are annual, tender perennial, or hardy in the container. Overwintering requires species-specific plans. Do not carry a mixed pot indoors as one unit without inspecting for pests and confirming that all plants share suitable indoor conditions.
Record why the original composition lost balance
At season end, compare the planting list with mature behavior. Note which plant dominated, which disappeared, how often the pot dried, and where light shifted. Photograph the pot at planting, peak, decline, and after renovation. This sequence reveals whether the main error was mature size, incompatible water needs, one-sided light, root volume, or missed pruning timing.
Use fewer species next year if maintenance became a series of conflicting rescues. Repeat a compatible foliage plant, choose one clear flowering filler, and leave more room around the structural element. A container can be abundant without holding five different irrigation schedules. Select plants by mature role and shared conditions before color combination.
Keep the successful renovation practice. Early light pinching, staged deadheading, local watering, and one midsummer edit may be enough. The lesson is not that mixed containers inevitably become disposable. It is that a composition of living plants needs room, compatible roots, and a planned point at which the gardener edits growth before failure becomes total.
Use a temporary support while the canopy rebuilds
After pruning, a retained upright plant may lose the neighboring stems that held it. Add a discreet short stake or ring only when the root route is known, and use broad loose ties. Support the existing line instead of pulling a curved stem vertical. Remove the aid after new fillers can carry their own space.
Keep supports below the normal viewing line and away from flowers. A large framework can make a container look repaired while still hiding poor balance. The temporary device should prevent breakage during recovery, not become a permanent substitute for compatible mature plant sizes.
Inspect after wind and watering. Loose mix may not hold a tall stake, and a small pot can tip as one retained plant catches wind. Brace externally or move the container safely if needed. Never drive long hardware blindly through a dense root mass or rely on the plant stems as the anchor.
Steps
- Level
- moderate
- Time
- 45 to 90 minutes, plus two weeks of brief checks
- Tools
- Bypass pruners, Fine snips, Soil probe, Watering wand
- Materials
- Fresh container mix for small pockets, Compatible replacement plant if needed, Plant labels
- 1Audit roots, drainage, and light
Probe several zones, clear drainage, review fertilizer, and identify one-sided or insufficient light. Inspect a failing edge root ball only when it can be removed safely. Separate normal mature crowding from soft crowns, root decay, severe salt injury, or a mix that no longer holds water evenly.
- 2Assign each plant a retained role
Name the structural plant, fillers, trailers, and seasonal accents. Choose the next visual priority and keep only material that supports it. Confirm species-specific pruning response and mark living nodes before choosing deadheading, pinching, staged reduction, or removal.
- 3Reduce healthy growth in stages
Remove dead and diseased tissue first, then shorten the longest healthy stems above leafy nodes. Release each group and check the whole pot. Preserve enough foliage, untangle trailers, and avoid shearing unlike species to one arbitrary level.
- 4Remove only failed plants
Cut the top, tease out the smallest possible root section, and protect neighboring crowns. Replace only with a compatible small transplant suited to the remaining light, water, space, and season. Leave open mix when no suitable plant exists instead of recreating crowding.
- 5Reset water and feeding
Check moisture after canopy reduction and water slowly only when needed, reaching new root balls separately. Let the container drain and hold fertilizer until roots show recovery. Protect briefly from extreme heat without moving the mixed planting into unsuitable deep shade.
- 6Guide two weeks of regrowth
Mark nodes and watch for firm shoots, stable leaves, and buds. Redirect trailers, pinch only where branching is needed, remove fallen petals, and water dry sectors locally. Diagnose persistent collapse or expanding spots instead of recutting the entire pot.
- 7Plan the next container from the record
Compare planting-day and mature photos, noting dominance, disappearance, dry-down, and light shifts. Reduce species count, match root-zone needs, leave mature space, and schedule one midsummer edit. Preserve successful structure instead of treating every tired pot as disposable.
- 8Support retained structure temporarily
Add a short discreet support only where roots can be avoided, guide stems with broad loose ties, and preserve their existing curves. Remove the support once regrowth stabilizes the composition rather than allowing it to become hidden permanent hardware.
- 9Test pot stability after the edit
Check the container after wind and a full watering. Brace externally or move it with safe equipment when the remaining canopy makes it top-heavy. Do not anchor by piercing a dense root ball or tying living stems rigidly.
- 10Set the next inspection date
Schedule a review after enough time for marked nodes to grow, and avoid daily corrective pruning. At that review, compare structure, root-zone moisture, and new buds before deciding whether the renovation is complete or one plant should be removed.
Related reading

Sources
- Pruning Herbaceous Plants. Penn State Extension. Source record · Accessed 2026-08-19.
- Container Gardening. University of Illinois Extension. Source record · Accessed 2026-08-19.
- Perennials: Selection, Planting, and Care. University of Maryland Extension. Source record · Accessed 2026-08-19.