Grow · early summer perennial establishment
Establish Container-Grown Perennials in Early Summer
Plant container-grown perennials in early summer by inspecting each root ball, correcting only genuine root defects, setting the crown at nursery depth, and watering from soil evidence rather than a fixed schedule.
Published Last updated
In this guide
- Decide whether early summer is still a planting window
- Read the nursery mix and surrounding soil separately
- Inspect the root ball before choosing a treatment
- Prepare the site before the pot comes off
- Match root treatment to what you actually see
- Set the crown at the nursery soil line
- Water the interface, not the calendar
- Protect the first weeks without forcing growth
- Read establishment and correct the cause
- Steps
Decide whether early summer is still a planting window
Container-grown perennials can be planted during the growing season, but early summer changes the margin for error. Roots arrive inside a small volume of nursery mix just as longer days, warmer soil, and drying winds increase demand from the leaves. The practical question is not whether the calendar permits planting. It is whether this plant, this site, and the next stretch of weather allow the root ball to remain evenly moist while roots begin moving into the bed.
Start with the site rather than the pot. Confirm that the chosen perennial matches the measured light, drainage, mature space, and regional hardiness of the position. A shade perennial does not become suitable for an exposed hot border because it is available on sale, and a moisture-loving selection does not belong in a fast-draining pocket that cannot be watched. Establishment care can bridge a temporary transition; it cannot reverse a permanent site mismatch.
Read the soil when it is neither powder-dry nor saturated. If water stands in the proposed hole, if the bed smears into dense wet clods, or if a heat event will leave nobody able to check the planting, keep the plant in a bright sheltered holding place and postpone. Water the container according to need while it waits. Planting into unworkable soil or just before neglect turns an ordinary transplant into a preventable stress test.
Choose a cooler part of the day and finish one manageable group rather than exposing an entire purchase at once. The job is complete only when each perennial is at final depth, backfilled, watered, labeled if necessary, and protected from rapid surface drying. A half-planted root ball waiting beside an open hole has lost the advantage that container stock is meant to provide.
Read the nursery mix and surrounding soil separately
Inspect the plant and weather window before planting, correcting only the root defect actually present. Preserve the appropriate nursery level and water so both the original mix and surrounding soil are assessed. During heat or rain, check for bypass flow, settling and persistent wetness. Surface appearance alone cannot show whether the occupied root ball is receiving useful water.
Inspect the root ball before choosing a treatment
Water the container before planting so the nursery mix is moist enough to hold together without being dripping wet. Slide the root ball out while supporting the crown and lower stems. Do not pull the plant by its foliage. First look for a coherent ball with firm roots, a recognizable crown, and no sour smell or collapsed dark tissue. Root color varies among plants, so structure and firmness are more useful than expecting every healthy root to be white.
Next, inspect the side and bottom as separate surfaces. A sound root ball may show fine roots at the edge yet still release its shape when pressed. A mildly congested ball may have several roots beginning to circle, while a severely root-bound plant presents a dense shell or mat that cannot readily connect with surrounding soil. Those are different conditions and should not receive the same ritual treatment.
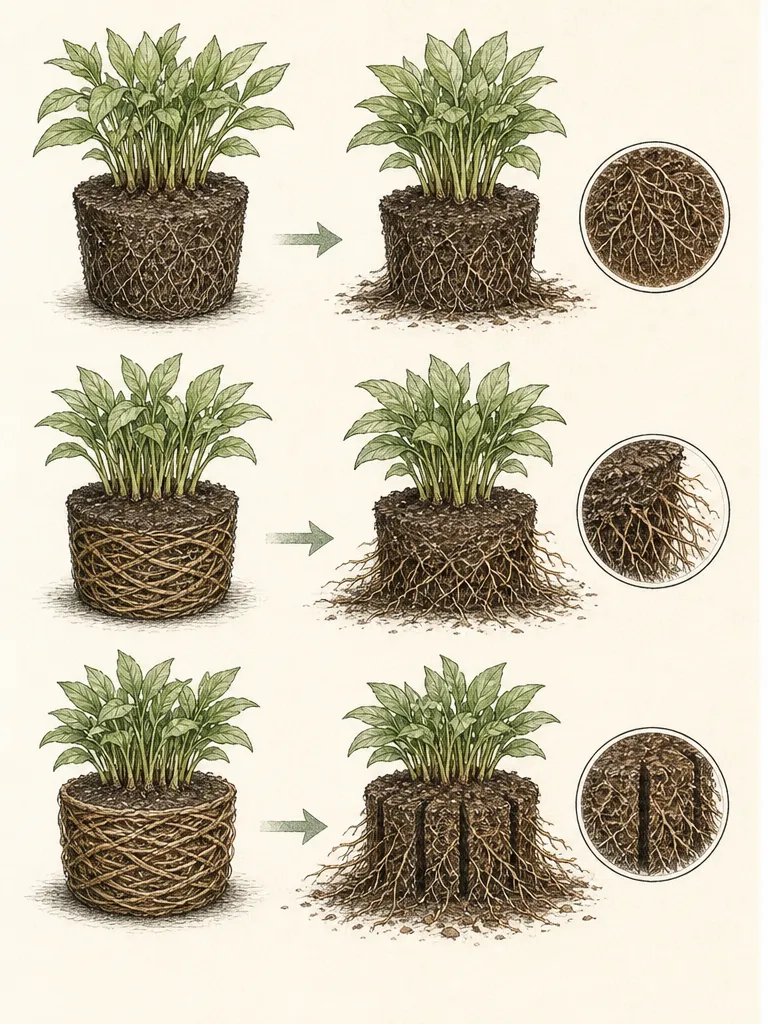
Also compare moisture inside the nursery mix with the garden soil. Peat- or bark-rich media can dry at a different rate from mineral soil after planting. A dry core may shed the first pass of water, while a saturated core can remain wet even when the bed surface looks dry. The future watering decision must therefore sample both materials, not use surface color as a substitute for inspection.
Reject a specimen whose crown is soft, whose root system has largely decayed, or whose top is too damaged to identify confidently. Correctable congestion is not the same as decay. Early summer offers little benefit in planting a failing specimen and hoping generous irrigation will repair missing roots. Exchange or discard it according to nursery policy and local plant-disposal guidance.
Prepare the site before the pot comes off
Set out every plant at its mature spacing while it is still in the pot. Use the label as a starting point, then check a regional institutional source for cultivar dimensions and site requirements. Leaves may overlap briefly in a finished display, but crowns should not be packed together to imitate maturity on planting day. Adequate space gives each plant a usable root zone and leaves room to inspect, mulch, and water without burying its neighbors.
Open a hole broad enough to accept the root ball and any roots that genuinely need redirecting, but no deeper than required to hold the crown at its nursery level. Roughen glazed sides in compact soil. Keep the excavated site soil for backfill unless a bed-wide soil assessment has already justified amendment. A rich isolated pocket can behave differently from the surrounding ground and does not correct poor drainage beyond the hole.
Test the finished depth with the plant still supported. Identify the crown or the point where stems meet the root system; do not use a loose layer of potting mix over the crown as the depth marker. Reserve enough soil to backfill without searching for material after roots are exposed. Place the hose or watering can within reach and clear mulch away from the working area.
If several species have different water needs, group the positions before planting and plan separate checks. Colorado guidance recommends grouping perennials by water requirement, and that principle matters most during establishment. One irrigation schedule across lavender, moisture-loving primroses, and a heavy clay hollow will create winners and losers even when every plant was installed correctly.
Match root treatment to what you actually see
Leave a healthy, coherent root ball largely intact. Ease only loose roots outward and preserve the contact between roots and their nursery medium. Teasing every perennial until bare-rooted removes fine absorbing roots and destroys a useful moisture reserve without evidence that the plant was confined. The goal is connection with the bed, not visible proof that the gardener handled every root.
For a few flexible roots circling at the edge, use fingers to redirect them outward without shredding the whole ball. Work from the bottom and sides, stopping as soon as roots can face into the surrounding soil. If a root resists and begins to tear back toward the crown, do not keep pulling for the sake of a loose appearance. Limited congestion calls for limited correction.
A dense, impenetrable outer mat is a different diagnosis. University of Maryland guidance supports trimming that root-bound mass, while Colorado State guidance describes careful separation or shallow cuts where roots are massed around the outside. Use a clean sharp blade to make controlled cuts through the outer shell, then ease the cut surfaces outward. Remove only the defect needed to release new growth; do not carve the ball smaller to fit an undersized hole.
Species and production systems vary. Fleshy crowns, brittle roots, recently potted plants, and plants sold in degradable sleeves may require different handling. Remove restrictive pot material and any rim that would wick moisture, but preserve roots that are already growing normally. When the label or a specialist source gives plant-specific instructions, those instructions outrank a general root-loosening habit.
Set the crown at the nursery soil line
Place the prepared root ball on firm undisturbed soil so it cannot sink after watering. The surrounding finished grade should meet the root ball at the level the plant occupied in its container. Illinois and Colorado guidance both emphasize this relationship: too high exposes the root zone to drying, while too deep reduces oxygen around roots and can place a vulnerable crown in persistently wet soil.
Backfill in stages with the reserved soil, breaking large clods by hand. Work soil into broad voids without ramming it into a dense ring. The objective is continuous contact that allows water and new roots to cross the interface. Heavy foot pressure removes pore space and can turn a carefully prepared site into a compact basin, so use hands and the settling water rather than stamping.
Check the plant from the side before watering. Leaning stems do not justify burying the crown; container foliage often grows toward nursery light and can reorient later. Correct the root ball itself if it is tilted. Keep labels, old potting mix, and mulch from obscuring the actual crown-to-grade relationship while the soil is still easy to adjust.
After the first watering, look again. Soil may settle around a light nursery mix or expose a shoulder of the root ball. Lift and reset a clearly sunken plant rather than piling soil over its crown. Add backfill around an exposed edge, then restore the surrounding grade so water can enter the root zone without forming a permanent moat.
Water the interface, not the calendar
Water immediately after backfilling, applying it slowly across the root ball and adjacent soil. This initial watering settles soil into contact and reveals whether water infiltrates or escapes along a channel. Pause if it ponds, then allow it to soak before adding more. A thorough first watering is not permission to leave the planting saturated for days.
During establishment, check moisture in two places: within the original nursery mix and just beyond it in the bed. Push a finger or narrow probe below the dry-looking surface without damaging the crown. If the core is dry while the bed is moist, direct water to the root ball. If the core remains wet and the surrounding clay is saturated, wait and investigate drainage rather than adding water because the day is hot.
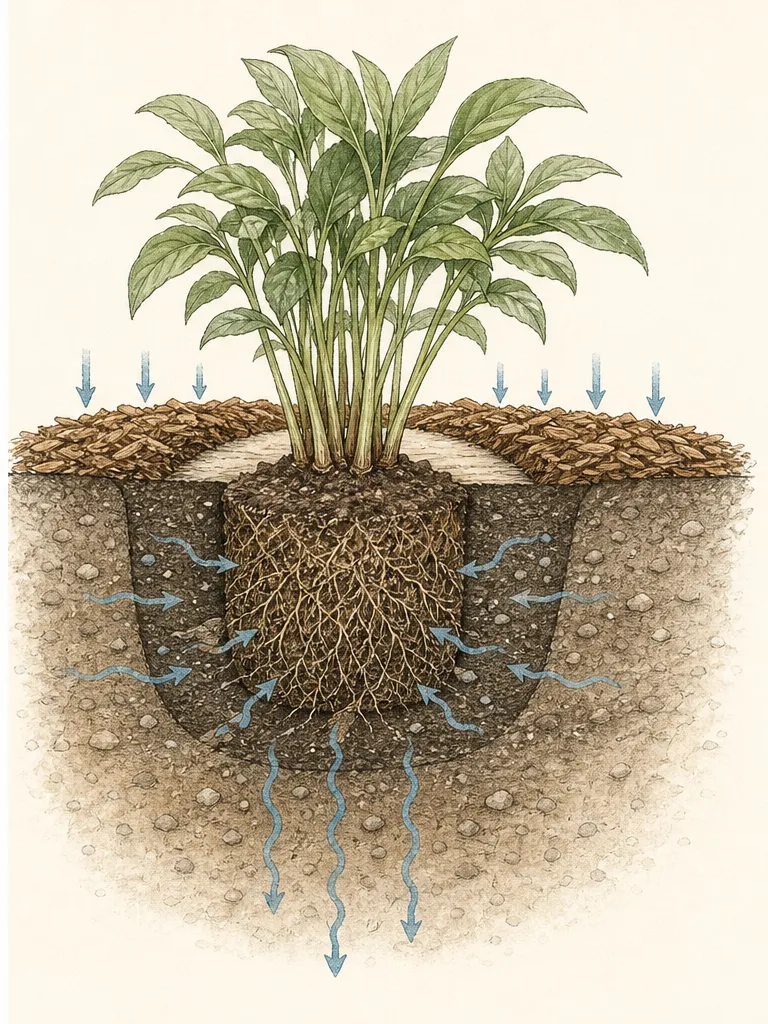
Weather, soil texture, plant size, sun, wind, and the contrast between potting mix and native soil all change the interval. A fixed daily dose can drown a shaded plant in heavy soil and still fail to wet a large root ball in an exposed sandy bed. Check more often during hot or windy periods, but let the observed moisture condition decide whether each check becomes a watering.
Apply water gently enough that it enters rather than washing soil onto the crown. Expand the wetted area as roots establish beyond the original ball. The transition is gradual: early checks focus on the nursery core, later checks include a wider root zone, and frequency can decline when the surrounding soil holds usable moisture and new growth continues without repeated wilting.
Protect the first weeks without forcing growth
Add a modest organic mulch over the bed surface to moderate evaporation, keeping it clear of every crown and stem base. Count existing material before adding more. Mulch is useful because it slows rapid surface drying; it becomes harmful when piled as a wet collar or used to hide a plant set below grade. The crown must remain visible enough to inspect.
Do not make fertilizer an automatic part of transplanting. A plant already grown in nursery media may carry nutrients, and a fertile prepared bed may need none. Excess soft growth can increase water demand before roots have crossed into the site. Base amendment and fertilizer on the bed’s soil assessment and the species rather than on the emotional desire to help a newly planted perennial.
Temporary protection can be useful after an unavoidable hot planting day. A light, ventilated shade screen on the afternoon side may reduce stress for a shade-adapted plant, but it should not trap heat, touch foliage, or become permanent compensation for the wrong exposure. Remove it as conditions moderate and observe whether the plant stands without it.
Delay optional cutting, dividing, or heavy flowering demands until the plant shows stable growth. Remove only broken tissue and, where appropriate for the species, a few flowers that are clearly taxing a small transplant. Do not shear healthy foliage indiscriminately; leaves supply the energy needed to rebuild roots. Plant-specific guidance controls any exception.
Read establishment and correct the cause
New growth, stable crown position, and a root zone that moves normally from moist toward drier are stronger evidence of establishment than a fixed number of days. Existing leaves may droop briefly after handling, especially in afternoon heat, then recover by morning. Persistent collapse requires a moisture check at root depth rather than an immediate reflex to add water.
A wilted plant can be too dry or too wet. Dry nursery mix may pull away from surrounding soil and leave the original ball unwetted; saturated soil can exclude the air roots need. Compare the core, interface, and outer bed. Correct the specific pattern with slow rewetting, a blocked runoff repair, or a pause in irrigation. More water is not a universal treatment for the word wilt.
Watch for a crown that sinks, roots exposed after runoff, mulch migrating against stems, or water bypassing the root ball. These are installation faults that remain correctable while the planting is young. Regrade, reset, or redirect irrigation promptly. Waiting for new foliage while the physical relationship stays wrong only makes later correction more disruptive.
As fresh roots and shoots develop, widen the inspection area and lengthen intervals where soil and weather permit. Keep species with different water needs on separate decisions. The successful early-summer planting is not the one watered most often; it is the one whose roots move from nursery medium into suitable garden soil while crown depth, aeration, and moisture remain in balance.
Steps
- Level
- moderate
- Time
- One planting session plus several weeks of moisture checks
- Tools
- Hand trowel or spade, Clean sharp knife for genuinely matted roots, Watering can or hose with a gentle outlet, Narrow soil probe
- Materials
- Container-grown perennials matched to the site, Site soil reserved for backfill, Organic mulch if the bed needs it, Plant labels
- 1Confirm the site and weather window
Match each perennial to measured light, drainage, mature space, and local hardiness. Work only when soil is workable rather than saturated, and choose a cooler part of the day. If severe heat, unworkable soil, or an absence of follow-up care will prevent moisture checks, keep the container in a suitable sheltered holding place and postpone planting.
- 2Water and inspect the container
Moisten the container before handling, then slide the root ball out while supporting the crown. Inspect crown firmness, root-ball structure, side and bottom congestion, and moisture in the nursery mix. Distinguish a coherent fibrous edge from a few circling roots and from a dense impenetrable mat. Reject decayed or unidentifiable plants rather than treating them with extra water.
- 3Prepare the final position
Set pots at mature spacing and open each hole before roots are exposed. Make it broad enough for the root ball and any redirected roots, but no deeper than the nursery soil line. Reserve the site soil, roughen glazed sides where needed, stage water nearby, and separate plants with different water requirements into care zones.
- 4Correct only the root defect present
Leave a sound root ball substantially intact. Redirect a small number of flexible circling roots with fingers. If the outside is a dense root shell, use a clean sharp blade for controlled shallow cuts and ease those cut surfaces outward. Stop when roots can face into the bed; do not bare-root every plant or carve a root ball down to fit a small hole.
- 5Plant at nursery depth
Support the root ball on firm soil with the crown and nursery soil surface aligned to the finished garden grade. Backfill in stages, using hands to close broad voids without stamping the soil. Check from the side, correct a tilted ball rather than burying leaning stems, and keep loose mix and mulch from hiding the crown.
- 6Water across both materials
Apply water slowly over the original root ball and adjacent backfill, pausing for infiltration. Recheck depth after settling. During the following weeks, test moisture inside the nursery mix and just beyond it before watering. Direct water to a dry core, pause when both materials remain saturated, and expand the wetted area as roots move outward.
- 7Mulch lightly and monitor establishment
Place a modest mulch layer over the bed while keeping crowns and stems open. Inspect after heat, wind, irrigation, and rain for sinking, exposed roots, bypass flow, or persistent wetness. Correct physical faults promptly. Lengthen watering intervals only when the wider root zone retains moisture normally and the plant holds stable placement with fresh growth.
Plants in this guide
Related reading

Sources
- Perennials: Selection, Planting, and Care. University of Maryland Extension. Source record · Accessed 2026-08-19.
- Planting and Care. Illinois Extension. Source record · Accessed 2026-08-19.
- Perennial Gardening. Colorado State University Extension. Source record · Accessed 2026-08-19.