Gardens · ornamental gravel garden design
Design an Ornamental Gravel Garden for Plants and Access
Plan an ornamental gravel garden from real drainage, plant habit, mature spacing and reachable maintenance routes rather than treating gravel as a universal low-care surface.
Published Last updated
In this guide
- Define a planted gravel garden precisely
- Match the selected palette to the actual soil and editing workload
- Let drainage decide whether the style fits
- Draw movement before placing plants
- Select plants by site and behavior
- Compose by habit and mature envelope
- Make spacing carry the maintenance plan
- Choose gravel for a defined job
- Prepare and plant without hiding defects
- Establish plants before expecting restraint
- Edit the garden as a changing composition
- Design ideas
Define a planted gravel garden precisely
An ornamental gravel garden is a plant community shaped for a free-draining site, with mineral surface and paths used to reveal plant form. It is not simply a conventional border covered with stones, and it is not a promise that every dry-looking plant will thrive without care. The design succeeds when selected plants fit the existing light, drainage, winter wet, summer moisture and local climate while the gardener can still reach every part of the composition.
Separate three layers on the plan. The substrate layer controls how water enters and leaves the root zone. The circulation layer defines the main route, maintenance spurs and stable working positions. The living layer contains the mature plant envelopes and their seasonal changes. Gravel may appear in all three, but its role is different each time. Surface gravel cannot repair a saturated subsoil, and a visually continuous gravel field is not automatically a safe path.
Use celebrated gardens as evidence of relationships, not transferable construction recipes. Historic England records that the Beth Chatto Gravel Garden occupies exceptionally deep, naturally free-draining sand and gravel and uses a meandering dry-river-bed composition. That geology and scale are not ordinary residential defaults. Borrow the discipline of matching plants to place, repeating structural habits and integrating paths; do not copy material depths or irrigation expectations without site evidence.
Write the garden's purpose before choosing species. It may be a sunny front garden with a clear route to the door, a dry courtyard planting seen from above, or an ornamental bed where low mounds and transparent stems replace lawn. State required access, winter appearance and acceptable self-seeding. These choices determine spacing and editing effort more honestly than the broad label low maintenance.
Match the selected palette to the actual soil and editing workload
Choose between the worked palettes only after confirming drainage, soil reaction, light and local suitability. Keep mature circles and service access in the layout, including room to manage self-sown plants. Gravel on the surface does not establish suitable subsoil. If the required ongoing editing is unrealistic, simplify the planting instead of treating a famous low-water garden as a low-labor guarantee.
Let drainage decide whether the style fits
Observe water before importing gravel. After substantial rain, mark puddles, slow infiltration, roof discharge, compacted tracks and the direction runoff takes. Digging a small inspection hole may reveal a freely draining profile, a compacted layer or heavy soil that remains wet below a dry surface. Where excavation could meet utilities or important roots, stop and use qualified locating and site advice rather than probing blindly.
RHS guidance warns that the familiar drought-adapted gravel-garden palette may not thrive on heavy, damp soil or a high water table. Treat that as a design gate. A thin mineral mulch over wet ground does not create a Mediterranean root climate. On an unsuitable site, select an ornamental style and plants adapted to the actual moisture, or obtain professional drainage and soil advice before changing grades or moving water toward neighboring property.
Distinguish fast drainage from permanent drought. Even a free-draining soil can retain useful moisture below the surface, and new plants need establishment care. Conversely, a compacted gravel parking area may shed water without offering a rootable profile. Test rooting depth, compaction and infiltration together. Preserve legal drainage paths and never direct roof or path runoff into a dry-plant pocket merely because its surface material looks absorbent.
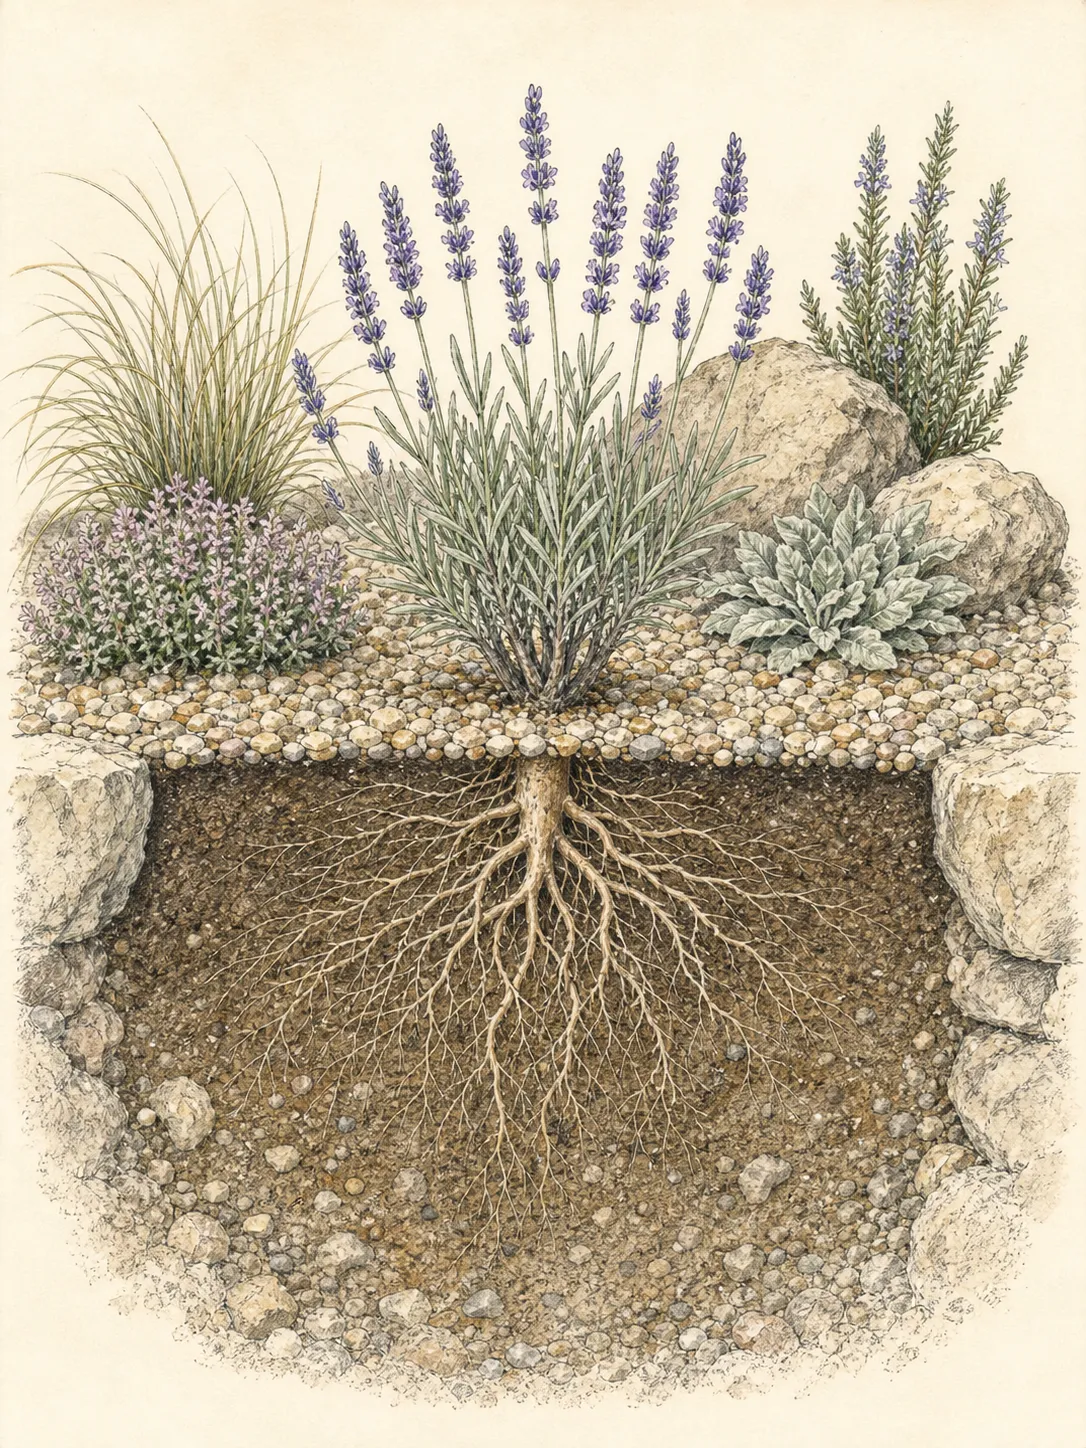
Map microclimates across the proposed area. A south-facing wall can add reflected heat, an open corner can increase wind, and a low pocket can collect cold or wet. Divide the site into genuinely similar planting zones. If only one part has the drainage and exposure required by the concept, make a smaller gravel garden there and give the remaining area a different planting language connected by material or form.
Draw movement before placing plants
Lay out the principal path from entrance to destination first. It must remain legible, stable and wide enough for the people and ordinary equipment that use it. Gravel grade, edging, slope and base construction affect accessibility and movement, so obtain local hardscape guidance for the actual site. A loose decorative surface that works in a display bed may be inappropriate for wheels, unsteady walkers or a frequently used doorway.
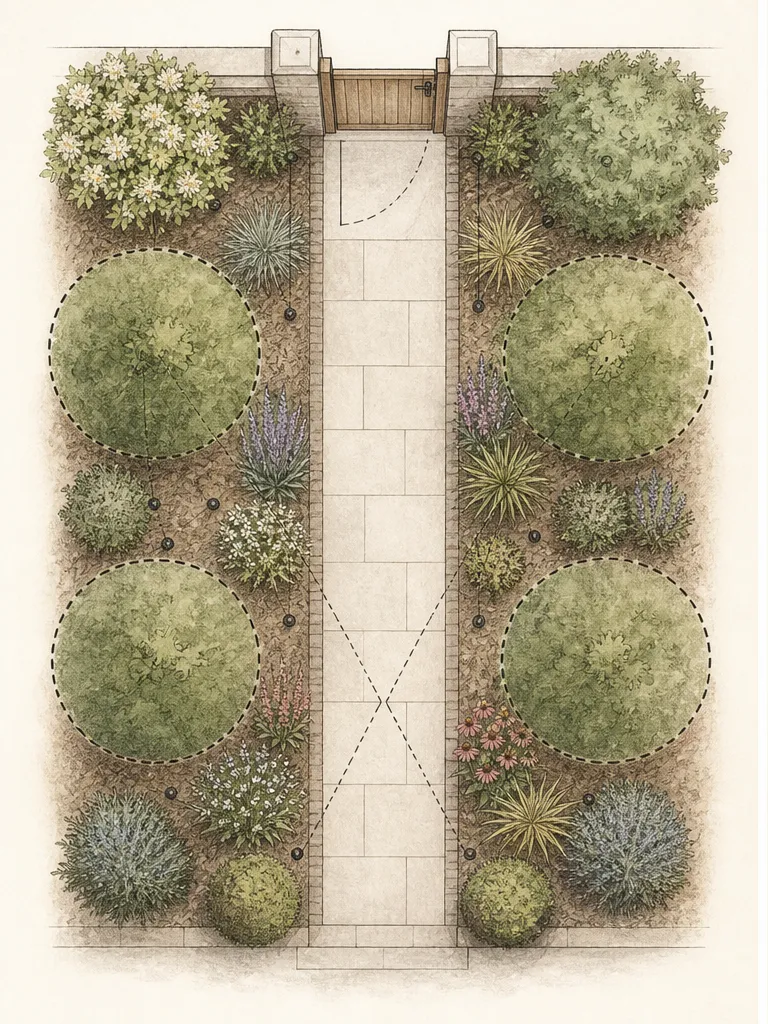
Add maintenance spurs and working bays. Every permanent plant should be reachable for planting, cutting back, division, removal of unwanted seedlings and inspection of the crown without stepping through neighboring growth. A spur can disappear visually into the mineral surface, but its clear width and firm footing belong on the scaled plan. If the gardener must balance between stones or crush a low mat to reach the center, the bed is too deep or access is missing.
Keep junctions open at mature plant spread. Arching grasses and billowing perennials can soften a path edge while still reducing clearance. Draw their farthest leaf and flowering arcs, not only the crown. Place vertical accents where they guide the eye without blocking sight lines at steps, driveways or gates. A plant repeatedly clipped to preserve access was assigned the wrong envelope.
Use the path as part of the composition rather than a leftover gap. Beth Chatto's team describes careful attention to the meandering route and the relationship among island beds. In a smaller garden, one restrained curve or offset can reveal changing plant groups without becoming a maze. Keep the route direct where function demands it and let plant habit, not arbitrary wiggles, provide most of the movement.
Select plants by site and behavior
Build the candidate list from plants documented for the measured drainage, light, ordinary moisture and regional winter. Drought tolerance is not one trait that overrides all others. Some dryland plants fail in humid summers or wet winters; some tolerate heat only after establishment; some spread aggressively in a favorable new climate. Verify species and named cultivars through current regional sources and invasive-plant guidance before assigning a design role.
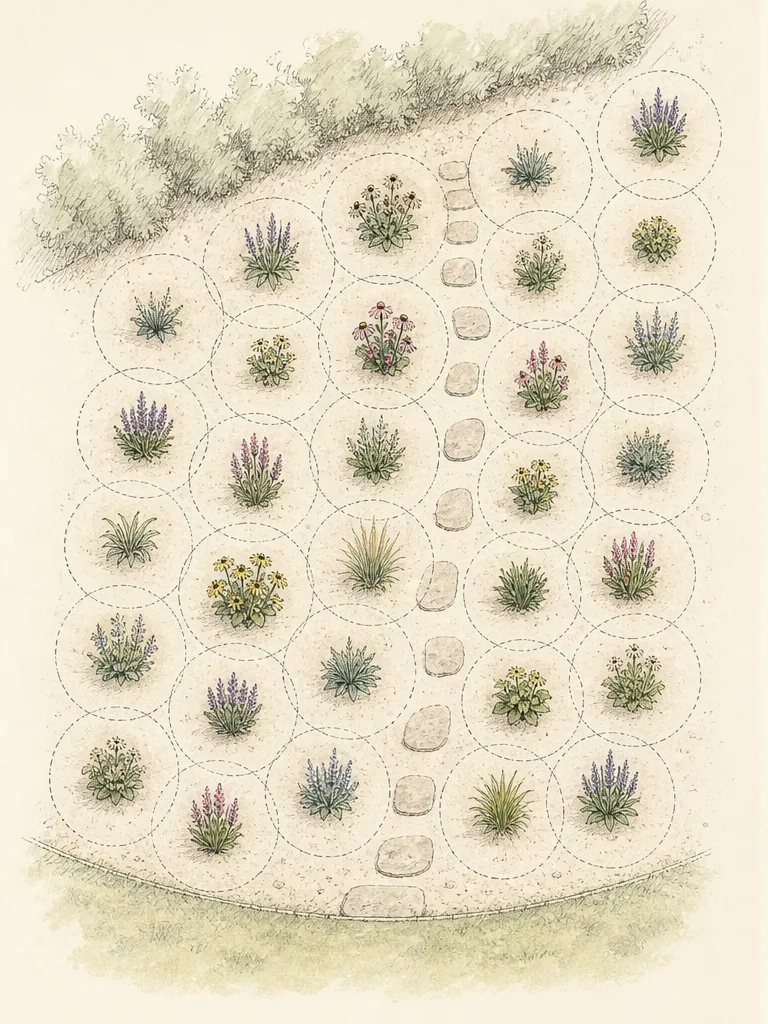
For a dry, alkaline, Essex-inspired 2 m by 2 m pocket, use three Stipa barbata as early-summer transparent tufts, five Hylotelephium 'Red Cauli' as repeated late-summer and early-autumn clumps, and one Verbascum bombyciferum as a summer vertical. Set Stipa and 'Red Cauli' on approximately 0.5 m centers, because their RHS profiles allow up to 0.5 m spread; reserve a full 1 m circle for the verbascum, whose RHS spread is 0.5–1 m; Beth Chatto's team separately reports that its rosettes can reach up to 1 m in circumference. Stipa is 0.5–1 m high, 'Red Cauli' 0.5–1 m, and the verbascum 1.5–2.5 m. All require full sun and well-drained soil; Stipa accepts any pH, 'Red Cauli' neutral to alkaline, and the verbascum poor alkaline soil. Keep the tallest plant away from a path edge and accept seedlings only in a marked pocket.
For a more compact, pH-flexible temperate 2 m by 2 m palette, repeat three Briza media tufts, five Betonica officinalis 'Hummelo' clumps and five Hylotelephium telephium (Atropurpureum Group) 'Xenox' clumps on roughly 0.5 m centers, staggering the groups rather than making rows. Briza reaches 0.5–1 m high and up to 0.5 m wide with flowers from late spring into summer; 'Hummelo' reaches 0.5–1 m high and up to 0.5 m wide with summer-to-early-autumn flowers; 'Xenox' reaches about 0.5 m high and wide and flowers in mid- to late summer. All need well-drained soil and sun, although 'Hummelo' accepts partial shade. Briza and 'Hummelo' accept acid, neutral or alkaline soil; keep 'Xenox' to neutral or alkaline soil. This relay is for a draining temperate site, not an unirrigated desert simulation.
Both palettes are design translations from UK and Essex evidence, not universal plant lists. RHS hardiness ratings describe UK conditions: Stipa barbata is H4, while the other named plants above are H6 or H7, but summer heat, humid nights, winter wet, rainfall pattern and exposed-site cold can reverse their usefulness elsewhere. Check every taxon against current local hardiness and invasive-status guidance before purchase. The Beth Chatto account also shows that a plant such as achillea can fail on exceptionally dry, poor gravel even when its general reputation sounds suitable; treat one full local cycle as the test before repeating a new plant throughout the garden.
Compose by habit and mature envelope
Draw every candidate twice: an overhead mature footprint and an elevation showing leaf, flower and seed-head height. A narrow crown may cast arching leaves far across gravel; an airy flower may overlap a view without blocking it. Include ordinary lean after rain or wind. These outlines make spacing a design tool rather than a row of generic intervals.
Place structural forms first. A low woody mound or persistent upright clump can hold the garden when herbaceous plants retreat. Repeat it in genuinely similar pockets, varying group size rather than dotting equal specimens. Keep each crown and eventual work area separate from the main path. The backbone should remain legible if a short-lived accent disappears.
Add a middle layer that connects rather than fills. Use bounded mounds or transparent stems to lead the eye between structural groups, leaving mineral intervals where each habit can be read. A gravel garden loses its distinctive clarity when plants are spaced like a conventional closed border before they have reached mature size. Early openness is not failure; it is reserved form and access.
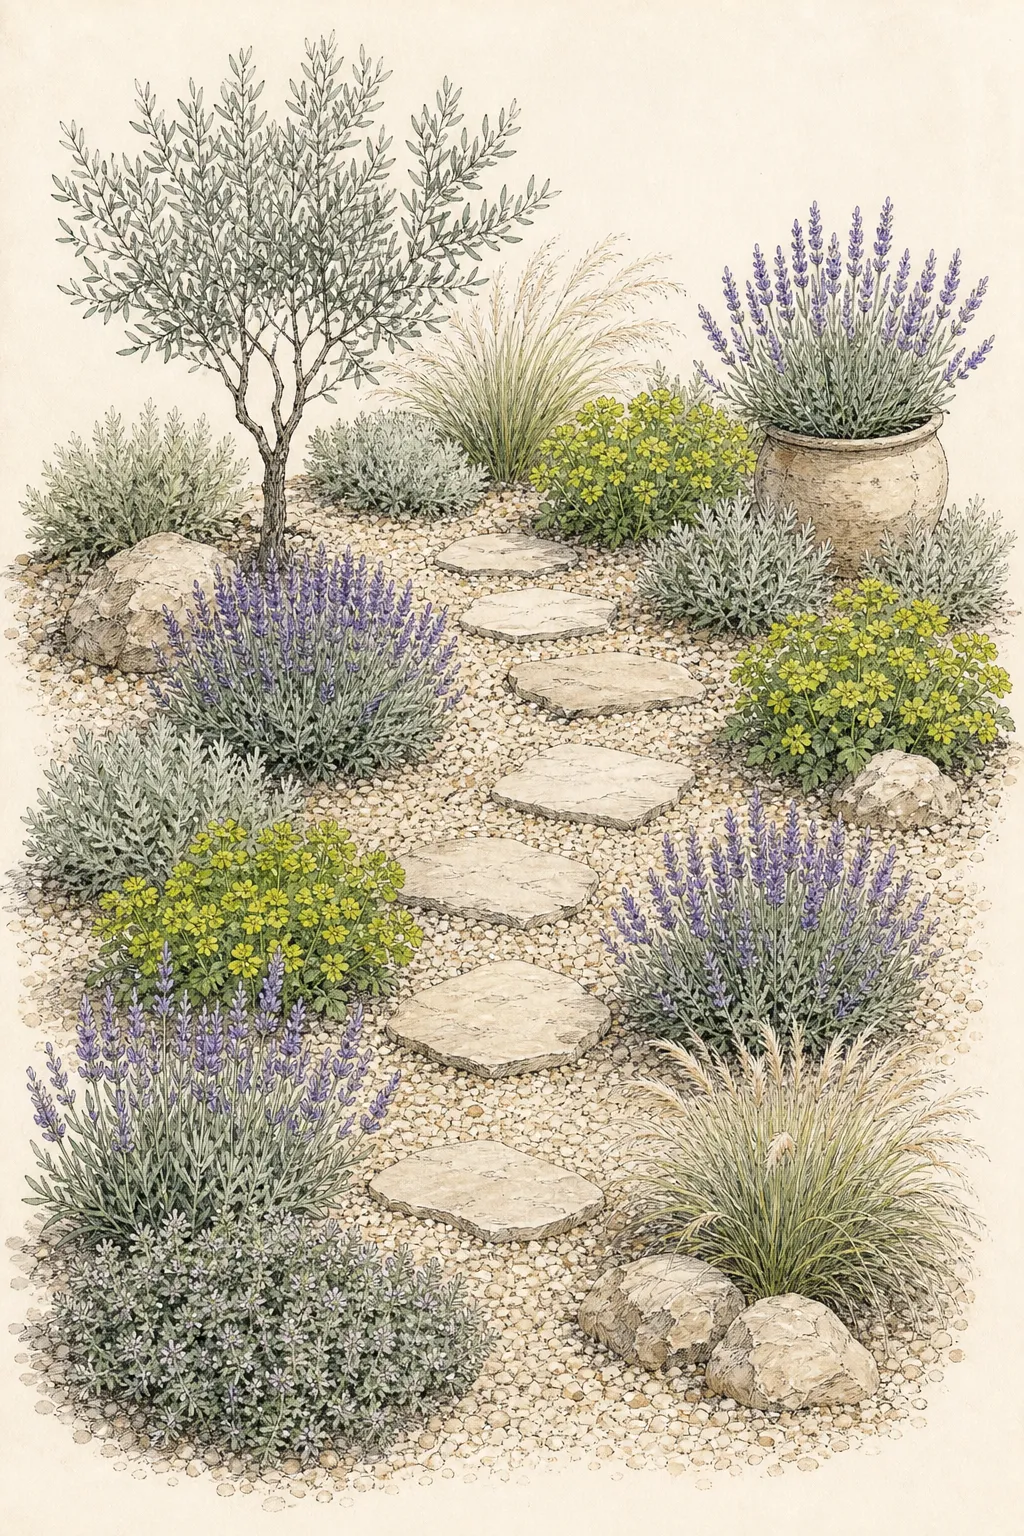
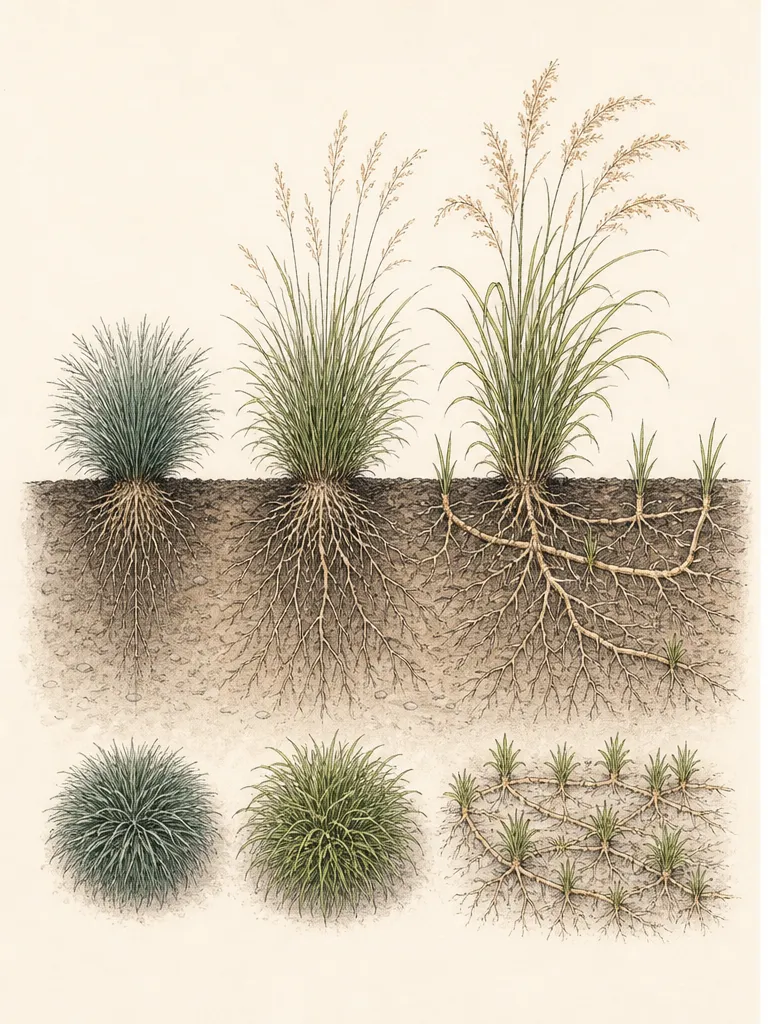
Use low mats carefully at edges and between taller masses. Confirm their spread and editability, then keep them out of path joints and plant crowns. A mat that crosses every gravel interval erases the graphic surface and conceals seedlings the gardener needs to assess. Give it a defined boundary and a reachable edge, allowing a few deliberate overlaps where softness is worth the extra edit.
Make spacing carry the maintenance plan
Reserve mature plant width from reliable references for the exact taxon, then add room for the work it will require. A grass may need a side from which old stems can be bundled; a woody mound needs access for selective pruning; a self-seeding perennial needs a visible halo where seedlings can be accepted or removed. Two envelopes that merely touch on paper may still leave no place for hands or tools.
Separate permanent and migratory plants on the plan. Permanent anchors receive protected crowns and long-term labels. Deliberate self-seeders receive bounded territories in which movement is acceptable. Remove volunteers outside those territories while they are identifiable and small. This creates a dynamic garden without surrendering path width or allowing every open interval to become occupied.
Protect service points. Drains, utilities, irrigation valves, wall vents and edging transitions must remain findable when plants are full. Do not place a dramatic specimen over an access cover or rely on cutting it down for every inspection. Mark these points with the same care as plant centers and keep their approach within the circulation layer.
Test the layout at ground level with hose, flags and pots. Walk every route carrying the tool or container ordinarily used, then crouch where crowns will be serviced. View the composition from windows and entrances. Move mature outlines rather than tightening the gap. A plan is complete when plants read as intentional masses and the gardener can still enter, turn and leave without damage.
Choose gravel for a defined job
Decide where gravel is a path surface, where it is a planting mulch and where it is only a visual link. For an Essex-inspired planting mulch, Beth Chatto's team used local 10 mm gravel about 3–5 cm deep after the first establishment year. RHS gives 5 cm as a general surface depth and estimates that a 25 kg bag covers about 0.6 square metre at that depth. Use those figures only to price and mock up a planting surface; product density changes coverage, and neither receipt is a structural path specification. For walking routes, RHS finds medium angular gravel easier underfoot than fine material of 10 mm or less, rounded pea shingle or cobbles of 20 mm or more, but the base, edging, slope and accessible route still require current local hardscape guidance.
Keep surface material away from crowns and stem bases that must remain visible. Small plants can be visually and physically swamped; RHS guidance recommends raising vulnerable plants slightly rather than burying them in gravel. Translate that through exact plant requirements and site construction. The goal is a clear crown at its appropriate grade, not an isolated mound that dries differently or sheds water away from roots.
Resolve the membrane decision by garden behavior, not a slogan. RHS presents fabric as an option when self-seeding is unwanted. Beth Chatto's team describes working without it so perennial roots remain accessible, while noting that annual seedlings can root into material above a barrier. A self-seeding design and a static specimen design may therefore choose differently. Consider future division, soil access, edge wear and local weed pressure before specifying a layer.
Use a mock-up before covering the site. Place the intended gravel beside mature foliage, paving and walls, and build a small edge transition. Check whether leaves vanish against it, whether glare is uncomfortable and whether stones migrate onto paving. A crisp retained edge can make a restrained planting look deliberate; an unresolved edge turns every sweeping and top-up into recurring work.
Prepare and plant without hiding defects
Remove established perennial weeds and unwanted roots before the surface is covered, using methods appropriate to the site and local guidance. Do not bury a living problem under gravel and call it controlled. Relieve compaction only where doing so will not damage utilities or protected roots, and do not import a deep amendment recipe from another geology. Soil preparation should correct the documented limitation while retaining the conditions selected plants need.
Set out all plants at mature spacing and view the empty intervals as designed space. Move groups until habits and path relationships are clear, then plant at the grade appropriate to each taxon. Water root balls and surrounding soil into contact. A drought-adapted mature plant still requires a sound establishment phase; withholding water from a newly installed root system is not a test of design purity.
Keep labels and a scaled map. Record botanical name, cultivar, planted position, expected spread and whether self-seeding is welcome. Gravel makes dormant crowns and tiny volunteers easy to lose during early maintenance. The map prevents a desired seedling from being hoed automatically and prevents a permanent crown from being struck when the surface appears empty.
Apply the mineral surface only after planting depths, drainage outlets and path edges are checked. Keep crown collars open and preserve intended depressions or runoff routes. Rake to an even functional surface without piling material against stems. Revisit after the first strong rain to see where gravel migrates, water concentrates or fines collect; those physical observations outrank the newly finished appearance.
Establish plants before expecting restraint
Create an establishment schedule from plant condition, weather and root-zone moisture. Water deeply enough to connect the planted root ball with surrounding soil, then let the documented drainage pattern reappear before repeating. Check beneath the gravel rather than judging by its dry-looking surface. Plants in separate microzones may need different inspection intervals even when the surface treatment is continuous.
Avoid encouraging soft, crowded growth simply to close gaps. Fertility must follow soil evidence and exact plant needs. A garden selected for lean, free-draining conditions may lose characteristic habit if treated like a rich mixed border, while a plant with a documented deficiency still deserves correction. Diagnose pale growth through moisture, root contact, pH, temperature and light before applying a general feed.
Keep the path fully open during establishment. New leaves often extend beyond the nursery outline, and hoses or cans can displace gravel around small crowns. Use the maintenance spurs drawn on the plan and water from stable positions. If a route cannot serve the planting without dragging across it, revise access while plants are young rather than accepting repeated damage.
Expect some trials to fail without declaring the whole method proven or disproven. The Beth Chatto garden was an experiment in a particular dry, deep gravel soil, and its current planting reflects years of selection. In a home garden, record which failure came from site mismatch, winter wet, hardiness, establishment or overly ambitious spread. Replace by role with a locally proven plant, not automatically with the same species.
Edit the garden as a changing composition
Schedule short, frequent observation during the establishment years. Identify seedlings while they are small, remove unwanted plants before roots cross neighboring crowns, and protect deliberate volunteers in their assigned territories. RHS notes that early weeding can be intensive, while Beth Chatto's account calls its celebrated Gravel Garden highly labor-intensive because self-seeding is integral to the effect. Low inputs and low editing are not the same promise.
Cut back by plant and season, not by sweeping the entire surface on one date. Some dry stems may hold useful winter structure; others collapse across paths or cover crowns. Preserve access and remove material before new growth is damaged. Carry debris along the planned route rather than raking blindly through dormant markers and low evergreen mats.
Review each mature habit against its assignment. Has an upright accent remained vertical, has a mound swallowed an interval, has a mat crossed the path, or has a self-seeder become too numerous to edit comfortably? Move, divide or remove in the suitable season using taxon-specific guidance. A beautiful plant can be wrong for the available maintenance envelope.
Refresh gravel only after identifying why it looks thin or uneven. Foot traffic, runoff, soil movement and expanding plants can expose the base or carry stones into edges. Correct the source before adding material. Re-establish crown collars, path width and intentional gaps. Continual top-ups that bury stems and raise the surface against paving are not maintenance; they are an accumulating construction fault.
The durable result is not a fixed picture. Structural habits provide continuity, seasonal plants alter emphasis, and edited seedlings migrate within limits. Drainage remains true to the site, every crown remains reachable and the paths retain their practical width. That combination of right plant, reserved space and visible access is what allows gravel to clarify an ornamental garden rather than merely cover it.
Design ideas
- Style
- Naturalistic ornamental gravel planting with clear mineral intervals
- Space
- Sunny residential front garden, courtyard or free-draining border with planned circulation
- Climate
- This design is not a universal treatment for dry-looking or low-care gardens. The familiar drought-adapted palette requires genuinely compatible drainage, light, winter moisture and regional climate. Heavy wet soil, a high water table, humid summers, cold exposure or local invasive behavior may require different plants or a different garden style. Historic examples on exceptionally deep sand and gravel demonstrate design principles, not transferable residential construction depths or no-irrigation promises.
- 1Draw a dry river path with firm purpose
Use one restrained curve to connect entrance and destination, widening only where a real pause or working bay is needed. Place low mats on the inside of a bend and taller transparent forms beyond it so the path is revealed rather than hidden. Confirm grade, footing and accessibility with local hardscape guidance. The dry-river image should emerge from route and planting rhythm, not from a decorative channel that collects runoff.
- 2Lay out the dry alkaline Essex palette
In a sunny, very free-draining 2 m square, place one Verbascum bombyciferum where its 1.5–2.5 m flower stem and reserved 1 m footprint cannot obstruct the path. Repeat three Stipa barbata tufts and five Hylotelephium 'Red Cauli' clumps on about 0.5 m centers around it. The grass veils early summer, the verbascum supplies a summer column and 'Red Cauli' carries late summer into early autumn. Use poor alkaline soil for the verbascum, neutral-to-alkaline soil for 'Red Cauli', and retain the combination only where local climate and invasive-status guidance support every taxon.
- 3Build the pH-flexible temperate relay
Stagger three Briza media, five Betonica officinalis 'Hummelo' and five Hylotelephium 'Xenox' through a sunny, well-drained 2 m square, beginning near 0.5 m centers and widening gaps where access requires. Briza carries late spring and summer movement, 'Hummelo' supplies summer into early autumn, and 'Xenox' adds dark foliage and mid- to late-summer bloom. Briza and 'Hummelo' accept a broad pH range, while 'Xenox' needs neutral-to-alkaline soil. Verify mature behavior and regional suitability before repeating the palette beyond one trial area.
- 4Give one low mat a hard boundary
Use a documented, regionally suitable mat-former to soften one edge, then mark the furthest acceptable spread on the plan. Keep it away from drains, path joints and neighboring crowns. Allow one intentional spill across the gravel while retaining a reachable side for editing. Repeating small mats everywhere would erase the mineral rhythm; one controlled boundary makes the contrast between living carpet and open surface legible.
- 5Make a no-step island with a service spur
Compose an island bed around a persistent anchor, a rounded middle layer and seasonal accents. Run a narrow firm spur to a concealed working bay near the center so every crown is reachable without stepping into gravel mulch. Keep the spur outside mature leaf arcs and record it on the plan even if surface material makes it visually quiet. Access becomes infrastructure rather than a path improvised during cutting back.
- 6Reserve a migration pocket
Leave one gravel opening where selected annual or short-lived ornamentals may self-seed. Mark its boundary and keep permanent plant crowns outside it. Retain only seedlings that preserve sight lines and the intended population, removing the rest while small. This concentrates the changing, spontaneous layer in a place the gardener can edit, while the structural groups and main path remain predictable.
- 7Connect two moisture zones by form
If drainage changes across the site, do not repeat one dry-plant list into the wetter pocket. Use separate locally appropriate taxa that share a visible habit, such as two rounded silver-green masses or two fine upright accents. Keep a clear material transition and map runoff between them. The eye receives continuity while each root zone remains honest about moisture, winter conditions and maintenance.
Plants in this guide
Related reading
Sources
- Gravel Gardens. Royal Horticultural Society. Source record · Accessed 2026-08-19.
- Beth Chatto Gardens, Elmstead. Historic England. Source record · Accessed 2026-08-19.
- Gravel Garden Creation and Maintenance. Beth Chatto's Plants and Gardens. Source record · Accessed 2026-08-19.
- Stipa barbata. Royal Horticultural Society. Source record · Accessed 2026-08-19.
- Hylotelephium 'Red Cauli'. Royal Horticultural Society. Source record · Accessed 2026-08-19.
- Verbascum bombyciferum. Royal Horticultural Society. Source record · Accessed 2026-08-19.
- Betonica officinalis 'Hummelo'. Royal Horticultural Society. Source record · Accessed 2026-08-19.
- Briza media. Royal Horticultural Society. Source record · Accessed 2026-08-19.
- Hylotelephium telephium (Atropurpureum Group) 'Xenox'. Royal Horticultural Society. Source record · Accessed 2026-08-19.