Gardens · front path border clearance
Design a Front-Path Border That Stays Off the Paving
Plan a welcoming front-path border from mature plant spread, a clear walking and service edge, contained plant habits, and irrigation that wets roots without spraying or draining across the paving.
Published Last updated
In this guide
- Measure the walking envelope before drawing flowers
- Draw every plant at mature spread
- Keep a dry service strip beside the paving
- Choose habits that hold their own edge
- Place irrigation inside the bed
- Shape the border for arrival and sight lines
- Use repetition to calm a narrow space
- Plan maintenance from the paving side
- Audit the border after rain and full growth
- Check an eighteen-foot lavender edge before planting
- Design ideas
Measure the walking envelope before drawing flowers
A front path is circulation first and a garden view second. Measure its full paved width, gates, steps, handrails, door swing, lighting, drainage, utility covers, and places where people pass one another or carry bags. Keep locally required access and sight lines clear. The border begins outside that working envelope; it does not borrow space from the path because nursery plants look small on installation day.
Walk the route at the busiest times and from both directions. Note where shoulders, coats, wheels, deliveries, and maintenance equipment need room. A plant that merely brushes an empty path can become an obstacle when wet foliage leans after rain. Design for normal mature posture and ordinary weather, not for the moment immediately after pruning.
Mark the edge with a hose or removable line and live with it for several days. Approach after dark, in rain, and while carrying something. If the path already feels narrow, change the bed line or reduce the planting ambition. A wider bed is not successful when its leaves force people toward a step, wall, or vehicle area.
Identify runoff direction before choosing the planting. Paving may shed water into the bed, away from it, or toward a low point near the entrance. Keep existing drains and joints visible. The border should receive water only where the soil can absorb it without sending sediment, mulch, or irrigation back across the walking surface.
Draw every plant at mature spread
NC State Extension emphasizes mature height and width when spacing landscape plants. Translate each candidate’s reliable regional dimensions into a plan-view circle or outline. Place the center so the expected canopy ends within the bed, then add any extra clearance needed for arching stems, snow load, local access, or the plant’s habit. Do not draw the pot diameter as though it were the finished plant.
Use cultivar dimensions where a named selection is being purchased. Species averages can be too broad for a narrow path, and marketing words such as compact or dwarf do not supply a measurement. Compare more than one institutional or botanical reference when labels disagree, then use the larger plausible spread for the site unless a regional trial supports a smaller mature plant.
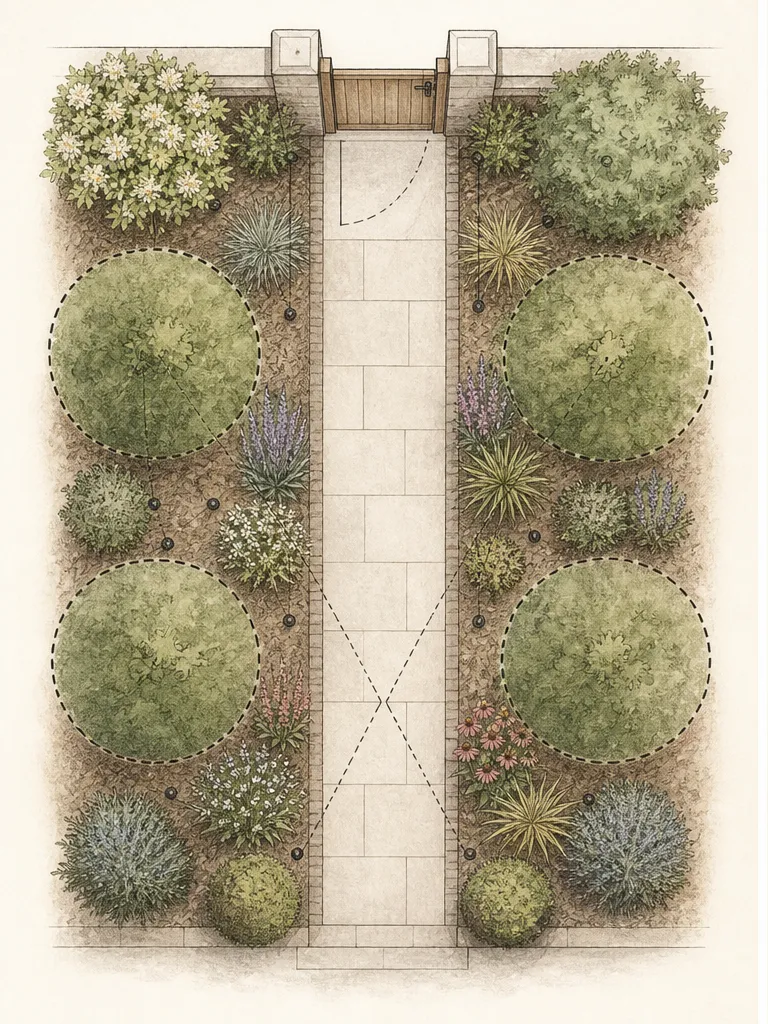
Represent neighboring plants at maturity too. Two circles that fit individually can overlap into the path when their combined mass has nowhere else to go. Reserve access to irrigation emitters and crowns rather than filling every gap. Temporary open ground can be mulched or planted with removable annual accents while long-lived plants expand.
Reject a plant whose natural outline requires repeated shearing to remain inside the plan. Routine deadheading or selective renewal is different from constant size control. A border feels composed when plants express their normal form; it feels defensive when every arching stem is cut flat at the paving each week.
Keep a dry service strip beside the paving
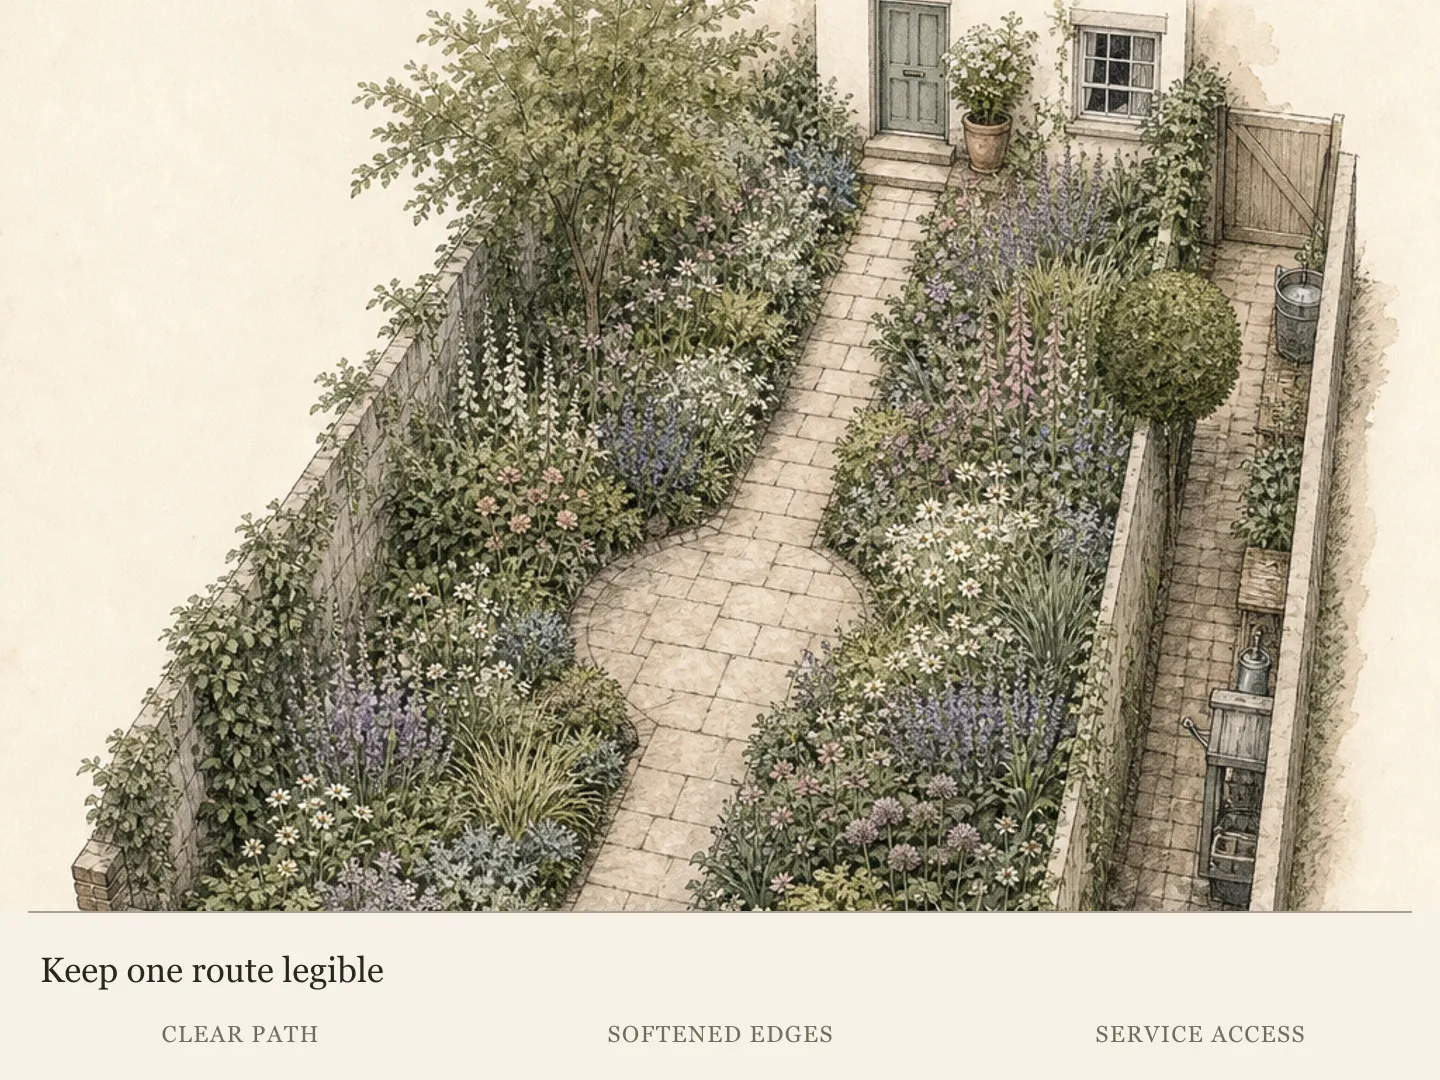
Insert a continuous transition between living crowns and the walking surface. It can be a narrow band of stable mineral mulch, a low contained ground layer, or simply open bed surface held below the paving edge. Its job is to catch minor growth and make inspection possible, not to become another row of plants that immediately fills the clearance.
The strip must suit the site. Loose fine material can migrate on slopes, and rounded gravel can be hazardous if kicked onto smooth paving. University of Nevada guidance warns that mulch should not slough onto sidewalks and recommends stable choices for buffer areas. Select an edge material that stays put under rainfall, sweeping, snow handling, and normal foot traffic in the region.
Keep finished soil and mulch slightly below the hard edge where drainage permits, while preserving plant crown levels. This helps contain loose material without turning the border into a trench. Do not pile mulch against the path until it spills, and do not bury crowns to create a visually level surface. The path edge should remain readable from end to end.
Use the strip as maintenance access. A hand can reach the nearest crowns, emitters, and weeds without stepping into plants or standing irrigation hardware on the paving. If the border is too deep to maintain from path and lawn or another side, add deliberate stepping points inside the bed rather than using the pedestrian route as a tool shelf.
Choose habits that hold their own edge
Favor clumping, upright, or compact mounding plants at the path side. Their mature form should end predictably inside the bed. Reserve broad arching grasses, lax catmint, sprawling groundcovers, and plants that lodge after rain for deeper positions where their movement will not enter the route. The issue is habit, not a blanket ban on any genus; cultivars can behave differently.
Place the lowest plants at the immediate edge only if their spread remains contained. A low plant can still become a wide mat that hides paving and traps moisture or debris along the joint. Check whether it roots as it travels, self-seeds into cracks, or requires a barrier. Local invasive-plant guidance should remove unsuitable spreaders from the list before aesthetic comparison.
Use upright accents behind the front layer, where flower stems can rise without leaning into people. Consider what happens after bloom: heavy seed heads, rain-soaked flowers, and stems reaching toward light may change the outline. A plant selected from a staked nursery display should be evaluated for its unsupported garden habit.
Keep thorny, sharp-edged, irritating, or fruit-dropping plants away from contact zones. The necessary distance depends on mature spread and the part encountered. A fragrant plant can be close enough to enjoy without requiring every passerby to brush it. Plant safety and maintenance traits belong on the plan alongside color and bloom season.
Place irrigation inside the bed
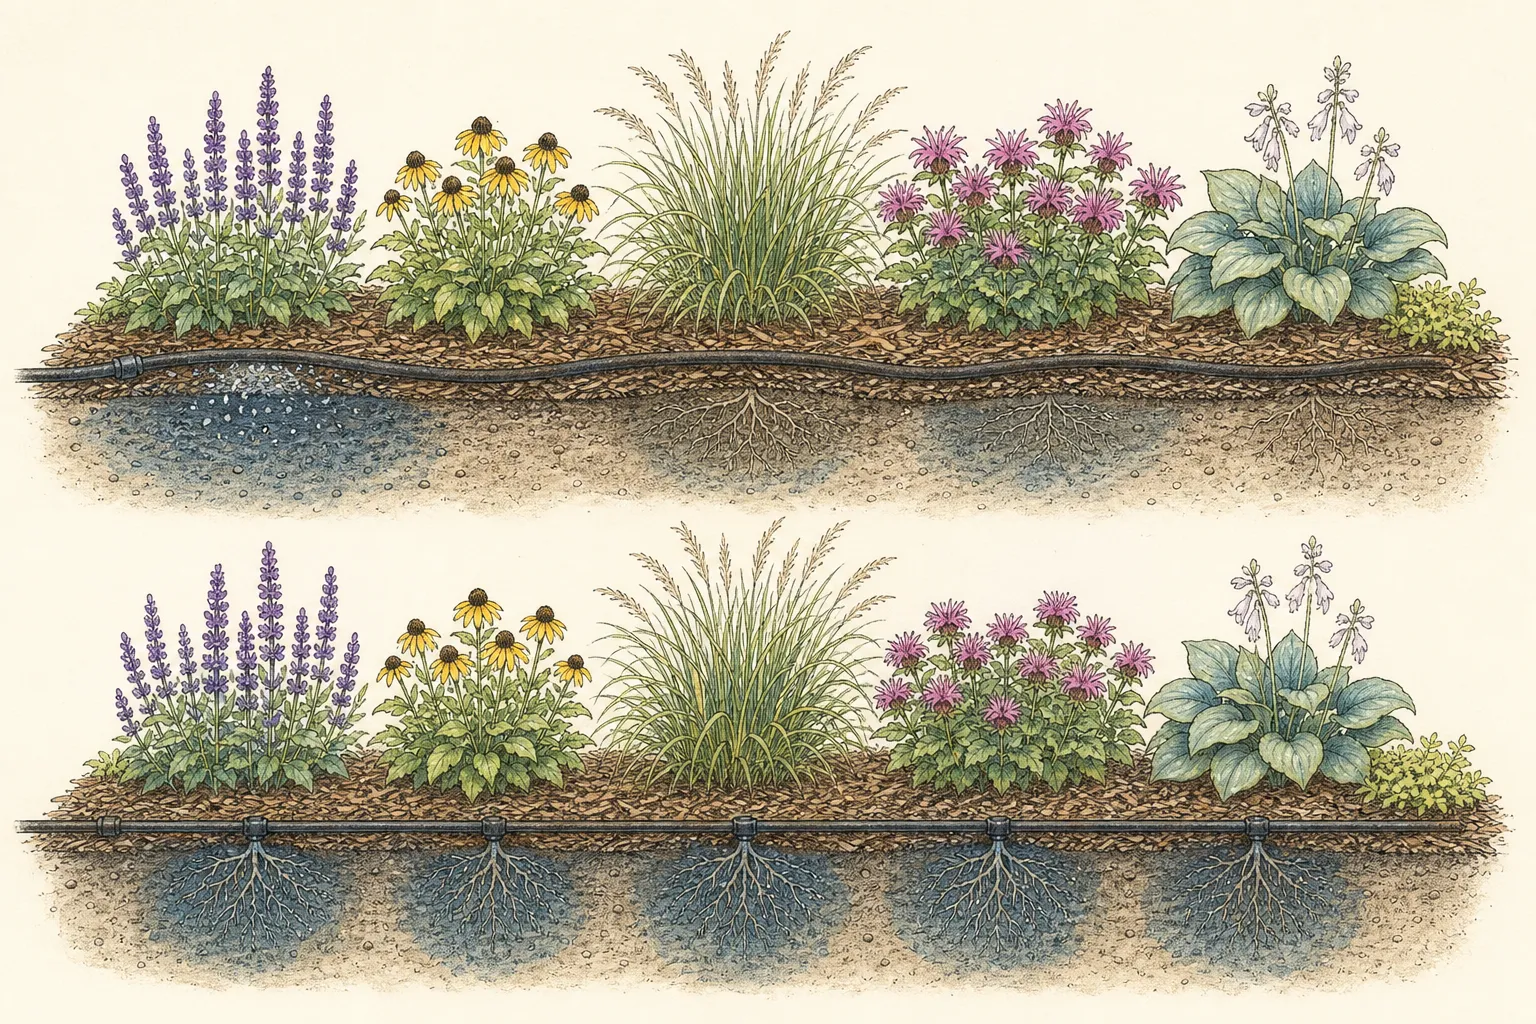
The EPA advises checking that sprinklers do not spray pavement or hardscape and that drip lines work without clogs or leaks. For a narrow mixed border, begin with the root zones rather than a spray arc. Place drip outlets or a suitable soaker line inside the bed, secure them where they remain visible for service, and keep connectors away from the walking edge.
Separate the border from adjacent turf irrigation when their water needs differ. University of Nevada guidance recommends revising sprinkler boundaries and using a separate drip zone for planted buffers. A front border should not be kept wet because the lawn station runs, nor should turf spray strike foliage and paving to reach a row of perennials.
Test the system while watching from both ends of the path. Look for overspray, runoff, blocked outlets, low-point drainage, and water following the pavement joint. Adjust pressure, emitter position, and runtime according to the equipment, soil, slope, and plant needs. On clay or a slope, shorter cycles with soak periods may allow infiltration better than one long run.
Keep establishment and mature watering separate. New plants need their original root balls monitored while roots expand; established regionally adapted plants may need a different interval. Move or add outlets as the wetted root zone changes, and cap unnecessary emitters. Permanent saturation at the edge encourages excessive growth and does not solve a poor plant choice.
Shape the border for arrival and sight lines
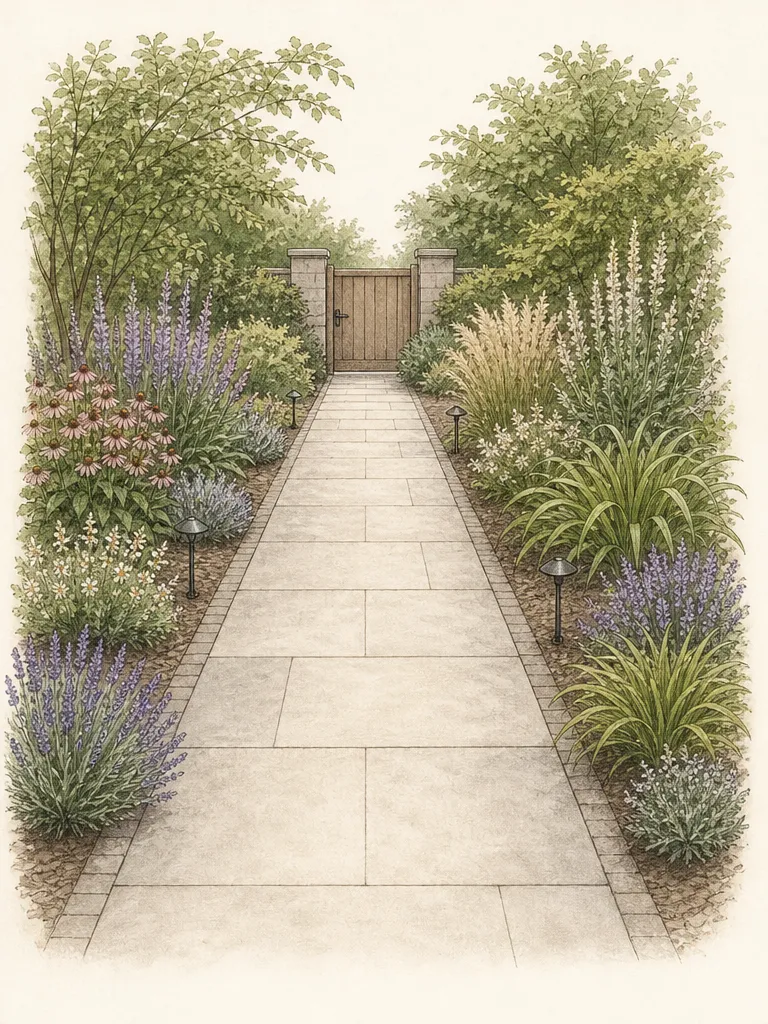
The path already supplies a strong line. Echo it with a clear bed edge, then use repeated plant masses to lead toward the door rather than scattering equal accents on both sides. A gentle widening near an entrance can hold a focal group while the travel surface remains unchanged. Keep house numbers, lights, gates, steps, and views from driveways unobstructed under local rules.
Balance does not require mirror-image beds. A broad shrub on one side can be balanced by several smaller repeated perennials on the other, provided neither enters the route. Use asymmetry when utilities, windows, or drainage make identical planting impractical. The shared edge treatment and repeated foliage can give the two sides unity.
Place the strongest color or form where it rewards arrival without stopping movement. An accent directly beside a narrow turning point may pull attention toward the place that needs the clearest footing. Move it beyond the pinch point or view it across the path. Design directs eyes as well as stems.
Consider the view from indoors. A front border can have a generous middle and back layer while the path edge stays quiet. Let taller flowers appear through gaps rather than leaning over the paving for visibility. This preserves a welcoming abundance without making circulation depend on constant cutting.
Use repetition to calm a narrow space
A narrow path border has little room for unrelated specimens. Choose a small set of foliage roles—perhaps one low clump, one rounded middle layer, and one vertical accent—and repeat them. Repetition lets gaps for access and irrigation read as intentional intervals rather than missing plants. It also makes replacement easier when one plant fails.
Vary bloom sequence within that framework. Spring bulbs can emerge between permanent clumps if their retiring foliage remains off the path. A later flower can take over the accent role without changing the mature edge. Mark bulbs and crowns so maintenance from the paving does not damage them while they are dormant.
Use foliage for the longest continuity. Similar greens, repeated silver leaves, or a recurring leaf shape can connect flowers that do not overlap. Avoid placing every variegated or brightly colored plant at the edge; high visual activity can make the route feel narrower and draw attention to every maintenance gap.
Keep enough negative space to see the line of the path. Plants do not need to touch continuously at soil level. A visible sequence of mulch, repeated clumps, and occasional verticals can look fuller because each form is legible. The clear service strip becomes part of the rhythm.
Plan maintenance from the paving side
List the tasks each edge plant requires: deadheading, division, renewal pruning, staking, leaf cleanup, and irrigation checks. Choose plants whose routine can be performed without blocking the path for long periods or reaching across thorny neighbors. A low-maintenance claim is incomplete unless the mature plant can be accessed safely.
Prune selectively to remove a damaged or exceptional stem, not to correct the entire design every week. If a healthy plant repeatedly occupies the path, move it during an appropriate season or replace it with a smaller habit. The mature-spread plan has failed at that position, and repeated shearing will not change the plant’s natural requirement.
Sweep soil, leaves, fruit, and mulch from the paving after work and storms. Do not blow debris into drains or neighboring property. Keep the hard edge visible so encroachment is noticed early. Repair a migrating mulch source or runoff path rather than treating sweeping as the permanent solution.
Inspect emitters without covering them under deep mulch. A concealed leak can saturate the path edge and drive lush growth toward the route. Mark flush points and connectors, test the zone at the start of the active season, and revisit it after digging or division. EPA guidance treats irrigation maintenance as an ongoing water-saving task.
Audit the border after rain and full growth
Review the path when foliage is wet and flowers are at peak weight. Walk the entire route without stepping aside. Mark leaves that enter the circulation envelope, plants that hide a step or light, and sections where water or mulch reaches the paving. The wet-day outline is often more useful than the tidy form seen during spring cleanup.
Compare the mature planting with the original circles. If one cultivar exceeds its documented spread in this site, update the plan and move neighboring additions outward. Regional climate, irrigation, and soil can change vigor. Treat the living record as local evidence without turning one specimen into a universal dimension for the cultivar.
Run irrigation and watch until water has infiltrated or begun to move. Correct overspray immediately and investigate runoff from slope, compacted soil, or excessive runtime. Brown foliage at the edge does not justify aiming spray across the path; inspect the root zone and equipment before changing delivery.
Edit toward a clear route, not maximum plant count. Remove a redundant edge plant when mature masses close the intended gap. Preserve the strongest repeated groups, the dry service strip, and access to infrastructure. Record what was moved or repaired and revisit that exact point after the next comparable rain; this distinguishes a durable correction from a temporary tidy-up. A front-path border succeeds when arrival feels planted and generous while the paving remains visibly, physically, and hydraulically clear.
Check an eighteen-foot lavender edge before planting
Assume an 18-by-4-foot planting strip beside an existing unobstructed path in a sunny Zone 6 Pennsylvania garden. The soil drains freely through winter and receives no lawn overspray. Four Lavandula angustifolia plants can provide one repeated low edge if the chosen stock has a mature spread no greater than the species profile's 3-foot upper width. The path itself lies outside the 4-foot planting depth and is not included in that measurement.
Mark centers 2, 6.5, 11, and 15.5 feet from one end, each 2 feet back from the path edge. With 3-foot foliage circles, the gaps between plants are 1.5 feet and the foliage stays 0.5 foot inside the path-side bed boundary. Buy four plants, preserving those spaces for inspection. Do not place additional plants in the gaps simply because the nursery plants look small.
Before accepting the layout, mark the full circles and walk the path carrying its usual load. Reject lavender here if winter wetness, shade or local performance fails the site test; shortening the spacing cannot correct those conditions. This example tests a plant-to-path relationship and does not specify a legally compliant path width or reproduce an existing illustration at scale.
Design ideas
- Style
- Restrained layered entry border with repeated clumps and a continuous dry path edge
- Space
- Residential front walk and adjoining ornamental planting bed
- Climate
- Use locally hardy plants and regional mature dimensions; adapt edge materials, runoff control, sight-line limits, irrigation zoning, and winter maintenance to local soil, slope, codes, and weather.
- 1Draw a mature-spread setback
Measure the path and mark its non-negotiable walking envelope. Draw every candidate at documented mature width, then place its center so normal spread ends inside the bed. Add extra room for arching or rain-laden stems. Keep the resulting clear band continuous instead of spending it on extra front-row plants.
- 2Build a three-habit edge
Repeat one contained low clump at the path, one rounded middle plant behind it, and one upright seasonal accent farther into the bed. Select all three for the measured light, soil, and region. The repeated habits make the border feel full while lax, thorny, or strongly spreading plants stay away from contact.
- 3Use a stable mineral pause
Create a narrow service strip of locally suitable stable gravel or another non-migrating surface between crowns and paving. Hold its finished level below the hard edge without burying plants. Use it to inspect emitters and catch minor growth, and reject loose material that washes or rolls onto the route.
- 4Keep irrigation on the root side
Move spray away from the border and place serviceable drip outlets inside plant root zones. Give the border a separate zone from turf where needs differ. Test for runoff, leaks, and blocked outlets while standing on the path, then adjust by soil and plant response rather than extending spray across paving.
- 5Widen the planting, not the path pinch point
Where space allows, let the bed expand away from the paving near an arrival focal point. Place the strongest flower or form in that deeper pocket and keep turning areas quiet. This creates generosity and a clear destination without narrowing the surface where people, deliveries, or wheels need room.
- 6Repeat foliage between bloom seasons
Choose one durable foliage color or shape and repeat it along the route, leaving visible intervals of mulch and edge. Thread spring bulbs and later upright flowers through the deeper layer. The foliage rhythm holds the composition when flowers change and makes necessary access gaps read as deliberate.
- 7Use the wet-day test
After full growth and rain, walk the route from both directions and photograph fixed views. Mark foliage, seed heads, runoff, or mulch crossing the edge. Repeat the walk while carrying an ordinary bag, pushing the usual wheeled item, or accompanying another person if those are normal uses, because a route that clears one upright walker may still pinch its intended traffic. Trace water back to its source before changing plants: distinguish direct overspray, runoff from the bed, and debris that blocks drainage. Assign each failure one correction and one review date. On the plan, use separate marks for a plant-spread problem, a water-delivery problem, and a moving-material problem; those causes require different remedies even when they leave the same wet patch on the paving. Photograph the corrected edge from the same fixed point after another rain and retain the pair with the maintenance notes. Correct local failures by moving a plant, repairing irrigation, or changing edge material; do not preserve an unsafe or chronically wet condition through repeated cosmetic trimming.
Plants in this guide
Related reading

Sources
- Landscape Design. NC State Extension. Source record · Accessed 2026-08-19.
- Home Maintenance. US EPA WaterSense. Source record · Accessed 2026-08-19.
- Reducing Lawn with Buffer Strips. University of Nevada, Reno Extension. Source record · Accessed 2026-08-19.
- English Lavender - Lavandula angustifolia. North Carolina Extension Gardener Plant Toolbox. Source record · Accessed 2026-09-09.