Gardens · low water front garden structure
Design a Low-Water Front Garden with Structure, Not Just Cacti
Build a low-water front garden around regionally suitable structural plants, repeated foliage, useful paths, and irrigation zones rather than a single desert stereotype.
Published Last updated
In this guide
- Define low-water by place, not by appearance
- Keep the two water zones separate when adapting the plan
- Read the front yard as several small climates
- Protect established trees during the conversion
- Build the composition from durable forms
- Draw hydrozones before arranging plants
- Plant one Colorado Front Range and foothills plan
- Make flowers a sequence inside the framework
- Let paths and mulch show intention
- Convert in phases without losing the design
- Water establishment as a temporary project
- Edit for lower input and stronger identity
- Design ideas
Define low-water by place, not by appearance
Define a low-water garden by reduced irrigation demand achieved through site fit, soil care, plant choice, and deliberate watering. It is not a visual style. Spiky leaves, gravel, and desert plants may be appropriate in some regions, but they do not automatically make a landscape water-wise. A soft meadow, clipped evergreen framework, cottage-like flower border, or contemporary grass garden can also use little supplemental water when its plants are genuinely matched to local conditions.
Begin with the front yard's obligations. Mark the route to the door, address numbers, steps, handrails, driveway sight lines, utilities, drainage, snow storage, waste-bin movement, and any local access or planting rules. Note where a visitor pauses and where a maintenance worker needs to stand. Water savings do not excuse a hidden entrance, blocked window, unstable surface, or shrub that must be cut continually to keep a route open.
Choose the water goal in relation to regional rainfall and the plants already present. In a summer-dry climate, the design may rely on winter rain and carefully timed establishment irrigation. In a humid region with intermittent drought, the challenge may be surviving dry spells without selecting plants that fail in wet winters. In a cold interior climate, snow cover, frozen soil, wind, and deicing salt may govern the palette as much as summer dryness.
Write a short project brief before naming plants: the garden should frame the house, remain readable in winter, preserve the existing tree, offer flowers from spring into autumn, and run on two compatible water zones after establishment. That statement is more useful than asking for a xeriscape look. It keeps every later choice tied to function, ornamental character, and a locally meaningful reduction in supplemental water.
Keep the two water zones separate when adapting the plan
Check the declared Colorado region, light and drainage before transferring the worked layout. Keep the dry matrix and the separately supplied entry pocket distinct at mature size, including their access and runoff boundaries. A replacement plant must fit both its allotted footprint and water class. Fitting a nursery pot into the drawing is not enough to preserve the low-water design.
Read the front yard as several small climates
Map direct sun through the day rather than labeling the entire frontage sunny. A south- or west-facing wall can reflect heat; an eave can create a rain shadow; a mature tree can make bright spring ground become dry shade after leaf-out. Paving, pale walls, wind funnels, low pockets, and compacted construction soil produce conditions that change over short distances. Those differences should shape plant groups and watering zones.
Check how water already moves. Watch a meaningful rain, note where roof discharge enters the bed, and identify soil that puddles, sheds water, or dries first. Do not route new irrigation toward a foundation, across a walk, or into a low point simply because the old sprinkler layout does so. Preserve working drainage, seek qualified advice for structural drainage concerns, and use planting only where the water path is understood.
Assess soil texture, compaction, and rooting depth without assuming that every drought-tolerant plant wants the same amendment. CSU Extension notes that compaction can impede xeriscape conversion and that many drought-tolerant plants perform better in conditions resembling their regional habitat rather than in universally enriched soil. A soil test can guide nutrient or pH decisions; it does not replace a drainage and root-zone inspection.
Record the evidence on a base plan: hours and season of sun, reflected heat, wind, roof shadow, existing root areas, drainage direction, irrigation components, and public-facing views. Leave uncertain pockets unassigned. The plan becomes fragile when one generic plant list is spread across every microclimate and then rescued with extra irrigation.
Protect established trees during the conversion
An established tree may be the front garden's strongest structure and its largest living water investment. If it has grown in irrigated lawn, removing turf and shutting off the old station can impose a sudden drought even when the tree species is described as tolerant once established. The CSU retrofit guidance specifically warns that landscape conversion can stress or kill trees that relied on surrounding lawn irrigation.
Map the visible trunk, canopy, major surface roots, and the wider soil area likely occupied by roots. Do not excavate, till, add deep soil, or run machinery through that zone without appropriate arboricultural guidance. Design low, compatible planting around the tree's real root and shade conditions rather than forcing a new geometric bed that requires root cutting or grade changes.
Give tree watering a deliberate plan separate from the new low-water perennials when their needs differ. The method and interval depend on species, soil, climate, root condition, and prior irrigation. Keep access to the delivery system and observe soil moisture rather than promising that a mature tree can be weaned on a fixed timetable. Some trees may always need supplemental water in that site.
Use the canopy as a compositional asset. It can anchor one side of the facade, cast useful shade, and give scale to lower shrubs and grasses. Echo its foliage color or branch line elsewhere while retaining it as the single large specimen. Protecting one sound tree often creates more immediate maturity than filling the yard with many small drought-marketed plants.
Build the composition from durable forms
Start with a small structural framework that remains legible outside peak bloom. Depending on region and architecture, it might include the retained tree, two or three rounded or upright shrubs, a repeated tufted grass, and broad low ground layers. These roles can be filled by many locally appropriate taxa. Form is the design decision; the species and cultivar are the horticultural decision.
Draw every candidate at a credible mature width and height. A compact nursery plant is not a reason to place five where two mature plants fit. Keep windows, paths, utilities, and the house accessible, and reject a shrub that must be repeatedly sheared to stay within its space. Low-water plants can still grow broad, arch after rain, sucker, seed, or overwhelm neighboring crowns.
Arrange structure in unequal but balanced masses. One substantial group near an exposed corner can balance several lower repeated shrubs near the entrance. A clear ground plane or mulch interval may connect them. Avoid the dotted effect of one specimen from every category; isolated plants make the irrigation layout complicated and keep attention on empty material rather than on a composed garden.
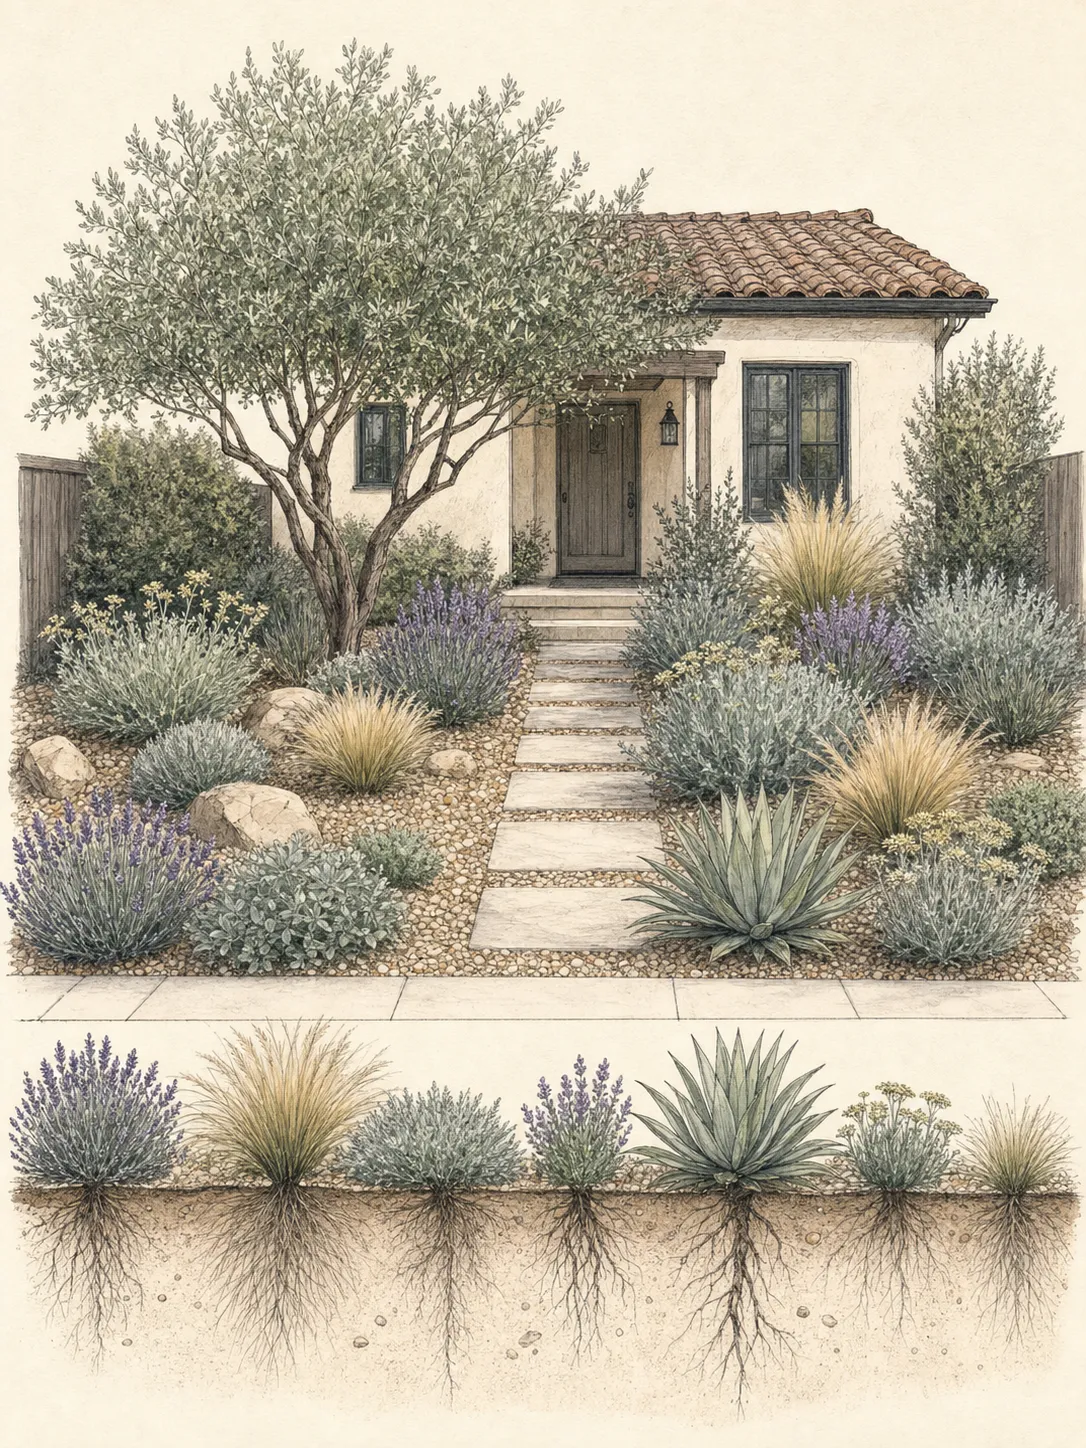
Test the framework in four seasonal sketches. Show bare deciduous branches, dormant perennial positions, evergreen weight, seed heads worth keeping, and the moment when spring growth has not yet filled the bed. If the design exists only when everything flowers at once, add or strengthen foliage, bark, branching, and repeated form before expanding the flower list.
Draw hydrozones before arranging plants
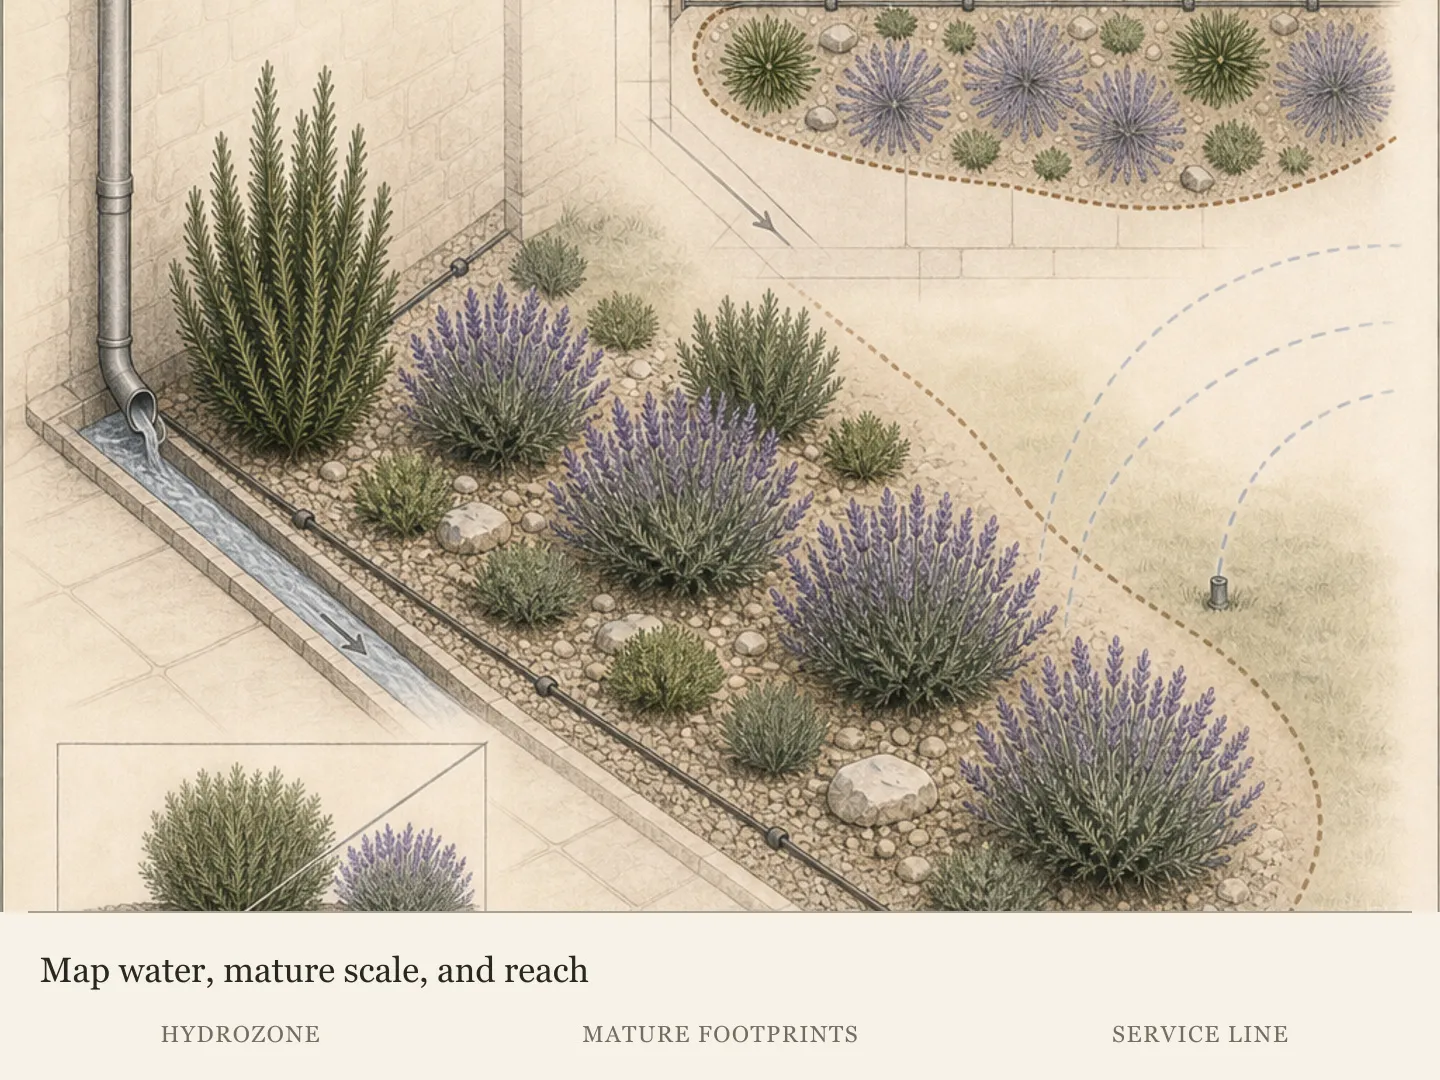
A hydrozone is a group of plants that can reasonably share water delivery because their needs and site conditions are compatible. EPA WaterSense and University of California guidance both recommend grouping plants by water requirement. On the plan, outline the retained tree zone, the low-water structural planting, any intentionally moderate-water accent, and the establishment needs of new work before choosing exact emitters or schedules.
Do not put a plant with reliably higher moisture needs in the middle of a dry matrix and then increase the whole station until that one plant looks comfortable. Move it into a compatible pocket, keep it in a separately managed container, substitute a similar ornamental role, or omit it. One exception can become the hidden water budget for the entire frontage.
Match water zones to exposure and soil as well as plant labels. The same cultivar beside reflective paving may dry differently from one under open morning sun, while a low pocket can remain wet after surrounding soil is ready for irrigation. Hydrozoning is a planning discipline, not a guarantee that every root ball in a drawn polygon behaves identically.
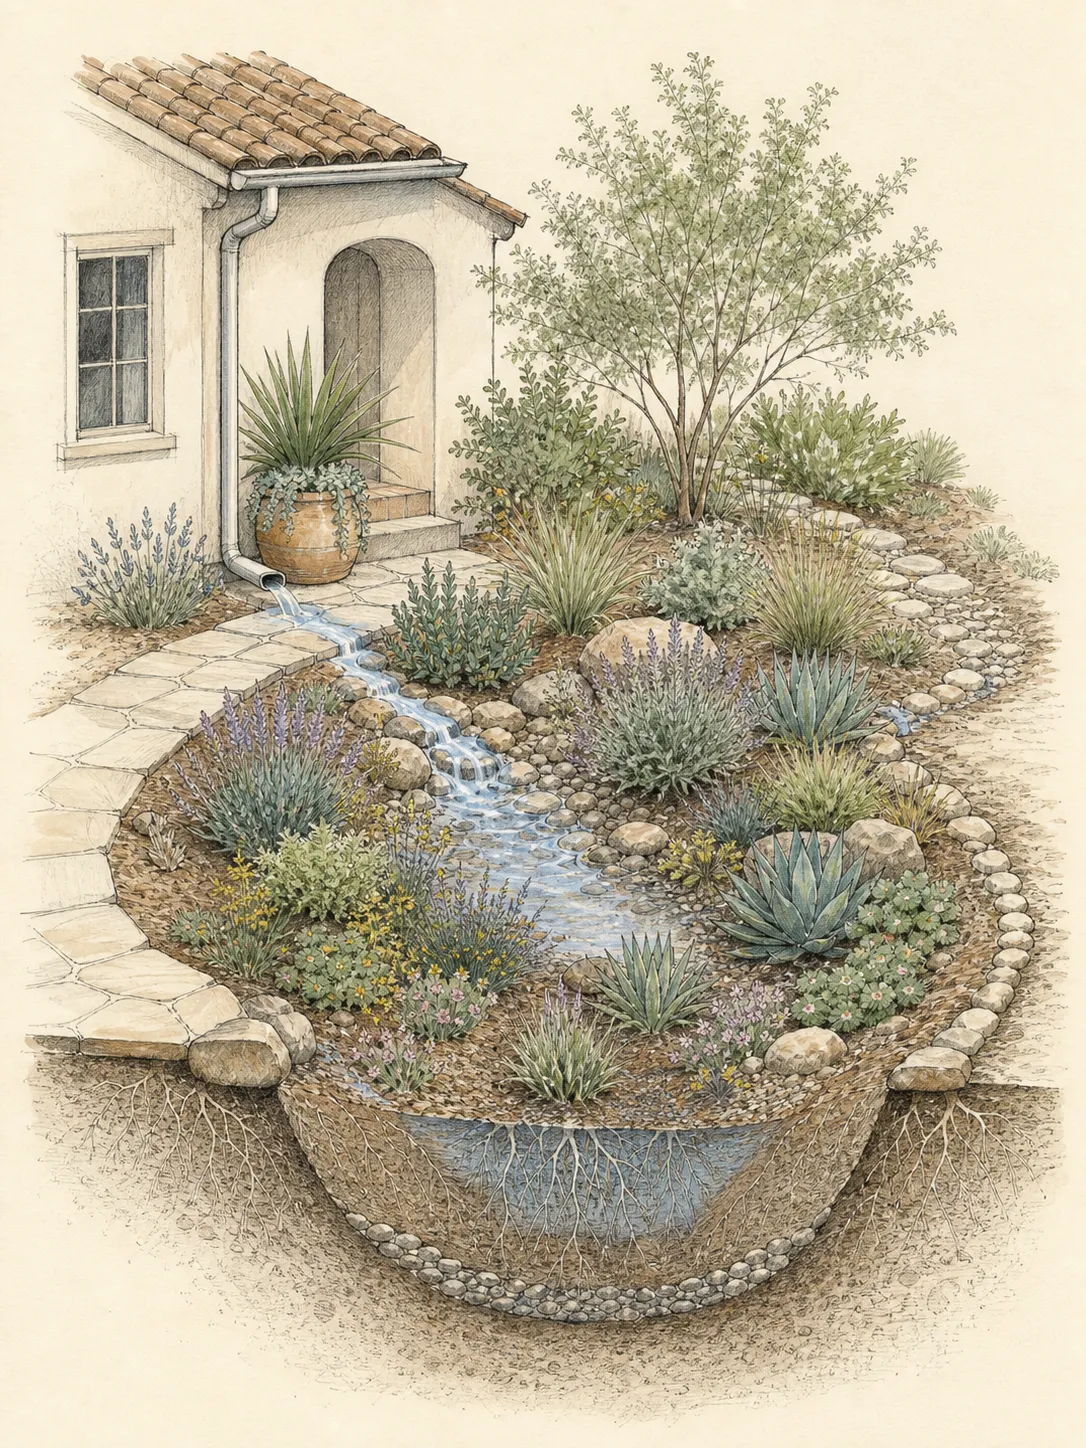
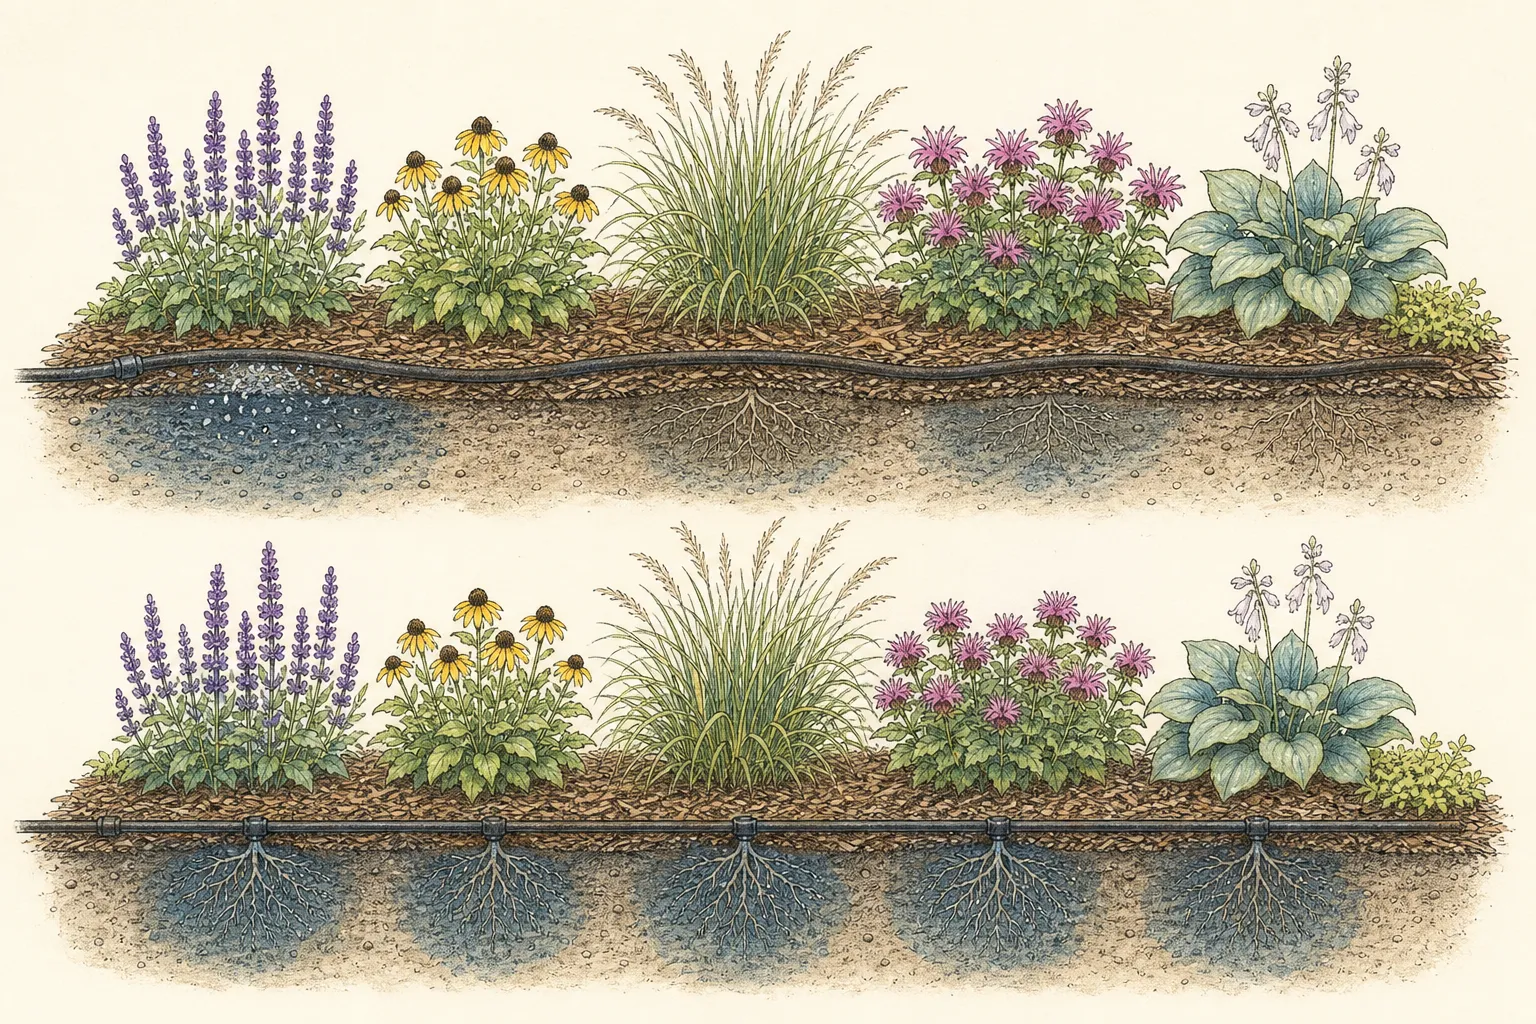
Design the system so it can be inspected and changed. Keep valves, flush points, connectors, and outlets reachable; show them on the plan; and avoid burying uncertainty under permanent fabric or deep aggregate. University of California guidance stresses operating and maintaining irrigation correctly. Concealed leaks or an unchanged lawn schedule make the garden only visually dry.
Plant one Colorado Front Range and foothills plan
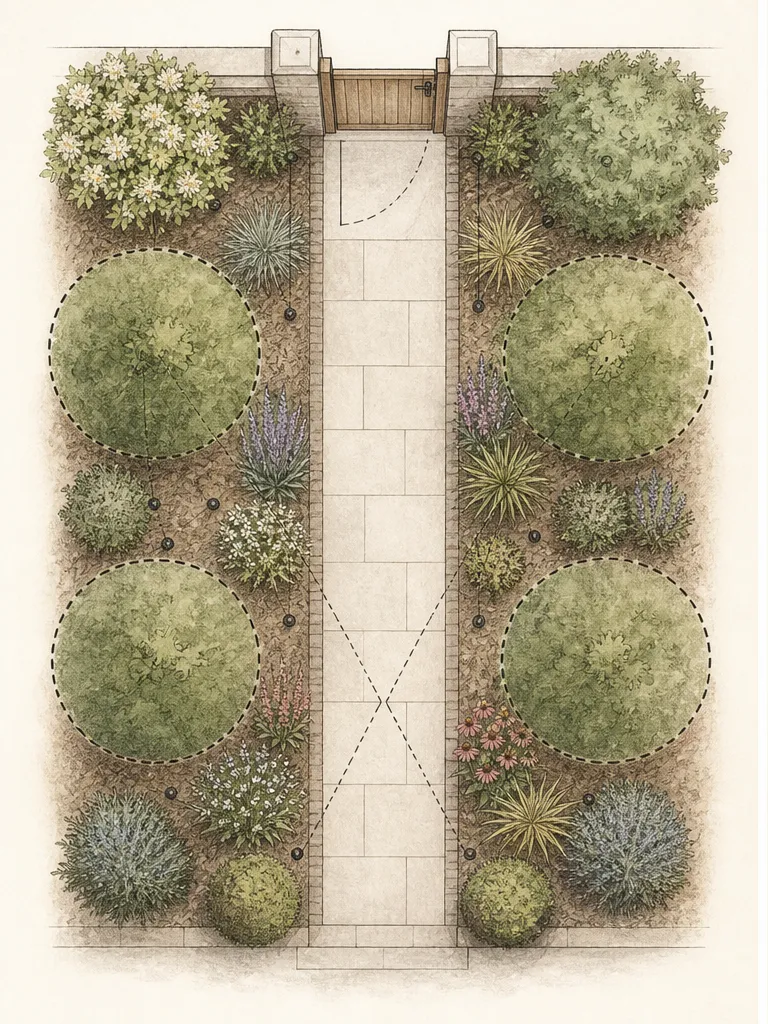
This worked plan is a 15-by-5-foot bed, approximately 4.6 by 1.5 metres, in full sun and well-drained soil along Colorado's Front Range and foothills. That source region lies east of the Continental Divide and west of the plains. It does not cover high mountains, southeastern Colorado, the Western Slope, California, or a site with persistent winter wet. The plan adapts the retained guide's rectangular Landscape Design #2. Any established tree remains on a separately managed H0 watering plan.
Divide the bed into a 12-by-5-foot H1 dry matrix and a separately delivered 3-by-5-foot H2 low-to-medium-water pocket at the cooler entry end. Keep H2 away from reflected driveway heat and uncontrolled roof discharge. H1 contains one Ericameria nauseosa, three Schizachyrium scoparium, three Penstemon strictus, three Liatris punctata, five Berlandiera lyrata, and five Sphaeralcea coccinea. H2 contains seven Antennaria parvifolia and five Callirhoe involucrata. Reduce a quantity whenever mature footprints or access would otherwise overlap.
Place the single rubber rabbitbrush at the rear, outside windows, utilities, the entry view, and driveway sight lines. The regional guide lists a mature size of 4 feet high by 3 feet wide, so reserve its full 3-foot spread for the late-season woody anchor and winter framework. Repeat little bluestem behind the flowering layer on 18-inch spread allowances; its listed 24-inch height and persistent upright form provide summer rhythm and winter seed-head structure.
Use the upright flowers as two distinct beats within H1. Rocky Mountain penstemon receives a 24-inch spread allowance from a listed 30-by-24-inch size, while dotted gayfeather receives 12 inches from a 24-by-12-inch size. Set both where their stems stay clear of circulation. Five 18-inch chocolate-flower mounds form the rounded summer middle layer, and five 10-inch scarlet globemallows stitch a lower warm-color foreground between them. The exact species names matter because a genus-level substitute can differ in size, spread, and water response.
Keep the H2 entry edge low and visibly separate. Pussytoes forms the quiet mat, using seven plants with 6-inch spread allowances based on a listed 2-by-6-inch size. Five wine cups weave through that mat on 10-inch spread allowances from a listed 4-by-10-inch size. This pocket may receive low-to-medium water without changing the H1 schedule. Move the boundary or reduce plants if roots would cross an outlet, paving joint, or the dry matrix before maturity.
All new plants begin with establishment care rather than their mature hydrozone schedule. The regional guide calls for watering through at least the first season and identifies the first three weeks as most critical. CSU's retrofit guidance adds that establishment duration varies with plant size and conditions. Check each original root ball and adjacent soil, correct runoff or saturation, and reduce irrigation only as roots and growth support the change. H2 never authorizes increasing H1, and the retained tree keeps its independent plan.
The plant list is regional evidence, not a universal permission list. Confirm exact nursery identity, local hardiness, winter-moisture tolerance, volunteer seedlings, fire-safety requirements, and current city, county, and HOA rules before purchase. The CSU material notes self-seeding for Rocky Mountain penstemon and places chocolate flower naturally toward the southern Front Range while recognizing its Metro Denver use. Omit any taxon that is prohibited, locally problematic, or unavailable as the named species.
Outside the declared region, preserve the roles while changing the names. Replace rabbitbrush only with a locally suitable late-season shrub that fits a 3-foot-wide envelope and the site's lowest mature-water class. Replace little bluestem with a non-running upright grass near an 18-inch spread that remains useful after summer. Match the early-to-midseason upright, later narrow spire, low summer mound, and entry mat to comparable mature outlines and the same hydrozone relationship.
Reject a substitute when flower color is its only match, its mature spread blocks a sight line, or its roots need a wetter zone than its neighbors. Running grasses, aggressive seeders, plants that collapse over the walk, and taxa with unresolved hardiness or legal status also fail the role. Check structural habit, local bloom sequence, light, soil, winter moisture, establishment needs, and current invasive guidance. Leave the position open when any consequential answer is missing.
Make flowers a sequence inside the framework
Once structure and water zones are fixed, layer flowers as repeated seasonal events. Choose a limited number of locally suitable perennials, bulbs, and small shrubs that share the assigned conditions. Repeat each in groups large enough to read from the street, then let a few upright accents rise through them. This produces generosity without requiring a cactus collection or a long list of unrelated drought symbols.
Use foliage to bridge bloom gaps. Fine grasses can contrast with broad leaves; silver or blue-green foliage can echo masonry; dark green mounds can quiet hot flower colors. Keep the palette restrained enough that bare intervals and newly establishing plants look intentional. Drought tolerance is not a color scheme, so green can remain the principal field even in a very low-water garden.
Select bloom by relative local season rather than catalog month. Heat, elevation, winter chill, and cultivar alter timing. Ask local public gardens, Extension resources, and reputable regional nurseries what persists under conditions like the site. Record cultivar names because size, flowering, and water response can differ within a species. Check invasive status and local restrictions before accepting a vigorous self-sower as easy care.
Keep one or two places for temporary first-season color only if their water and root competition are compatible with the permanent plan. Mark permanent crowns and remove fillers before they take future space. The objective is not instant density. It is a repeatable sequence that becomes more coherent as long-lived plants reach their intended form.
Let paths and mulch show intention
A front garden communicates through edges before visitors identify plants. Keep the route to the door continuous, stable, and visually obvious. Shape beds in lines that relate to the entrance, facade, or retained tree rather than tracing every sprinkler head. Preserve locally required widths, sight lines, and accessible surfaces; garden abundance should never depend on borrowing from circulation.
Choose mulch for the plants, climate, slope, and maintenance regime. Colorado State guidance notes that organic materials can retain water and help with compaction, while gravel can suit plants that need fast crown drainage. Neither is universally correct. Dark rock can intensify heat, fine material can migrate, and organic mulch can bury dry-loving crowns if applied as a uniform deep blanket.
Use one main surface material and few transitions. Broad mulch fields, repeated groundcover masses, or stable mineral bands can serve as negative space around young plants. Avoid scattering decorative boulders, pots, and contrasting gravels until the composition becomes a catalogue of objects. Intentional form comes from a clear hierarchy between plants and open ground.
Keep mulch away from trunks and crowns according to the plant's needs, and maintain visible access to irrigation. Replenish only after measuring what remains; do not add a ceremonial new layer every year. Weed early while the soil is visible, because a dense weed population consumes both water and the negative space that makes a young structured garden readable.
Convert in phases without losing the design
A phased conversion is useful when the site is large, existing plants are valuable, or the new maintenance pattern is unfamiliar. CSU Extension recommends phases so gardeners can learn what performs and what the work requires. Divide by complete visual and irrigation units, not by buying a few scattered plants for every future bed.
Begin with the entry route, retained tree protection, and one representative hydrozone. Install its structural plants at mature spacing, mark permanent centers, and use a coherent temporary mulch field around them. This first area should test reflected heat, soil preparation, irrigation access, and the visual language that later phases will repeat.
Keep the rest stable while observing. Do not remove all functioning cover and leave bare compacted soil for a year. Maintain remaining turf or existing planting responsibly, or use an appropriate interim surface after checking local rules and drainage. Protect roots and prevent sediment from leaving the property during every phase.
Record products, plant names, dates, irrigation changes, and photographs from fixed views. When the first zone succeeds, repeat its relationships rather than adding a completely new palette. When it fails, diagnose site fit and establishment practice before assuming the low-water premise was wrong. Phasing is valuable only when evidence changes the next phase.
Water establishment as a temporary project
Drought-tolerant does not mean dry immediately after planting. CSU Extension emphasizes that new xeric plants need regular water until roots establish, with duration varying by plant size and conditions. Water the original root ball and surrounding soil as needed for root expansion, checking moisture rather than relying on the surface appearance of mulch.
Commission the irrigation with containers or catch tests appropriate to the system, and watch every zone run. Look for blocked outlets, runoff, overspray, low-point drainage, and water that never reaches a root ball. Adjust delivery to soil intake and equipment instructions. Keep spray off walks and walls and avoid using one long runtime to compensate for compaction or a misplaced emitter.
Review each plant separately during the first hot, windy, or unusually dry period. Wilting, dull foliage, leaf scorch, and saturated soil can have different causes, and adding water reflexively can make poor drainage worse. Confirm moisture in the active root zone, inspect the outlet, and compare plants within the same zone before changing the schedule.
Reduce establishment irrigation gradually only when root-zone evidence and new growth support the change. Keep the tree and any moderate-water pocket on their own appropriate plan. Write down each adjustment and the weather context. The mature low-water pattern should emerge from observation; it should not arrive as an arbitrary date when all supplemental water stops.
Edit for lower input and stronger identity
Review the garden after establishment and during a demanding weather period. Photograph it from the street, entry, and main window. Mark plants that need rescue watering, repeated shearing, staking in ordinary weather, or replacement after predictable winter wet. Also mark successful groups whose form remains clear without attention. Maintenance records reveal whether the design is genuinely low-input.
Remove or relocate the exception that controls an entire zone. A favorite plant can move to a pot or more suitable bed rather than forcing every neighbor onto its schedule. Replace failures by ornamental role—rounded evergreen, airy flowering layer, vertical accent—not by hunting for a visual duplicate with the same site mismatch.
Preserve some seasonal change. Low-water does not require an evergreen carpet, and winter structure does not require every stem to remain. Keep seed heads and grasses that stand safely and contribute, cut material that collapses over paths, and let deciduous shrubs reveal branch form. The four-season framework should guide selective cleanup rather than a universal cutback date.
Recheck irrigation at least when the active season begins and after digging, damage, or major growth. Update the plan as canopies expand and outlets move. A successful low-water front garden is recognizable by its composed forms, clear entrance, locally credible plants, and decreasing need for intervention—not by gravel quantity or the presence of any particular desert plant.
Design ideas
- Style
- Layered, foliage-led low-water planting with a restrained structural framework and seasonal flowering drifts
- Space
- Residential front garden viewed from the street, entry walk, driveway, and principal front windows
- Climate
- Low-water is regional: select species and cultivars from local evidence, preserve established-tree needs, account for winter wet or cold as well as summer drought, and group plants by compatible water demand, exposure, soil, and establishment stage.
- 1Frame the entry with two unequal masses
Place one larger locally suitable shrub or small-tree group where it can anchor an open corner, then balance it with several lower repeated shrubs near the entry without making a mirror image. Keep both groups at mature clearance from paths, windows, utilities, and the building. Connect them with one ground layer or mulch field so the house remains the focal point and the irrigation zones stay simple.
- 2Repeat one grass and one broad leaf
Choose a regionally dependable tufted grass and a contrasting broad-leaved perennial that share the same light, soil, and water zone. Repeat them in separated groups of different sizes, leaving crowns and mature widths legible. The recurring texture supplies movement and coherence before and after bloom; a few seasonal flowers can change around this pair without turning the front yard into unrelated specimens.
- 3Make a dry foreground and a greener core
Use low, contained plants and a stable locally appropriate mulch along the hottest public edge, then place deeper green shrubs and flowering perennials in a slightly more sheltered inner group. The visual gradient can feel lush without assigning equal water everywhere. Confirm that both areas remain separate hydrozones and that the foreground does not become a heat-reflecting strip that exceeds the selected plants' tolerance.
- 4Keep one moderate-water accent honest
If one treasured plant needs more moisture than the low-water matrix, place it in a discrete pocket with its own delivery and a clear reason, such as framing the door. Do not conceal it in the middle of the dry zone. Record its actual use through a full season; if the pocket drives frequent irrigation or fails in the site's heat, substitute another plant with the same form or color role.
- 5Use three rounds of seasonal emphasis
Assign a repeated early flower, a broader summer drift, and a restrained autumn accent within the permanent foliage framework. Choose relative timing from local observation rather than promised calendar months, and ensure every group shares its site's water requirements. Let foliage, bark, and grass form carry intervals between flowers. This creates a garden sequence without requiring every square foot to bloom or receive extra water.
- 6Turn irrigation access into negative space
Preserve a small open mulch or stepping pocket beside a valve, flush point, tree-watering connection, and any plant that needs periodic division. Repeat the shape so it reads as part of the design. The openings make maintenance possible without compacting root zones and keep young planting calm. Do not fill them later with pots or volunteer seedlings that hide the equipment they were meant to expose.
- 7Test one complete composition first
Install a representative planting containing one structural shrub, one repeated grass, one flowering group, its final mulch, and its intended irrigation. Observe establishment, winter drainage, mature posture, and maintenance before repeating it. Reserve realistic mature space on the whole plan from the start, so the trial informs later phases without inviting temporary plants into positions needed by the finished framework.
Plants in this guide
Related reading
Sources
- Xeriscaping: Retrofit Your Yard. Colorado State University Extension. Source record · Accessed 2026-08-30.
- Conserve Water in Landscapes. University of California Statewide IPM Program. Source record · Accessed 2026-08-30.
- Take Action. US EPA WaterSense. Source record · Accessed 2026-08-30.
- Low-Water Native Plants for Colorado Gardens: Front Range & Foothills. Colorado Native Plant Society and Colorado State University Extension. Source record · Accessed 2026-08-30.