Grow · first summer mixed shrub watering
Water a Newly Planted Mixed Shrub Border Through Its First Summer
Check each original root ball and its surrounding soil before watering, then adapt delivery by plant, drainage, weather, and the developing root zone rather than following one border-wide schedule.
Published Last updated
In this guide
- Treat a mixed border as separate new root zones
- Treat each original root ball as its own starting point
- Recheck planting depth and water movement first
- Check two soil zones at every representative shrub
- Calibrate the delivery instead of timing by guesswork
- Build a weather-responsive check rhythm
- Separate heat response from water need
- Move the wetted pattern outward as roots establish
- Use mulch as a surface aid, not a moisture verdict
- Close the first summer with a root-zone record
- Steps
Treat a mixed border as separate new root zones
A newly planted mixed shrub border may look like one continuous bed, but its plants do not begin with one shared root system. Each shrub arrives with an original root ball that differs in volume, texture, density, and moisture from the surrounding soil. Container-grown material, balled-and-burlapped stock, and plants of different sizes can dry or drain at different rates. The first-summer routine must keep these individual zones visible in the gardener's mind.
Create a simple border map with every shrub, planting date, stock type, root-ball outline, irrigation outlet, slope, downspout, and known drainage change. Record species and cultivar because establishment behavior and moisture tolerance differ. The map is not a prescription for fixed quantities. It is a way to locate where water is being delivered and where evidence must be collected before the border is treated uniformly.
Use regional institutional guidance as a starting framework, then adjust to observed soil and plant response. University of Minnesota Extension describes establishment watering by time since planting, while Iowa State and Clemson provide climatic and regional context. Those schedules and volumes are not universal across soil types, climates, plant sizes, or water systems. This method therefore centers repeatable root-zone checks rather than transferring one number to every garden.
Treat each original root ball as its own starting point
Map shrubs whose root balls, exposure or surrounding soil differ before setting irrigation. Check the original ball and adjacent ground at representative points, then water only the zones supported by those readings. Expand useful delivery as establishment develops. A continuous-looking bed does not mean every young shrub shares the same moisture state or watering interval.
Recheck planting depth and water movement first
Before correcting a summer symptom with more water, verify that planting depth, grade, mulch, drainage, and root-ball preparation were appropriate for the exact stock and local guidance. Keep the shrub's trunk flare or stem base visible as applicable, and keep mulch away from living stems. Water cannot correct a deeply buried base, a perched root ball, compacted glaze, circling roots left unaddressed, or a planting pocket that remains saturated.
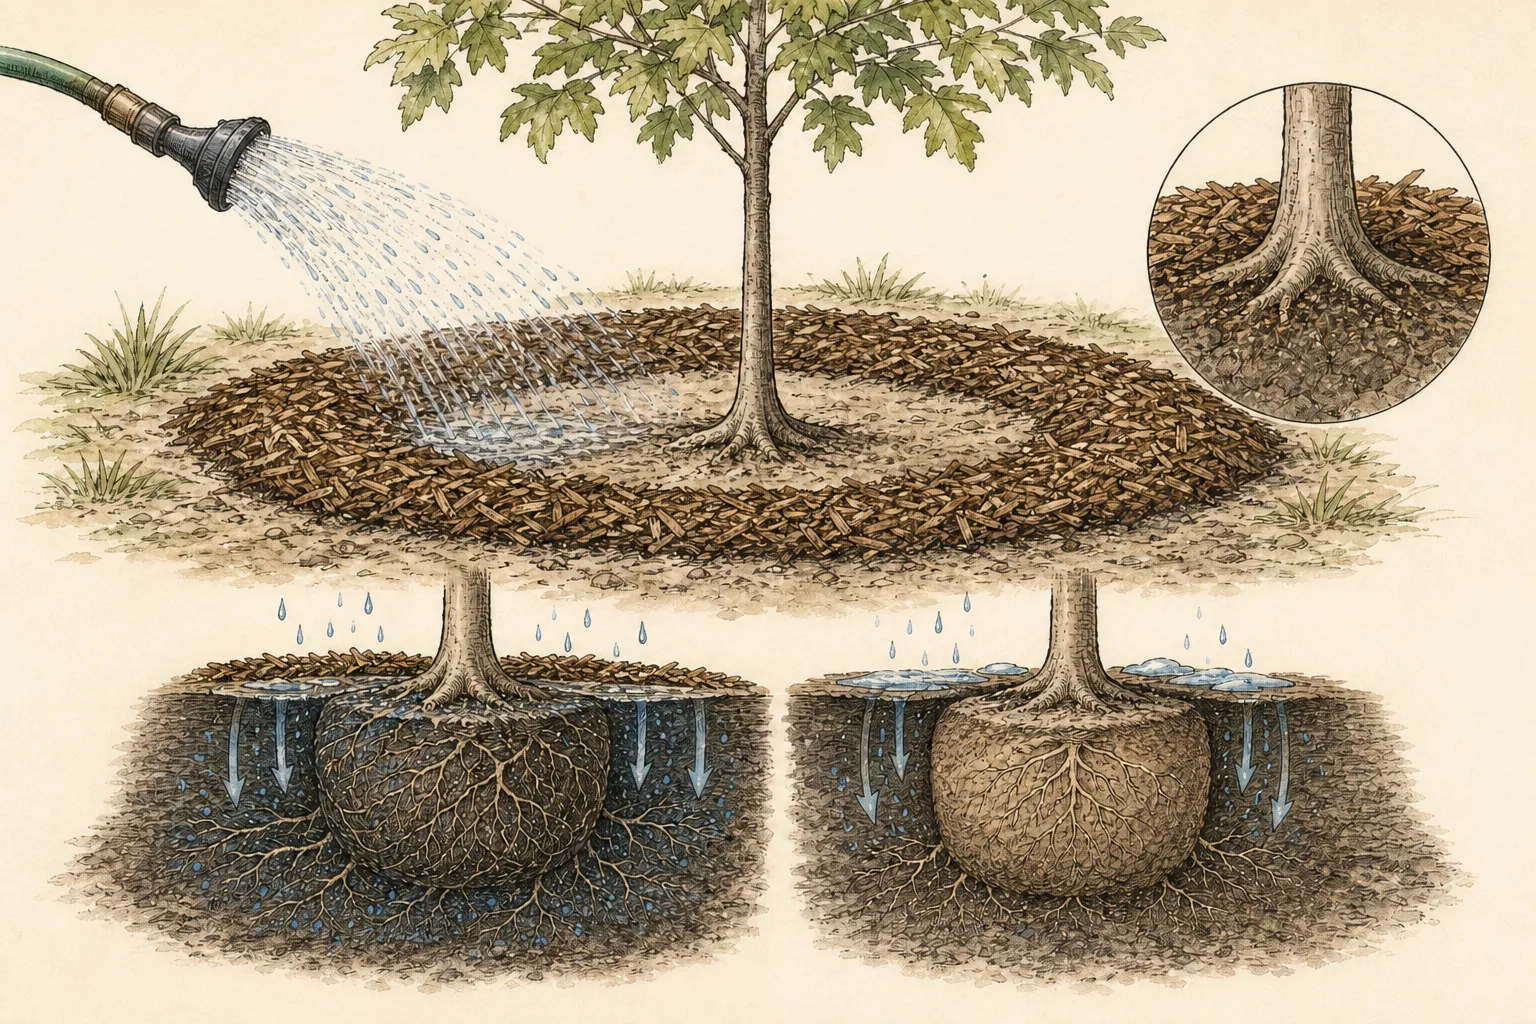
Watch one ordinary watering cycle. Note whether water infiltrates the root ball, runs down its side, ponds in the surrounding soil, escapes downhill, or disappears into a crack. A coarse container substrate can behave differently from finer native soil; a very dry root ball may initially resist wetting. Correct delivery and planting faults using appropriate professional or regional guidance rather than lengthening runtime blindly.
Investigate standing water, persistent saturation, or drainage toward buildings before continuing routine irrigation. Do not dig near marked utilities or alter grading and drainage without appropriate authorization and expertise. Where oxygen-poor conditions or root decay are suspected, obtain a regional diagnosis. Wilting can occur in both dry and waterlogged root zones, so the appearance of leaves alone does not authorize another watering.
Check two soil zones at every representative shrub
At each check plant, examine moisture within the original root ball and again in the adjacent surrounding soil. Use a finger, narrow trowel, soil probe, or another method that can sample below the decorative surface without damaging major roots or utilities. Assess feel and moisture condition rather than judging only the mulch or top crust. The root ball can be dry while nearby soil feels damp, or the reverse.
Choose representative shrubs for every meaningful difference: stock type, size, sun exposure, slope position, soil pocket, irrigation outlet, and species moisture response. Early in establishment, check more than one plant even if they share a line. Once repeated observations show similar behavior, a representative can stand for a genuinely uniform group, but any plant showing a different response returns to individual checks.
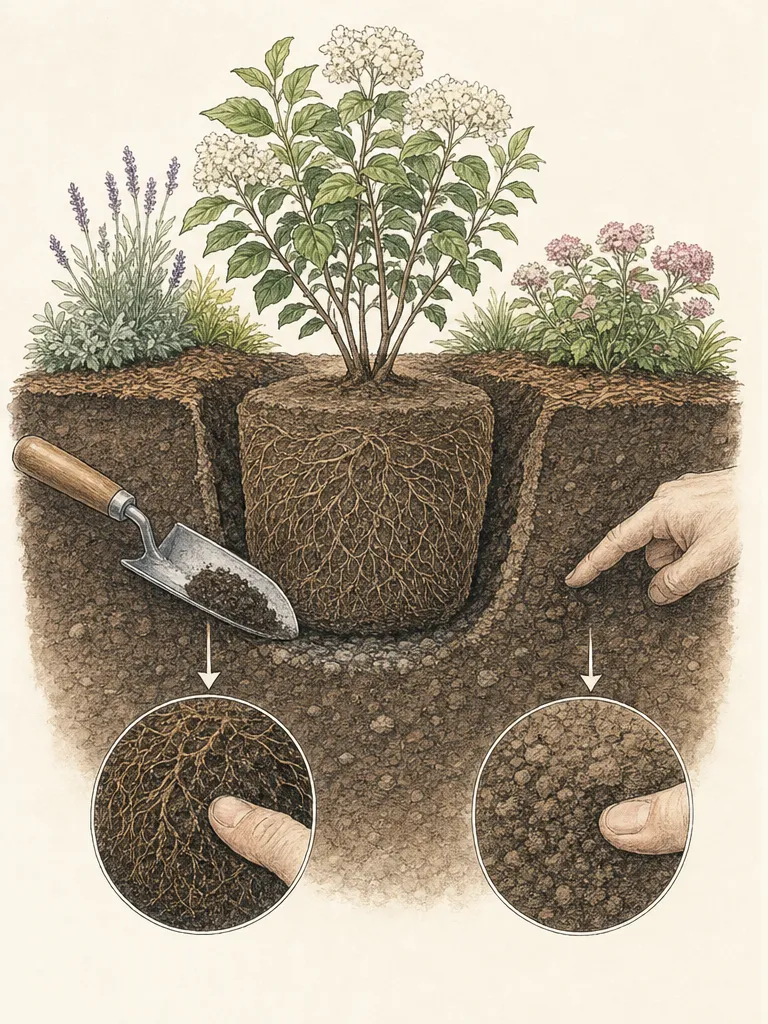
Keep notes in simple categories that make sense for the soil—dry and resistant, lightly moist, evenly moist, very wet, or saturated—along with weather and plant condition. Avoid claiming that one feel equals one exact water content across soils. The purpose is comparison over time. Water when the root-zone evidence and plant-specific guidance indicate need, then check the result to learn how that border responds.
Calibrate the delivery instead of timing by guesswork
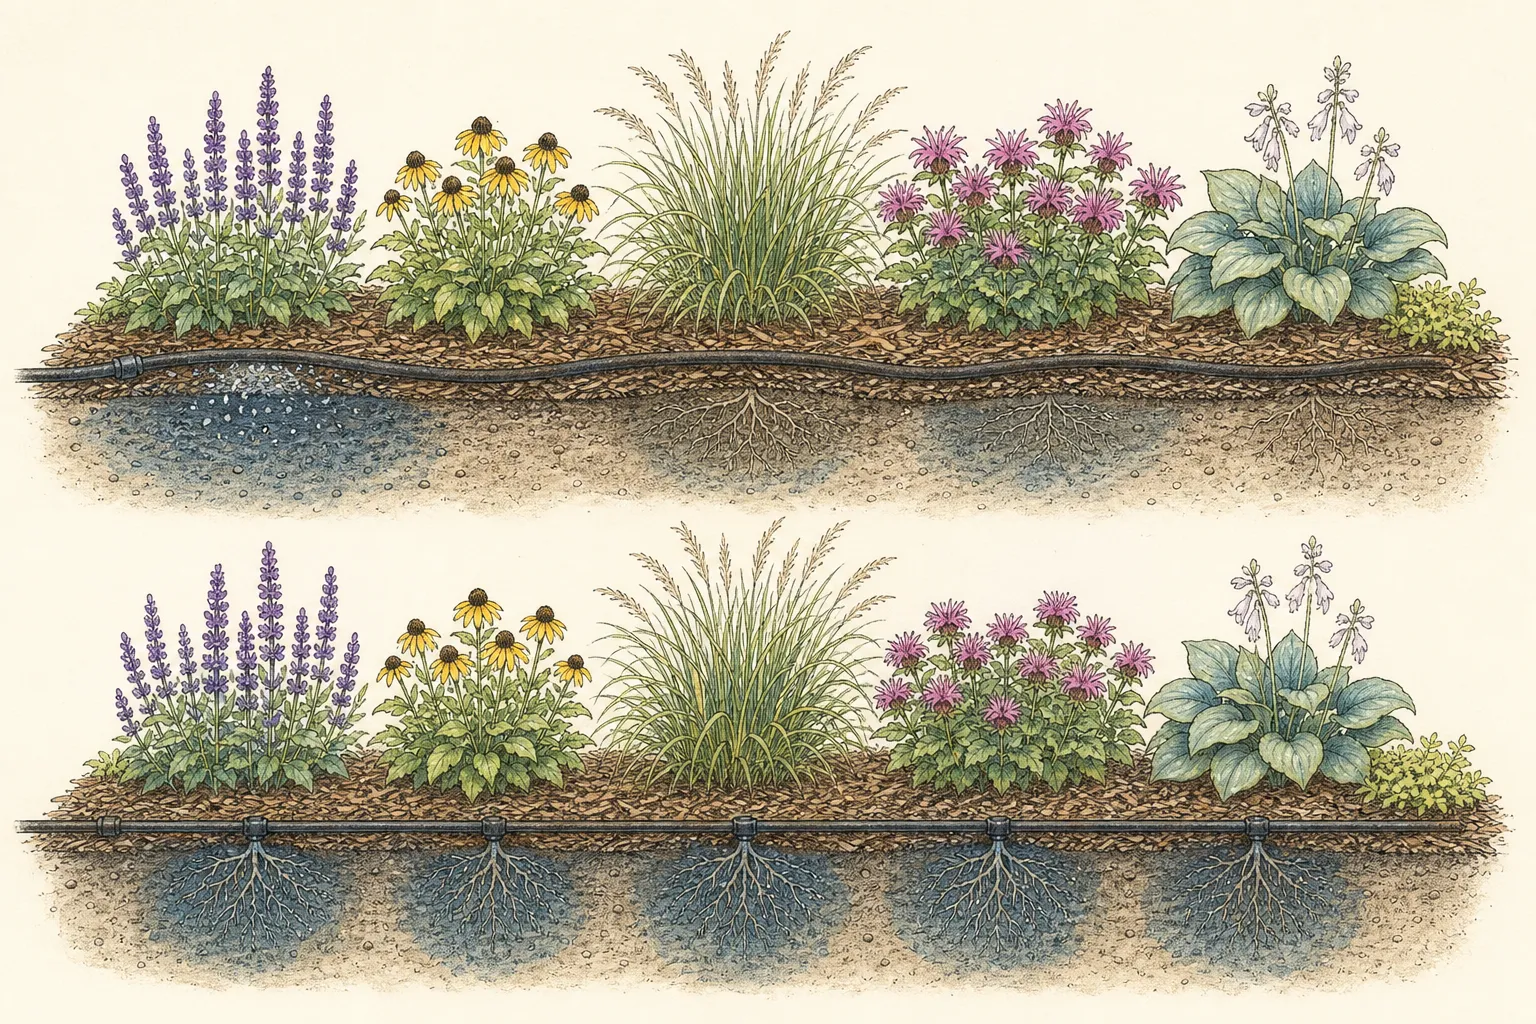
Measure what the chosen device actually does at each shrub. Drip emitters can vary with pressure, clogging, line length, slope, and installation; soaker hoses can wet unevenly; a hand-held hose depends on the operator. Use a suitable collection or flow-check method recommended for the system, inspect outlets while running, and record enough information to compare zones. A timer setting alone is not evidence that a root ball received water.
Position delivery to wet the original root ball during early establishment while encouraging contact with the immediately surrounding soil. Avoid sending most water beyond the young root system or against the stem. More than one outlet may be needed around a larger root ball, but the configuration depends on size, soil, device, and slope. Check the wetted pattern below the surface after a cycle and revise placement rather than assuming a visible surface circle represents depth.
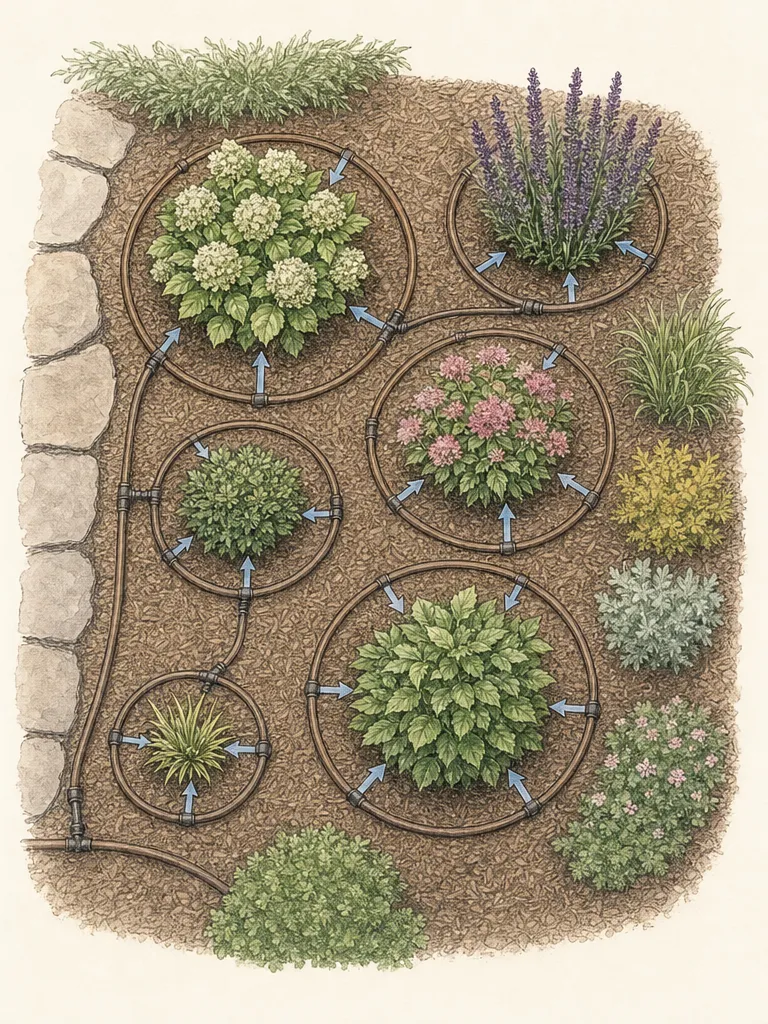
Apply water slowly enough for infiltration and pause when runoff or ponding begins. If the soil cannot accept the intended application, diagnose compaction, slope, crusting, or device flow. Splitting an application may help in some settings, but it should not conceal chronic saturation or a blocked drain. Follow local water restrictions and use regional drought guidance; ornamental priorities and permitted watering methods can change during restrictions.
Build a weather-responsive check rhythm
Schedule checks, not automatic watering. Early in the first summer, place recurring reminders to inspect representative root balls and adjacent soil. Increase observation during hot, windy, or unusually dry periods and after changes to irrigation. Reduce or postpone delivery when useful rain has actually moistened the relevant root zones. A rain gauge can record precipitation, but canopy interception and runoff mean the root-zone check remains decisive.
Consider plant demand and site exposure. A large leafy shrub in reflected heat may use water differently from a small, drought-adapted shrub in afternoon shade, even when planted the same day. Deciduous leaf-out, flowering, pruning, and storm damage can alter demand. Do not equate a species' mature drought tolerance with independence immediately after planting; roots still need to establish into surrounding soil.
Use the same observation method often enough to recognize trends. If the root ball repeatedly dries before surrounding soil, adjust outlet position or root-ball wetting. If surrounding soil remains very wet, reduce delivery and investigate drainage. If both remain appropriately moist for longer than expected, extend the interval between checks rather than watering because a calendar notification appeared.
Separate heat response from water need
Some plants temporarily droop or change leaf angle during the hottest part of the day even when soil moisture is adequate, then recover as conditions moderate. Other plants remain wilted because roots cannot supply the canopy, whether from dryness, damage, or poor aeration. Check the root ball and surrounding soil before acting. Compare condition during a cooler period and look for progression rather than using one midday observation as a diagnosis.
Watch for patterns: scorch concentrated on an exposed side, wilt limited to one branch, yellowing with persistently wet soil, premature leaf drop, or a plant that fails to recover overnight. These are prompts for closer investigation, not diagnoses supplied by this article. Verify irrigation function, planting depth, stem damage, root-zone condition, and exact plant problems through regional Extension or diagnostic services.
Use temporary non-plant interventions only when safe and regionally appropriate. Correct a displaced emitter, restore a conservative mulch layer while keeping bases clear, or shield a newly exposed root zone from further disturbance. Do not repeatedly flood a stressed plant, apply fertilizer, or prune healthy canopy merely to reduce perceived water demand without a diagnosis. Each action can add stress or obscure the original evidence.
Move the wetted pattern outward as roots establish
The watering pattern should evolve. Early attention to the original root ball prevents it from drying while roots are limited, but a permanent tight wet spot does not support expansion into surrounding soil. As observations show that roots and new growth are establishing and the adjacent soil participates in moisture exchange, reposition or expand delivery gradually. Continue checking the original root ball so the transition does not abandon it abruptly.
Do not infer full establishment from one flush of top growth. Root development depends on plant size, stock, species, soil, climate, planting season, and care, and may extend beyond the first summer. University schedules are useful regional frameworks but should not be converted into a universal finish date. Continue a locally appropriate establishment program until root-zone behavior and plant performance support a broader, less frequent pattern.
Coordinate outlets where shrub roots begin to share soil, but keep moisture preferences in mind. A mixed border may contain plants that should not remain on one permanent irrigation zone. If one species repeatedly needs water while another remains wet, separate their delivery or reconsider the combination. Irrigation design should follow compatible root-zone evidence, not the visual convenience of one continuous line.
Use mulch as a surface aid, not a moisture verdict
An appropriate surface mulch can moderate evaporation and soil temperature, but it also hides the soil. Pull it aside at the check point and inspect below. Keep a conservative layer that does not mound against stems, cover the trunk flare, bury shrub bases, block air movement at crown tissue, or obstruct irrigation and drains. Restore it after inspection without filling the probe opening with a deep collar.
Check whether water lands on mulch and runs elsewhere before entering the root zone. Matted organic material, steep grade, crusted soil, or misplaced tubing can redirect delivery. Break up or replace unsuitable surface conditions using local guidance, while avoiding deep cultivation among new roots. Do not keep increasing duration when the main problem is that water never reaches the intended zone.
Weeds and dense volunteer growth compete for water and can conceal emitters. Remove them carefully without disturbing new shrub roots. Keep ornamental perennials in the mixed border on their own evidence-based establishment checks; their smaller root volumes may differ from shrub root balls. A neat continuous mulch surface should not encourage the assumption that every plant beneath it shares the same moisture condition.
Close the first summer with a root-zone record
At the end of the first active season, summarize each irrigation group: which root balls dried first, which pockets stayed wet, where runoff occurred, which emitters moved, and how plants responded to hot or rainy intervals. Photograph plant form and record growth without turning shoot length into a universal success measure. The record should make next season's first checks more accurate, not declare the plants independent.
Inspect the system before winter or the local dormant and wet season. Follow manufacturer and regional guidance for shutting down, protecting, or continuing irrigation. Ensure lines do not constrict stems and outlets remain findable. Check mulch and grade again. In climates with winter drought or evergreen water loss, establishment care may continue under local guidance; in wet climates, excess water may be the greater risk.
The method succeeds when watering decisions become more specific and less automatic. Each shrub's original root ball and surrounding soil are checked, delivery is calibrated, weather changes the observation rhythm, and the wetted pattern follows root establishment outward. That evidence-based routine protects a diverse ornamental border from both blanket drought and blanket saturation through its first summer.
Steps
- Level
- moderate
- Time
- 20 to 45 minutes per check, plus calibrated watering time that varies by border and system
- Tools
- Narrow trowel or soil probe appropriate for the site, Rain gauge, Clean collection containers or system-specific flow-check tools, Timer or watch, Border map and waterproof notes, Hose, watering wand, drip system, or soaker hose suited to the planting
- Materials
- Water permitted under current local restrictions, Replacement emitters or fittings matched to the installed system, Appropriate surface mulch for restoring thin displaced areas, Plant labels for representative check shrubs
- 1Map every shrub and meaningful root-zone difference
Record planting date, exact plant, stock type, approximate root-ball outline, irrigation outlet, exposure, slope, drainage feature, and soil change. Group shrubs only when those conditions are genuinely similar. Select representative check plants for each group and retain individual checks for unusually large, stressed, differently sourced, or differently exposed shrubs.
- 2Verify grade, base visibility, mulch, and drainage
Confirm that planting depth and root-ball treatment follow current plant- and stock-specific regional guidance. Keep trunk flares or stem bases visible as applicable, move mulch away from living tissue, and inspect water movement. Stop and seek appropriate help for persistent ponding, building drainage conflicts, uncertain utilities, or symptoms consistent with a serious planting or root problem.
- 3Check the original root ball and adjacent soil
Move mulch aside and sample below the decorative surface inside the root ball, then repeat in the surrounding soil without damaging roots or utilities. Record both conditions along with weather and plant appearance. Do not water from surface color or leaf droop alone. If the two zones differ, plan delivery around that difference.
- 4Run and calibrate each delivery zone
Operate the system while watching every representative outlet. Use an appropriate collection or flow-check method to compare actual delivery, then inspect the wetted pattern below the surface. Correct clogging, pressure differences, misplaced emitters, runoff, or poor infiltration before increasing runtime. A timer setting is not a measurement of water received by the root ball.
- 5Water only the zones whose evidence supports it
Apply water slowly to the needed root ball and immediately surrounding soil, keeping it away from stems and stopping for runoff or ponding. Respect current restrictions and regional drought priorities. Shrubs on the same border may receive different decisions. Recheck after application to confirm that the intended depth and area changed rather than only the mulch surface.
- 6Adjust the next check for weather and response
Use heat, wind, useful rainfall, exposure, plant demand, and the last moisture observations to set the next inspection—not the next automatic watering. Increase observation when conditions change; lengthen the interval when both zones remain suitably moist. Compare midday stress with cooler-period recovery and investigate persistent or one-sided symptoms rather than repeatedly flooding the plant.
- 7Expand delivery outward as establishment develops
When repeated checks show the adjacent soil participating and the plant is establishing, shift or broaden the wetted pattern gradually while continuing to monitor the original root ball. Do not use a fixed date or one growth flush as proof of establishment. Separate irrigation zones if mixed shrubs show persistently incompatible moisture behavior.
- 8Review the season and preserve the evidence
Summarize dry and wet pockets, runoff, outlet changes, weather responses, and unresolved plant symptoms. Photograph the border, restore conservative mulch without burying bases, and service the system for the local next season. Carry forward representative check points until root-zone behavior and regional guidance—not the calendar alone—support a reduced establishment routine.
Plants in this guide
Related reading

Sources
- Watering the Garden and Lawn During Drought or Water Restrictions. Iowa State University Extension and Outreach. Source record · Accessed 2026-08-19.
- Watering Newly Planted Trees and Shrubs. University of Minnesota Extension. Source record · Accessed 2026-08-19.
- Watering Shrubs and Trees. Clemson Cooperative Extension Home & Garden Information Center. Source record · Accessed 2026-08-19.