Grow · flowering crabapple espalier framework training
Train a Young Flowering Crabapple as an Espalier Framework
Select a suitable crabapple and support, establish horizontal tiers from well-placed buds and laterals, and preserve flowering spurs without forcing mature wood flat.
Published Last updated
In this guide
- Decide whether espalier suits this tree and wall
- Separate permanent framework from a young flexible shoot
- Start with compatible plant material
- Build the support before shaping the tree
- Plant and establish the central leader
- Select one leader and the first paired laterals
- Develop flowering wood without losing the framework
- Add tiers only when the lower framework is sound
- Maintain a living framework, not a wall decoration
- Steps
Decide whether espalier suits this tree and wall
Espalier is a long-term training system, not a way to press any mature tree against a wall. Begin with a young, healthy, correctly identified crabapple whose rootstock, vigor, branching, disease resistance, fruit persistence, and mature potential suit the site. Ask the nursery whether the named ornamental selection responds well to formative training. A vigorous standard tree on an unknown rootstock can overwhelm a small façade despite annual pruning.
Measure available width and height, windows, doors, eaves, utilities, vents, paths, and the wall’s maintenance needs. Draw the finished tiers and a working gap behind them. The tree should not attach directly to siding or masonry. A support held away from the surface provides air, room for ties, and access for painting or repair. Keep roots clear of foundations, drains, and restricted soil volume.
Confirm light and soil. Flowering and sturdy spur development require useful sun, while reflected heat and foundation dryness can stress roots and bark. Inspect drainage after rain and map irrigation. Do not improve one narrow planting hole with rich material while leaving surrounding compacted soil unchanged. The root system will extend beyond the flat crown and needs a broad viable zone. Choose the final form. A horizontal tiered espalier uses a central leader with paired laterals at set heights. A fan uses different branch geometry. This article addresses a young tiered framework. Do not combine forms halfway because one shoot appears convenient. If the tree’s existing branches cannot supply a sound first tier without severe bending, start with a younger whip or accept a different form.
Separate permanent framework from a young flexible shoot
Confirm the tree and rootstock fit the completed espalier before training begins. Install support independently, then guide suitable young laterals gradually while protecting flowering spurs. A stiff branch that will not follow the intended line safely is a framework decision, not a reason to tighten its tie. Revisit attachments as the branch thickens and keep the wall serviceable.
Start with compatible plant material
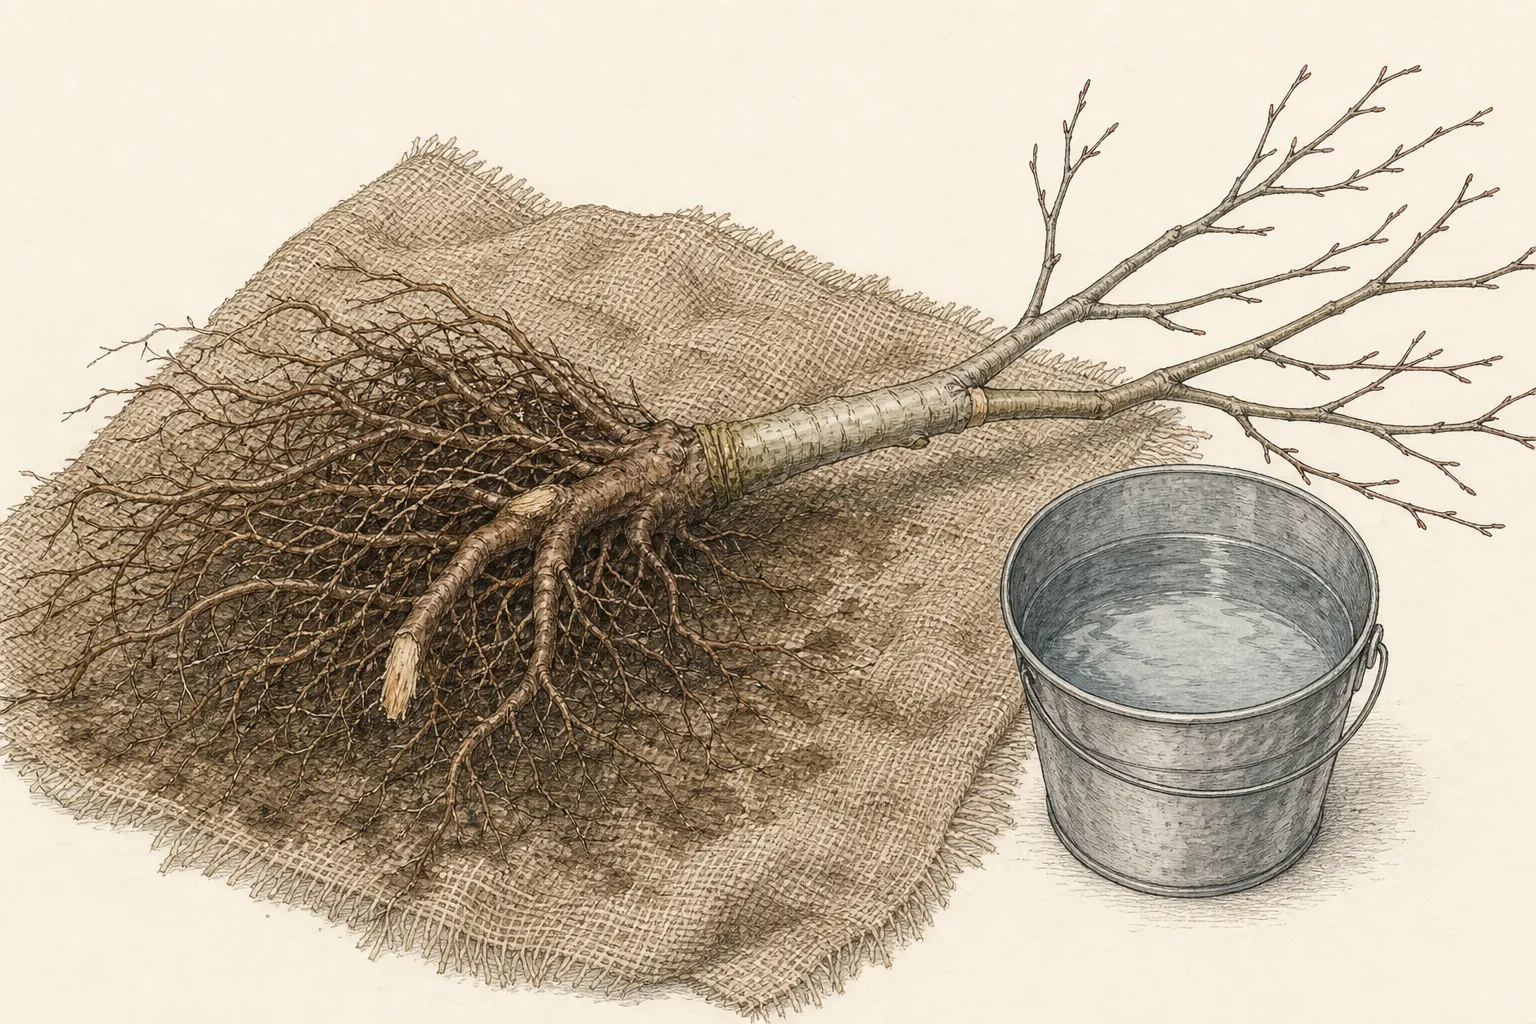
Select a one-year whip or lightly feathered young tree with an intact leader, healthy roots, no trunk wounds, and usable buds or side shoots near the intended first tier. A container tree should not be severely root-bound; a bare-root tree should arrive dormant and protected from drying. Keep the cultivar and rootstock label permanently in the garden record.
Inspect the graft union. It should remain above finished soil according to nursery and regional guidance, and shoots arising below it belong to the rootstock. Do not use a rootstock sucker as a tier. Remove it cleanly when identified. A buried union can allow scion rooting and alter vigor, while an exposed dry root flare creates another problem; plant at correct structural depth.
Consider fruit. Flowering crabapples may carry persistent or dropping fruit that stains paving and attracts wildlife. A flat form above an entry or narrow walk magnifies the issue. Place the tree where flowers and structure can be enjoyed without requiring constant cleanup on steps. Retain enough access to inspect for disease and remove mummified fruit if regional guidance calls for it. Avoid trees with included bark at low unions, cankers, major heading wounds, circling structural roots, or a leader already bent into a rigid curve. Espalier exposes every defect and applies repeated directional forces. A clean young tree may seem visually sparse, but it offers more control and less corrective injury than an older branched bargain plant forced into a diagram.
Build the support before shaping the tree
Install durable posts or wall anchors suitable for the structure and expected wet canopy load. Use corrosion-resistant wire and fittings appropriate to local conditions. Maintain a stand-off gap from the wall so leaves and fruit are not held against a damp surface. Do not drill into masonry, cladding, waterproofing, or utilities without the correct method and permission. Use a qualified installer when the substrate is uncertain.
Set the first wire at the planned tier height, then repeat equal or intentionally graduated spacing upward. RHS apple espalier guidance provides a traditional framework, but exact dimensions must fit rootstock, cultivar, wall, and access. Level each wire and tension it firmly without damaging anchors. Mark the final horizontal reach on both sides so tiers do not enter windows, paths, or a neighbor’s space.
Provide an independent vertical cane or wire for the leader. It should not rub the trunk or force it against the wall. Install soft ties with room for growth and schedule inspection. Do not wrap wire around bark or use a permanent tight loop. The support carries branches; the tree should never become the structural anchor for the support itself.
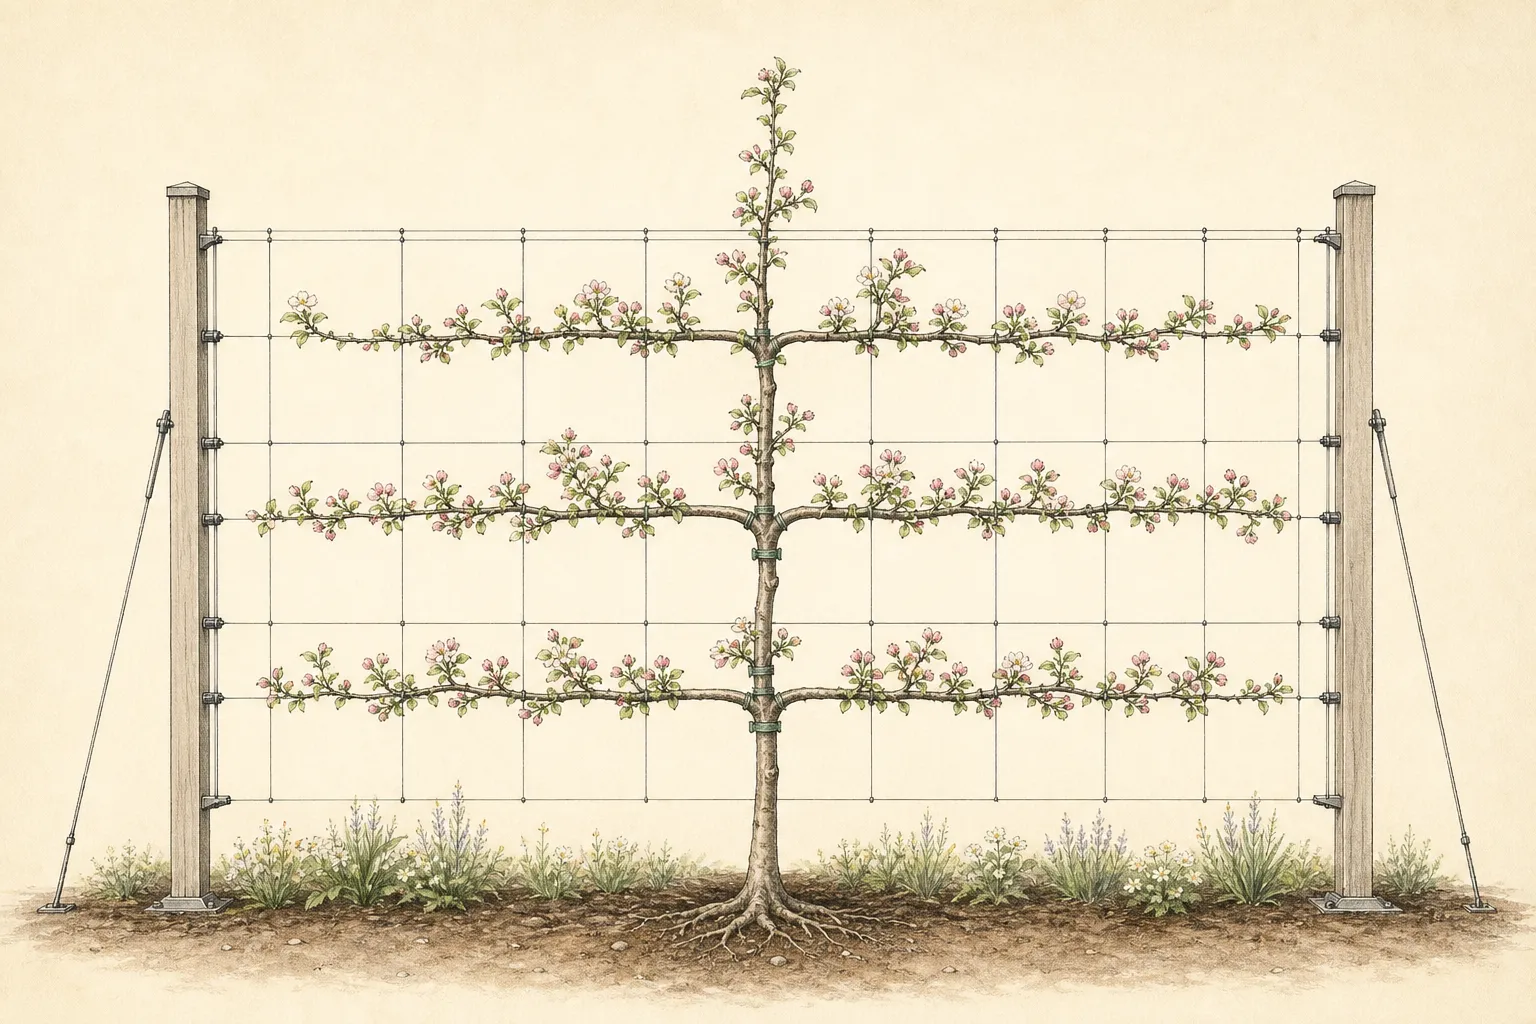
Test service access with the bare framework. Can hands reach every future tier, can a ladder-free gardener work from stable ground, and can the wall be inspected? If upper wires require unsafe reach, reduce the final height. An espalier whose top tier can be maintained only by overreaching or standing on an improvised object is too tall for the site.
Plant and establish the central leader
Plant during the locally suitable dormant season. Protect bare roots from drying, identify the root flare, correct circling roots where feasible, and set the tree at proper depth with the graft union visible. Spread roots naturally, backfill without burying the trunk, water slowly, and mulch broadly but shallowly away from bark. Do not add fertilizer at planting unless a tested need and regional recommendation support it.
Align the trunk with the central support while preserving natural root position. Tie loosely in two places using broad flexible material. The trunk should not rub wire or wall and should be able to thicken. Inspect after wind and watering. Staking is temporary; the root system must establish. The espalier wires remain, but trunk ties should be adjusted and removed as their role ends.
Head the whip only when the timing, plant condition, and selected buds match a credible espalier method. The cut can stimulate shoots near the first tier, but it also removes the leader above. Traditional systems select new growth to recreate the leader. Do not make the cut on a newly stressed or unidentified tree without understanding which bud will continue upward and which can become laterals.
If the tree already has a sound leader and two suitably placed flexible laterals, formative pruning can preserve them rather than forcing a textbook heading cut. Remove only clearly competing, damaged, or badly placed shoots in the initial plan. Establishment and root recovery take priority over producing a complete first-tier photograph in the planting year.
Select one leader and the first paired laterals
As growth begins, identify one strong shoot to continue vertically and two well-placed shoots on opposite sides near the first wire. The paired laterals should have sound attachment, similar vigor where possible, and enough flexibility to change angle gradually. Remove or shorten competing shoots according to the training method, preserving leaves needed for establishment and avoiding a bare trunk stripped in one session.
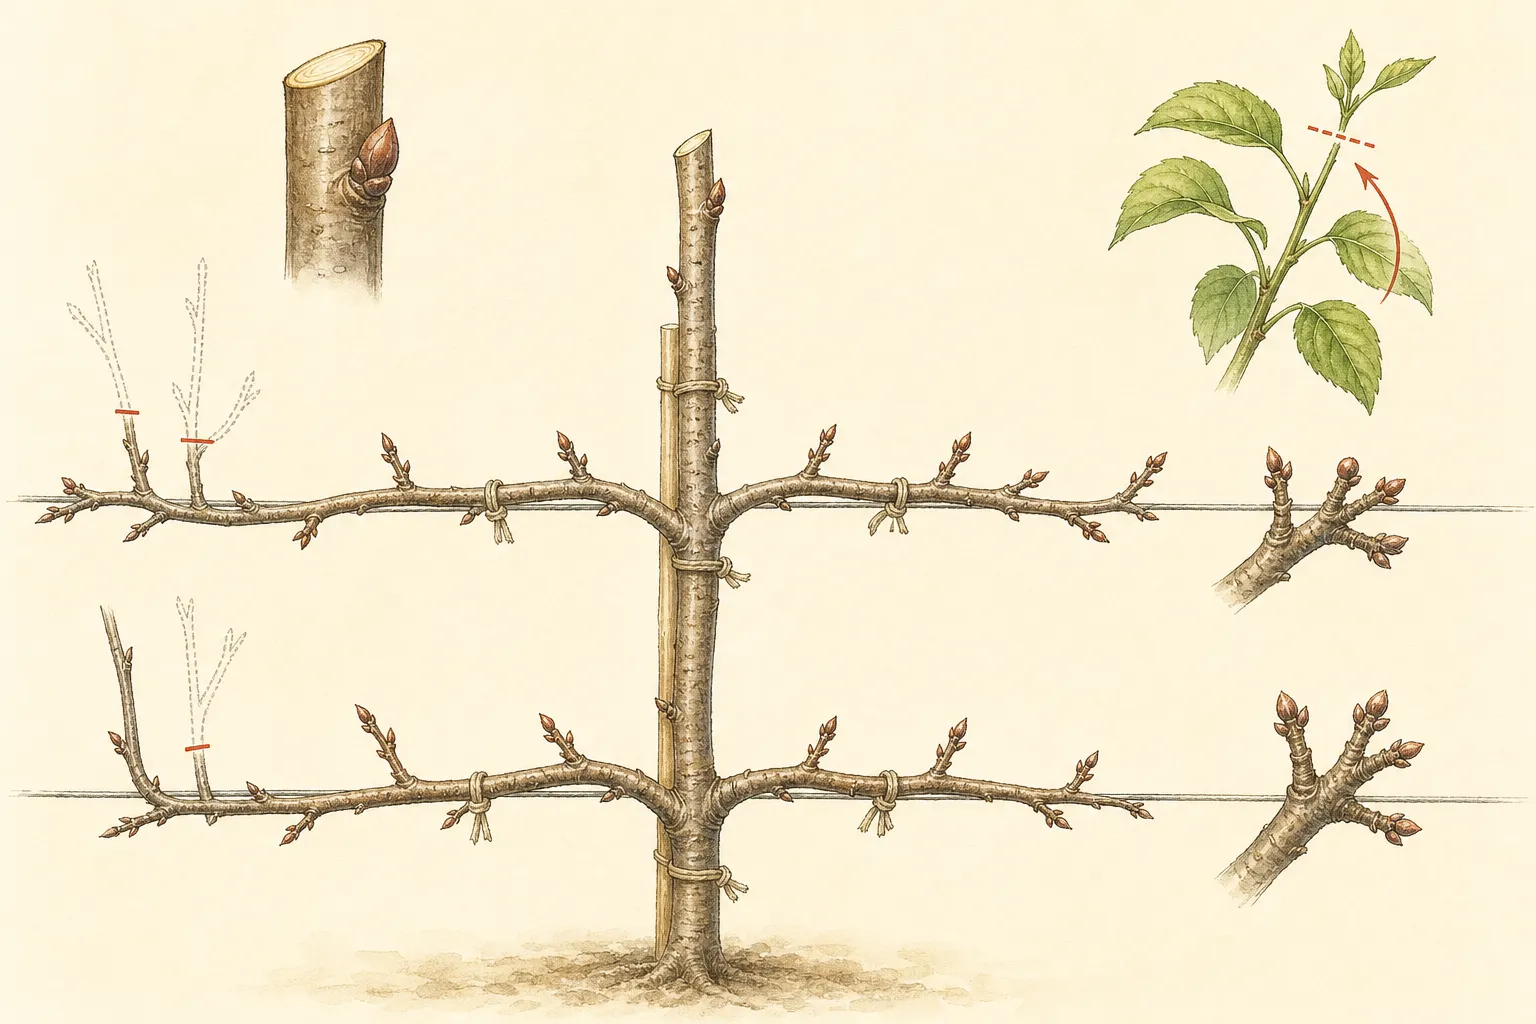
Tie the leader upright with a loose figure-eight or other regionally accepted soft method. Keep the growing tip intact while the next tier is being formed. Do not let it spiral around a cane or become pinched behind wire. Check every few weeks during rapid growth. A tie that was loose in spring can girdle soft bark before midsummer.
Begin laterals at an upward angle rather than bending young shoots immediately to horizontal. A more vertical orientation supports extension growth. Lower them in stages as they lengthen and wood begins to mature, following RHS training guidance and cultivar response. Never force a rigid branch until bark wrinkles or fibers crack. A damaged attachment cannot become a sound permanent tier. Attach laterals to the wire with multiple loose ties that spread load. Keep the tip oriented along the framework and avoid sharp bends at the trunk. If one side is weaker, preserve its growing tip and reduce competition on the stronger side rather than pulling harder. Symmetry develops over seasons; mechanical force should not substitute for balanced growth.
Develop flowering wood without losing the framework
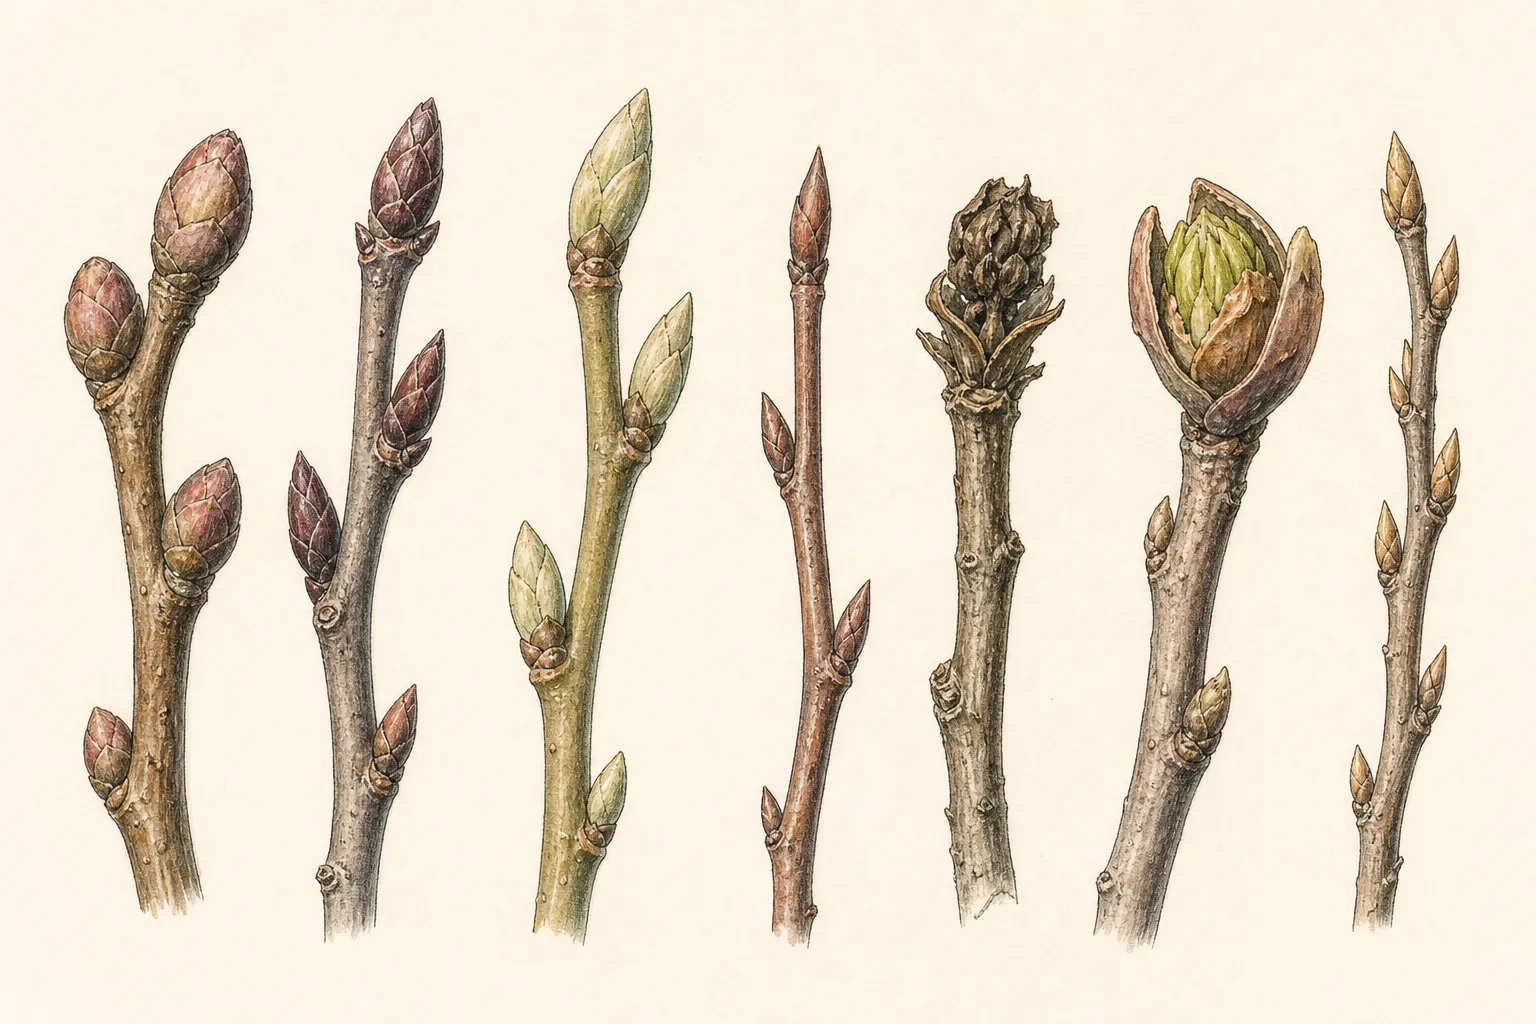
Apple and crabapple flowers often arise on short spurs formed on older lateral wood, but cultivar behavior varies. Learn to distinguish a plump flower bud, slender growth bud, short spur, and vigorous vertical shoot. Preserve well-placed spurs along the horizontal tier. Do not shear the flat crown, which removes buds indiscriminately and creates dense outer growth.
During summer training, shorten or manage side shoots according to a current espalier method while preserving the main tier and leaves needed for growth. Winter pruning and summer pruning have different effects. The exact number of leaves or buds retained should come from the selected regional system and cultivar response, not a universal number copied from a fruit-production guide.
Remove vertical watershoots that crowd the wall only after confirming they are not needed for a future tier, replacement branch, or leader. Work selectively. A young framework may use one well-positioned shoot next year. Label candidates before cutting. Repeatedly removing all upright growth while trying to extend the leader can reduce vigor and leave no replacement for a damaged tier.
Thin fruit if weight bends a young branch or regional guidance recommends it. Ornamental effect does not justify overloading an immature tier. Keep branches supported independently and inspect attachments after wind. Do not wire fruiting wood tightly to prevent movement; adjust ties and support while preserving bark and access around developing spurs.
Add tiers only when the lower framework is sound
Allow the central leader to reach the next wire and form another pair of laterals using the same measured method. Do not add tiers faster than roots and lower branches establish. A top-heavy flat tree catches wind and directs leverage into the trunk and anchors. The first tier should be extending, tied safely, and free of major defects before the second becomes the priority.
Keep vertical spacing and final width consistent with the plan, but use real buds. If no sound paired shoots form at the exact height, select the nearest workable positions or delay rather than creating a long weak stub. Slight asymmetry can be corrected gradually and often disappears under flowers and foliage. A cracked branch created for geometric accuracy remains a permanent defect.
Stop the final leader at the planned height through a plant-appropriate cut once the top tier is established. Preserve a service gap below eaves and above the wall. Continue to remove rootstock suckers and competing leaders. Do not let a convenience shoot grow behind the support where it becomes inaccessible and later requires a large wound near the trunk.
Photograph each dormant framework and summer canopy. Mark tie positions, spur development, fruit load, disease, and wall clearance. The flat form makes records especially useful because small changes in angle and density are visible. Use the images to plan the next few cuts before standing beside the tree with an open tool.
Maintain a living framework, not a wall decoration
Inspect ties, wire, anchors, trunk clearance, graft union, root flare, and branch attachments at least twice during active growth and after storms. Loosen or replace ties before pressure marks appear. Keep mulch away from bark and irrigation directed to the occupied root zone. A flat canopy can shed rain unevenly, and the foundation side may remain drier than the outer side.
Prune with clean sharp tools at the correct seasonal stage, preserving collars and avoiding flush cuts. Remove dead, damaged, diseased, rubbing, or unneeded growth selectively. Seek a local diagnosis for cankers, fire blight symptoms, repeated dieback, or abnormal fruit lesions. Do not spread suspect material along the wall or disinfect with an improvised product.
Review whether the support and tree still fit the building. Roots, branches, fruit, and maintenance access change over years. If the cultivar repeatedly exceeds the plan, consider replacing it while removal remains manageable. Permanent hard reduction creates large wounds and dense regrowth, undermining the flowering framework the form was meant to showcase.
Accept that the espalier takes several years. Early flowers may be sparse, and formative cuts can delay a full display. The reward is legible branch architecture, close flowers, and a tree fitted thoughtfully to a limited plane. Speed obtained by bending mature branches, retaining every fruit, or adding tiers without roots produces a fragile diagram rather than a durable ornamental plant.
Steps
- Level
- advanced
- Time
- Several hours to install and plant, then seasonal training for multiple years
- Tools
- Measured elevation and level, Appropriate wall or post hardware tools, Clean bypass pruners, Soft ties, Gloves and eye protection
- Materials
- Suitable young grafted flowering crabapple, Corrosion-resistant stand-off wires and anchors, Vertical leader support, Broad organic mulch
- 1Match tree, rootstock, and site
Confirm cultivar identity, vigor, rootstock, disease resistance, fruit behavior, and formative-training suitability, then measure soil, sun, wall heat, mature width, utilities, and maintenance access.
- 2Draw the final framework
Set first tier, tier spacing, final reach, top clearance, central leader, working gap, path safety, and root area on an elevation before buying hardware or making cuts.
- 3Install independent support
Use correct anchors, stand-off space, durable wire, and a separate vertical leader support. Test load and service access; never use the tree as the structural anchor.
- 4Plant at correct structural depth
Protect roots, expose the flare, keep the graft union above finished soil as directed, align without twisting roots, water, and mulch away from bark.
- 5Select leader and paired laterals
Choose one upright continuation and two sound flexible opposite shoots near the first wire. Preserve uncertainty rather than forcing unsuitable mature branches into a tier.
- 6Lower flexible growth gradually
Begin laterals at an upward angle, extend them, then lower in stages with broad loose ties. Stop before bark wrinkles or fibers crack and balance unequal sides through growth, not force.
- 7Preserve spurs and inspect ties
Distinguish flower spurs from extension shoots, manage side growth selectively, adjust ties during rapid thickening, and prevent fruit weight from bending young framework.
- 8Add one tier at a time
Advance the leader only after the lower tier and roots are sound, select real buds near each wire, and stop at the planned height while preserving wall and eave clearance.
- 9Audit the living structure
Photograph dormant and summer forms, inspect anchors, bark, graft, roots, flowers, fruit, disease, and wall access, and plan the next limited cuts before opening a tool.
- 10Protect flowering potential
Learn the exact cultivar’s spur and bud behavior, preserve well-placed short flowering wood, and separate summer side-shoot management from dormant framework pruning. Do not shear the plane or import one universal fruit-tree bud count into an ornamental cultivar without source support.
- 11Keep the wall serviceable
At every tie and tier review, confirm air behind foliage, window and eave clearance, anchor condition, painting or repair access, and irrigation distribution on both sides of the root zone. Remove a convenience shoot before it becomes inaccessible behind wire or cladding.
Related reading
Sources
- Apples: Starting an Espalier. Royal Horticultural Society. Source record · Accessed 2026-08-19.
- Pruning and Training Apple Trees. University of Minnesota Extension. Source record · Accessed 2026-08-19.
- Pruning Trees in the Home Landscape. University of Maryland Extension. Source record · Accessed 2026-08-19.