Grow · bare root ornamental tree planting
Plant a Bare-Root Ornamental Tree Before Budbreak
Keep roots moist, inspect the flare and graft, spread roots across a firm planting base, and establish a dormant ornamental tree without burying its structure.
Published Last updated
In this guide
Prepare the site before roots are exposed
Finish site selection and most excavation before opening the root package. Match the tree's mature height, spread, hardiness, light, and soil needs to the permanent position, then locate utilities, irrigation, paving, and overhead clearance. A bare-root tree cannot wait in sun and wind while the gardener decides whether the crown will fit beside a path or under a line.
Check drainage and soil structure across the planting area. Roots need oxygen as well as moisture; a low compacted hole that holds water is not repaired by gravel at the bottom. Minnesota Extension warns that gravel can reduce available oxygen unless it connects to designed drainage. Choose a species tolerant of the site, correct broad drainage, or move the position before the tree arrives.
Dig only when soil is thawed and workable. Wet clay smears into glazed walls, while frozen clods cannot settle among fine roots. Keep excavated site soil shaded and break large clods. Prepare water, damp root wrap, shovel, pruners, mulch, and optional stakes so exposed roots move directly from inspection to the finished hole.
Plan the tree's orientation and access. Preserve enough open soil around the trunk for watering, mulch, and future inspection, and keep mower and string-trimmer routes away from bark. If one side has a developed branch framework, orient it for the site without twisting roots or sacrificing correct depth. Structural training can wait until establishment unless a branch is broken or hazardous.
Keep every root moist and cool
Keep roots moist, cool, shaded, and protected from wind from delivery until backfill closes around them. Minnesota treats packaged stock like bare-root stock and keeps both packing and roots moist. Use damp cloth, paper, or the supplied medium around roots; keep the trunk and graft uncovered enough for inspection. A few minutes of drying can injure fine absorbing roots.
If planting is delayed briefly, place the wrapped root system in a cool shaded location and recheck the packing. Keep the tree in a cool shaded place protected from vehicle heat, doorway sun, and wind. For a longer unavoidable delay, heel roots into loose moist soil or follow the nursery's documented extended-storage method.
Rehydrate only within source limits. Colorado State Extension allows dry bare roots to soak for a few hours but warns against holding them submerged for half a day or longer because roots also need oxygen. Use clean cool water, keep the trunk above the container, then move the tree promptly to planting. Soaking is a correction for dryness, not routine overnight storage.
Heeling-in is temporary root protection, not a substitute planting site. Open a shallow trench in loose draining soil, spread roots in a single layer, cover every root with moist soil, and label the tree. Keep the trunk above grade and return for permanent planting as soon as the prepared site is workable. Stock left heeled-in into active growth becomes harder to lift without another round of root injury.
Inspect roots, flare and graft in shade
Unwrap roots in shade and identify the root flare, original soil line, and any graft union. The flare is where the trunk widens into structural roots; the darker nursery soil mark may help confirm grade. A graft, when present, is a separate swollen union higher on the trunk and must remain above soil. Keep these two features distinct.
Spread roots for inspection without forcing stiff sections straight. Retain healthy flexible roots and prune only dead, diseased, crushed, or broken ends back to sound tissue with clean sharp pruners. Shortening every root to fit a narrow hole wastes the tree's existing system. Enlarge the hole so sound roots can follow their natural direction.
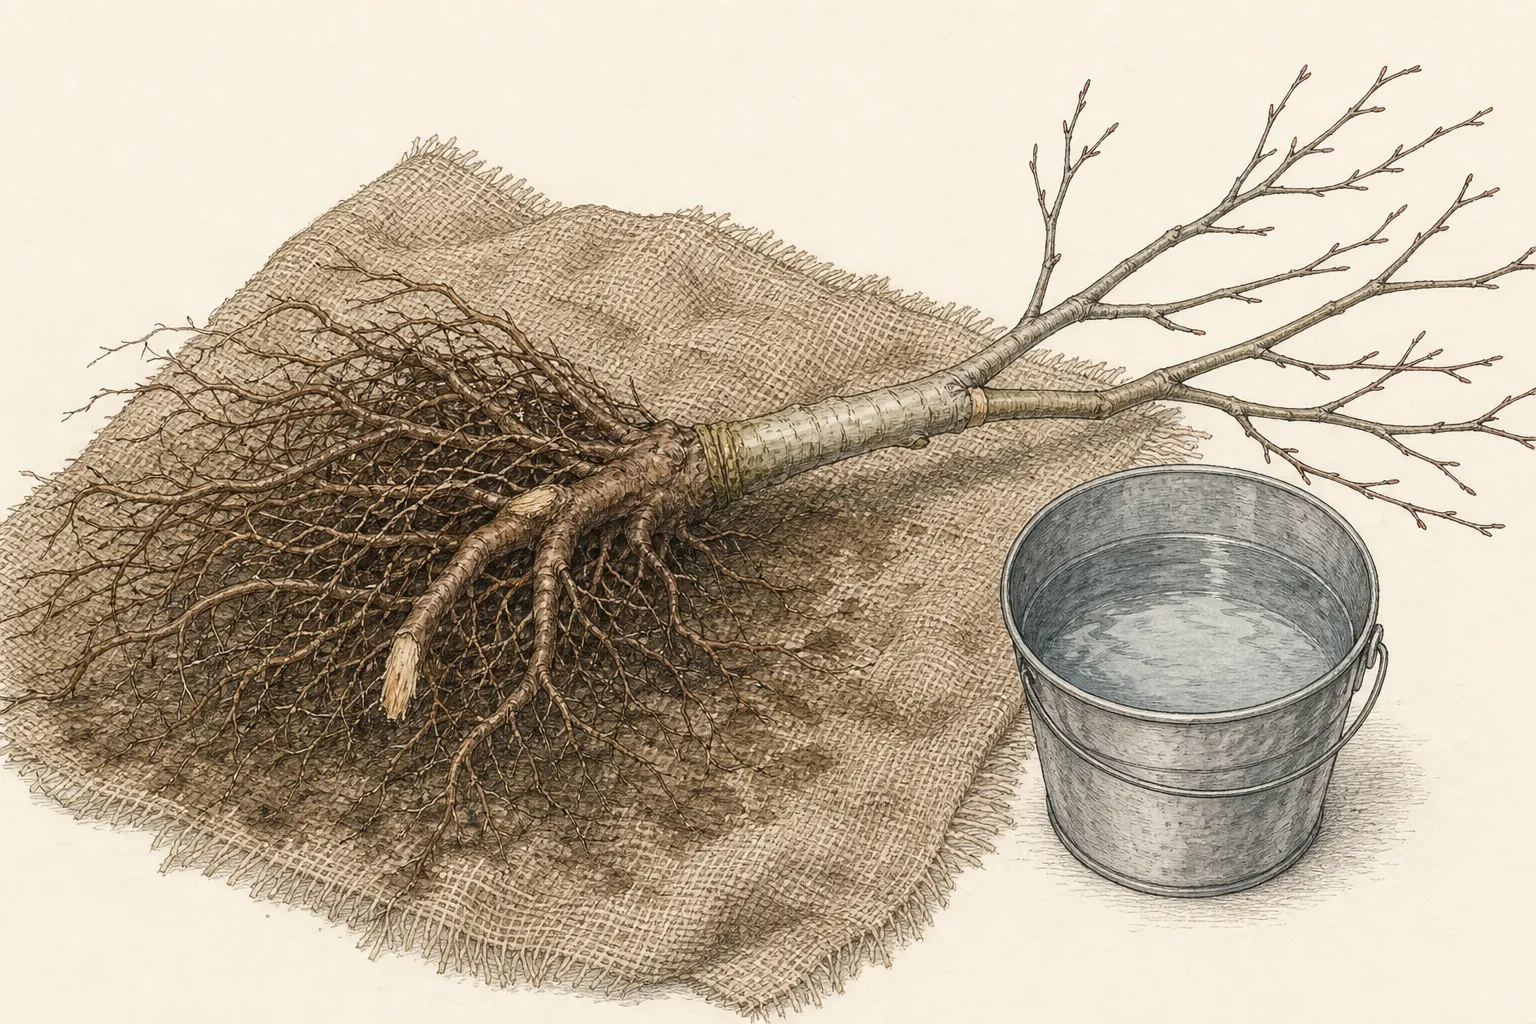
Check the trunk and branches for shipping damage, bark tears, broken leaders, and unsafe branches. Remove a jagged broken piece cleanly when it cannot be retained, but postpone routine crown shaping. ISA guidance favors limited pruning at planting because leaves and buds will support root establishment. Keep the tree label and note the nursery's pruning instructions.
Reject stock with extensive root death, severe trunk injury, a failed graft, or desiccation beyond recovery. A bargain tree that requires most roots and crown to be removed is not equivalent to sound dormant stock. Photograph a questionable shipment and contact the supplier before planting evidence disappears beneath soil. Replacement is more reliable than building a permanent landscape around a structurally compromised start.
Build a hole around the root system
Size the hole from the actual root spread. University of Minnesota asks for at least 1–2 feet beyond the root system; Purdue ranges from roughly one to one-and-a-half times the spread, wider in clay; ISA and Colorado State commonly use a two-to-three-times-wide approach. The practical minimum is the width that lets every healthy root lie outward without circling or sharp bends.
Keep the hole shallow enough that the flare finishes at grade or slightly high according to local guidance. Measure from the flare to the lowest resting root, not from the top of the trunk package. Leave the center floor firm so the tree cannot settle downward after watering. Extra depth filled with loose soil is a common route to a buried flare.
Shape a low cone or mound of firm site soil in the center for roots that descend from the trunk, as Minnesota and Colorado guidance describe. Test the tree on it before backfilling. The mound should support the crown while roots radiate down and outward; it should not force roots steeply upward or leave an air cavity beneath the trunk.
Roughen compacted sidewalls and remove debris, but keep the surrounding soil recognizable. The new roots must enter that soil. A bowl filled entirely with rich amendment creates a texture and moisture boundary that can confine roots. Improve the broader bed when a soil test and site plan support amendment; otherwise backfill primarily with compatible excavated soil.
Source dimensions describe different starting assumptions, so keep their scope visible. Minnesota's extra 1–2 feet is an absolute margin, Purdue's ratios change with soil, and ISA or Colorado State's two-to-three-times width is a broad woody-plant protocol. Use the widest practical preparation that preserves surrounding structure, while preserving correct flare depth even with a very broad excavation. Width invites lateral roots; depth only supports their origin.
Spread roots across a firm base
Set the tree on the firm mound and ask a helper to hold the trunk upright while roots are arranged. Lead major roots radially into the prepared width at their natural level. Untangle crossings that can be moved without tearing. A root that turns sharply back toward the trunk should be redirected or, only when irreparably deformed, pruned to sound outward-facing tissue.
Recheck flare height from several sides after the roots are spread. The highest structural roots should remain at the finished surface, with the graft above. Account for only minimal settlement because the center base is firm. If the tree sits low, remove it and add compacted site soil beneath the mound; pulling upward after partial backfill leaves voids.
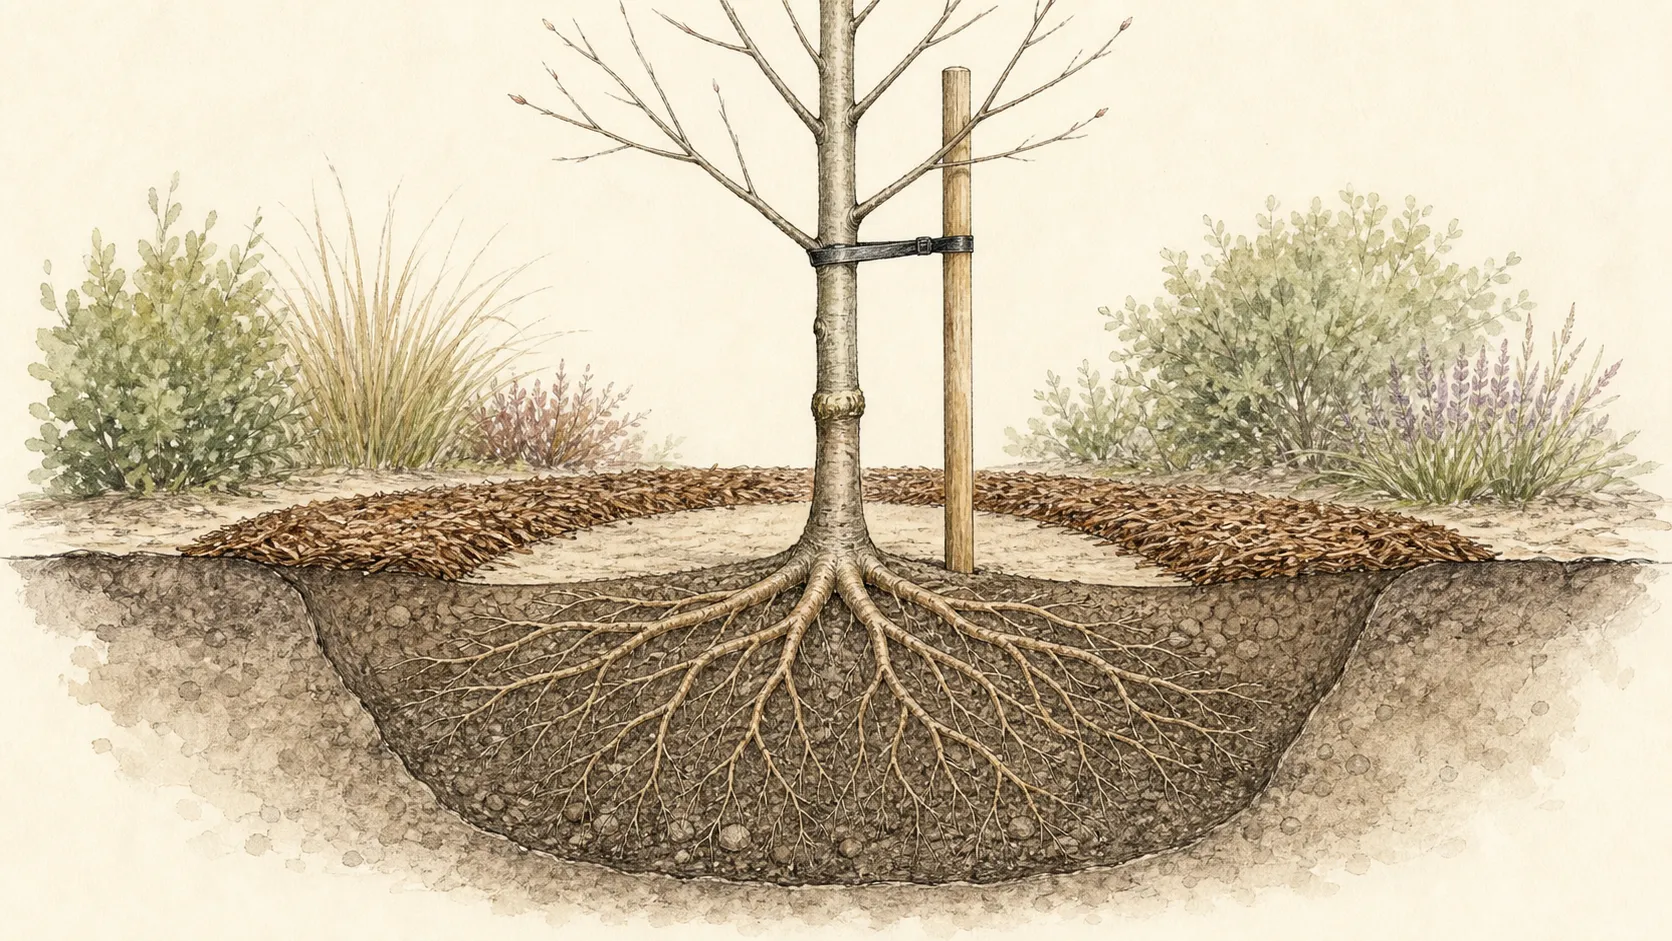
Balance trunk position without rotating the root system into tension. Minor trunk lean can be corrected by rebuilding the base and rearranging roots, not by staking a poorly seated tree upright. Keep the trunk vertical while a helper begins backfill. If the root pattern makes correct depth impossible, widen and reshape the hole before proceeding.
Backfill among roots
Return site soil in small lifts, working it by hand among roots so each layer has contact without roots being bunched together. Keep the flare visible throughout. Gently firm with fingers and water as needed to settle fine particles; avoid stomping, which compacts wet soil and can break roots. Maintain the trunk's vertical position while the soil rises.
Keep concentrated fertilizer out of the planting hole and use compatible site soil in clay. Tender cut roots can be injured by salts, and a different backfill texture changes water movement. Use amendments only from soil-test and regional recommendations applied across the broader root zone. The immediate job is root-soil contact, oxygen, correct depth, and water.
Water the completed root zone slowly until soil settles around the roots. Watch for sinking at the trunk, bubbles from voids, and exposed roots at the perimeter. Add compatible soil only where settlement reveals a gap, keeping the flare uncovered. A basin may be useful in some dry regional guidance, but it must not hold water against the trunk or remain saturated in heavy soil.
Pause halfway through backfill to inspect root position and trunk height. Once the hole is full, correcting a folded root or buried flare requires reopening the work. At the halfway point, roots should still radiate, the trunk should remain vertical without tension, and site soil should contact both upper and lower root surfaces. Continue only after those features are visible; water can settle soil but cannot unfold a trapped root.
Mulch, water and stabilize only as needed
Apply a broad shallow mulch layer over the disturbed soil, leaving a clear ring around trunk and flare. Mulch moderates moisture and protects roots from mower injury; a volcano against bark hides grade and keeps the trunk damp. Extend a low mulch layer toward the outer hole. Keep turf and weeds from competing directly with the new root system.
Water from soil moisture and weather, not an automatic daily habit. Check within the original root zone and the surrounding backfill because they can dry at different rates. Water deeply when the root zone is drying, then allow drainage and air return. Minnesota offers a regional schedule, but explicitly adjusts for rainfall, soil texture, and establishment.
Stake only when the correctly planted root system cannot keep the trunk stable in wind or where a documented site hazard requires it. ISA and Purdue favor allowing some trunk movement. Use broad flexible ties low enough to stabilize the root ball while the crown moves, inspect them for rubbing, and remove the system after the establishment period.
Protect bark from equipment and animals with a guard suited to the actual risk, keeping it loose and ventilated. A guard must leave the flare visible, release moisture, and avoid becoming a forgotten girdle. Add stakes, ties, and guards to the first-season inspection list, with removal dates where appropriate, and remove temporary protection before it creates a structural defect.
Audit establishment before pruning for shape
Inspect after the first soaking rain for settlement, exposed roots, tilt, edge erosion, and standing water. Reset grade promptly while changes are small. A trunk that rocks despite correct seating may need temporary support; a trunk that sits low needs the base corrected, not a tighter tie. Keep mulch back while checking the flare.
Track budbreak, leaf size, shoot extension, and moisture across the first season. Uneven or delayed growth can reflect transplant shock, root drying, drainage, or stock condition. Compare with the species' normal regional timing and inspect the whole tree. Check roots, water, and planting depth before considering fertilizer for slow growth.
Limit early pruning to dead, broken, rubbing, or hazardous branches. Preserve the leader and useful crown tissue while roots establish, then apply species-specific ornamental training at the correct future season. Flowering habit varies among crabapples, magnolias, dogwoods, serviceberries, and other ornamental trees; bare-root planting does not create one universal pruning date.
Extend the establishment check beyond budbreak. Leaves can open from stored reserves before new roots occupy surrounding soil. Continue monitoring moisture, trunk stability, tie pressure, and shoot extension through heat and into dormancy. A tree that opens buds and then stalls may have dried during handling, settled too deep, or lost root contact. Investigate those planting factors before concluding that fertilizer or crown reduction will restore growth.
Read summer wilt by time and soil condition. Leaves that recover overnight while the root zone is dry point toward water demand; persistent wilt in wet soil calls for drainage and root inspection. Apply water slowly across the original root spread and surrounding backfill, then confirm penetration. Keep a dated note through the first heat event because successful spring budbreak alone cannot prove that new roots have reached enough soil to support the crown.
Steps
- Level
- advanced
- Time
- 90–180 minutes
- Tools
- shovel, bypass pruners, bucket or damp wrap, stake only if needed
- Materials
- site soil, mulch, broad flexible ties if staking
- 1Prepare site and hole
Select the permanent site, locate utilities, test drainage, and dig in workable soil before opening the package. Size the width for the actual root spread and leave a firm center floor that will hold the flare at finished grade.
- 2Protect the roots
Keep every root moist, cool, shaded, and protected from wind. Use damp wrap during a short delay; if roots arrived dry, rehydrate for only the source-supported few hours and plant promptly after that short rehydration.
- 3Inspect the stock
Unwrap in shade, locate flare, nursery soil mark, and graft if present, then inspect roots and trunk. Prune only dead, diseased, crushed, or broken roots to sound tissue and reject stock with damage too extensive for a viable tree.
- 4Test the elevation
Build a firm low mound, set the flare at grade or slightly high according to local guidance, and spread roots radially without circling or sharp bends. Enlarge or reshape the hole before shortening sound roots to make them fit.
- 5Arrange and backfill
Backfill in small lifts with compatible site soil, working it among roots by hand while a helper holds the trunk upright. Settle gently with water, keep the flare visible, and correct sinking, voids, or exposed roots before the soil firms.
- 6Mulch and water
Water the complete root zone, apply broad shallow mulch with a clear trunk ring, and protect bark from equipment. Stake only a tree that rocks after correct seating, using broad flexible ties and a documented removal date.
- 7Stabilize and monitor
Reinspect after rain and through budbreak for grade, tilt, drainage, moisture, tie pressure, and growth. Delay routine shaping until establishment; remove only dead, broken, rubbing, or hazardous wood and use the ornamental species' later pruning guidance.
Related reading
Sources
- Planting and transplanting trees and shrubs. University of Minnesota Extension. Source record · Accessed 2026-08-30.
- Arbor Day – Planting a Tree Correctly. Purdue University Extension. Source record · Accessed 2026-08-30.
- Planting a Tree. International Society of Arboriculture. Source record · Accessed 2026-08-30.
- The Science of Planting Trees. Colorado State University Extension. Source record · Accessed 2026-08-30.