Grow · early peony support
Support Peonies While Stems Are Short
Choose support by peony type and flower weight, place legs beyond the crown while shoots are short, and guide stems into a natural display before buds become heavy.
Published Last updated
In this guide
- Confirm the peony before choosing hardware
- Choose the herbaceous support before stems fill the frame
- Use emergence as the installation cue
- Match the frame to the mature outline
- Map the crown before touching the soil
- Place every leg beyond the crown
- Guide growth without manufacturing a bouquet
- Prepare for flowers, rain and cutting
- Keep the crown and foliage working after bloom
- Turn this season into next spring's placement map
- Steps
Confirm the peony before choosing hardware
This method is for herbaceous garden peonies and similar herbaceous hybrids that rise from a persistent crown and die back in winter. A woody tree peony retains a branch framework and usually does not use the same grow-through ring. Intersectional peonies combine traits and often carry flowers on stronger stems. Read the complete label and observe what remained above ground through winter before dropping a cage over anything called peony.
Flower form helps predict load. Purdue notes that single peonies often stand without additional support, while semi-double and full-double flowers are more likely to droop under their own weight. North Carolina likewise limits the need to plants with large double flowers, especially when rain adds weight. Cultivar, stem strength, exposure and shade still matter. Support the clump that has a demonstrated need, not every peony as a ritual.
Review last season's evidence. Photographs show whether the entire mound opened, only the outer stems leaned or a few flowers bent after rain. A whole-clump problem may suit a ring or grid; a few heavy stems may need targeted support later. If the plant leans consistently toward light, grows softly in shade or is crowded by neighbors, hardware can protect this display but does not resolve the site condition.
Choose the herbaceous support before stems fill the frame
Confirm an herbaceous peony and a real support need, then fit the frame to its architecture while shoots are short. Place legs clear of the crown and guide growth gradually. Review the setup before wet buds and flowers increase the load. A woody tree peony and a herbaceous clump do not automatically need the same enclosing structure.
Use emergence as the installation cue
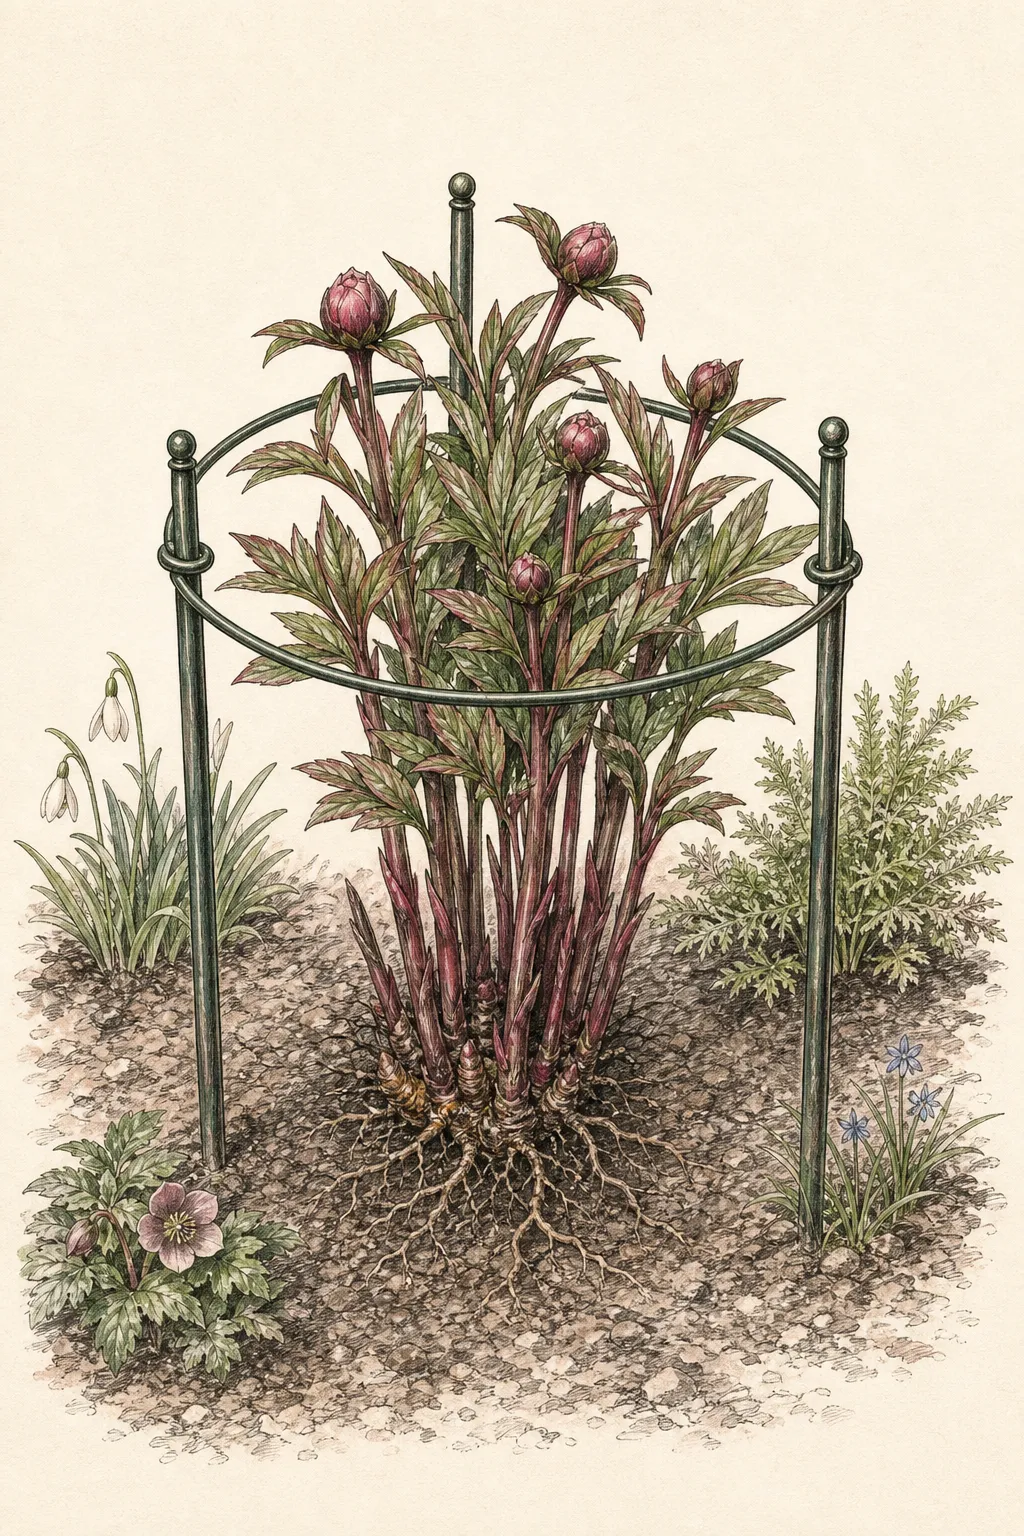
Install while red to green shoots are short enough to see the crown outline and flexible enough to find open cells as they grow. Iowa State recommends placing peony rings early as leaves begin to unfurl, and Purdue recommends early-season caging to prevent installation damage. The cue is visible organized emergence, not a fixed date. Regional spring timing and cultivar growth can shift the operation by weeks.
Do not rush into a bed whose soil is saturated or whose crown is hidden beneath winter mulch. Remove temporary protection according to local care guidance, expose the surface and identify every shoot before inserting legs. In waterlogged soil, supports may not anchor and footsteps compact the root zone. In hard dry soil, forcing metal blindly can deflect into crown tissue. Wait for workable conditions while the stems remain manageable.
If buds are already large and stems have spread, change methods rather than forcing an early ring through mature growth. Linking perimeter stakes can surround an irregular clump from the outside, and a few stems can be supported individually. A late rescue should follow existing curves. Threading a full canopy through a small grid can break leaves, scrape stems and damage the flower display it was meant to preserve.
Match the frame to the mature outline
Choose a grow-through grid for many stems rising across one crown. Use a simple ring where outer stems open but the center remains coherent. Use linked stakes for an irregular outline or where existing growth prevents a fixed ring from descending safely. Individual stakes fit a small number of exceptional flower stems. The device should respond to plant architecture, not to whichever support happened to be left in the shed.
Size the frame to the named cultivar's mature spread. A narrow ring compresses leaves and presents flowers as a tight bouquet; a frame wider than the natural mound offers no useful contact before stems bend. Iowa State places a peony hoop around roughly half the mature plant's height or a little lower as a working guide. Treat that proportion as a starting relationship, then adjust for flower weight, stem length and actual bend point.
Choose smooth, durable material with no open eye-level ends or sharp wire hidden in foliage. Dark or green finishes can recede, but invisibility is not worth unsafe hardware. Test welds, legs and connections before installation. A support that rocks, catches sleeves or has begun to rust through will be harder to repair after stems fill it. Mark each support by the plant it fits so next spring's choice is based on measured performance.
Map the crown before touching the soil
Brush loose surface mulch aside with your hands and locate the outermost emerging shoots. These do not reveal every root, but they establish a protected crown zone. Look for old cut-stem positions and the original plant label. Sketch or photograph the outline from directly above. If several peonies overlap, identify which shoots belong to each clump before deciding where a shared-looking gap can accept hardware.
Set the support on the soil surface without pressing. Rotate it until grid openings distribute shoots rather than trapping several under one wire. Check the view from the path: the ring should follow the natural mound, not sit as a visibly skewed circle that pulls growth away from the border. Mark leg positions outside the crown with small canes, then lift the support and inspect each point for neighboring bulbs, irrigation or buried cable.
Preserve crown depth. Do not mound soil to steady a leg, scrape soil from around the peony or add mulch over eyes after installation. Peony flowering is sensitive to deep crown placement, and support work should not change grade. If the hardware cannot stand without soil piled at its feet, it is the wrong size or anchor design for that site. Choose another frame rather than burying the plant to stabilize an object.
Place every leg beyond the crown
Insert legs at the marked outer points, moving a small amount at a time around the frame. Press evenly so one side does not descend while the opposite wire sweeps across shoots. Never stand inside the crown for leverage. If a leg meets firm resistance, stop, withdraw and shift it outward; resistance can be a root, stone or utility, and greater force does not identify which one.
Keep the support level enough that stems meet it at a useful height, but follow a sloping site rather than excavating a flat platform around the peony. Test each leg with gentle side pressure. It should hold the expected flower load without rocking through the crown. Add an external brace where soft soil needs it, keeping that brace outside roots and circulation. Do not tie the whole plant tightly to compensate for an unstable base.
Look through every grid cell before leaving. No shoot should be pinched under wire, sharply bent or trapped against a leg. Move flexible shoots with open fingers and give clustered stems neighboring routes where practical. The distribution does not need to be mathematically even. It needs enough room for leaves to unfold and flowers to occupy a broad outline while the support remains hidden within growth.
Guide growth without manufacturing a bouquet
Return as stems lengthen and leaves open. Guide a wayward shoot through the nearest generous opening before it hardens into a strong curve. Do not pull every stem toward the center or cross stems to fill an empty cell. The plant's natural radial growth should remain visible. Small adjustments over several visits are safer and less conspicuous than one correction made after flower buds carry weight.
Keep foliage outside hard contact points where possible. A leaf folded under a ring can tear and a stem rubbing one wire in wind can scar. Rotate an adjustable contact or add a soft tie only where the frame cannot guide a particular stem. Use a broad loose figure-eight around an external stake, leaving expansion room. Avoid thin monofilament or wire that disappears until it cuts tissue.
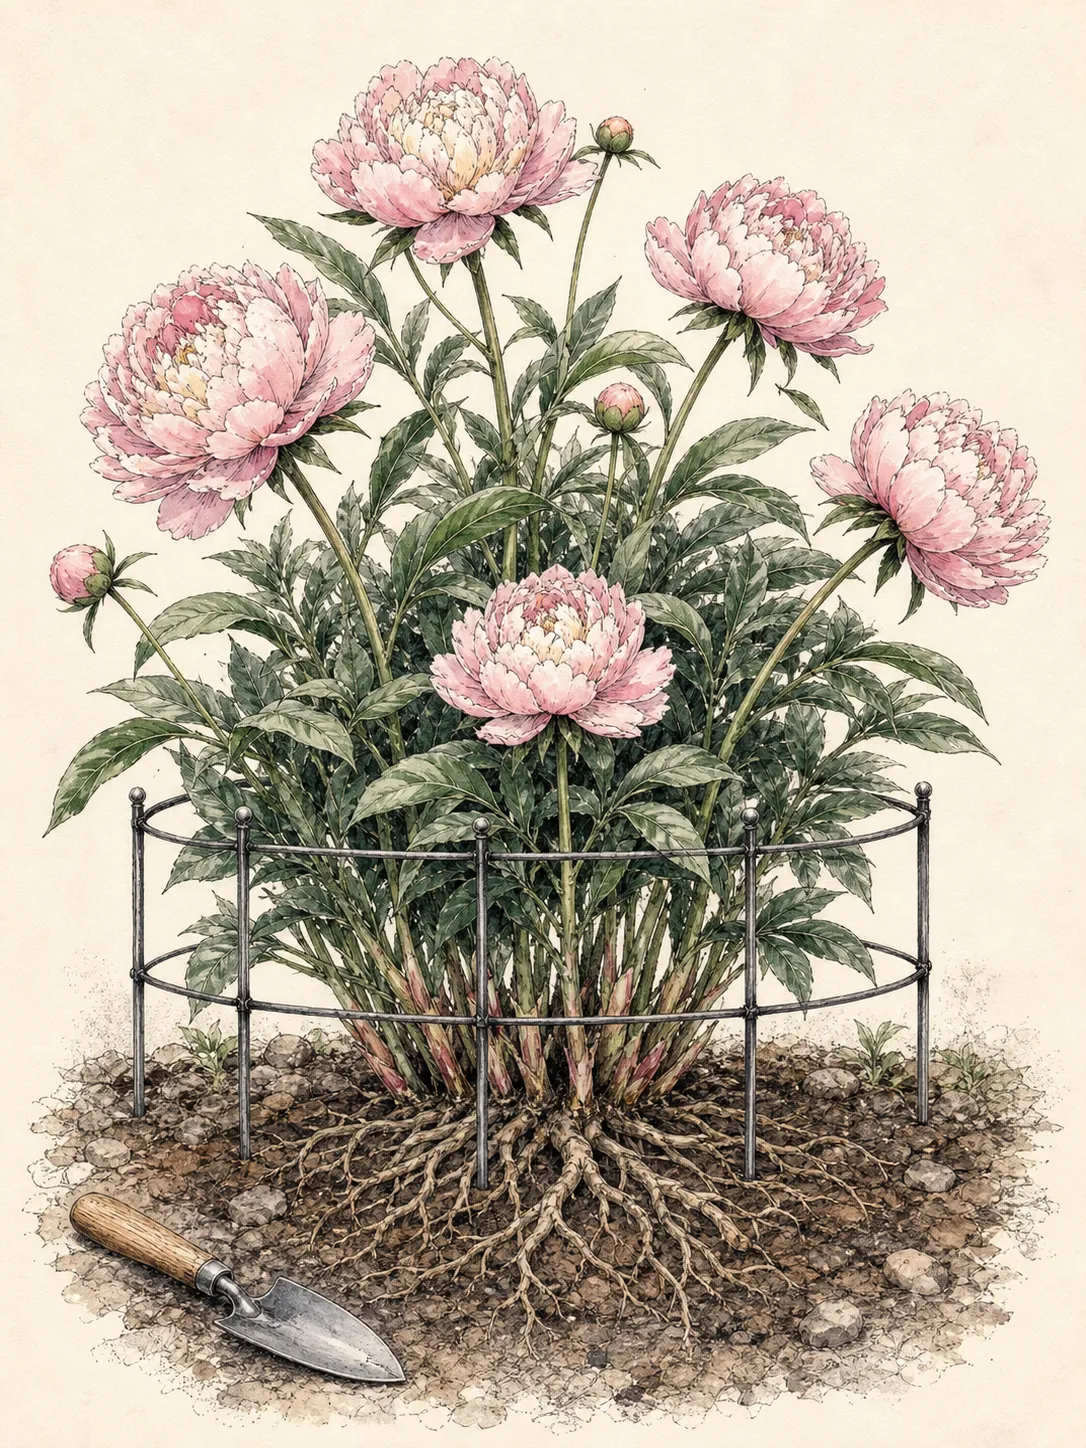
Judge the display from its main views. A supported peony should remain a broad mound with flowers at varied natural angles, not a cylinder with a hollow center. If outer stems still escape, add one discreet perimeter link rather than tightening the entire clump. If the support is visible above foliage, lower an adjustable frame only while stems can move safely; do not press a high grid downward through buds.
Prepare for flowers, rain and cutting
Before buds open, test anchors and check whether the likely flower load sits above a useful support point. Large double flowers may collect rain and lean even on sound stems. Add a second loose contact only where the first frame leaves a clear hinge. Do not wrap twine around the outer flowers as a last-minute belt; it compresses the display and transfers load to a few stems.
After rain, let the surface drain before entering the bed. Lift a leaning group along its existing line and support it in sections. Do not shake a wet peony violently or force a creased stem upright. Remove only broken tissue with clean tools. A sound flower that faces outward or lower than its neighbor is not failure; the purpose is to keep blooms clear of soil and paths while retaining the plant's character.
For cut flowers, take stems conservatively and retain substantial foliage on the plant. Purdue advises that leaf removal, unlike picking flowers itself, can injure the plant's future performance. Keep the cut above the support where possible so remaining stems do not lose shared stability. Rebalance any loose ties after harvest, because removing a heavy cluster can shift the load on the opposite side of the frame.
Keep the crown and foliage working after bloom
Deadhead spent flowers where seed is not wanted, removing the flower and seed structure without stripping the leafy stem. Leave healthy foliage through summer so the crown can continue storing resources. The support may remain while it helps the mound resist lodging, but loosen or remove ties that no longer carry weight. Never pull a ring upward through full foliage merely because the flowers have ended.
Inspect hidden contact points monthly. Stems thicken, ties tighten and mulch can conceal a leg that has shifted inward. Clear the crown surface, loosen any constriction and brace from outside if the frame leans. If disease symptoms appear, diagnose them separately; crowding foliage into a tight support can reduce airflow, but removing healthy leaves broadly is not a substitute for accurate diagnosis and appropriate sanitation.
At natural dormancy, cut herbaceous stems according to local peony guidance and remove the support without twisting through crown buds. Clean off soil and plant debris, dry the frame and repair rough edges before storage. Do not leave a low ring hidden where next spring's shoots can emerge through the wrong openings. Woody and intersectional peonies require type-specific pruning, so verify the plant before any ground-level cut.
Turn this season into next spring's placement map
Photograph the empty crown after cleanup and mark leg positions beyond it. Record support diameter, working height, installation cue, cultivar and which side carried the heaviest flowers. Add one image at bud stage and another after rain. These records make early installation quick next year and prevent repeated probing around a crown that is still difficult to see.
Decide whether hardware remains the right answer. A consistently shade-stretched peony may need a sunnier position, while a crowded plant may need neighboring competition reduced. A cultivar with weak stems and very heavy flowers can legitimately require annual support. A single or stronger-stemmed cultivar may perform better where hardware would dominate the design. Make relocation or division decisions in the plant's correct dormant window, not during bloom.
Refine one variable at a time. Widen a ring that compressed the mound, lower a support that sat above leaves or add an outer link where one side escaped. Preserve the crown-clear leg map. The successful system is almost invisible at flowering because it was chosen for this peony, installed before stems became heavy and adjusted gradually while every leaf and bloom retained room to form.
Steps
- Level
- easy
- Time
- 20 to 40 minutes per established clump, plus brief follow-up adjustments
- Tools
- Gloves, Measuring tape, Small marker canes, Mallet only for external stakes where soil conditions allow, Clean bypass pruners
- Materials
- Cultivar-sized peony ring, grow-through grid or linking stakes, Broad soft plant ties for limited targeted support, Stake caps where exposed ends require them, Weather-resistant plant label
- 1Identify the peony and the actual support need
Confirm herbaceous, woody or intersectional type and keep the cultivar label. Use last season's photographs to learn whether the whole clump opened, only outer stems leaned or no support was needed. Heavy semi-double and full-double flowers often need more help than single forms, but site and stem strength remain part of the decision.
- 2Work while shoots are short and soil is workable
Use visible early emergence as the cue rather than a fixed date. Remove temporary winter cover, wait until saturated soil drains and expose the crown surface without adding or scraping away grade. If mature stems and buds already fill the clump, switch to perimeter or individual support instead of forcing a grid through them.
- 3Choose the frame by architecture
Use a grow-through grid for many stems, a ring for a coherent mound, linked stakes for an irregular outline and individual stakes for a few exceptional stems. Match width to mature spread and place the main contact around the likely bend zone, using cultivar performance rather than a one-size product label.
- 4Map crown, shoots and obstacles
Photograph the emerging clump from above, set the support loosely over it and rotate until cells distribute shoots. Mark every intended leg outside the outer shoots. Check each point for neighboring bulbs, irrigation, cable and path conflict, and keep the root-crown grade unchanged.
- 5Insert legs evenly beyond the crown
Advance each leg a little in turn so wire does not sweep across stems. Stop at resistance and move outward rather than forcing through a root or unknown object. Test the frame from several directions and brace externally if needed; never stabilize it by mounding soil or mulch over peony eyes.
- 6Distribute shoots and guide them gradually
Free every pinched shoot and give stems open routes through the frame. Revisit as growth lengthens, guiding wayward stems to nearby cells without crossing or bundling the clump. Use only broad loose ties for specific stems and keep foliage from rubbing hard edges.
- 7Adjust before buds carry rain
Inspect anchor stability and the likely hinge below heavy flowers before bloom. Add a discreet outer link or targeted stake where needed, preserving the broad natural outline. After rain, lift along existing curves in sections and remove only truly broken stems; do not cinch wet flowers into one tight belt.
- 8Preserve foliage and record the system
Deadhead without stripping leafy stems, keep healthy foliage through summer and monitor hidden ties. At dormancy, remove and clean the hardware without twisting through crown buds. Record frame size, height, leg map and storm performance so next spring's installation is early, accurate and less intrusive.
Plants in this guide
Related reading

Sources
- Growing Peonies in the Indiana Landscape. Purdue University Extension. Source record · Accessed 2026-08-19.
- Staking Perennials. Iowa State University Extension and Outreach. Source record · Accessed 2026-08-19.
- Paeonia – Herbaceous Types. North Carolina Extension Gardener Plant Toolbox. Source record · Accessed 2026-08-19.