Grow · stake tall perennials
Stake Tall Perennials Before Summer Storms
Choose a support that disappears into the plant, install it beyond the crown, and tie stems loosely before wind and rain turn flexible growth into a collapsed tangle.
Published Last updated
In this guide
- Decide whether the plant needs support or a different site
- Match the support to the reason stems open
- Match the support to the plant’s architecture
- Install while stems are still flexible
- Anchor beyond the crown and tie for movement
- Prepare for rain without sealing the canopy
- Repair storm damage in the plant’s existing line
- Keep supports readable through the season
- Remove, clean, and redesign after dormancy
- Support cut flowers and seed heads differently
- Design supports into repeated border maintenance
- Retire unsafe improvised hardware
- Steps
Decide whether the plant needs support or a different site
Tall does not automatically mean weak. Many perennials move in wind and return upright. Support becomes useful when heavy flowers pull stems outward, a clump opens onto a path, rain loads a broad canopy, or prior storms repeatedly break the same plant. Observe the natural architecture before enclosing it. A plant that leans steadily toward light may need more sun or relocation, not a tighter ring.
Check cultural causes of soft growth. Excess nitrogen, deep shade, crowded spacing, and overly rich moisture can stretch stems. Staking can protect the current season, but it should not become a permanent disguise for unsuitable conditions. Record which side falls, when it begins, and whether neighboring plants provide support or competition. That evidence guides autumn division, pruning, or site changes.
Identify plants that should not be bound tightly. Broad mound-forming perennials, grasses that need natural movement, and brittle hollow stems can be damaged by a small hard ring. Some perennials respond to early-season pinching, but timing and species matter. Use plant-specific guidance before substituting pruning for support. This procedure focuses on physical frames and ties during active summer growth.
Match the support to the reason stems open
Use a grid or perimeter support when a healthy clump repeatedly opens under flower or rain load. A plant reaching toward light also needs its exposure reviewed; tightening a ring does not answer that cause. After installation, check the frame and ties under changing stem thickness and canopy weight, keeping both the path and the plant's natural outline open.
Match the support to the plant’s architecture
Use a grow-through grid for a clump that rises as many stems from one crown. Install it low while growth is young and let stems distribute themselves through the openings. The grid should be wider than the crown and ultimately hidden inside foliage. A grid added after stems are tall requires threading and bending that can break the exact growth it was meant to protect.
Use a ring for a compact clump whose outer stems splay while the center remains upright. Choose a diameter that supports the natural mound rather than cinching it into a bouquet. Linked perimeter stakes and twine suit broad irregular plants because the outline can follow the clump. Individual stakes are better for a few heavy flower stems than for binding an entire plant to one post.
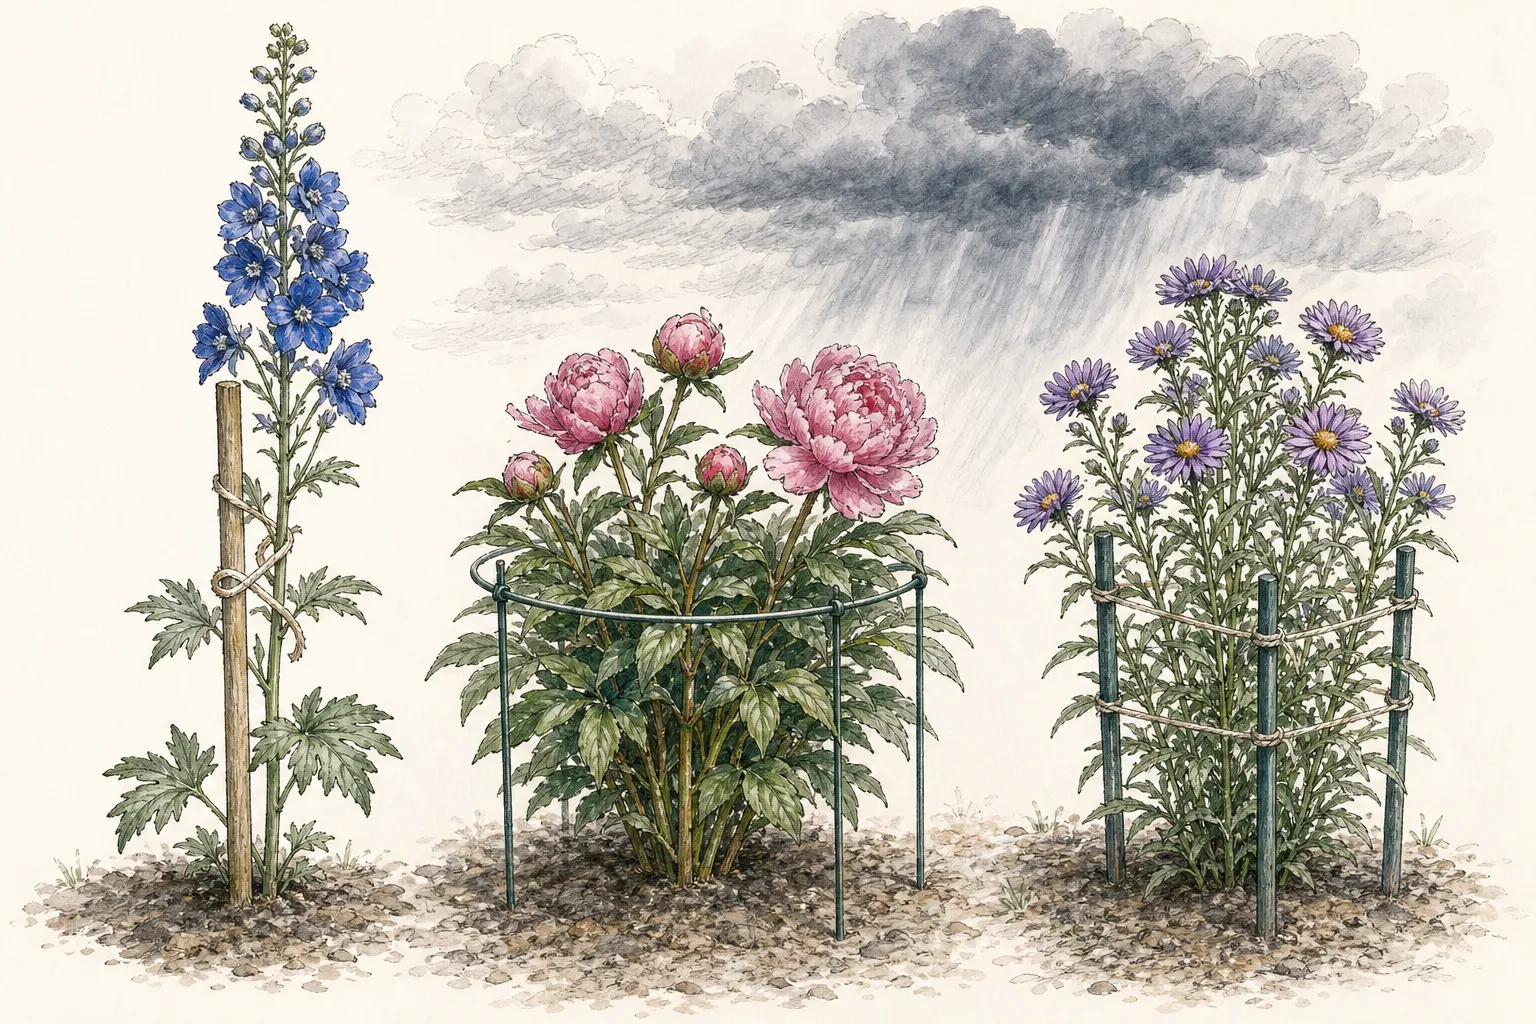
Choose height based on the likely bend point, not the flower top. Support near one-half to two-thirds of mature stem height often distributes load while leaving the upper plant natural, though species and structure vary. A short ring under a high heavy bloom becomes a hinge. A support at the very top looks rigid and can force all wind movement into one lower point.
Install while stems are still flexible
The best time is before the plant needs visible rescue. Place grids and rings in spring or early growth, then raise adjustable legs as stems extend. Perimeter stakes can be added later, but do so before a storm forecast turns the job urgent. Flexible young stems can be guided gradually; mature stems that have curved toward light may split when forced immediately upright.
If the plant is already leaning, support it in stages. Lift a group only partway, add a loose temporary tie, and return after the stems adjust. Preserve their existing curves and remove only broken tissue. A natural-looking supported plant may remain slightly asymmetrical. Perfect vertical alignment is not worth a crease hidden inside the stem.
Waterlogged soil reduces anchor strength. Install after the surface drains enough to hold a stake, and test it in the direction of expected pull. In very dry hard soil, water the intended point earlier rather than hammering beside the crown with excessive force. Know the route of irrigation lines and lighting cable before driving long stakes.
Anchor beyond the crown and tie for movement
Place stakes outside the crown and main root concentration, angled or braced against the load. Driving through the center can split crowns and damage roots. Use enough depth for the soil and canopy, then cap or position exposed tops away from eyes and paths. A decorative stake that rocks by hand will not become stronger when rain adds weight to every leaf.
Use broad soft ties or garden twine that will not cut tissue. A figure-eight tie keeps the stem from rubbing directly on the stake. Leave room for diameter growth and some movement. Thin wire, fishing line, and tight plastic loops can girdle stems. Check every tie after rapid growth; a loose loop in June can become constricting in July.
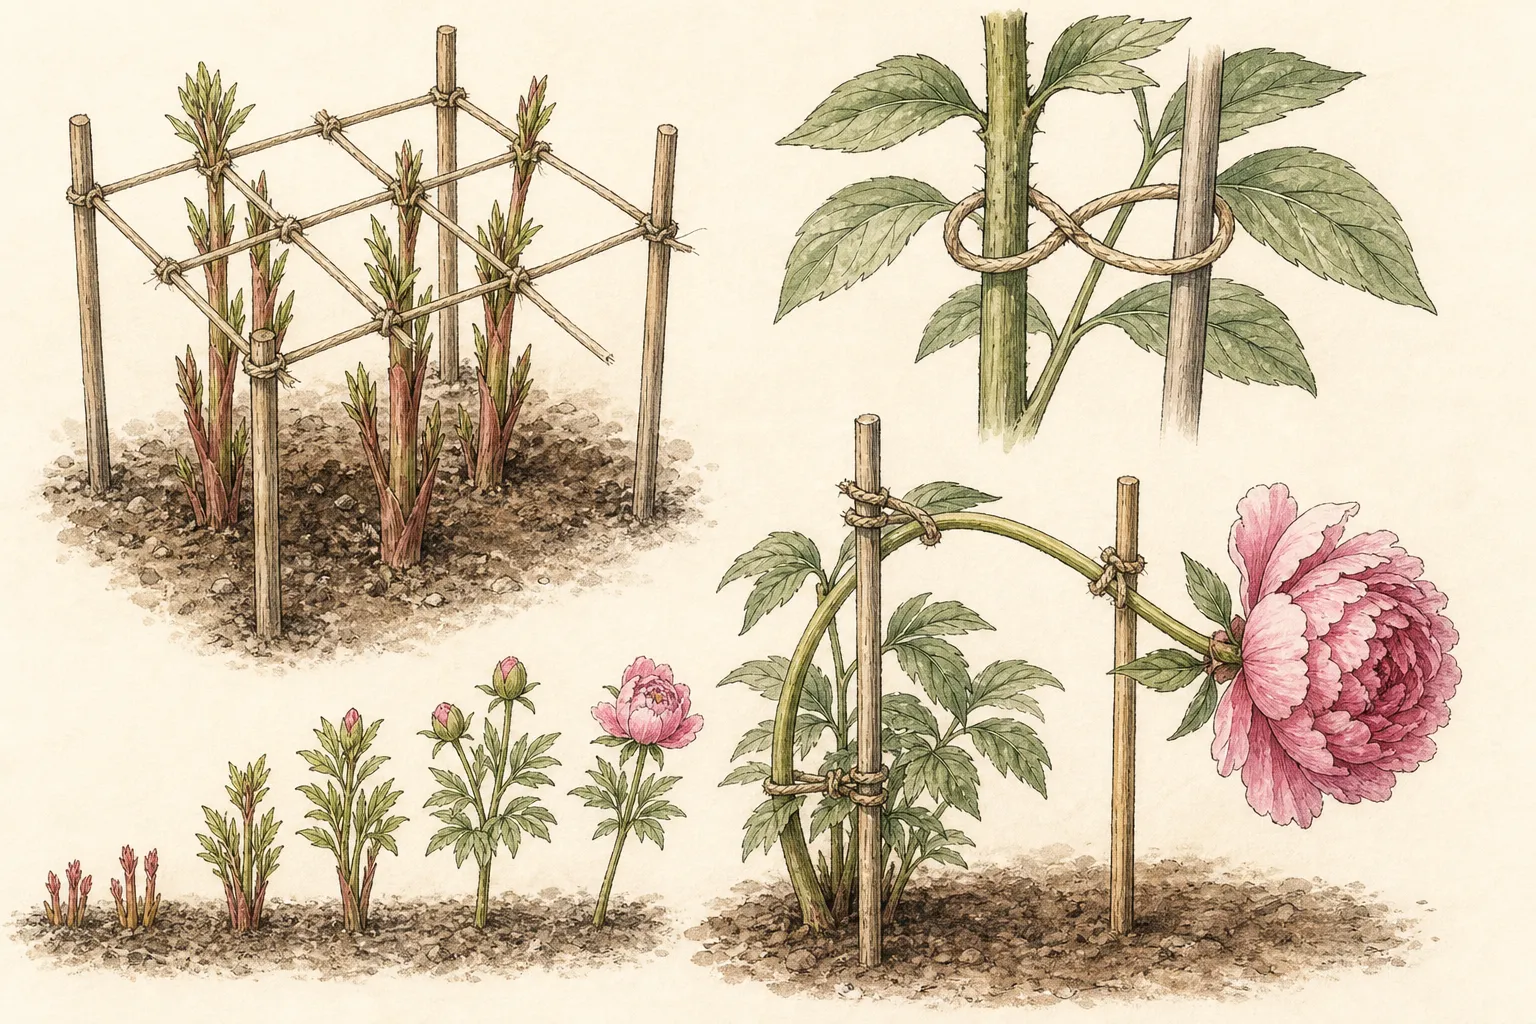
Distribute load across several contact points. A perimeter of four stakes and two levels of twine can support a large clump better than one tight belt. Tie small groups rather than every stem together. Keep flowers and leaves outside the tie where possible so the center remains ventilated and the support disappears into the plant.
Prepare for rain without sealing the canopy
Before a storm, remove only spent flower heads or broken stems that add useless weight. Do not strip healthy foliage or tie the plant into a dense column. Leaves need space to dry, and a compact bundle can hold rain and disease pressure in the center. Clear fallen branches and unsecured garden objects that could strike the support.
Check each anchor, knot, grid leg, and connection. Replace degraded jute or ultraviolet-damaged plastic. Lower a top-heavy decorative finial if it catches wind. Apply gentle pressure to the frame from several directions and watch the soil at the base. Movement there calls for a second brace or deeper anchor, not a tighter tie around the stems.
Do not work among tall metal stakes during lightning or dangerous wind. Complete preparation before conditions arrive and observe from shelter. A plant can be repaired later; the gardener should not become part of the storm exposure. Afterward, wait until saturated soil can bear foot traffic without compaction before entering the bed.
Repair storm damage in the plant’s existing line
Photograph the collapse before lifting so broken and intact stems can be distinguished. Remove stems torn at the base with a clean cut appropriate to the plant. Support bent but unbroken stems along their curve with a sling or added stake. Do not straighten a creased stem until its fibers split; stabilization may preserve flowers even when the stem never regains a perfect line.
Lift broad clumps in sections from the outside toward the center. Add a lower support first, then a higher contact point. Pulling the entire wet canopy upright with one rope concentrates load and can uproot the crown. Shake off water gently only when stems tolerate it; vigorous handling causes additional breaks.
Recheck root-zone moisture after the storm. Heavy rain may mean irrigation should pause, while wind can dry raised beds rapidly. Do not fertilize to replace broken growth. Preserve healthy leaves, maintain normal care, and let the plant decide whether it has season left for regrowth or should hold its remaining framework.
Keep supports readable through the season
Inspect ties and frames every week during rapid growth. Raise adjustable rings before foliage grows through them sideways, loosen constricting loops, and add a contact point below new heavy flowers. Remove labels or ties that have migrated into stems. A support should guide growth, not become a hidden object discovered only when it girdles the plant.
Keep weeds and mulch from hiding anchor bases. A visible base shows rot, rust, loosened soil, and irrigation conflict. Touch up dark or green supports only with plant-safe cured coatings used away from foliage. Avoid improvised sharp metal and splintered wood in paths. The most discreet support is one whose shape is quiet, not one made invisible by being unsafe.
As flowers are cut or deadheaded, redistribute ties if weight changes. A frame built for the first heavy side can pull the now-lighter plant off center. Do not remove support abruptly while storms remain likely; loosen it and observe. Some plants regain sufficient structure after flowering, while others need the frame until frost or dormancy.
Remove, clean, and redesign after dormancy
Remove rings, grids, and synthetic ties before stems collapse over them or new spring growth emerges through last year’s hardware. Clean soil and plant debris, dry metal, repair welds, smooth sharp ends, and store supports by size. Leave no tight loop around a perennial crown. Natural twine can still girdle when forgotten.
Record plant height, support type, installation date, first lean, and storm performance. If the frame held but the plant looked compressed, choose a wider support. If anchors moved, add depth or bracing. If stems leaned toward light despite support, address placement. These notes turn next spring’s early installation into a quick task rather than another midsummer rescue.
Consider design changes when support demand remains excessive. Place tall perennials among sturdy companions, choose a more compact cultivar, divide an overgrown clump, reduce excess fertility, or move a shade-stretched plant. Support is a legitimate garden tool, but the best system works with the plant’s mature form and the site instead of continuously correcting both.
Support cut flowers and seed heads differently
A plant being grown for cut flowers carries changing loads as stems are harvested. Use individual or small-group supports that can be removed and retied without loosening the whole clump. Keep ties below the cutting point and preserve access to each stem. A fixed top ring can obstruct harvest and leave sharp cut stems caught in the frame.
Seed heads kept for wildlife or winter structure become heavier in rain and snow. Support their lower stem before maturity and leave the head free. Remove weak duplicate stems rather than binding a dense wet cluster. The goal is a readable durable silhouette, not every seed head retained regardless of structural strength.
Label the intended role before helpers work in the bed. A flower stem ready for harvest, a seed stem to keep, and a broken stem to remove can look similar after a storm. The support map prevents accidental cutting and clarifies where the frame must remain after flowering.
Design supports into repeated border maintenance
Store supports near the beds they serve and sort them by mature plant height. Install on a recurring calendar linked to emergence, not after the first storm warning. Early placement disappears into foliage and avoids threading. Photograph each correct frame before growth hides it so next year’s position can be repeated.
Use consistent materials and colors across the border while varying form by plant architecture. This keeps the support system visually quiet without forcing every plant into the same ring. Maintain spare ties and caps at one accessible station, making quick adjustments possible before weather.
At design review, count the plants that need annual hardware. If support installation dominates spring work, reduce the number, group similar systems, or replace some selections with sturdier forms. Staking is legitimate maintenance, but its total workload belongs in the planting plan.
Retire unsafe improvised hardware
Remove rusted wire, cracked plastic, splintered stakes, and supports with open eye-level ends. Do not reuse an unsafe object because foliage will hide it. Replace it with a smooth correctly sized support and cap exposed tops. Check paths from child and seated eye height as well as standing height.
Record the discarded size and plant assignment so replacement happens before spring growth. A known missing support is easier to plan than another improvised repair during a storm warning. Store sound components dry and separate from hardware that needs repair.
Steps
- Level
- moderate
- Time
- 30 to 60 minutes per mature clump
- Tools
- Mallet, Pruners, Gloves, Measuring tape
- Materials
- Grow-through grid, ring, or stakes, Broad soft ties, Stake caps where needed
- 1Diagnose the lean before supporting it
Observe whether flowers, rain, shade, rich growth, crowding, or one-sided light causes the plant to open. Support repeated storm-prone failure now, but record site and vigor problems for a later cultural or design correction.
- 2Choose the frame by growth habit
Use grids for many rising stems, rings for compact clumps, linked perimeter stakes for broad irregular plants, and individual stakes for a few heavy stems. Size the support to the natural mature outline and likely bend point.
- 3Install early or lift in stages
Place grids while growth is young. When mature stems already lean, guide them partway and return after they adjust. Preserve existing curves instead of forcing brittle stems straight, and install only when soil can hold an anchor.
- 4Anchor beyond roots and utilities
Locate irrigation and cables, then drive stakes outside the crown and brace them against expected pull. Test movement at the base, cap exposed tops, and add a second anchor where soft soil or a broad wet canopy creates leverage.
- 5Tie loosely at several levels
Use broad soft figure-eight ties and leave expansion room. Support small groups and place contact points below heavy flowers. Avoid wire, monofilament, tight belts, and a single top tie that transfers all movement to one lower stem section.
- 6Audit before and after storms
Replace weak knots, remove useless spent weight, and test the frame before weather arrives. Afterward, cut only torn stems, support bent stems along their curves, lift wet clumps in sections, and delay bed entry until soil can bear traffic.
- 7Remove and record after the season
Take out ties and frames before dormancy hides them, then clean, dry, repair, and sort supports. Record plant height, support type, timing, and failure point. Use the record to change width, anchors, placement, cultivar, division, or fertility next year.
- 8Support harvest and seed roles separately
Use removable contact points below cut-flower stems and stronger lower support beneath retained seed heads. Label which stems are harvested, kept, or damaged so a storm repair does not erase the intended seasonal role.
- 9Install from an emergence calendar
Store frames by bed and height, photograph correct early positions, and install as each clump emerges. Use consistent quiet materials while matching grid, ring, perimeter, or individual form to plant architecture.
- 10Count the annual support workload
Review how many plants require hardware, adjustment, and removal. Group compatible systems, simplify access, or select sturdier cultivars when support work overwhelms the border’s maintenance capacity.
- 11Retire unsafe supports
Remove rusted, splintered, cracked, sharp, or poorly capped hardware before foliage hides it. Record the plant and size, replace with a smooth correctly scaled frame, and inspect exposure from path, seated, child, and maintenance viewpoints.
- 12Keep spare ties
Store labeled broad soft replacements near the bed.
Related reading

Sources
- Supporting Herbaceous Plants in a Flower Garden. Penn State Extension. Source record · Accessed 2026-08-19.
- Perennials: Selection, Planting, and Care. University of Maryland Extension. Source record · Accessed 2026-08-19.
- Landscape Basics: Success with Herbaceous Perennials. University of Georgia Cooperative Extension. Source record · Accessed 2026-08-19.