Grow · autumn sweet pea cold frame winter
Sow Sweet Peas in Autumn for a Cold-Frame Winter
Start annual sweet peas in October or November in milder UK gardens, then manage cold-frame ventilation, moisture and frost protection until spring.
Published Last updated
In this guide
- Decide whether your winter suits an autumn sowing
- Prepare the frame before the seeds germinate
- Choose a sowing method you can keep consistent
- Ventilate through mild days and protect through hard frost
- Water the pots according to their condition
- Read the new growth before reaching for the snips
- Separate damage from a watering problem
- Release the plants when spring conditions allow
- Steps
Decide whether your winter suits an autumn sowing
Sow annual sweet peas in October or November if you garden in the milder south or Midlands of the UK and can look after a bright, ventilated cold frame through winter. Germinate the seeds with modest warmth, then move the emerging plants into cool protected conditions. The long part of the job is keeping those seedlings compact, suitably moist and protected during severe weather until the garden is ready in spring.
This is a method for summer-flowering Lathyrus odoratus. The National Sweet Pea Society places northern UK sowing later, in January or February. In a cold continental garden with prolonged deep freezes, use a locally timed spring start; a small unheated box has limited protective capacity. October 14 is a useful planning point for the mild-winter method, while the conditions at your home decide whether to use it.
Reserve only the number of plants you can house at their winter size. Lay the empty pots inside the frame before ordering seed. Check that you can remove a rear pot easily and that the lid clears the shoots as they develop. Leave an accessible place for the thermometer. If the frame is already full of cuttings or tender plants needing different temperatures, give the sweet peas their own accommodation or choose a later sowing.
Earlier flowers are a possible benefit of autumn sowing, as the RHS trials guidance explains. The method also brings several months of care and exposure to weather before planting out. Choose it because you can manage that interval. A promise of a precise number of weeks gained would overlook cultivar, winter losses, spring conditions and the date of the comparison sowing.
Prepare the frame before the seeds germinate
Choose a bright position where the lid can be opened safely and checked easily in winter. A cold frame against an accessible path is more useful than one hidden behind a muddy border. Look at the light that will reach it when the sun is low: an autumn canopy, fence or stored garden furniture may shade the pots even though the same position was bright in summer.
Set the frame on a base that drains, with pots upright and their holes clear. Test it with empty containers and water before adding seedlings. Follow the runoff to its exit. A waterproof carrying tray that fills beneath the pots needs emptying; it cannot be treated as a permanent reservoir. Sweep out old leaves and potting debris so the clean batch begins in an inspectable space.
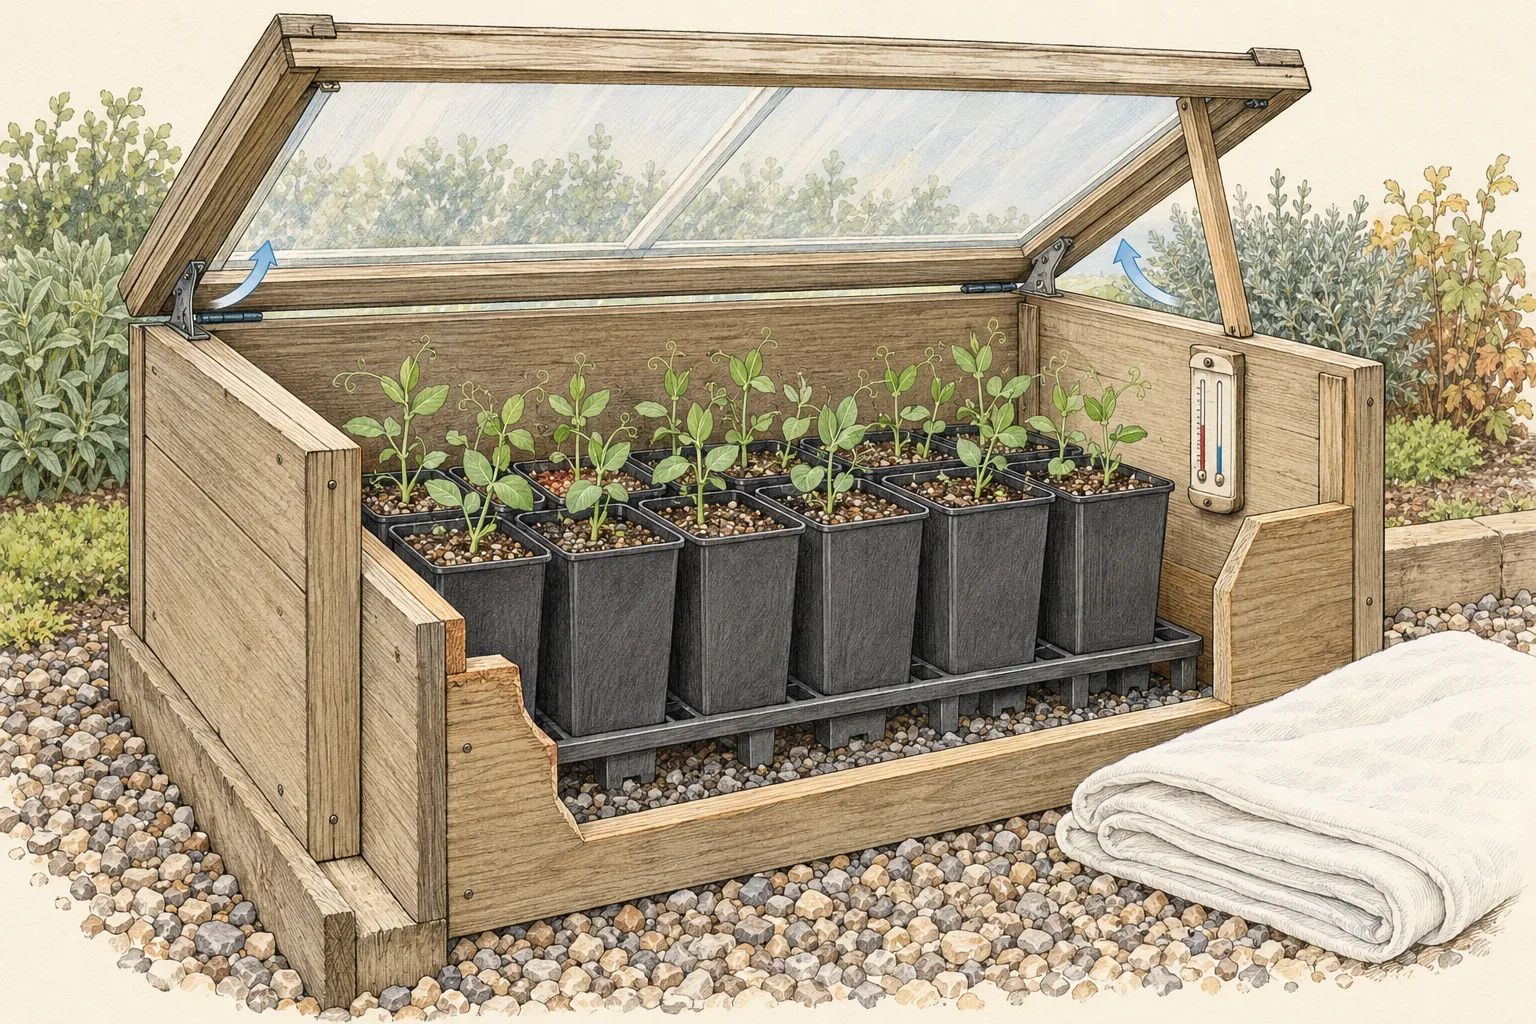
Check hinges, lid props and any fastening before windy weather arrives. Use the frame manufacturer's secure opening mechanism and keep the access path clear of loose pots. Place fleece nearby, dry and ready to use temporarily, with supports if needed to hold it clear of delicate growth. Decide where you could move a small tray if a severe freeze exceeds the protection available in the frame.
A minimum–maximum thermometer records what happens beside the plants while you are elsewhere. Put it inside the frame, following its positioning instructions, and compare its readings with the local forecast. One mild night establishes very little. The value of the instrument is seeing how this particular frame behaves through changing weather, including sunny afternoons and clear nights.
Choose a sowing method you can keep consistent
Use one seed in each deep individual container for this method. Root trainers make it possible to move a whole plug later; individual pots also let you separate a slow or failed cell from the rest. Label the cultivar and sowing date on the container or its permanent holder. Keep ornamental sweet-pea packets and trays distinct from edible pea sowings: both NC State and the RHS warn that sweet-pea seeds or pods are poisonous.
The sources differ over compost and pretreatment. RHS recommends peat-free seed compost and describes moist-tissue preparation for hard seed; the National Sweet Pea Society favors a suitably airy multipurpose compost and advises against soaking. For a straightforward batch, use fresh, freely draining mix appropriate for sowing and sow sound seed directly, unless the packet supplies a specific treatment. This follows the Society's no-soak route and does not require nicking every seed.
Both guides specify about 1 cm of compost over the seed. Prepare the mix so it is evenly moist, fill the pots and cover at that depth. Settle it gently and water in. Keep the batch around 15°C for germination, within the guidance of both publishers. Check for emerging shoots and leave apparently quiet seeds undisturbed; the Society gives approximately seven to fourteen days under its stated germination conditions.
Keep an ungerminated pot's label when moving it aside. Otherwise an empty space soon becomes an invitation to sow a different cultivar into the same cell. Write any replacement sowing date separately. If a packet behaves poorly across several containers, retain the packet and compare its instructions with the actual mix moisture and temperature before using up the remaining seed.
Ventilate through mild days and protect through hard frost
Once seedlings emerge, give them the cool, bright frame position. Remove any small germination cover and keep the frame ventilated during suitable weather. The RHS sweet-pea guide calls for a raised lid except when heavy frost is expected. In practice, that means reading the forecast and adjusting the frame; leaving the same opening for the entire winter cannot respond to sunshine, driving rain and sharp overnight cold.
On a mild morning, inspect the plants and open or adjust the lid with its secure prop. Consider where rain is entering as well as how much air can pass. If water is soaking one side, reposition the tray within the usable bright area or adjust the opening while retaining ventilation. A transparent roof can shelter the compost while an opening still exchanges air around the leaves.
Before a hard frost, close the frame and use temporary fleece as extra protection where appropriate. The RHS trials page mentions survival down to about −4°C; the Society describes moderate frost down to −5°C. These are guidance values, not universal safe limits for every seedling, pot or duration of cold. Plan protection before a forecast approaches that range, particularly for recently emerged plants, and keep a brighter protected fallback available for more severe weather.
Reopen as conditions improve and remove temporary insulation when it is no longer needed. RHS cold-frame guidance notes that extra insulation can reduce light and ventilation. A covering added on a cold evening can become an unnecessary barrier the following mild day. Keep the fleece where it can be replaced quickly, and make the next morning's opening check part of the same frost-response task.
Water the pots according to their condition
Inspect compost moisture alongside the lid check. Pick up an accessible representative pot and compare its weight with its weight after watering and drainage. Look below the surface near the pot edge with a gentle touch. A moist, heavy pot can wait; a noticeably light pot with drying mix needs attention. Keep the leaves in view, but let the root container supply the watering evidence.
Water the pots that need it and let excess drain away. Then return them to their places and empty any catch tray. A small can gives more control than spraying the entire frame, especially when one row has received rain and another has stayed sheltered. This selective approach also makes it easier to notice a pot that repeatedly stays wetter than its neighbors.
The Society discourages further watering before germination appears because excess moisture can promote losses. Apply that warning as a reason to inspect carefully, while preventing the seed mix from becoming completely dry. Neither a fixed weekly dose nor a rule to leave every pot untouched fits all container materials, openings and weather. Record a troublesome pot's condition before deciding to change the whole batch's care.
Read the new growth before reaching for the snips
Look at the distance between leaf-bearing nodes and the strength of the new shoots. Compact growth and developing side shoots are useful winter observations. Increasingly long, pale stems suggest reviewing light and warmth; RHS connects legginess with insufficient light and excess heat. Clean dirty glazing, remove unnecessary shade and reassess ventilation before adding stakes to accommodate a rapidly stretching batch.
Autumn-sown plants often branch naturally. The RHS distinguishes them from spring-sown seedlings that are routinely pinched; the Society also describes natural autumn branching, while recommending removal of the primary stem before planting out. For an ordinary garden display, inspect the actual branching before deciding on a cut. A calendar reminder to pinch every newly emerged plant ignores that distinction.
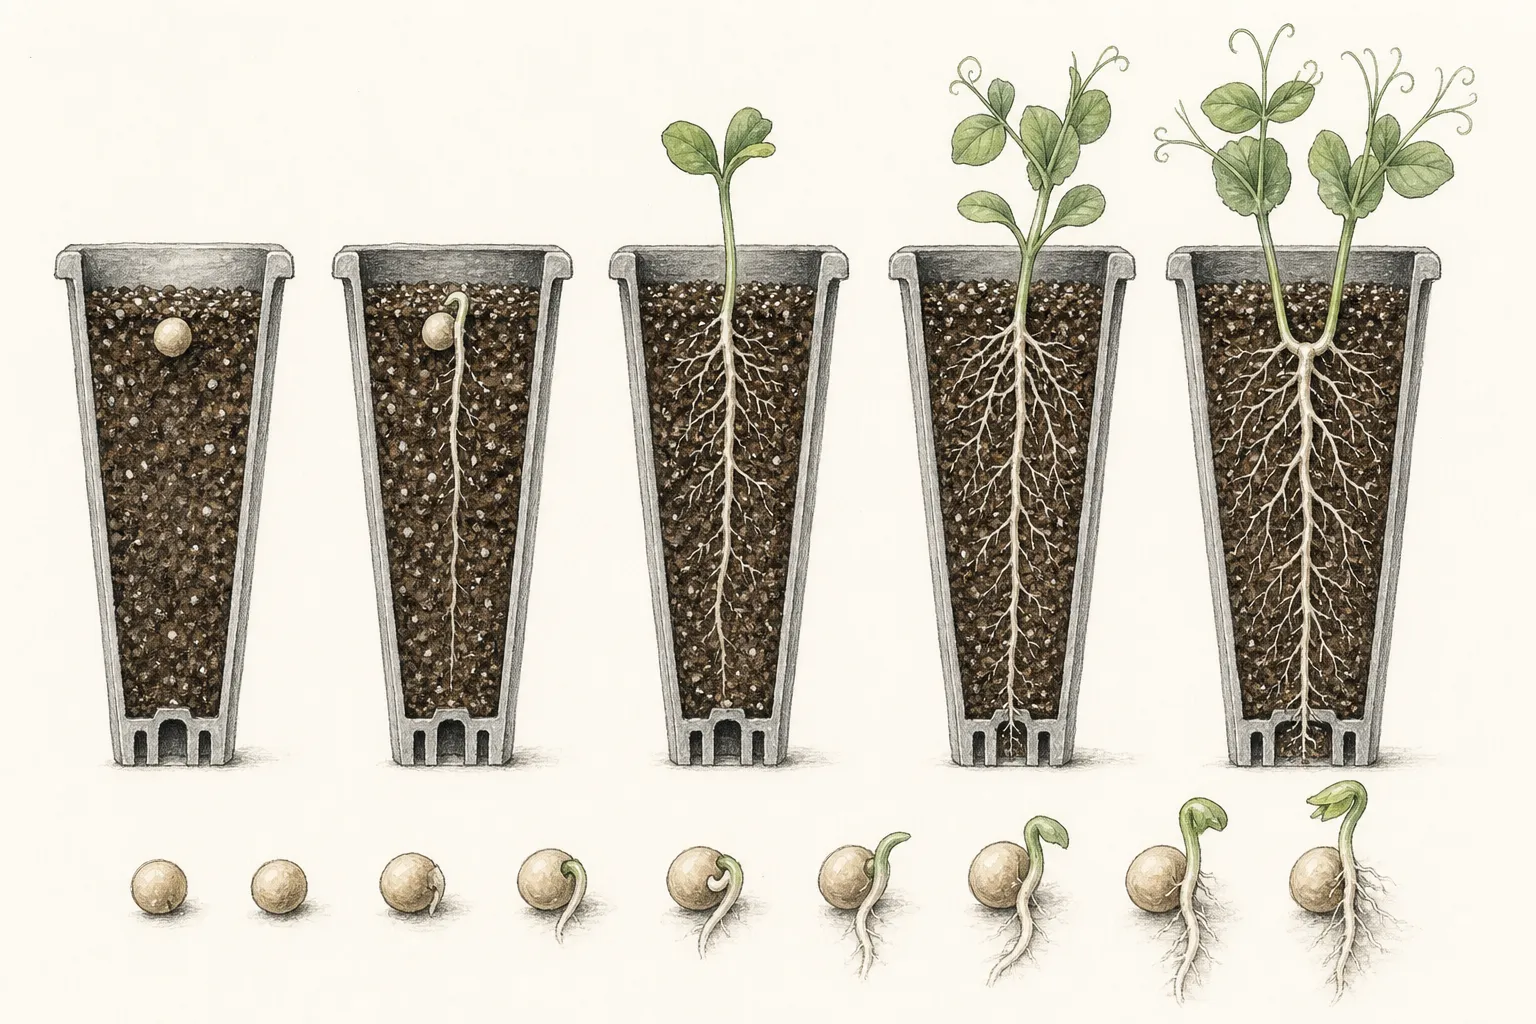
Keep sound low shoots and their attachment points visible while assessing the plant. If you choose to remove a vigorous primary tip later, identify a healthy leaf and existing side growth first. A stretched, weakened seedling calls for environmental correction before further pruning decisions. The comparison plate illustrates differences to look for; it does not portray the result of a guaranteed rescue treatment.
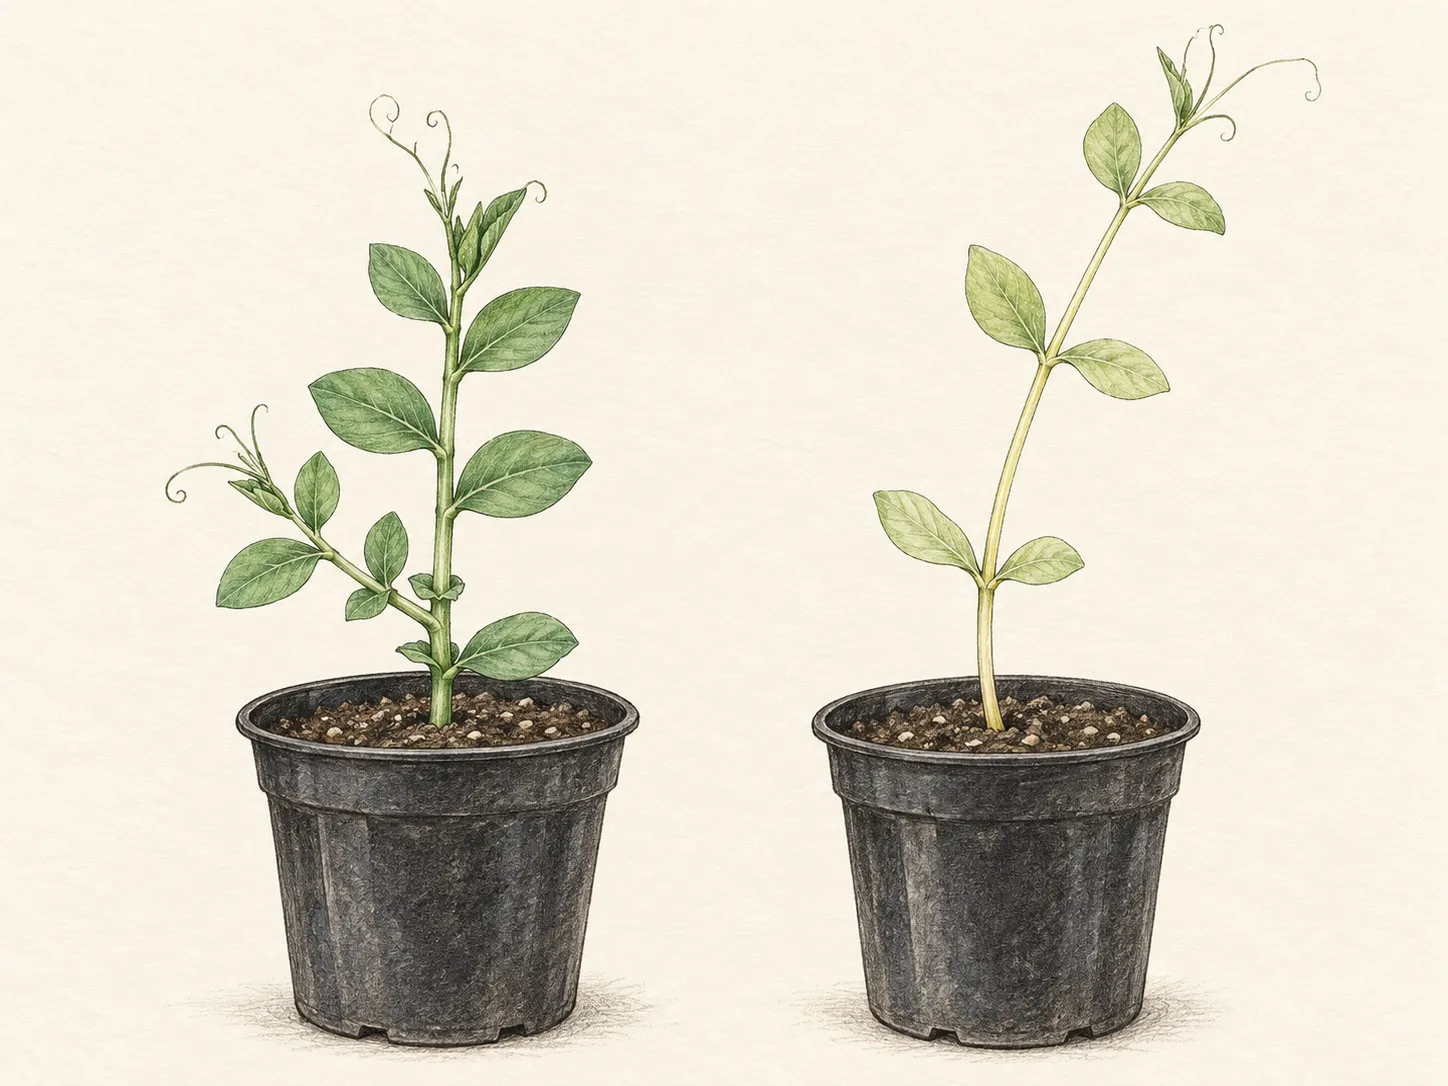
Release tendrils that have caught a neighboring plant while they are still easy to separate. Move pots a little farther apart as growth fills their allotted space. A short individual twig can help manage an extending shoot, but the frame should still close clear of the plant. If every pot is reaching the lid, reassess the growing conditions and provide adequate headroom so shoots can grow freely.
Separate damage from a watering problem
Inspect missing or cut seedlings before assuming that a seed lot has failed. The Society specifically advises protection against mice, and the RHS identifies slugs and snails as threats to young plants. Look beneath pots, around the frame edges and at disturbed compost. Close access gaps with an appropriate physical barrier that preserves ventilation, and clear hiding debris. Keep any wildlife response proportionate to what you actually find.
A seedling collapsing at compost level needs a different response from a dry but intact plant. University of Minnesota Extension describes damping off as seedling loss associated with pathogens, with cool wet conditions among the risks. Remove an affected plant and its mix from the growing batch, then review drainage, crowding and cleanliness. A single symptom cannot identify the organism, and extra watering is an unsuitable automatic remedy.
Check neighboring pots and the shared tray after removing a loss. Replace a contaminated sowing with clean equipment and fresh mix if you choose to resow. Keep the replacement dated so it receives care appropriate to its stage. Where damage continues or the cause is unclear, take close photographs of stems, compost and the whole tray for a local horticultural adviser; the pattern across containers can be more useful than one detached leaf.
Release the plants when spring conditions allow
Prepare the final sunny site and climbing support before the young vines become entangled in their winter quarters. Check that the ground is workable and drains adequately. The Society suggests roughly mid-March planting for autumn-sown plants, depending on location; RHS uses April in its general guide. These are different UK scheduling guides. Let local conditions and the state of the plants decide between them.
Increase exposure gradually as planting approaches, opening the frame more fully through suitable weather. RHS recommends ten to fourteen days of hardening for indoor-raised seedlings. Plants already accustomed to an open frame have a different starting point from those kept enclosed through cold weather, so assess what protection they have actually received. Retain the ability to shelter them again if the forecast changes sharply.
Water before easing each plug free and support the root mass as it leaves the container. Plant at the established compost level, settle the surrounding soil and water in. RHS spacing is 20–30 cm between plants, with climbers close to their support. Keep labels through this move, then use the outdoor training guide as tendrils begin finding the netting. The winter frame is finished with the batch only after the plants have transferred to their prepared growing place.
Steps
- Level
- moderate
- Time
- One sowing session, followed by winter care until spring
- Tools
- Deep individual pots or root trainers, Watering can with fine rose, Permanent plant labels, Minimum–maximum thermometer
- Materials
- Summer-flowering Lathyrus odoratus seed, Fresh free-draining peat-free sowing mix, Cold frame with a secure opening lid, Horticultural fleece, Freely draining carrying tray
- 1Check the winter commitment
Lay out empty deep pots inside the proposed frame and count only the spaces you can reach, water and ventilate. For southern and midland UK summer-flowering sweet peas, schedule October or November sowing. Choose a later regional start if the frame cannot provide suitable winter conditions. Identify a temporary fallback position for unusually severe weather before sowing the batch.
- 2Make the empty frame ready
Clear debris, check the lid hinges and secure prop, and test where water exits beneath the pots. Set up a minimum–maximum thermometer at plant level using its instructions. Store clean fleece within reach. Practise opening, closing and covering the frame with empty pots inside so a cold evening will not be the first time you discover a blocked hinge or inaccessible tray.
- 3Sow a labeled batch
Fill individual deep containers with fresh, airy sowing mix. For the direct-sowing route described here, place one sound seed per pot and cover with about 1 cm of compost. Water gently and keep near 15°C while watching for emergence. Follow any seed-packet treatment exception. Label cultivar and date before another batch comes onto the bench.
- 4Transfer emergence to cool light
Move the newly emerged plants to the prepared frame and remove their germination cover. Give late pots their own labeled space if necessary. On suitable days, maintain a secure lid opening and inspect for incoming rain. Read the thermometer alongside the forecast. Close and add temporary protection ahead of hard frost, then arrange to reopen and uncover as weather permits.
- 5Inspect roots indirectly and shoots directly
Lift representative pots to judge moisture, water drying ones and let them drain fully. Empty standing runoff. Look for compact new growth, natural side shoots, stretching stems and tendrils crossing between pots. Correct the light or ventilation when extension becomes weak. Set aside damaged seedlings for assessment, and examine the surrounding tray before assuming every drooping plant needs another drink.
- 6Prepare the spring handover
Check the final bed and install support while the plants are still manageable. Gradually increase exposure according to their previous protection and the forecast. Water the plugs before removing them, carry each root mass intact, plant at its established level and water in. Retain the cultivar labels and record the actual planting date so next autumn’s sowing decision has a local reference.
Related reading
Sources
- How to grow lathyrus. Royal Horticultural Society. Source record · Accessed 2026-09-30.
- Hints on growing. National Sweet Pea Society. Source record · Accessed 2026-09-30.
- Lathyrus (sweet pea) trial results 2022–2023. Royal Horticultural Society. Source record · Accessed 2026-09-30.
- Coldframes and Mini-Greenhouses. Royal Horticultural Society. Source record · Accessed 2026-09-30.
- Lathyrus odoratus. North Carolina Extension Gardener Plant Toolbox. Source record · Accessed 2026-09-30.
- Sweet peas. Royal Horticultural Society. Source record · Accessed 2026-09-30.
- How to prevent seedling damping off. University of Minnesota Extension. Source record · Accessed 2026-09-30.