Grow · pruner sharpening
Sharpen Bypass Pruners Without Changing Blade Geometry
Clean the tool first, read the existing factory bevel, sharpen only the cutting side with controlled strokes, and remove the burr without creating a second edge.
Published Last updated
In this guide
- Confirm the tool and the damage before sharpening
- Separate a dull edge from a damaged mechanism
- Clean down to bright steel before judging the edge
- Read the existing bevel and hold to it
- Sharpen heel to tip with controlled one-direction strokes
- Remove the burr, reset tension, and protect the edge
- Know when to stop and replace parts or send the tool out
- Steps
Confirm the tool and the damage before sharpening
A bypass pruner is not simply any hand cutter with two moving parts. It works because one sharpened cutting blade passes closely by an opposing hook or counter blade. The maintenance goal is therefore specific: restore the cutting edge while preserving that bypass relationship. If you sharpen the wrong face, create a second bevel, or grind away more steel than the original geometry allows, the tool may still feel sharp in the air while cutting worse on living stems.
Start by identifying what kind of poor performance you actually have. Crushing, tearing, or increased effort may come from a dull edge, but they can also come from dried sap, a loose pivot, bent alignment, a damaged spring, or a nick severe enough that ordinary honing will only chase the defect deeper into the blade. FELCO distinguishes between a quick touch-up and deeper seasonal maintenance for exactly this reason. You are not automatically in full restoration mode every time a stem stops cutting cleanly.
Inspection belongs before disassembly and before the first sharpening stroke. Illinois Extension advises examining blades for cracks, nicks, and burrs, because sharpening cannot safely correct every defect. Open the pruner, clean away loose debris, and look along the edge in good light. A continuous line with mild dulling calls for ordinary sharpening. A bent cutting blade, a sprung hook, or a crack near the pivot is a repair or replacement decision instead.
That early diagnosis protects geometry. When gardeners say they ruined a favorite pruner while sharpening, the failure often started before the stone touched steel. They tried to file away a chip that required more metal removal than the blade shape could spare, or they mistook sticky sap drag for dullness and kept sharpening a blade that mostly needed cleaning and tension adjustment. Geometry is preserved first by deciding whether sharpening is truly the next job.
Separate a dull edge from a damaged mechanism
A dirty or superficially dull cutting edge belongs in the cleaning-and-sharpening sequence. Cracked or bent metal, deep damage, and a loose bypass relationship need repair assessment first. After sharpening, judge an actual controlled cut: continued crushing directs attention back to alignment, damage or service needs, not automatically to more grinding.
Clean down to bright steel before judging the edge
Never sharpen through grime. FELCO is explicit that dirt, dried sap, and resin hide the true condition of the steel and accelerate wear on sharpening tools. Illinois Extension likewise advises removing dirt, rust, and sap before sharpening, and notes that pruners can be disassembled for cleaning when their design allows it. If you sharpen through residue, the stone rides over contamination instead of tracking the real bevel.
Use cleaning to expose the reflective band that tells you where the edge has gone dull. Brush off soil, remove sticky plant residue, and clear light rust so the existing bevel becomes readable from heel to tip. The goal is not a cosmetically polished tool. The goal is a surface clean enough that you can see where the angled face begins, where it narrows toward the edge, and whether the wear pattern is even or concentrated in one section.
Cleaning also reveals whether the bypass relationship is still mechanically plausible. FELCO advises checking that the cutting blade and counter blade pass closely without gaps, and that the pivot bolt remains secure while still allowing smooth movement. If alignment is visibly off before sharpening, you may need to correct tension or service the pruner before edge work. Filing a blade that cannot pass the hook correctly is wasted steel.
If disease hygiene is relevant, keep it separate from edge work. Clean the blade first, then disinfect as needed after pruning diseased material, and dry the tool fully before returning to lubrication. The sharpening pass should work on clean, dry metal. That sequence matters because disinfectants, moisture, and lubricant each have their place, and a blade hidden under all three at once is hard to read accurately.
Read the existing bevel and hold to it
The essential geometry rule is simple and unforgiving: sharpen only the beveled side of the cutting blade and preserve the existing angle. FELCO states that the goal is to restore the original factory bevel rather than create a new angle, and notes that many high-quality bypass pruners fall around a 23 to 25 degree bevel. Illinois Extension gives the same practical instruction in shorter form: the beveled edge should be sharpened at the same angle as the bevel.
That does not mean you need to measure every blade with a protractor. FELCO's more useful advice is to lay the sharpening stone flat against the existing factory bevel and keep that angle consistent throughout the stroke. In other words, the blade itself teaches the angle if the surface is clean enough to read. Tilt steeper than the bevel and you create a short aggressive edge that changes the geometry. Tilt flatter and you polish behind the edge without restoring it efficiently.
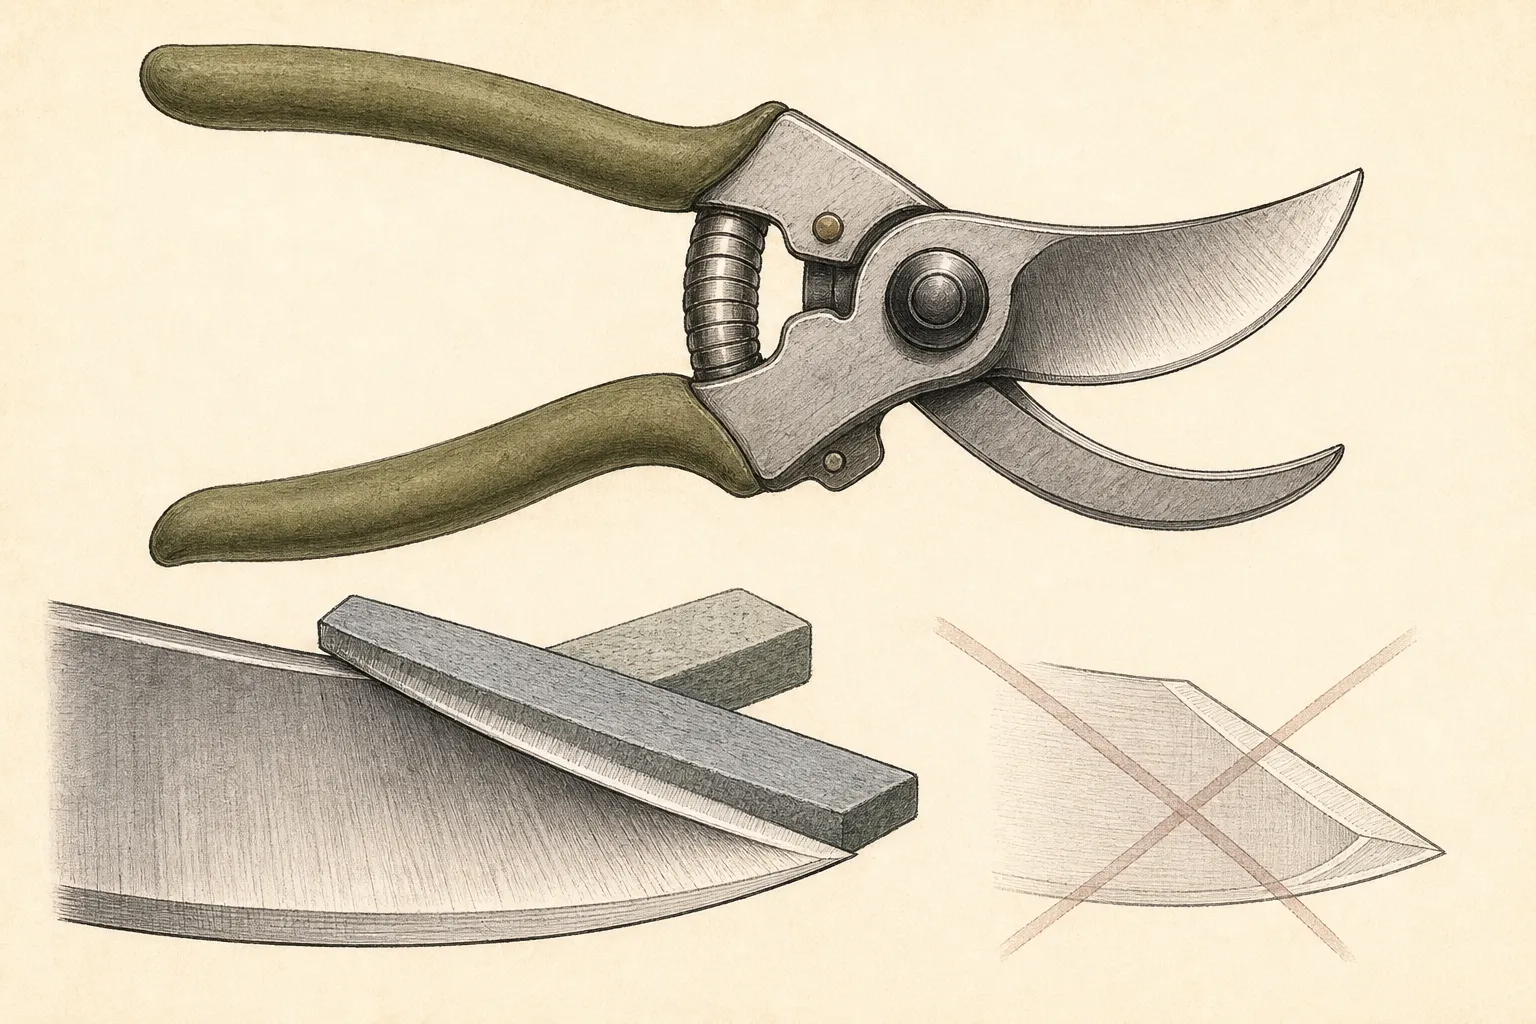
Just as important is what not to sharpen. FELCO says the reverse side of the bypass cutting blade should not be filed and the anvil or hook side is not the sharpening target. Corona's sharpener guidance aligns with that pattern by specifying several passes on the beveled cutting side and only a single pass on the flat edge to remove metal burrs. The flat side participates in the finish, but not as a place to create a second bevel.
Read the whole blade, not just the first inch near the tip. Bypass pruners cut through a curve, and that curve only stays efficient if the sharpening contact follows it. A correct bevel looks consistent from heel to tip. If one area reflects brightly and another stays dark, the wear pattern or your hand pressure has become uneven. Geometry is preserved by maintaining that original curve and angle together.
Sharpen heel to tip with controlled one-direction strokes
Once the stone is riding on the true bevel, the work becomes repetitive and calm. FELCO recommends pushing from the heel toward the tip in smooth, even strokes and not moving the stone back and forth. That direction matters because the stroke follows the cutting line as the blade narrows, and it helps the hand commit to one geometry rather than sawing uncertainly across the face.
Use the full edge on every pass. FELCO advises letting each stroke follow the blade's curve from base to tip, and Illinois Extension notes that longer sharpening stones can be easier to control on garden tools for exactly this reason. A short choppy stroke on only the middle of the blade often creates bright hollows and leaves the heel or tip underworked. Controlled full-length passes preserve the original sweep of the edge.
The amount of metal removed should stay modest. FELCO suggests roughly five to ten steady strokes until a clean even edge begins to form, while Corona describes a practical touch-up range of four or five passes on the beveled side for burr removal tools in its sharpening system. Treat those numbers as bounded guidance for ordinary dullness, not as a contest to see how much steel can be removed. Stop when the edge becomes continuous and even.
Avoid power grinding for routine home sharpening. Illinois Extension warns that friction heat from power grinding stones can make the metal brittle. That warning fits this article's promise exactly. If your goal is to keep the original blade geometry, heat, speed, and aggressive material removal are the wrong tools. Slow hand sharpening offers feedback at every stroke, and feedback is how geometry survives.
Remove the burr, reset tension, and protect the edge
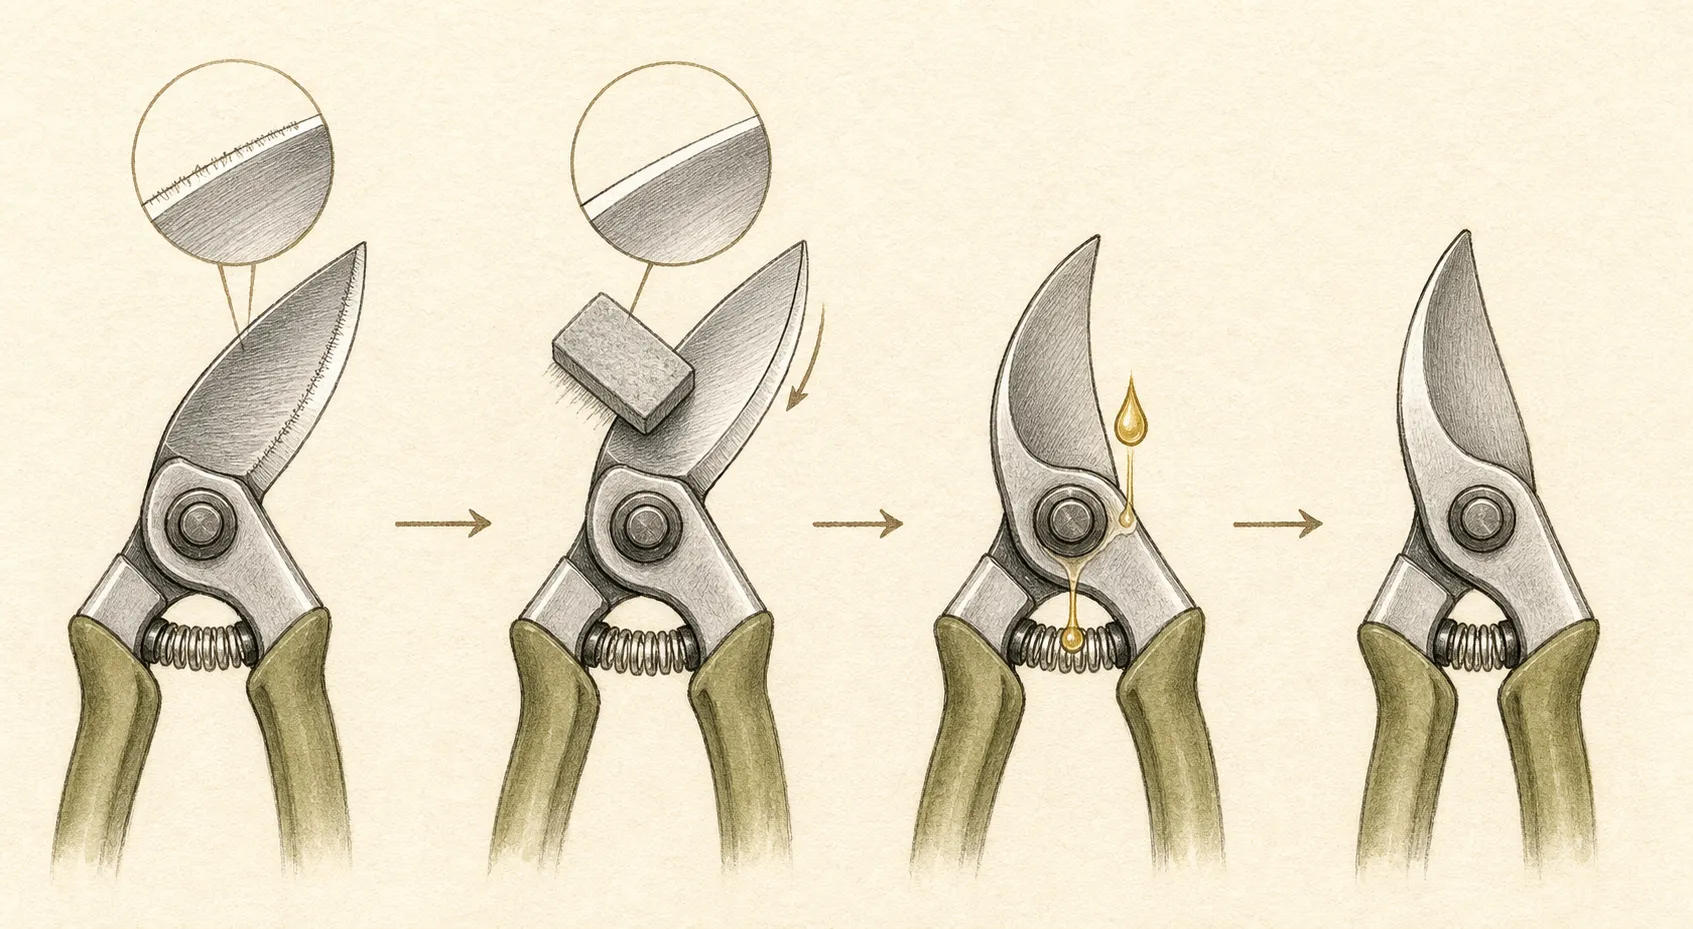
Sharpening is incomplete until the burr is handled correctly. FELCO explains that a fine burr forms on the reverse side and should be removed by laying a fine stone or ceramic stone completely flat against that surface for one light stroke from pivot toward tip. Corona's sharpening guidance reaches the same mechanical end by advising only a single pass on the flat edge after several beveled passes. The key is the word light. This is burr removal, not a second sharpening face.
If you make repeated passes on the flat side, you begin to create the very geometry change this article is trying to avoid. A bypass blade works because that reverse surface remains flat enough to meet the counter blade properly. Shear off the burr and stop. The blade should feel cleaner and more exact, not thinner from both sides. One deliberate finishing pass is far safer than a fussy polishing routine that slowly invents a new angle.
Next, re-establish the mechanism. FELCO advises lubricating the pivot bolt and spring, then tightening the pivot nut until movement is smooth without play and the blades pass cleanly without grinding. This adjustment is not secondary. A perfectly sharpened blade with sloppy pivot tension still cuts poorly, while an over-tightened pivot increases friction and encourages the user to misdiagnose resistance as dullness. The closing action should feel controlled, close, and quiet.
Finish by protecting what you restored. FELCO recommends lightly oiling exposed metal surfaces after sharpening, and Illinois Extension similarly advises a light lubricant coat on the blade once tools are sharp. Wipe away excess so the pruner goes into storage clean rather than gummy. A thin protective film on bright steel and a small amount of oil at the pivot complete the maintenance cycle without hiding the edge under residue.
Know when to stop and replace parts or send the tool out
A home sharpening session has a sensible endpoint, and honoring it protects both tool life and cutting quality. If the edge remains visibly chipped after moderate controlled work, the pivot cannot be set without wobble or binding, or the hook and blade no longer pass closely, you are no longer preserving geometry by continuing. You are sacrificing steel to compensate for a deeper mechanical problem.
This is where replaceable-part pruners earn their reputation. Illinois Extension notes that many manufacturers offer replaceable blades on quality hand pruners. That matters because a blade that has been sharpened repeatedly for years may eventually lose enough width or profile that the bypass relationship changes even if every sharpening was careful. Replacement can preserve the tool's function more honestly than one more rescue attempt on a spent blade.
Professional sharpening also has a place. FELCO frames deep maintenance as periodic, not constant, and UVM points out that waiting time for professional sharpening may be shorter in fall than in spring. If you are uncertain about a distorted edge, high-value pruner, or disassembly sequence, that timing is useful. Sending the tool out before the rush is often the more exact path, not the less capable one.
The correct finish is measurable in the hand. The pruner should close smoothly, the edge should look continuous, the flat side should remain flat, and cuts should require noticeably less force without crushing stems. If you reached that point while respecting the original bevel, the job is done. Geometry is preserved not by sharpening forever, but by stopping as soon as the original working relationship has been restored.
Steps
- Level
- moderate
- Time
- About 30 to 45 minutes for one pruner including cleaning, sharpening, and reset
- Tools
- fine sharpening stone or diamond file, cleaning brush or scouring pad, clean rags, wrench or adjustment tool for the pivot, good task lighting
- Materials
- light oil for the pivot and exposed metal, appropriate cleaner for sap and grime, optional fine ceramic stone for final burr removal
- 1Confirm that the tool is a bypass pruner and inspect the edge
Open the pruner and identify the sharpened cutting blade and the opposing hook or counter blade. Look for cracks, deep chips, bent metal, slack at the pivot, or a spring problem before sharpening begins. If damage is structural rather than superficial, tag the pruner for repair, parts, or professional service instead of grinding away steel in hope.
- 2Clean the blade and mechanism first
Brush off dirt, remove sticky sap, and clear light rust so the real bevel is visible from heel to tip. Open and close the pruner while cleaning to expose hidden residue at the pivot and blade overlap. Dry the tool fully before sharpening. A stone that rides on resin or grit cannot preserve the original blade angle with any consistency.
- 3Read the existing bevel before the first stroke
Place the stone against the angled face of the cutting blade and adjust until it lies flat on the existing bevel. Do not start on the flat reverse side and do not file the hook. If the correct angle is hard to find, stop and improve the cleaning or light rather than guessing. The blade already contains the angle you need to follow.
- 4Sharpen from heel to tip in one direction
Push the stone along the bevel from the base of the blade toward the tip in smooth controlled passes, following the curve of the edge. Maintain the same angle through the full stroke. Use only enough passes to restore a clean even edge. Repeated scrubbing back and forth invites inconsistent pressure and geometry drift.
- 5Remove the burr with one light flat pass
Turn the blade over and lay a fine stone fully flat against the reverse side. Make one light pass from pivot toward tip only to shear off the burr created by sharpening. Stop immediately afterward. The reverse side helps finish the edge, but it is not a second bevel and it should not receive repeated sharpening strokes.
- 6Lubricate and reset the pivot
Apply a small amount of oil to the pivot and spring, then tighten or loosen the pivot hardware until the pruner closes smoothly without side play. Test the action several times. The blades should pass closely without grinding. If smooth movement and close alignment cannot be reached together, the pruner needs further service beyond ordinary sharpening.
- 7Protect, test, and store the pruner
Wipe a light protective film over exposed metal and remove any excess. Make a few controlled test cuts on suitable soft stems or similar material to confirm that slicing has replaced crushing. Store the pruner clean and dry. If the cut still tears after a careful session, record whether the likely next step is replacement parts, deeper service, or professional sharpening.
Related reading

Sources
- How to Sharpen and Maintain Pruning Tools. FELCO EU. Source record · Accessed 2026-08-19.
- Carbide Sharpening Tool. Corona Clipper Inc.. Source record · Accessed 2026-08-19.
- Proper maintenance extends lifespan, saves money on garden tools. Illinois Extension. Source record · Accessed 2026-08-19.