Grow · protect autumn planted bulbs from rodents
Protect Tulip and Crocus Bulbs with Wire Mesh After Autumn Planting
Protect newly planted tulip and crocus bulbs with a buried half-inch mesh cover or complete cage chosen from the actual digging pattern.
Published Last updated
In this guide
- Match the barrier to the way the bulbs are being reached
- Read the disturbance before rebuilding the bed
- Choose a top cover or a complete cage
- Measure the bulb depth independently of the wire
- Cut and fold the mesh into a safe buried shape
- Backfill while keeping bulbs and the barrier stable
- Inspect after planting while the system stays intact
- Open a route for spring growth and future lifting
- Steps
Match the barrier to the way the bulbs are being reached
Protect a newly planted tulip or crocus drift with half-inch galvanized hardware cloth only after deciding whether the damage begins at the surface or travels underground. A horizontal sheet buried above the bulbs can interrupt squirrels and other animals digging down through freshly worked soil. A complete mesh basket or cage addresses access from the sides and below as well. Both methods must preserve the bulb's correct planting depth, functioning soil drainage, room for roots, and a clear route for spring shoots. Wire is an exclusion layer, not a substitute for planting correctly.
Early October is a practical moment for this job in many cool-temperate Northern Hemisphere gardens because spring bulbs are being planted as soil cools. It is not a universal planting date. Use the named bulb's regional guidance and the existing soil-temperature article to decide when to plant. This guide begins once that decision is made and a real history of disturbance, nearby rodent pressure, or a valuable planting justifies protection. A bed with no evidence of digging does not automatically need permanent metal below its surface.
Tulips and crocuses deserve special attention because several Extension sources name them among bulbs commonly eaten or disturbed. North Carolina State and New Hampshire Extension contrast them with bulbs such as daffodils and hyacinths, which are usually less bothered. That contrast can shape a future planting palette, but it does not turn any plant into a guaranteed repellent. Use less-favored bulbs because they suit the garden, not as an invisible fence around a tulip feast.
The finished installation should disappear into an ordinary planted bed. No sharp edge remains at the surface, the mesh does not lift the bulbs toward frost or compress them against metal, and the mulch remains a separate shallow surface layer. Record the mesh footprint and take a photograph before the last soil is returned. That record prevents a future spade, aerator, division fork, or irrigation repair from meeting hidden wire by surprise.
Read the disturbance before rebuilding the bed
Inspect before smoothing the soil. A shallow pit in the recently loosened patch, loose crumbs thrown outward, a bulb left on the surface, or repeated digging from above supports a surface-access problem. Photograph the hole with a ruler and mark its position on the planting plan. One untidy patch cannot identify an animal. Birds, pets, skunks, squirrels, chipmunks, and a gardener revisiting an unmarked hole can all disturb soft soil in different ways, and several may use the same bed.
A tunnel entering from the side, a void below the planting, gnawed bulbs underground, or repeated loss with little surface excavation points toward burrowing access. Illinois Extension notes that moles are often blamed for missing bulbs while field mice may use mole tunnels. The distinction matters: a sheet placed only above the bulbs cannot close an existing route beneath them. Preserve footprints, tunnels, tooth marks, droppings, and the pattern of neighboring damage for a local Extension or wildlife specialist if identification remains uncertain.
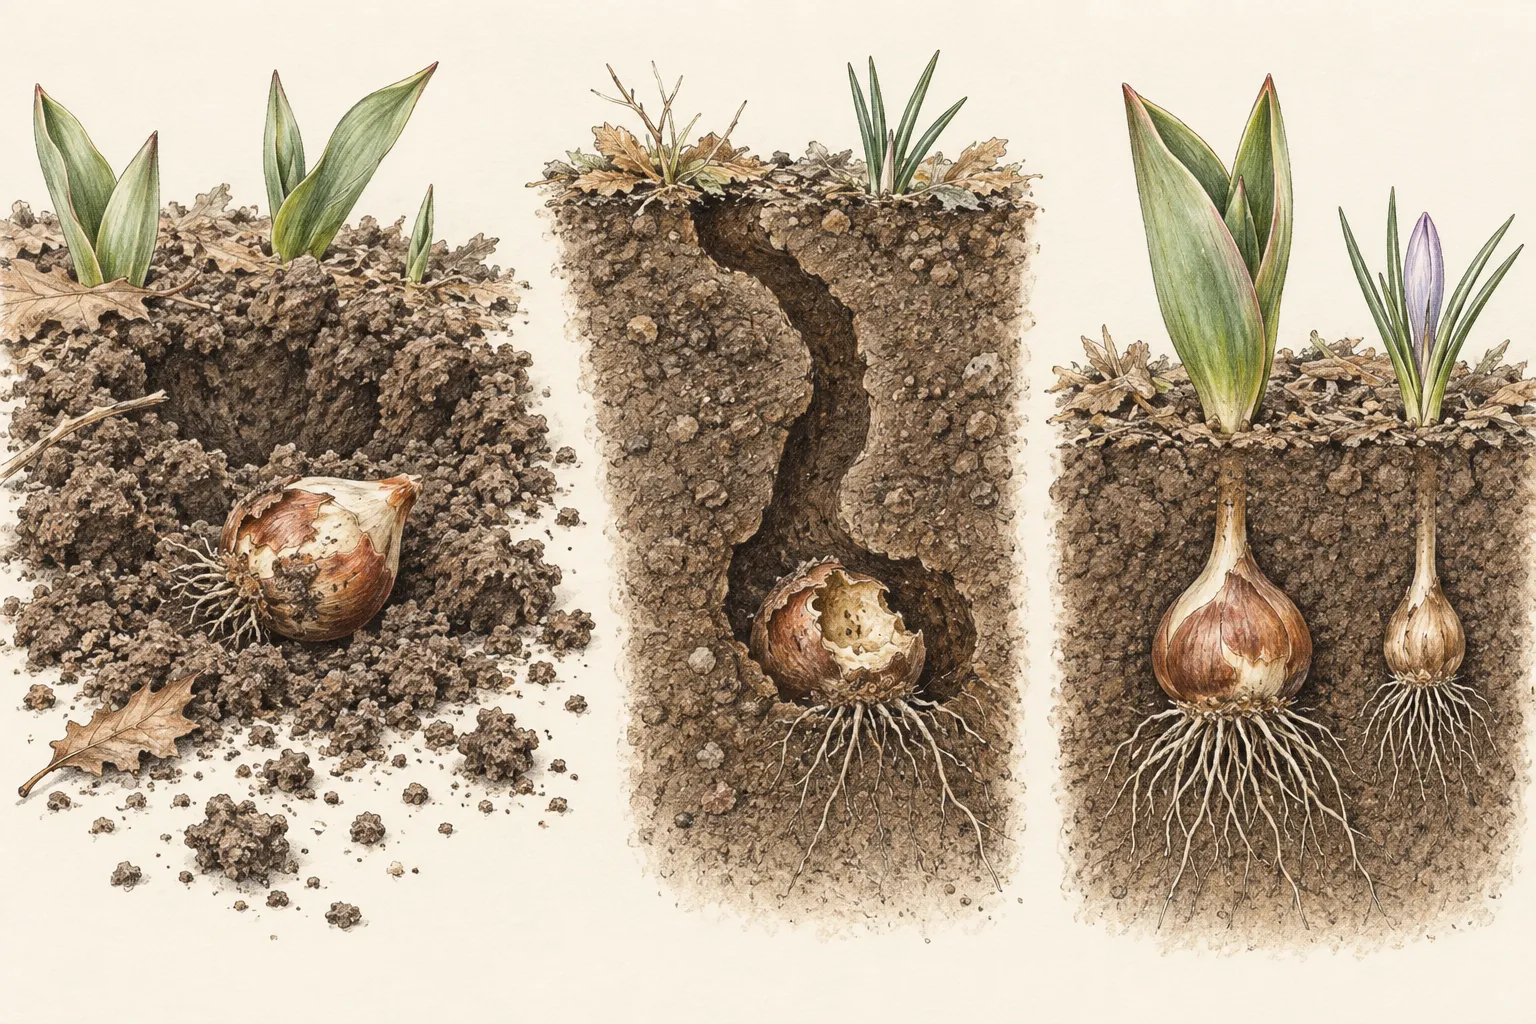
Separate feeding from planting failure. A soft bulb in saturated soil, a bulb with fungal decay, and a bulb cleanly removed or gnawed demand different corrections. Check drainage, planting depth, bulb firmness, and the condition of the basal plate. A mesh cage built around diseased bulbs in wet soil merely makes the failed planting harder to inspect. Discard compromised material according to local guidance and correct water movement before rebuilding the protected group.
Map the route as well as the missing bulb. Surface digging concentrated along one freshly planted strip suggests a cover over that strip may be proportionate. Connected underground runs, losses from several directions, or repeated damage inside an apparently settled bed make a complete cage more defensible. Widespread wildlife conflict beyond the bulb bed needs broader habitat and exclusion advice. This small construction should solve a bounded planting problem, not promise control of an entire yard.
Choose a top cover or a complete cage
For digging that arrives from above, use a flat panel of half-inch galvanized hardware cloth parallel to the soil surface and buried above the bulbs. UF/IFAS describes this arrangement and recommends extending mesh at least one foot beyond the protected bed edge for maximum effectiveness against squirrels. Treat that extension as part of the footprint, not scrap that can curl up beside the border. A narrow cap exactly matching the bulb cluster lets an animal begin at its edge and work inward.
For access from below or several sides, form a complete cage. Illinois Extension recommends a small cage of half-inch mesh with bulbs inside at their proper depth, while New Hampshire Extension likewise names half-inch galvanized hardware cloth for cages. The base and sides close the routes that a top panel leaves open. The cage still needs soil contact and drainage; it is not a pot, liner, or sealed box. Roots must enter the surrounding soil, and excess water must leave normally.
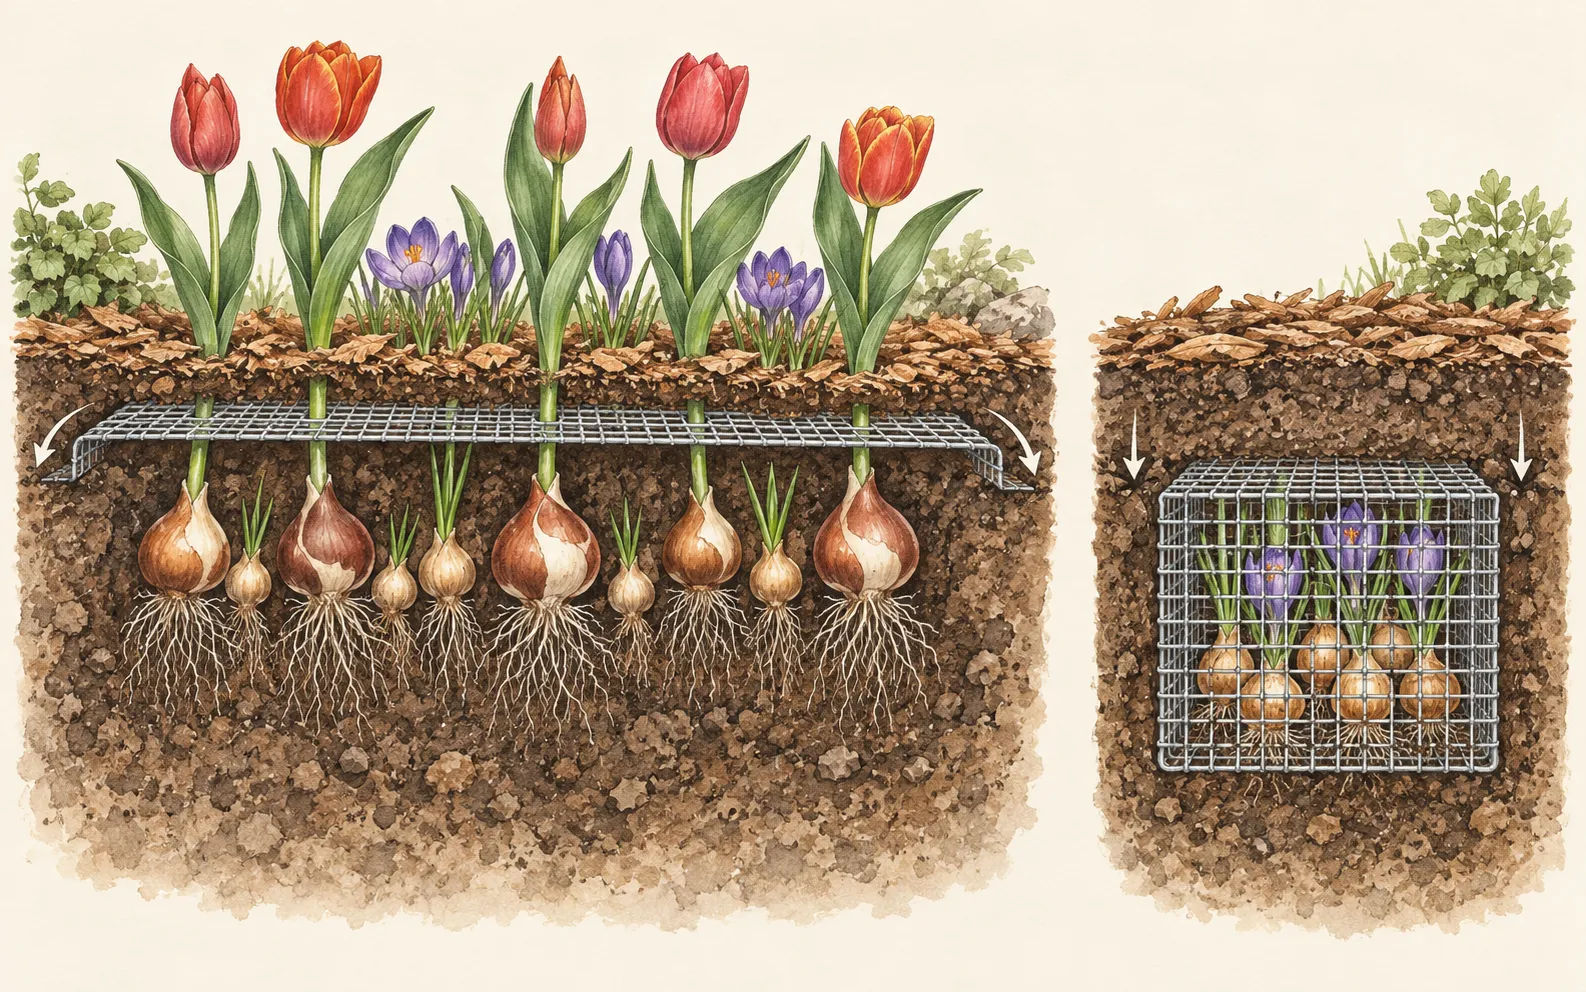
A cage is the more intrusive choice. It uses more wire, requires a larger excavation, and can obstruct later lifting or natural increase if its dimensions are mean. Reserve enough horizontal room for the intended cluster and its expected offsets, and map the boundary. If the long-term design depends on bulbs spreading freely through a broad bed, a permanent small basket works against that goal. A temporary top cover or a palette less vulnerable to local feeding may fit better.
Use half-inch galvanized hardware cloth. Plastic film interferes with water and gas movement; very fine insect screen can become a root barrier or clogged layer; unknown corroding mesh creates sharp hidden debris. The retained Extension sources repeatedly specify half-inch galvanized hardware cloth because it balances exclusion with openings for plant growth. Where soil chemistry, coastal exposure, local codes, or product coatings raise concerns, ask local guidance before burying metal.
Measure the bulb depth independently of the wire
Establish the bulb's planting grade first. Follow the label and current regional guidance for the exact tulip or crocus, measuring from the finished soil surface to the relevant part of the bulb. North Carolina State gives broad handbook examples for small and large bulbs, but one general number cannot replace the named bulb's instructions, soil, and climate. The protective sheet belongs within that established section; it must not become the new surface from which depth is guessed.
For a top panel, plant the bulbs at their specified grade, cover them with enough soil to keep metal from resting on their noses, then set the panel level above the group. Continue backfilling to the intended finished grade. The illustration exaggerates the space so the parts are legible. In the bed, the distance must follow the chosen planting method and leave the developing shoot a short direct path through an opening; a wire intersection should not force it sideways.
For a cage, excavate the whole protected volume before bending the mesh. The cage base sits below the bulb root plates with soil between bulb and wire; the top closes above the noses with a soil layer between. Add those clearances to the required planting depth when calculating the excavation. A shallow cage that pushes bulbs upward is not protective horticulture. A cramped basket that wedges bulbs against its side can damage scales and create awkward roots.
Keep mulch outside the depth calculation unless the bulb guidance explicitly says otherwise. NC State discusses planting depth and a surface mulch as related but distinct layers. Restore soil to grade, settle it with water, then apply the appropriate mulch over the surface while adjacent perennial crowns remain open. A deep decorative mound cannot compensate for a bulb or cage set too shallow, and it can hide a mesh edge that has worked upward.
Cut and fold the mesh into a safe buried shape
Wear sturdy gloves and eye protection before cutting hardware cloth. Unroll only the length you can control and weight the remaining coil so it does not spring. Mark the final dimensions, including the UF/IFAS edge extension for a top barrier or every side and overlap for a cage. Cut with tools rated for the wire gauge. Collect each clipped end as it falls; a short galvanized offcut is difficult to see in soil and can puncture a glove, paw, hose, or future bare hand.
Flatten a top panel and turn cut edges downward and inward where the design permits. The panel must lie flat, with every corner stable. Use corrosion-resistant landscape staples or pins only as needed to keep it located during backfilling, and count them on the plan. Stakes that project into the bulb group can damage storage tissue or later meet a spade. Bury the panel fully so it cannot become a trip, mower, paw, or maintenance hazard.
To form a cage, bend the base and sides over a straight board or other firm edge, overlap corners, and close them with durable corrosion-resistant wire so gaps stay closed during backfilling. Fold sharp tails into the cage wall, away from bulbs and the future digging approach. Fit the empty cage in the excavation before adding soil. It should sit stable, clear of the path, irrigation tubing, tree roots, utility lines, edging, and other buried structures.
Set aside a removable sample or photograph the exact mesh before burial. Record its opening size, material, footprint, depth, fasteners, and installation date. A vague note saying wire under tulips is not sufficient five years later. The useful record lets another gardener locate the perimeter, predict where edges and pins lie, and decide whether the cage should be removed when the planting is redesigned.
Backfill while keeping bulbs and the barrier stable
Return loose soil in small lifts. Around a top-protected drift, support the panel near its center while the first soil is added across it, then work outward so one heavy pile does not bow the mesh onto bulb noses. Around a cage, add soil both inside and outside the walls in stages. This balances pressure and keeps the basket square. Check labels and bulb orientation before the top becomes inaccessible; tulip points and crocus growing tips face upward while root plates meet soil below.
Use the excavated soil unless the original planting plan calls for a justified amendment across the whole root zone. A pocket of radically different mix inside the cage can hold water or dry at a different rate from the surrounding bed. Break only large clods and remove stones that would press hard against a bulb or wire edge. Keep feet off the backfill. Gentle hand firming and a thorough watering settle contact while preserving pore space.
Finish at the surrounding grade and erase the visual invitation created by fresh loose soil. Illinois Extension advises firm refilling, camouflaging disturbed ground with leaf or bark mulch, and watering enough to settle the surface. Camouflage cannot hide a raised wire corner. Inspect from the path, then with a gloved hand across the whole footprint. The surface should be even, the perimeter buried, and labels positioned away from the precise bulb center.
Photograph the finished surface and the pre-backfill mesh. Mark the bed plan with fixed references such as an edging corner or paving joint; a temporary annual plant is an unreliable datum. If several cages share a border, assign each an identifier and bulb list. This protects both the plants and future maintenance: a gardener can weed, divide nearby perennials, or install another drift while staying clear of hidden metal.
Inspect after planting while the system stays intact
Check the bed the next morning and after several days, heavy rain, or renewed animal activity. Look for an entry point at the perimeter, a lifted corner, displaced staples, a tunnel beside the cage, standing water, or bulbs exposed beyond the protected footprint. Rebury a sound edge after correcting its support. If pressure repeatedly shifts the installation, stop adding more pins at random; reopen enough of the bed to understand the route and resize or rebuild the barrier safely.
Keep homemade deterrents, mothballs, poison, and unlabeled repellents out of the repair. Wildlife products have legal uses, nontarget risks, and variable effectiveness. The retained sources present physical exclusion as the durable core of this method. Any commercial repellent must be currently labeled for the site, plant, and target animal and used exactly as directed. Children, pets, pollinators, soil organisms, and wildlife beyond the target remain part of the decision.
Watch drainage separately. A protected patch that stays wet longer than the surrounding bed may have compacted during construction or received an unsuitable fine amendment. Mesh cannot fix saturation. Probe nearby soil clear of the mapped barrier and compare after rain. Softening bulbs, odor, or standing water call for reopening and correcting the planting environment; a tighter seal against an animal would miss the evidence.
If a bulb appears outside the mesh after planting, identify whether it came from beyond the protected footprint, was missed during installation, or was pushed from the new group. One displaced bulb does not prove failure across the barrier. Update the count and map. A bounded correction preserves a sound installation; covering the whole border with more wire creates overlapping hidden hazards and still may leave an underground route open.
Open a route for spring growth and future lifting
Observe the protected area as shoots emerge. Half-inch openings are intended to allow growth through, but a shoot can still meet a wire intersection, folded overlap, fastening point, or a panel displaced by frost and soil movement. Compare emergence with the planting map. Leave a trapped shoot in place while exposing the obstruction carefully from above, keeping the bulb and neighboring shoots stable, and adjust only the smallest safe section.
A temporary surface-laid wire cover is different from the buried installations in this guide and must be removed before growth catches it. Buried hardware cloth can remain when it is stable, fully covered, mapped, and compatible with the planting's future. Inspect for exposed metal after frost heave, erosion, animal digging, or border work. Rebury or remove a compromised edge promptly; once a sharp corner appears at grade, it is no longer functioning as an invisible protected layer.
After flowering, let tulip and crocus foliage mature according to the site's separate bulb-foliage guidance. The cage does not change the bulb's need to replenish reserves. Mark weak, missing, or oddly deflected shoots on the plan. A missing flower is not proof of renewed feeding; planting condition, bulb quality, chilling, drainage, and cultivar persistence also matter. Investigate evidence before reopening the cage.
Plan removal before natural increase or redesign turns the mesh into a constraint. Lift the entire mapped unit during the appropriate dormant handling window, locate every edge, and remove fasteners and fragments with it. Count bulbs and wire pieces before closing the hole. A complete removal is preferable to clipping an old cage into hidden sections. The system succeeds when it protects a deliberate planting and remains legible to the next gardener, not when metal accumulates invisibly with every autumn order.
Steps
- Level
- moderate
- Time
- About one to two hours for a small drift, plus checks after planting and in spring
- Tools
- Tape measure, Spade or hand trowel, Wire cutters, Pliers, Gloves, Landscape staples or corrosion-resistant pins
- Materials
- Sound tulip or crocus bulbs, Half-inch galvanized hardware cloth, Excavated soil, Locally appropriate surface mulch, Weatherproof plant labels
- 1Document the access pattern
Before smoothing disturbed soil, photograph holes, displaced or gnawed bulbs, tunnels, tracks, droppings, and the condition of neighboring plantings. Check bulb firmness and drainage so rot is not mistaken for feeding. Mark whether access came mainly from above or appears to travel below or beside the planting; seek local identification when the evidence is uncertain.
- 2Choose the least intrusive effective barrier
Select a buried horizontal half-inch galvanized hardware-cloth panel for surface digging. Extend it beyond the protected drift; UF/IFAS specifies at least one foot beyond bed edges for maximum effectiveness against squirrels. Choose a fully enclosed half-inch mesh cage when tunneling or side access is supported by evidence. Leave unpressured plantings unmeshed.
- 3Set planting depth before mesh depth
Use the exact bulb label and current regional guidance to establish tulip or crocus planting depth. Place soil between every bulb and the wire, keeping root plates down and shoots up. Calculate cage excavation from the bulb grade plus lower and upper clearance. Treat the surface mulch as a separate layer; it cannot disguise shallow planting.
- 4Cut, fold, and record the metal safely
With gloves and eye protection, cut mesh using rated tools and collect every offcut. Fold sharp edges inward and downward. Close cage corners with corrosion-resistant wire and test the empty form in the hole. Record material, opening size, perimeter, depth, pins, and date, and photograph the complete installation against fixed site references.
- 5Backfill in balanced layers
Return suitable excavated soil gradually so a top panel stays level and cage walls stay square. Firm gently by hand, restore finished grade, water to settle soil, and add only the planned surface mulch. Sweep a gloved hand across the area to confirm every wire edge and fastener is buried, then update the bulb count and labels.
- 6Check edges, drainage, and emergence
Inspect after the first nights, heavy rain, renewed digging, frost movement, and spring emergence. Correct lifted edges or perimeter access with a mapped repair that keeps wire layers legible. Watch for standing water and shoots meeting intersections. Keep the map for later bulb lifting, and remove the cage completely when spread or redesign makes it a constraint.
Related reading
Sources
- Extension Gardener Handbook: Herbaceous Ornamentals. North Carolina State Extension. Source record · Accessed 2026-09-20.
- How Can I Keep Wildlife from Eating My New Bulbs?. University of New Hampshire Extension. Source record · Accessed 2026-09-20.
- How to Use Deterrents to Stop Damage Caused by Nuisance Wildlife in Your Yard. University of Florida IFAS Extension. Source record · Accessed 2026-09-20.
- Bulbs. University of Illinois Extension. Source record · Accessed 2026-09-20.