Grow · propagate coleus cuttings
Propagate Coleus From Cuttings and Keep the New Plant Compact
Take nonflowering tips below a node, root them in clean media or water, then pot and pinch only after new roots can support a compact canopy.
Published Last updated
In this guide
- Choose healthy source growth and a lawful plant
- Approve the parent and final growing space before cutting
- Prepare a clean rooting station before cutting
- Prepare a cutting around one useful node
- Root in medium with air around the node
- Root in water without waiting for a tangled mass
- Pot first and pinch only after establishment
- Feed and water the new plant by its small root volume
- Harden the plant for its final position
- Keep a propagation record and cull weak starts
- Compare several cuttings before changing the method
- Shape the stock plant for the next cutting cycle
- Steps
Choose healthy source growth and a lawful plant
Take cuttings from a vigorous coleus with firm stems, true cultivar color, and no unexplained spotting, distortion, wilt, insects, or stem collapse. Propagation copies the health of the source. Inspect lower and upper leaf surfaces and isolate suspect plants. A cutting is not a rescue for root rot or systemic decline; establish the diagnosis before multiplying material.
Check whether the cultivar is patented or otherwise restricted from asexual propagation. A plant label may state restrictions. Home gardeners should respect those rights and use seed, unrestricted plants, or permitted propagation material when required. Keeping the original label also preserves cultivar identity, light tolerance, mature size, and color information for the new plant.
Select nonflowering shoot tips when possible. Flowering stems invest in buds and may root more slowly or branch awkwardly after the spike is removed. Choose several medium-sized tips from different parts of the plant instead of stripping one side. Water a dry source plant the day before and take cuttings when tissue is hydrated but leaves are dry.
Approve the parent and final growing space before cutting
Choose correctly identified, healthy source growth that can be propagated, and prepare the rooting station first. Keep the node, moisture and light requirements of the chosen method together. Pot on when roots support the transition, then pinch only after active growth resumes. An attractive parent color does not override unexplained disease signs or inadequate space for the resulting plants.
Prepare a clean rooting station before cutting
Gather clean sharp snips, labels, a shallow container, and either clean propagation medium in containers with drainage or clean water vessels. Wash reused pots and follow appropriate disinfection guidance. Pre-moisten medium so it is evenly damp and airy, not saturated. Make planting holes before the cutting arrives so the soft stem is not forced through compact particles.
Choose media intended for propagation or a light sterile mix with suitable air and water balance. Garden soil is heavy, variable, and can carry organisms into a small humid container. If rooting in water, use a vessel that holds leaves above the surface and allows observation. Water rooting is simple but creates roots adapted to water, so transfer requires careful timing and moisture.
Label cultivar, date, and method immediately. Several coleus selections can look similar after lower leaves are removed. Keep the work surface out of direct sun and wind. Cuttings lose water through leaves before roots form, and an organized station shortens the period between severing and placement.
Prepare a cutting around one useful node
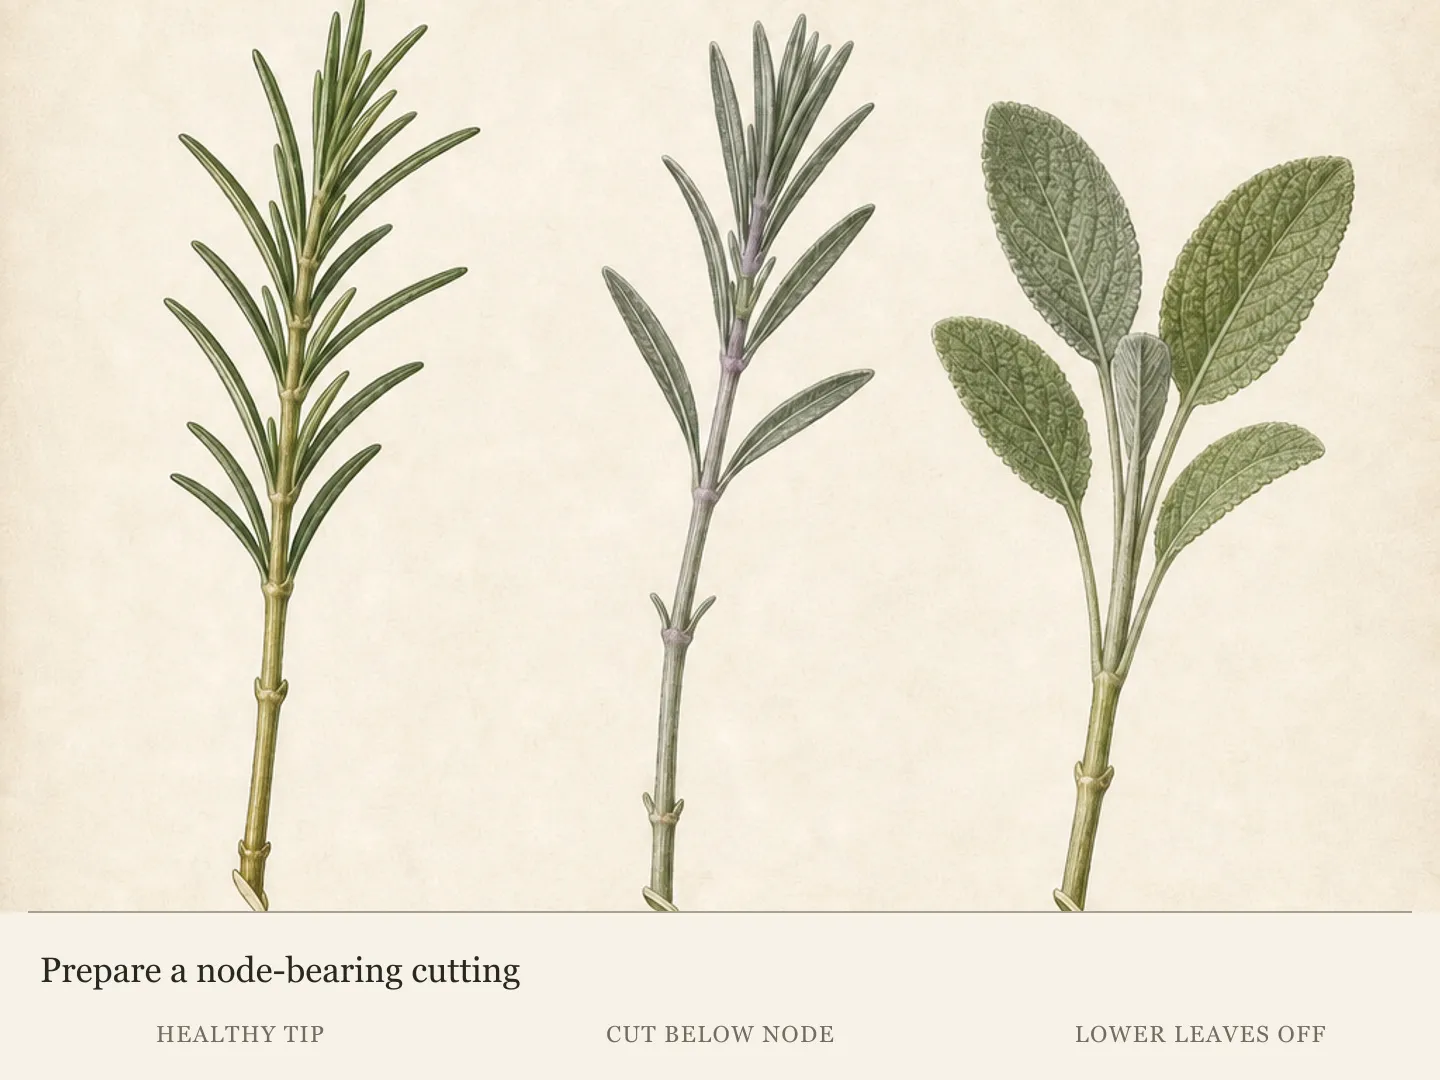
Choose a tip with several leaf pairs and cut just below a node, using a clean blade. The node is where leaves and buds arise and where roots commonly initiate. Make the cutting long enough to place one or two nodes in the rooting environment while keeping leaves above it. Avoid long bare stems that require deep containers and carry unnecessary leaf area.
Remove the lower leaves cleanly without tearing the node. Retain a small upper canopy and trim exceptionally large leaves only when needed to reduce water loss, preserving enough tissue for photosynthesis. Remove flower buds. Do not scrape the entire stem or split it unless a plant-specific propagation protocol calls for wounding; unnecessary injury increases decay risk.
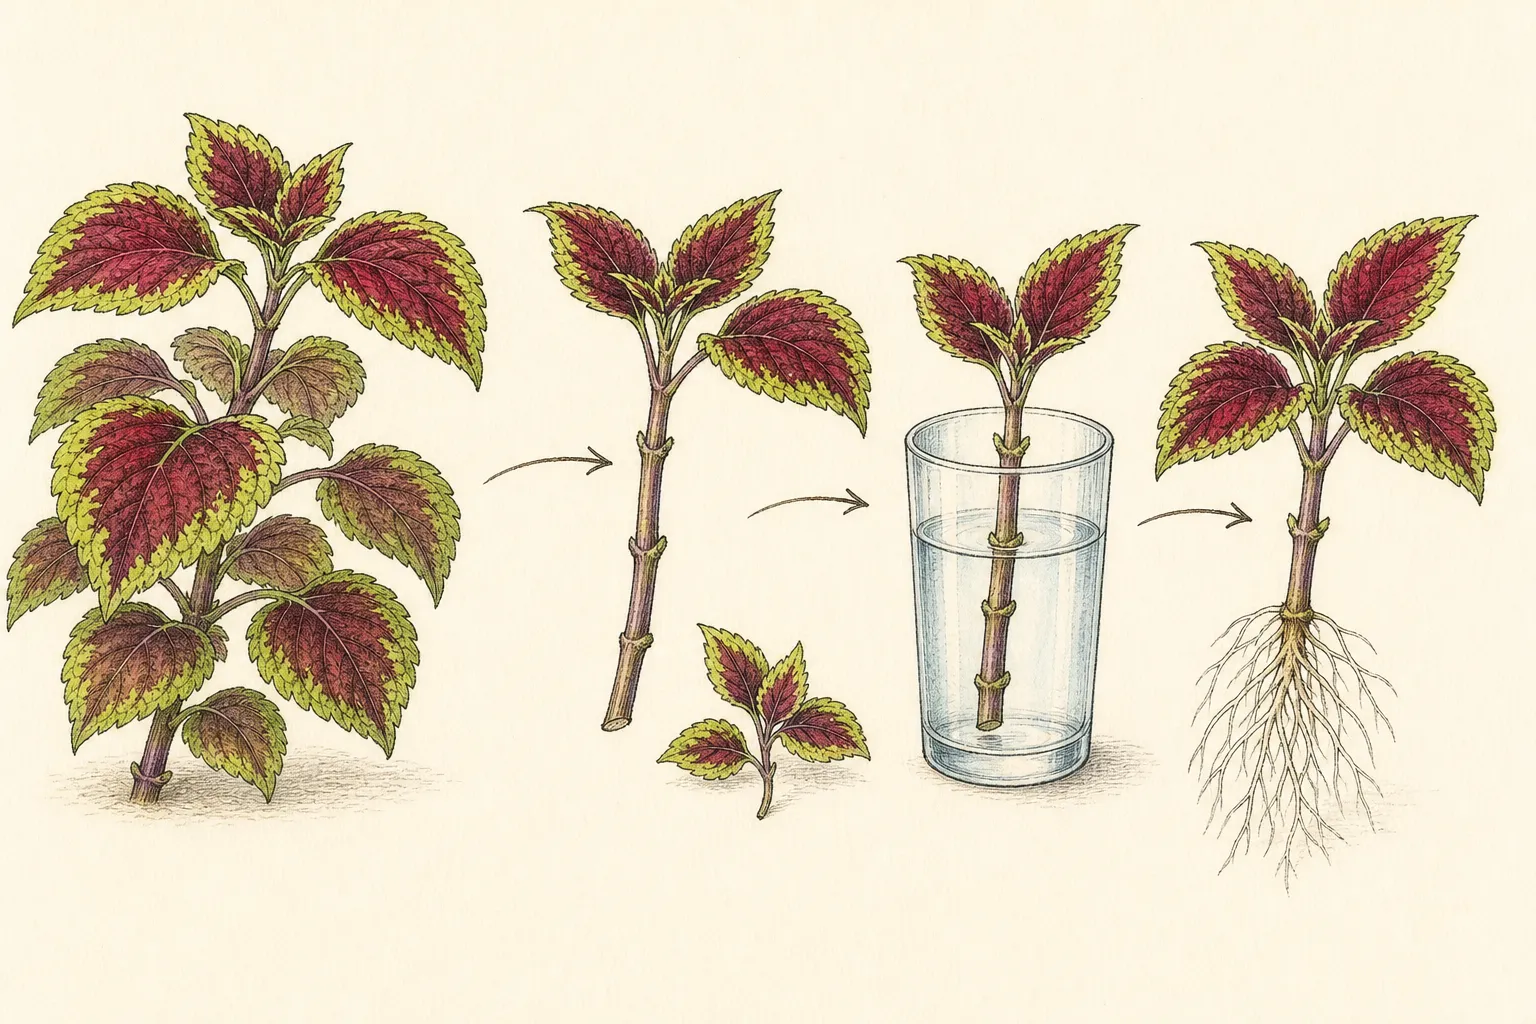
Keep prepared cuttings shaded and place them promptly. If several are being taken, stand their ends in clean water briefly or wrap in damp material without soaking leaves. Do not leave them on a warm bench while continuing to prune the source plant. A fresh clean basal cut is more useful than a wilted tip treated with extra rooting product.
Root in medium with air around the node
Insert the lower node into the prepared hole and firm medium lightly around the stem. Leaves should not touch the surface. Space cuttings so their foliage does not form a wet mat. Water gently to settle the medium and let excess drain. A clear humidity cover can reduce water loss, but it must not touch leaves and needs ventilation to prevent persistent condensation.
Provide bright indirect light and warm conditions suitable for coleus, avoiding hot direct sun on an enclosed propagation container. Check medium below the surface and add water only when it begins to dry. Constant saturation deprives the stem of oxygen and encourages rot. A cutting that wilts slightly at first may recover; one blackening at the base should be removed.
Do not tug daily to test roots. Look for firm posture and new growth, then make one gentle resistance check after an appropriate interval. Roots may be visible at drainage openings. Keep unrooted cuttings separate from established plants and inspect for fungus gnats, mold, and leaf pests. Correct the environment before applying an unverified treatment.
Root in water without waiting for a tangled mass
Place one or two lower nodes in clean water while keeping every leaf above the line. Use separate vessels or uncrowded stems so rot and roots are visible. Change water when cloudy and keep the container in bright indirect light away from heat. Top up for evaporation, but also refresh the vessel so submerged tissue remains clean.
Remove a cutting if the stem becomes soft, dark, or odorous. Rinse the vessel before reusing it. Roots should emerge from nodes and remain light and firm. Pot before they become a long tangled mass. Shorter branching roots generally adapt with less breakage than a vase full of brittle strands wrapped around neighboring cuttings.
Water-rooted cuttings need consistently moist, well-drained medium during transition. Pot gently, spread roots without forcing them, and water to settle. Keep humidity and light moderate for the first days, then gradually return to normal care. Do not leave the pot standing in water to imitate the jar; roots must adapt to an aerated medium.
Pot first and pinch only after establishment
Move a medium-rooted cutting when roots hold the plug lightly and new growth is active, before it becomes root-bound. Choose a small pot with drainage and a suitable container mix. Set the rooted node and crown at the same functional grade, spread roots gently, backfill, and water. An oversized pot stays wet longer and makes moisture harder to judge.
Wait until the plant resumes active growth before pinching. Then remove the tip just above a strong pair of leaves, leaving buds in both axils to form branches. A newly potted cutting with few roots should not be cut severely for instant compactness. Establishment supplies the roots that will support the new canopy.
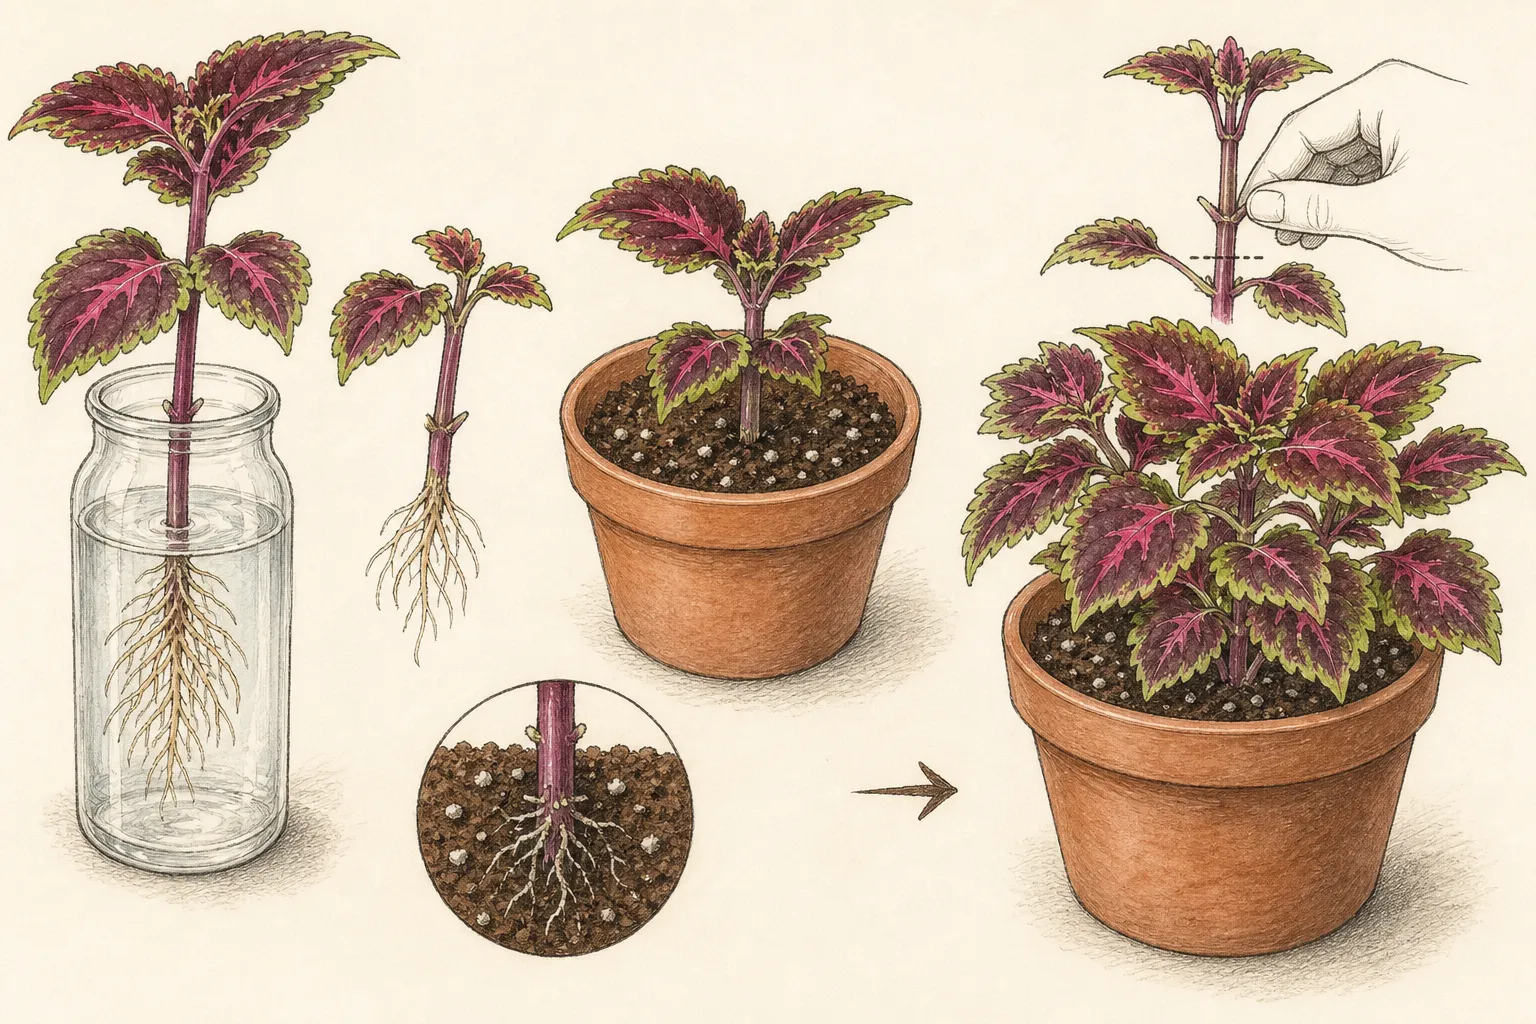
Rotate the pot for even light, but confirm the cultivar’s sun tolerance before increasing exposure. Stronger light can improve compact color on suitable coleus, while harsh sun can scorch selections adapted to shade. Long pale internodes suggest inadequate light or crowding. Pinching can branch a stem; it cannot fix a permanently dark site.
Feed and water the new plant by its small root volume
Check the small pot frequently but water from the mix, not the calendar. Apply enough to wet the root zone and let excess drain. A newly rooted plant can dry faster than a large established pot, yet it also suffers quickly in saturation. Lift the pot and probe below the surface to learn its changing water use.
Begin fertilizer only after roots and new leaves are active, using a labeled rate appropriate to coleus and the medium. Account for fertilizer already in commercial mix. High nitrogen and low light can produce soft stretched growth. The aim is steady colored foliage and short internodes, not the fastest possible size.
Keep foliage dry enough for observation and give air around plants. Remove lower leaves that touch the mix. Inspect for aphids, whiteflies, mites, and mealybugs before moving the new plant into a larger collection. Isolate and identify pests rather than spreading a cutting because it appears otherwise vigorous.
Harden the plant for its final position
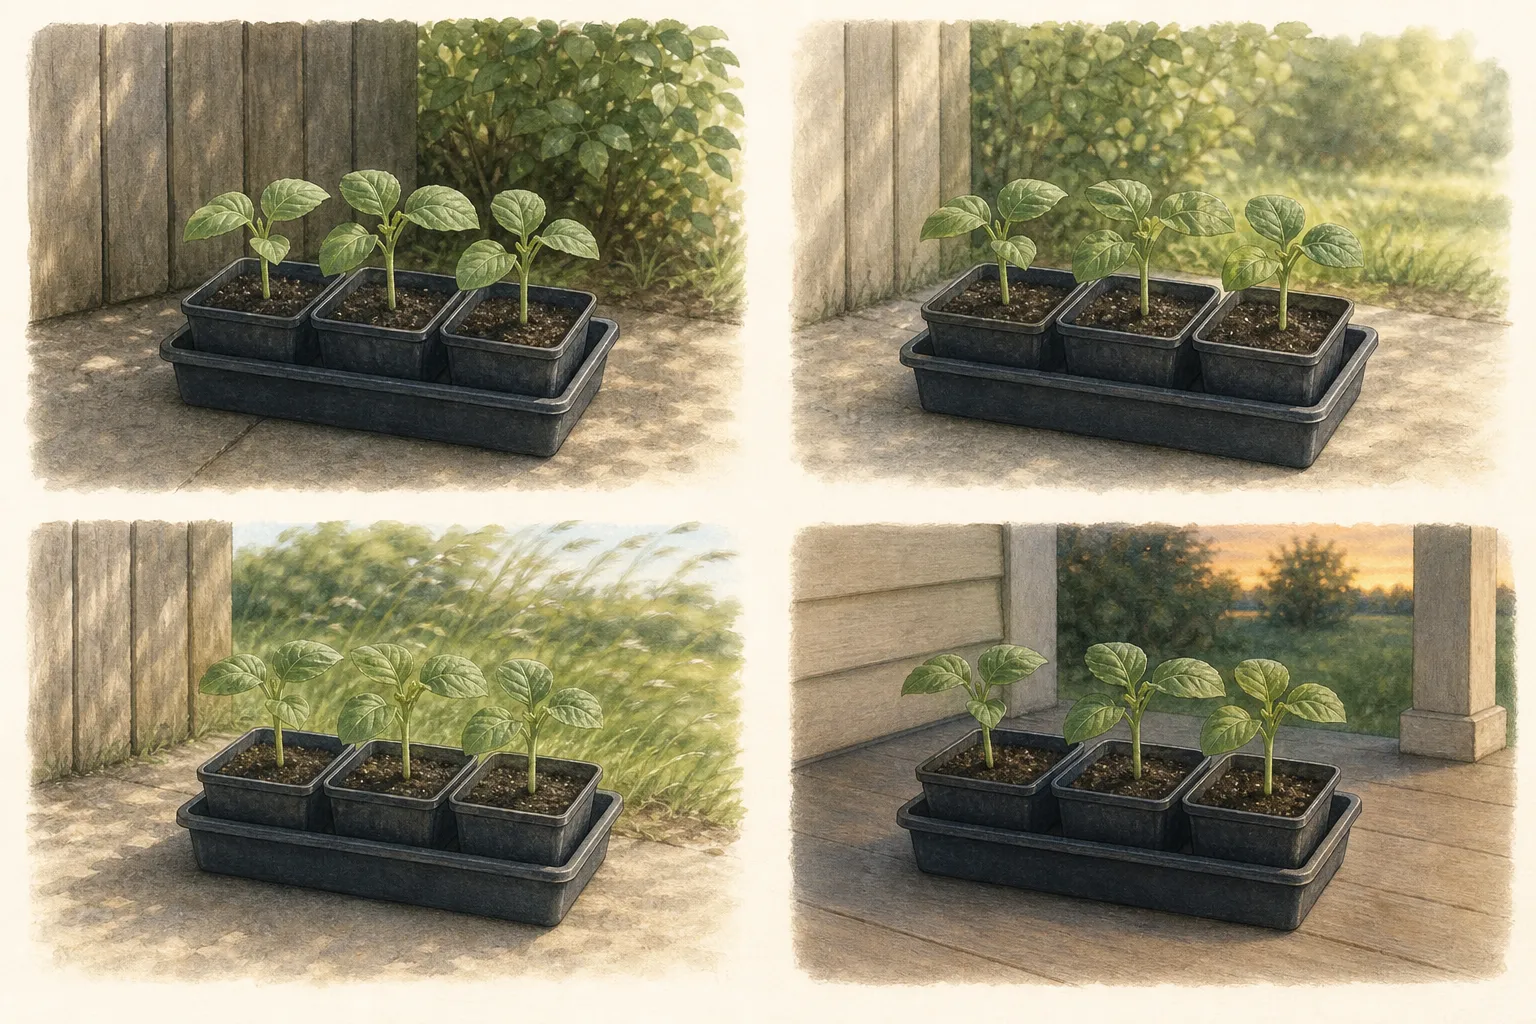
A cutting rooted indoors or in sheltered shade needs gradual exposure to outdoor light, wind, and temperature. Begin in protected conditions and increase exposure over several days according to weather and cultivar. Bring it back under cover during severe wind, cold, or intense sun. Hardening is a progression, not one afternoon on a hot step.
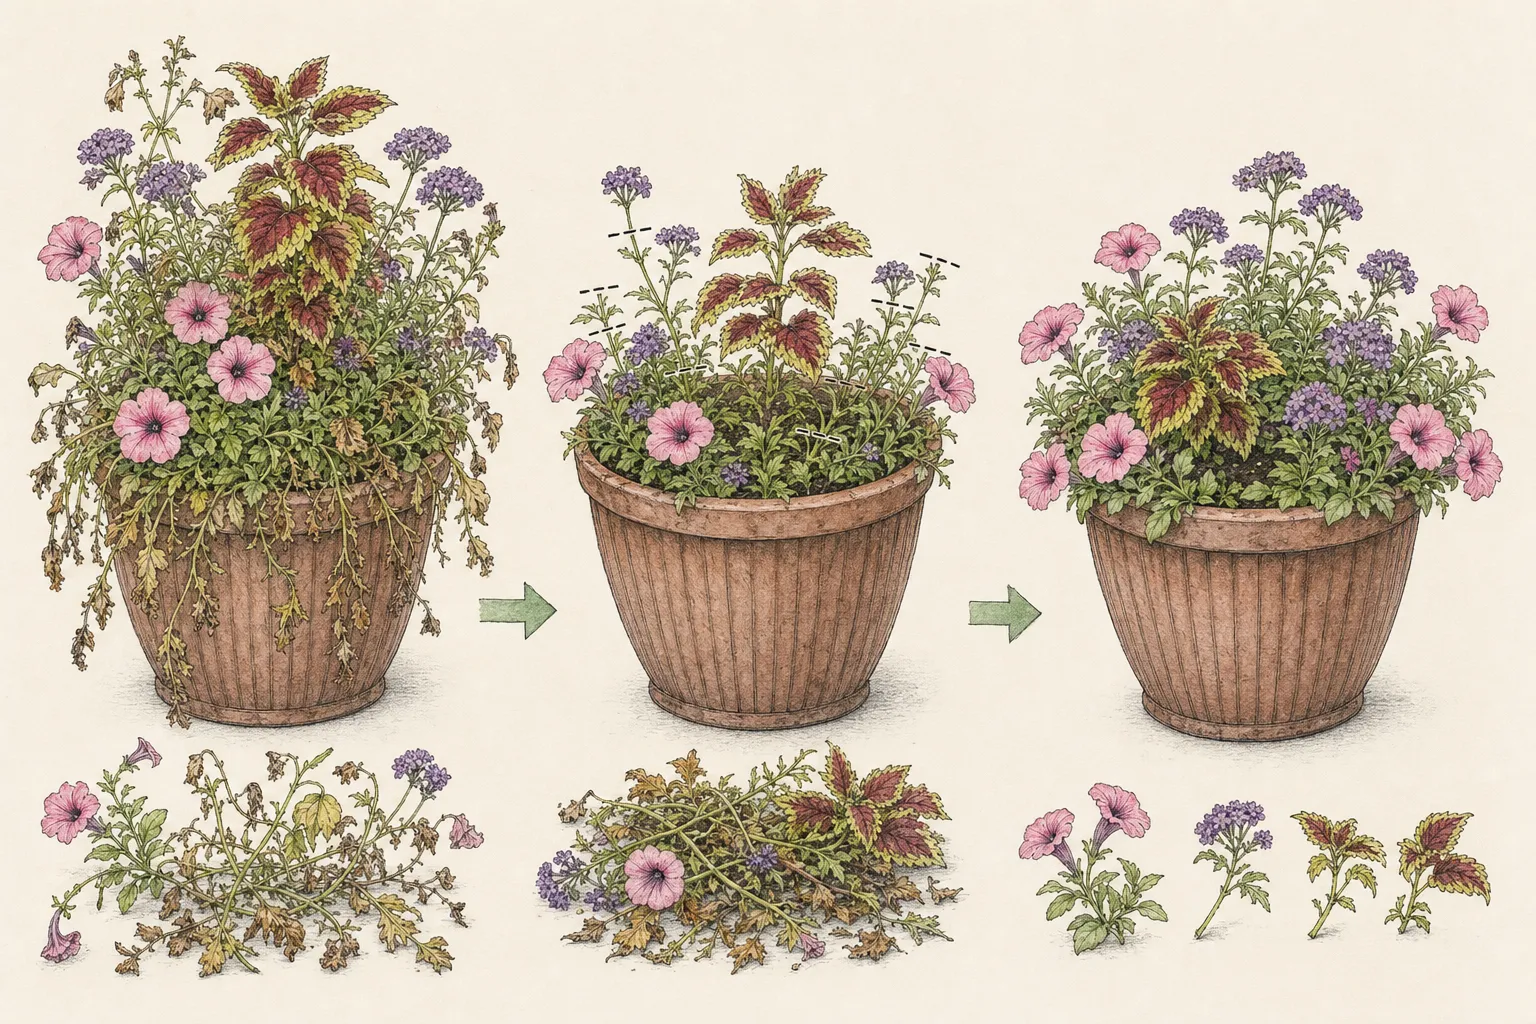
Plant outdoors only when temperatures suit coleus and the chosen position matches its light tolerance. Keep the root ball intact, set at grade, water thoroughly, and maintain moisture during establishment. In containers, pair it with plants that share water and light needs. A colorful combination does not override root-zone compatibility.
Pinch again only after new growth establishes in the final site. Stagger pinches among stems so the plant retains leaves and shape. Remove flower spikes when foliage production is the goal, or retain some if seed or pollinator value is intended and the cultivar status allows. Do not let routine pinching become constant loss of every growing tip.
Keep a propagation record and cull weak starts
Record source plant, method, cutting date, rooting date, potting date, and first pinch. Compare water and medium methods if both were used. Note basal rot, slow rooting, and transplant loss. The record identifies whether the weak point was source health, sanitation, saturation, delayed potting, or abrupt exposure.
Keep only vigorous correctly labeled plants. A cutting that never develops sound roots, remains distorted, or repeatedly carries pests should not be maintained merely because it rooted. Compost healthy culls where appropriate and discard diseased material under local guidance. Space and attention are better given to clean strong plants.
Before frost, repeat propagation only from healthy unrestricted stock and provide suitable indoor conditions. Inspect cuttings before bringing them into the home. The value of coleus cuttings is reliable renewal of a known foliage plant; that value depends on clean nodes, accurate labels, and a new root system allowed to establish before design pruning begins.
Compare several cuttings before changing the method
Take a small batch from equivalent healthy shoots and keep method, light, and temperature consistent. Record how many root, rot, or wilt. One failed cutting may reflect a damaged node, while failure across the batch points toward source health, sanitation, saturation, or heat. Change one condition at a time so the next batch can answer a clear question.
Do not keep opening humidity covers or lifting stems for photographs. Set observation times and use clear containers where appropriate. The propagation environment should remain stable between checks. A record of new growth and root visibility is more useful than daily handling that creates the very wilt being measured.
When water and medium methods both work, choose from the final use. Medium-rooted cuttings usually transition directly to potting, while water roots are convenient for display and observation but need careful transfer. Keep the method that produces sound plants with the least handling in the actual home conditions.
Shape the stock plant for the next cutting cycle
After taking tips, cut the source plant above strong leaf pairs so remaining axillary buds can branch. Balance cuts around the canopy and preserve enough foliage. Remove flower spikes where foliage production is the goal. The stock plant should become fuller rather than a collection of long bare stems harvested from the same side.
Give the source appropriate light and measured water, then wait for firm new shoots before another round. Do not fertilize heavily to force cutting material. Soft stretched stems lose water quickly and may root poorly. A modest steady stock plant supports more reliable propagation than a rapid cycle of severe harvest and rescue feeding.
Retire stock that carries recurring pests, disease, woody empty growth, or unreliable identity. Begin a new clean labeled plant from the best established cutting. This renewal keeps propagation material close to the desired foliage form and prevents a declining original from remaining the permanent source.
Steps
- Level
- easy
- Time
- 30 minutes to prepare cuttings, plus several weeks for rooting and establishment
- Tools
- Clean snips, Labels, Small pots, Watering bottle
- Materials
- Clean propagation medium or water vessels, Potting mix, Optional vented humidity cover
- 1Select healthy permitted source growth
Confirm vigorous pest-free nonflowering tips and retain the cultivar label. Respect plant-patent restrictions. Water a dry source plant the previous day and distribute cuts around it instead of stripping one side.
- 2Prepare the station first
Clean tools and containers, pre-moisten airy propagation medium or fill clean water vessels, make planting holes, and label cultivar, date, and method. Work in shade so severed tips enter the rooting environment promptly.
- 3Cut below a node
Take a tip below a useful node, remove lower leaves without tearing it, retain a modest upper canopy, and remove flower buds. Place one or two nodes in medium or water while every leaf stays above the surface.
- 4Maintain air, moisture, and indirect light
Keep medium evenly damp but not saturated, vent humidity covers, and avoid direct sun. Refresh cloudy water and remove soft dark stems. Judge rooting from new growth and a gentle later resistance check instead of daily tugging.
- 5Pot before roots become crowded
Move a rooted plug or short water-rooted cutting into a small draining pot. Spread roots gently, set the plant at grade, water to settle, and protect during transition. Do not use an oversized wet pot or keep a soil-potted cutting standing in water.
- 6Pinch after active growth resumes
Wait for functioning roots and new leaves, then cut above a strong leaf pair. Give appropriate light, measured water, and later labeled fertilizer. Inspect for pests and keep the plant isolated until clean growth is established.
- 7Harden and record the final plant
Increase outdoor light, wind, and temperature exposure gradually, then plant at grade in compatible conditions. Record rooting, potting, and pinch dates; cull weak or diseased starts and propagate future stock only from healthy correctly labeled plants.
- 8Run a small controlled batch
Use equivalent healthy tips and keep source, light, temperature, and method recorded. Count rooting, wilt, and rot before changing one condition. Observe through clear containers or scheduled checks instead of repeatedly disturbing every cutting.
- 9Choose the method by final transition
Prefer medium rooting for direct potting or water rooting for visible short-term observation, then transfer before roots tangle. Keep the approach that produces firm established plants with the least handling in the actual growing space.
- 10Renew the stock plant
Balance source cuts above leaf pairs, wait for firm new shoots, and avoid force-feeding soft material. Replace pest-ridden, diseased, woody, or uncertain stock with a clean established labeled cutting before the next propagation cycle.
- 11Archive the clean parent record
Keep one photograph of the healthy source, its label, cutting date, and the established offspring. This record preserves identity and shows that later color or shape differences arose under growing conditions rather than from an unlabelled mix-up.
Related reading
Sources
- Coleus. University of Minnesota Extension. Source record · Accessed 2026-08-19.
- Cuttings. University of Illinois Extension. Source record · Accessed 2026-08-19.
- Extension Gardener Handbook: Propagation. NC State Extension. Source record · Accessed 2026-08-19.