Grow · propagation
Propagating Woody Herbs from Stem Cuttings
Root rosemary, lavender and sage from clean stem sections by preserving nodes, limiting leaf loss and balancing moisture with air around the base.
Published Last updated
In this guide
Use this method for suitable woody herbs
Propagate rosemary, English lavender, and sage from healthy, non-flowering stem sections that carry visible nodes. Prepare a bare lower insertion zone, place at least one node in clean airy medium, and balance moisture with air while roots form. The decisive transplant signal is pale roots holding part of the plug together. Fresh leaves or an upright stem can appear before that root system is ready.
Confirm that stem cuttings are appropriate for the exact herb before taking material. Annual herbs are often simpler from seed, while chives and spreading mint may be divided. Woody herbs also differ by species, cultivar, shoot maturity, and season. A method that suits rosemary material does not establish the same timing or rooting period for every lavender or sage.
Keep the procedure deliberately small for the first attempt. Label each cultivar and collection date, and separate unlike species in the tray so their progress can be read independently. A mixed, unlabeled batch makes a fast-rooting group look like proof that every cutting is ready. It also removes the record needed to compare shoot type, preparation, and outcome.
Choose a parent plant whose growth is vigorous and free of visible insects, distortion, or stem lesions. A cutting has no independent root system to buffer a poor start. Material from a stressed or unhealthy parent may take longer to root or fail, and placing it under humid conditions makes close observation more important. Select another parent or postpone the attempt when healthy shoots are unavailable.
Set the success condition before cutting: a labeled, rooted plug that can support its canopy as humidity is reduced. The goal is not a green stem surviving indefinitely under plastic. This distinction controls every later judgment about leaf area, watering, ventilation, and potting on, and it prevents premature transplanting from being mistaken for progress.
Match the shoot to the species
Match shoot maturity to species guidance. Rosemary is commonly prepared from short terminal material after the newest growth begins to firm. Lavender guidance calls for non-flowering stems, and sage material should also be mature enough to handle without collapsing. A very soft tip can lose water quickly, while a fully woody section may belong to a different propagation method or season.
Use non-flowering shoots because flowers and seed heads compete with the rooting task. A stem selected for abundant bloom is therefore a poor propagation choice even when it looks vigorous. On lavender, wait for the appropriate post-bloom opportunity described by local guidance and choose stems without flower buds. On all three herbs, remove the flowering candidate from the tray before preparation begins.
Collect during a cool part of the day and protect the severed shoots from direct sun and wind. Arrange the rooting station first so material moves promptly from the parent to preparation. Wilting during collection is not corrected by saturating the medium later; it is evidence that the cutting lost water before the root-forming environment was ready.
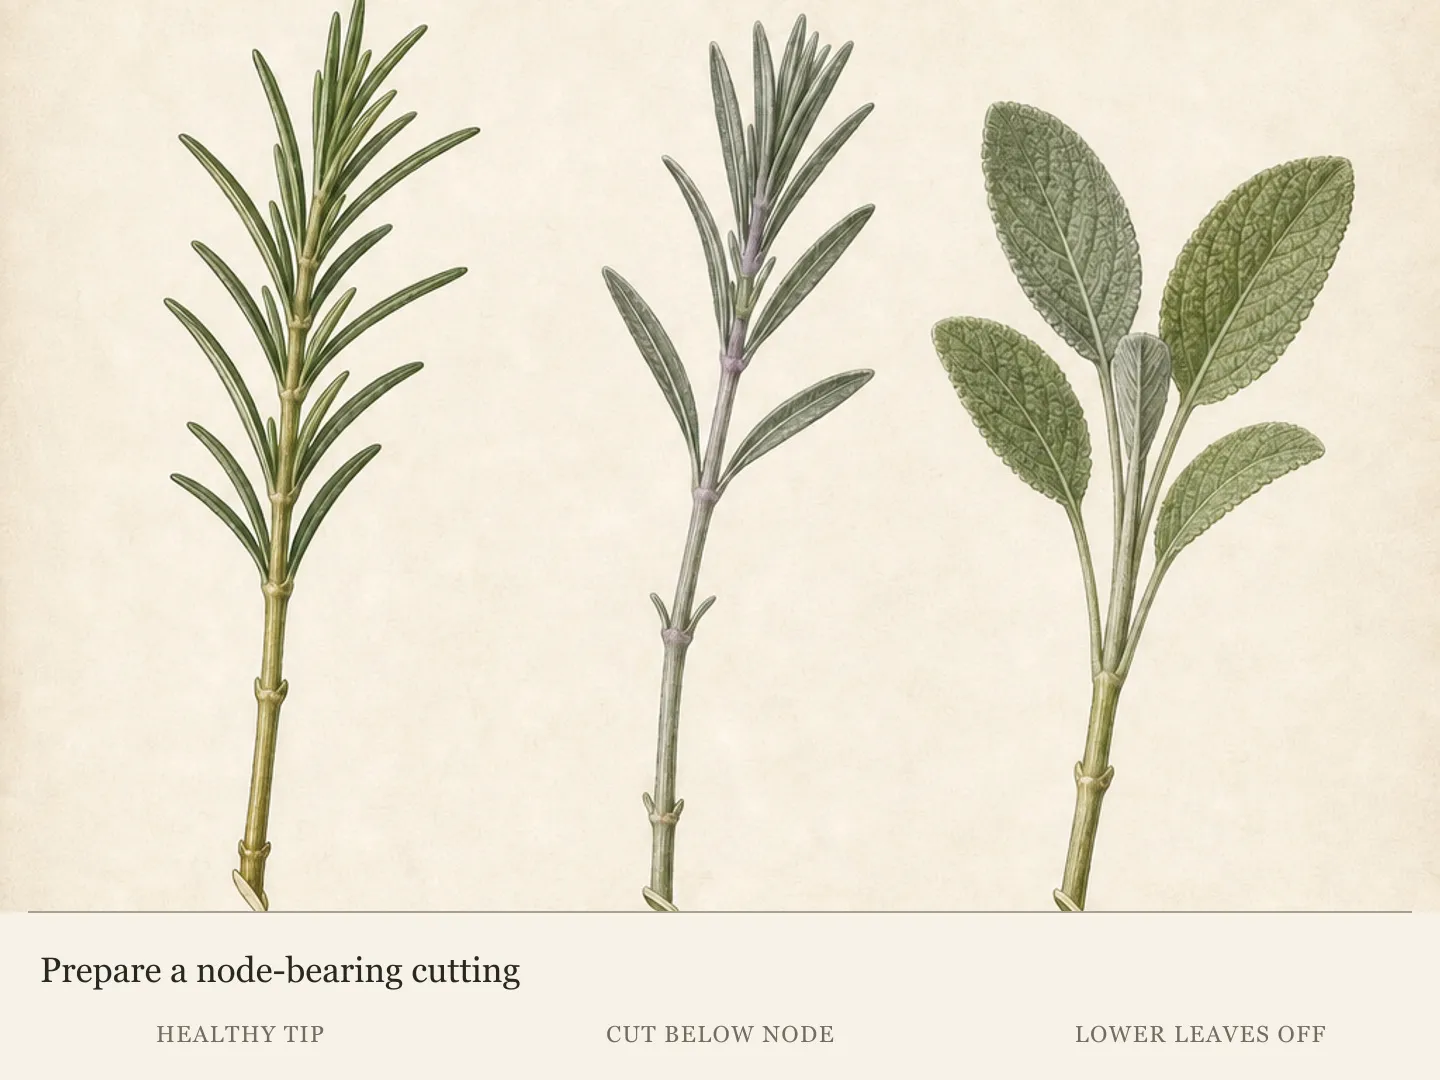
Examine the stem from tip to base and identify each node before deciding where to cut. The chosen section needs enough structure to stand, a lower node for insertion, and a modest leafy top. Avoid sections with damaged nodes, tightly crowded leaves that cannot be separated in the tray, or a basal portion so woody that the selected guidance no longer fits.
Compare several shoots on the parent before removing any. The youngest tip, a section whose growth has begun to firm, and an older woody stem represent different material even when all carry healthy leaves. Select the stage named by the species guidance and leave the others on the plant. This comparison is more reliable than choosing the first shoot that happens to match a convenient length.
Collect more than one cutting only when the station has space to keep leaves apart and labels readable. Crowding increases contact among damp leaves and makes failed stems difficult to remove without disturbing sound neighbors. A smaller tray of clearly identified material gives better information than a dense batch whose individual bases cannot be inspected.
The node, not the pot, is the working unit
A node is the point where leaves and buds attach, and at least one prepared node belongs below the surface. Make the basal cut cleanly just below a node with a sharp tool. A crushed or ragged base adds damage at the part that must remain sound, so refresh an imperfect cut before moving to the medium.
Remove only the leaves that would enter the mix or touch its wet surface. Buried foliage invites decay, while stripping the entire shoot removes leaf tissue involved in supporting root formation. Retain a modest canopy and reduce crowding through spacing in the tray. The prepared cutting should show a clear bare insertion zone and leaves held above the surface.
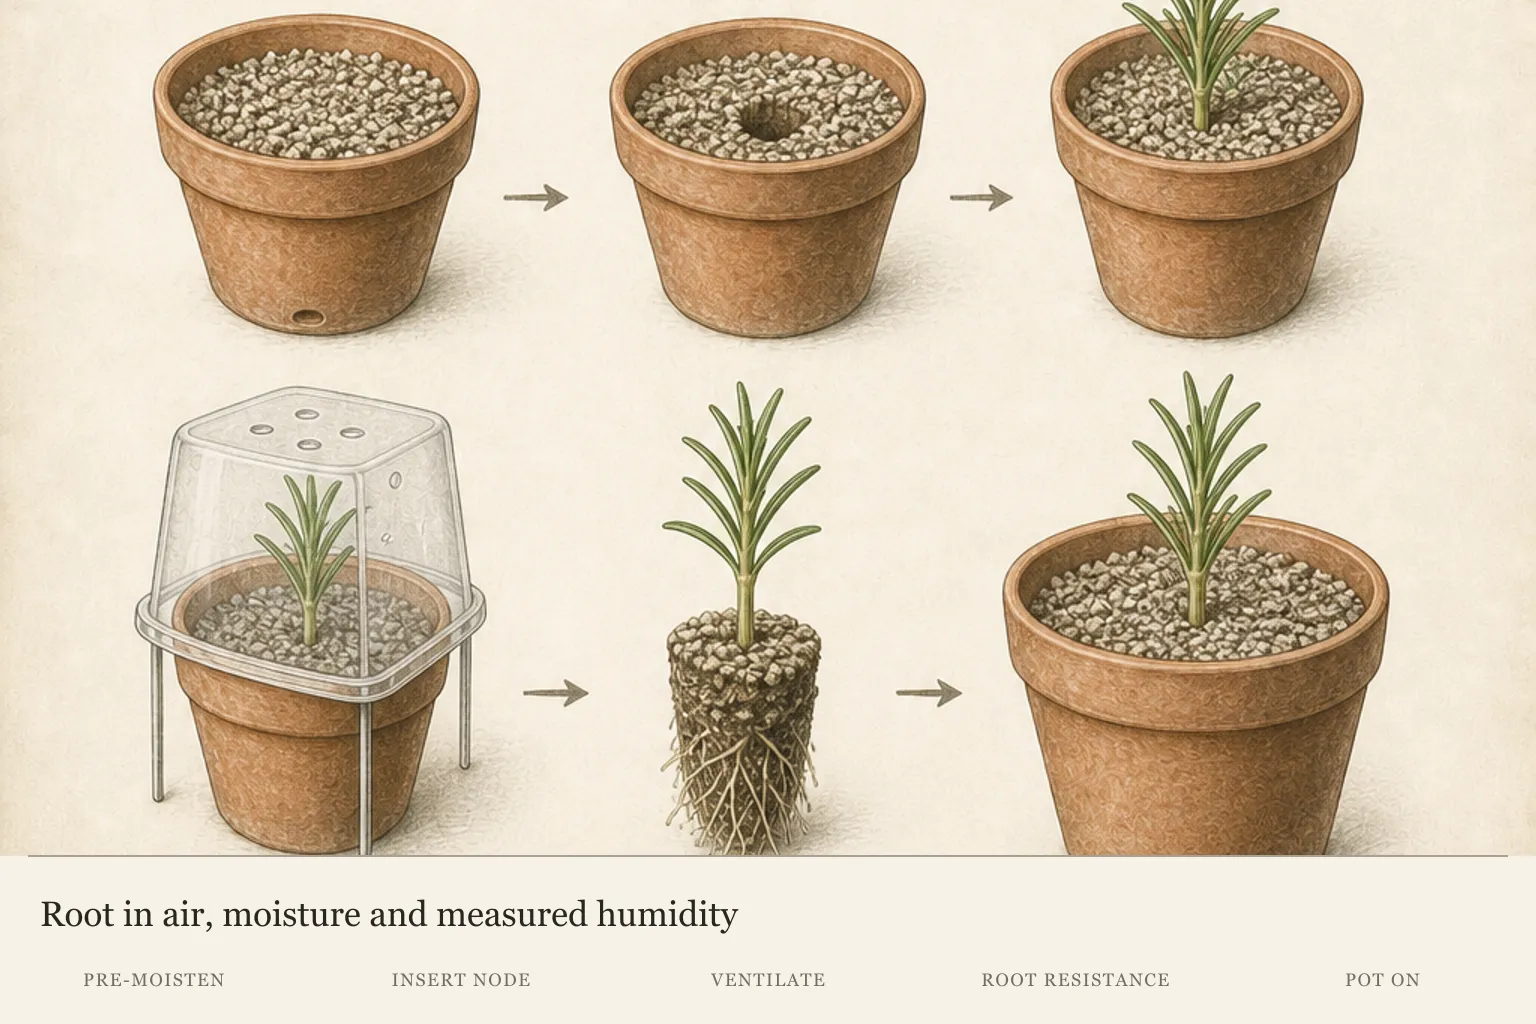
Use a dibber or pencil to make the hole before insertion. This protects the basal tissue and prevents the medium from scraping off an optional rooting-hormone treatment. Lower the stem far enough to place the prepared node below the surface, then firm gently for contact without compressing all the air from the mix.
The rooting medium has two simultaneous jobs: retain enough moisture to limit water stress and drain well enough to preserve oxygen. Use a clean container with drainage and pre-moistened sterile or soilless propagation medium. Garden soil is heavy and can hold excessive water in a humid tray; visible drainage and an airy texture make moisture management more predictable.
Prepare the medium before collecting shoots. Wet it evenly, allow excess water to leave the container, and fill every planned cell or pot so the cuttings can be inserted promptly. A dry pocket around one base and a saturated pocket around another create different trials within the same tray. Begin with an even condition, then judge later watering from the medium rather than from a fixed routine.
Rooting hormone is optional and species guidance differs. When the selected product is appropriate, dispense a small amount separately, follow the label, tap off excess, and discard the remainder. Never dip stems into the main supply or return dispensed material. Hormone may assist root formation in some woody material, but it cannot repair a damaged node, unhealthy parent, or airless medium.
Humidity buys time but also raises risk
Before roots form, a cutting spends stored water through its leaves without an established intake system. A humid enclosure slows that loss; it does not give the stem a functioning root zone. Bright indirect light and a loose clear cover can extend the useful interval, but direct sun can turn the same enclosure into a rapidly heating chamber. Humidity is therefore a temporary buffer whose benefits depend on light and air.
Water in the air and water in the medium solve different problems. The canopy benefits from reduced evaporative demand, while the buried node still needs a porous environment containing both moisture and oxygen. A glossy, permanently wet surface or a container that never loses weight signals that the second balance has failed even if the leaves remain upright.
Condensation is evidence about the shared chamber, not a success target. A light transient film can accompany useful humidity. Persistent droplets on leaves, stagnant odor or uniformly wet mix show that evaporation and exchange are no longer keeping pace. By contrast, one failing stem among firm neighbors points first to that cutting's collection, preparation or insertion rather than to the whole enclosure.
Read patterns at two scales. A tray-wide change justifies examining the common light, cover and moisture conditions. An isolated blackening base or wilt calls for a close look at that individual and its immediate cell. Altering every variable for one outlier can move sound cuttings into the very wetness that causes basal decline.
Species and cultivar labels make those comparisons possible. Rosemary, lavender and sage groups need not show progress on the same timetable, and one group may consistently occupy a different moisture balance. Separate management is more informative than tuning the chamber to whichever cutting looks worst on a given morning.
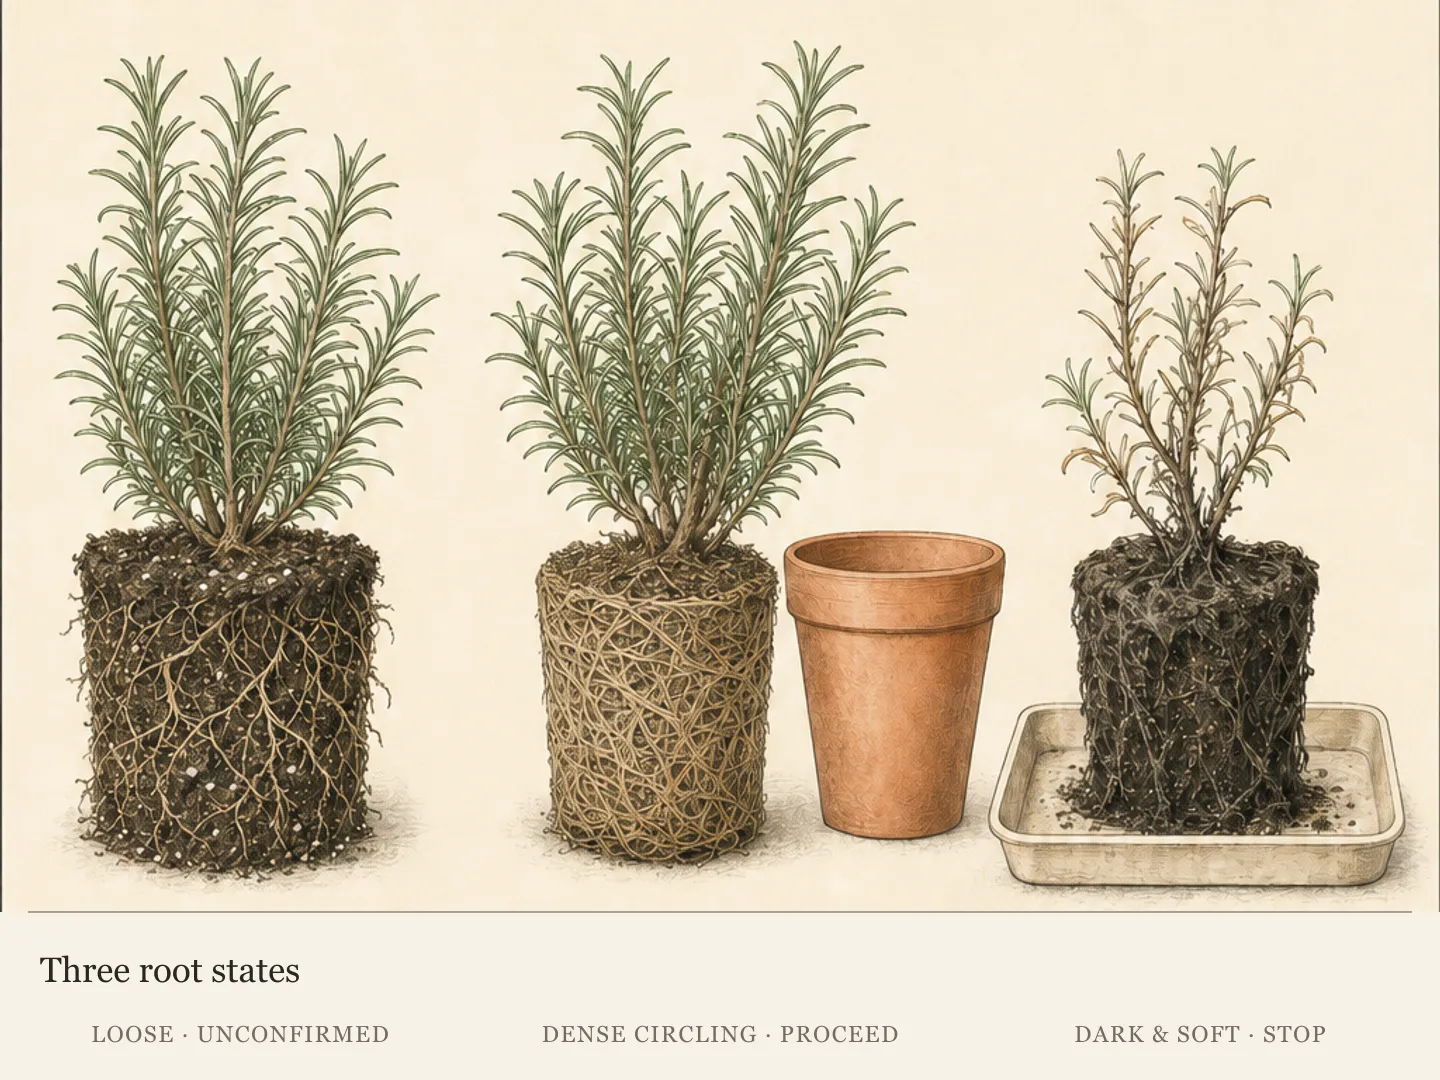
Shoot movement remains provisional evidence because stored reserves can support leaves before a useful root system exists. Repeated tugging can damage the structures being tested. Pale roots that hold some medium together provide a stronger transition signal. Until then, compare each stem with the shared environment so one cutting's change is not mistaken for a tray-wide problem.
Make the transition only after roots hold
Begin the transition when pale roots hold part of the rooting plug together, not when the calendar reaches an expected date. Species, shoot maturity, and conditions change the rooting period. Lift or inspect as little as possible, and return a cutting that lacks a coherent plug to the rooting environment without turning the check into repeated disturbance.
Reduce humidity progressively by opening the cover in stages. Watch whether the leaves remain firm as air exchange increases. A cutting that wilts immediately has not demonstrated that it can support the canopy in the drier environment. Pause the transition and reassess roots and moisture rather than moving it directly into brighter, windier conditions.
Move a rooted plug intact into a small individual pot at the same depth. A disproportionately large pot adds unused wet medium around a still-small root system, while breaking the plug discards the main evidence that the cutting was ready. Firm the new mix enough to support the plant and keep its label attached.
Shelter the newly potted cutting from abrupt sun and wind while it resumes growth. Increase exposure gradually in line with local hardening guidance. The transition is an observation period in its own right: leaf firmness, continued root support, and renewed growth matter more than a rapid move to the final garden position.
Delay pinching or other canopy reduction until the new root system is supporting active growth. The cutting has already lost lower leaves and endured a change in humidity and medium. Give it time to establish in the individual pot before asking it to replace more shoot tissue.
If a rooted plug loses firmness after potting, review the transition before adding unrelated treatment. Check whether the cover was opened too quickly, the plug broke apart, the plant moved into abrupt sun or wind, or the new medium remains excessively wet. Correct the identified condition and keep the plant sheltered while it responds. A transplant setback does not erase the need for gradual acclimation or justify returning every potted cutting to a closed humid chamber.
Record the result by species, cultivar, collection date, shoot condition, and outcome. Remove failed material, clean the station, and keep successful plants labeled. The record makes the next attempt more precise without converting one result into a universal rooting schedule.
Steps
- Level
- moderate
- Time
- One setup session followed by a species-dependent rooting period
- Tools
- clean sharp snips or knife, dibber or pencil, plant labels
- Materials
- clean pots or propagation tray with drainage, sterile, well-aerated soilless rooting medium, loose clear humidity cover or ventilated propagator, optional rooting hormone labeled for the plant type
- 1Confirm the propagation method
Check reliable guidance for the exact rosemary, lavender, or sage and confirm that a stem cutting at the available shoot maturity and season is appropriate. Record the cultivar and collection date on labels before taking material. If the species is better handled by seed or division, or if only flowering, damaged, or unsuitable shoots are available, postpone this cutting session.
- 2Prepare the rooting station
Clean and sharpen the cutting tool, wash the draining container, and fill it with clean, sterile or soilless airy propagation medium. Moisten the mix evenly and let excess water drain. Set out the dibber, labels, and loose clear cover, then make the insertion holes. If using labeled rooting hormone, dispense a small separate portion now and keep the main container closed.
- 3Collect healthy non-flowering shoots
During a cool part of the day, select vigorous non-flowering shoots without visible insects, distortion, or stem lesions. Match firmness to the species guidance and identify several usable nodes. Cut with a sharp blade and protect the material immediately from direct sun and wind. Take only as many shoots as the prepared tray can hold without leaves touching.
- 4Cut below a node
Identify the lower insertion node and refresh the base cleanly just below it. Remove flower buds and only the lower leaves that would sit beneath or directly on the medium, leaving a modest leafy canopy above. Reject a section with a crushed base or damaged node unless it can be recut into sound material while retaining the required nodes.
- 5Insert without scraping the stem
Apply optional rooting hormone exactly as its label directs, tapping away excess. Lower the prepared stem through the dibber hole so at least one bare node sits below the surface. Firm the mix gently around the stem without packing it hard. Space and orient cuttings so neighboring leaves and the clear cover do not touch their foliage.
- 6Set bright indirect light and ventilation
Place the tray in bright indirect light. Add a loose clear cover when humidity support is needed, keeping plastic away from the foliage and allowing controlled air exchange. Label each group visibly. Protect the chamber from direct sun, drying wind, and stagnant closure, then check that the container can drain freely before leaving the station.
- 7Water by the medium's condition
Inspect the medium, leaves, condensation, and stem bases every day. Maintain light, even moisture without standing water. When condensation persists, leaves remain wet, the mix smells sour, or a base blackens, increase air exchange and withhold additional mist while correcting the condition. Remove failed material carefully and clean the tool before it touches sound cuttings.
- 8Test roots and acclimate gradually
Wait until pale roots provide gentle resistance and hold part of the plug together. Open the humidity cover progressively and confirm that leaves remain firm. Move the intact rooted plug into a small individual pot at its original depth, retain the label, and shelter it from abrupt sun and wind. Increase exposure only as the plant resumes supported growth.
Plants in this guide
Related reading
Sources
- Starting Plants from Cuttings for the Home Gardener. University of Georgia Cooperative Extension. Source record · Accessed 2026-08-16.
- Herbs in Southern Gardens. University of Georgia Cooperative Extension. Source record · Accessed 2026-08-16.
- Plant Propagation in Maine. University of Maine Cooperative Extension. Source record · Accessed 2026-08-16.
- Growing Lavender in Colorado. Colorado State University Extension. Source record · Accessed 2026-08-16.