Grow · hyacinth autumn potting cold rooting
Pot Hyacinth Bulbs in Autumn for Indoor Winter Forcing
Start hyacinths for indoor winter bloom with sound bulbs, shallow potting and measured cold storage. Distinguish heat-prepared stock from bulbs already chilled.
Published Last updated
In this guide
- Start with the cold-storage space, then buy the bulbs
- Read prepared and pre-chilled as different instructions
- Calculate the winter flowering window
- Set the noses above the mix and leave room beneath
- Water once, drain fully and establish the starting condition
- Keep the pots cold, dark and separate from ripening fruit
- Inspect the rooting pots while keeping the dates intact
- Hand a rooted, fully chilled pot over to the flowering stage
- Steps
Start with the cold-storage space, then buy the bulbs
For indoor winter flowers, pot ordinary hyacinth bulbs in autumn with their tips exposed, water and drain the mix, then give the planted pots a measured cold period. Iowa State recommends 40–45°F (about 4–7°C) for 12–15 weeks for its potted spring-bulb method. Wisconsin lists the same duration specifically for Hyacinthus. A bright kitchen windowsill is the later destination; the newly planted bulbs first need a suitable place to root in the cold.
Mid-October is a useful starting point for a later winter display in the Northern Hemisphere. Before buying a bag of bulbs, test the shelf or cellar where the pots will spend those weeks. There must be room for the container, its drainage tray and the shoots that may emerge during storage. If the only available space stays warm or freezes hard, resolve that limitation before planting. A cupboard that feels chilly to your hand gives too little information.
This method uses common or Dutch hyacinth, Hyacinthus orientalis, in potting mix. Grape hyacinths are Muscari and have a different forcing schedule. Water-filled hyacinth glasses are another method with their own root and water-level management. Keeping one species, one planting medium and one treatment history in the first batch makes the eventual result easier to interpret. If you already have a fully chilled, rooted pot, move to the related guide on bringing chilled hyacinths into bloom.
Read prepared and pre-chilled as different instructions
The same named hyacinth cultivar may be offered as ordinary garden stock or as prepared bulbs. RHS describes prepared stock as specially heat-treated to advance flowering. That treatment is not proof that the bulb has completed its cold-rooting period. Its guide calls for September planting of prepared bulbs for Christmas and allows 10–12 weeks for root and shoot development. Preserve the supplier’s instructions with the bulbs, especially when a seasonal gift display depends on the timing.
Pre-chilled describes a different part of the process: cold treatment already supplied before sale. Ask how much treatment has been completed, what storage is needed after delivery, and when the bulb should be planted. The word prepared alone cannot answer those questions. Photograph both sides of the packet, including any cultivar and planting notes, before opening it. If the seller cannot establish the treatment history, leave the flowering date flexible until the cold-treatment history can be confirmed.
For an ordinary, unchilled bulb sold as suitable for forcing, use the full potted cold-treatment schedule in this guide. For documented prepared or pre-chilled stock, follow the specific instructions supplied for that batch. Keep the batches in separate labelled pots even when their flowers will be the same color. Combining them in one container would tie bulbs with different start dates to a single decision about leaving storage.
Choose large, firm, undamaged bulbs from the available forcing stock. Look at the base as well as the pointed top before accepting a bulb; a soft area is a reason to select another. Keep the papery covering intact during handling. NC State and RHS identify skin irritation and ingestion hazards, so use gloves and keep the bulbs separate from food. A labelled gardening tray also makes it easier to gather loose skins and return unused bulbs to their packaging.
Calculate the winter flowering window
Count the cold period and the later growing period separately. Iowa State gives a general planning allowance of 14–19 weeks from potting through bloom: 12–15 weeks cold, followed by roughly 2–4 weeks in growing conditions. Wisconsin also places hyacinths in the 12–15-week cold group. The cultivar, actual temperatures and later light conditions still affect the result. A date on the calendar is useful for organizing checks, but the roots and shoots must support the eventual move.
For example, a pot starting its measured cold period on October 16 reaches twelve weeks on January 8 and fifteen weeks on January 29. Adding the broad two-to-four-week growing allowance gives an illustrative January 22 to February 26 flowering window. This is calendar arithmetic from the extension ranges, not a prediction for every bulb. It explains why ordinary bulbs started in mid-October are a later-winter project and why Christmas is an unreliable promise for that batch.
Write the earliest review date on the label, with the word review beside it. Keep the original start date visible too. If a supplier gives a longer cultivar-specific requirement, calculate from that instruction. For several pots, a small shelf card can list each batch and its earliest assessment date. Leave space to record interruptions such as a warm spell in a cellar; elapsed time since planting is only useful when the storage conditions have also been suitable.
Set the noses above the mix and leave room beneath
Choose a container with drainage holes and enough depth for the bulbs and their roots. Iowa State recommends a pot at least twice the depth of the bulbs; its example fits three hyacinths in a 6-inch-diameter pot. Use that as a starting arrangement, then check the actual bulb sizes. Three unusually large bulbs may need more room. A pot that fits the shelf but leaves the bulbs wedged tightly against its sides is the wrong fit for the batch.
Part-fill with a well-drained commercial potting mix and rest the bulbs on it with their bases down. Arrange them close together, leaving small gaps between bulbs and between bulbs and the pot wall. Add mix around them gently. In the Iowa State method used here, the tips remain just above the final surface and the surface finishes roughly ½–1 inch below the rim. Adjust the supporting mix underneath to achieve that relationship; pressing the bulbs downward risks damaging the base.
The exposed nose is a feature of this indoor-forcing pot. Outdoor garden planting uses a deeper soil cover, so the depth printed for a spring border should not be transferred automatically to this container. Keep a useful volume of mix below the bulb bases and a watering space above the surface. Looking across the pot at rim height makes both relationships easier to check before the first watering. The section below shows those layers, with small developing roots below the bases.
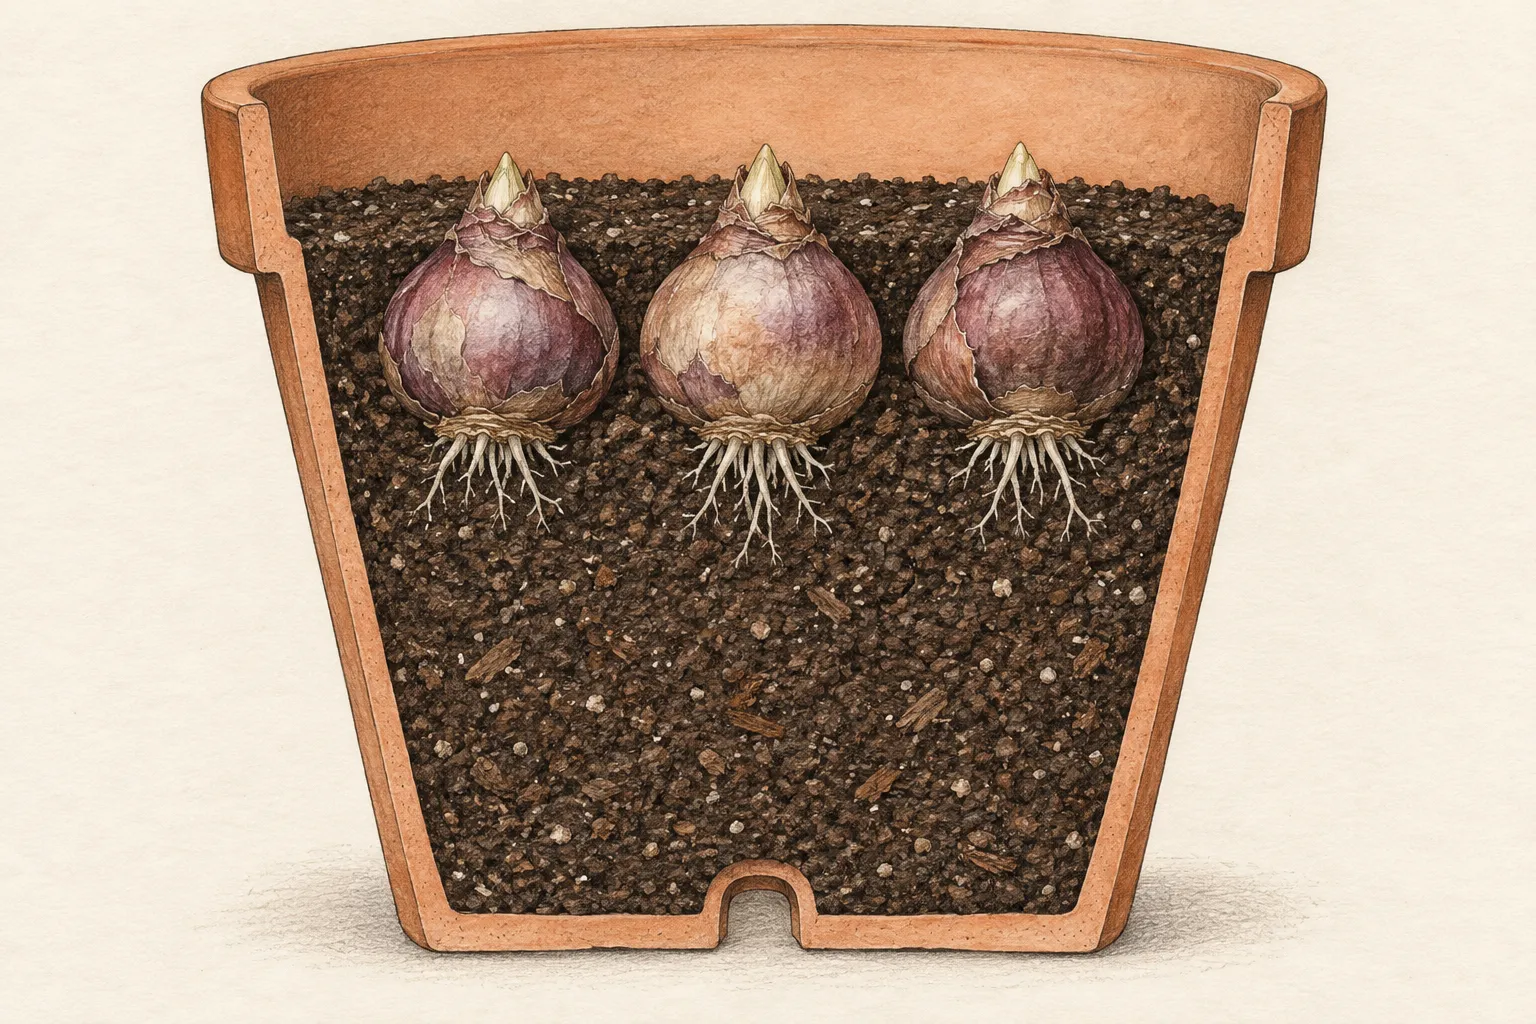
Use one cultivar in each pot when you want the group to develop together. Different cultivars can still be displayed side by side in separate containers later. This also leaves the slower pot in cold storage if the other is ready first. Label the planted container immediately, while its packet is still beside it. Once the tops are tucked into the mix, several similar purple-skinned bulbs become difficult to distinguish by appearance alone.
Water once, drain fully and establish the starting condition
Water the planted pot thoroughly so the mix is wetted, then let excess water escape through its holes. Check for settling around the bulbs and gently fill a gap if necessary, preserving the exposed tips and watering space. Carry the pot into storage after drainage has stopped. An empty catch tray protects the shelf, but retained runoff turns that tray into an unintended reservoir. Keep it accessible enough to lift out during later checks.
The rooting medium should remain moist, with air and drainage available. Wisconsin cautions that excessive moisture favors rot and advises allowing an overly wet mix to dry somewhat before cold treatment. This is particularly relevant when an outer decorative pot conceals the nursery pot beneath it. Use the plain draining pot during rooting if that makes inspection easier; the display container can be chosen when the bulbs are ready to enter the house.
Fertilizer is unnecessary for the forcing process described by Wisconsin. The first watering therefore needs no bulb-feed recipe. Note how heavy the freshly drained container feels and what the mix looks like at the rim. Those observations give you a reference for later checks. They cannot prescribe a watering interval because different pots and storage spaces lose moisture at different rates, but they help distinguish a drying pot from one that is still thoroughly damp.
Keep the pots cold, dark and separate from ripening fruit
A dedicated fruit-free refrigerator gives a controllable storage option. Place a thermometer beside the pots and check that the actual shelf temperature falls within the selected 40–45°F range. The appliance dial alone is insufficient. Keep the pots clear of a freezing surface, and give the thermometer time to reflect normal operation with the door closed. For this method, follow Iowa State’s guidance to prevent freezing throughout the cold period.
Wisconsin describes a gradually falling temperature sequence as ideal, but also accepts a constant home-refrigerator temperature of 35–45°F. The narrower Iowa State range provides the simple working target here; there is no need to imitate a stepped commercial schedule by repeatedly moving pots around the house. A cellar or garage can serve only if measurement shows that it provides the required conditions. Recheck such spaces when the weather changes, because the name of the room says little about its winter extremes.
Keep the rooting pots dark and in a single accessible layer, with clearance above the bulb noses. A refrigerator supplies darkness when closed; the illustration shows it open for inspection. Ripening fruit releases ethylene that can interfere with flower development, as both Iowa State and Wisconsin explain. Reserve fruit-free storage for these pots. Check that everyone using the refrigerator knows the shelf is reserved for the bulb project.
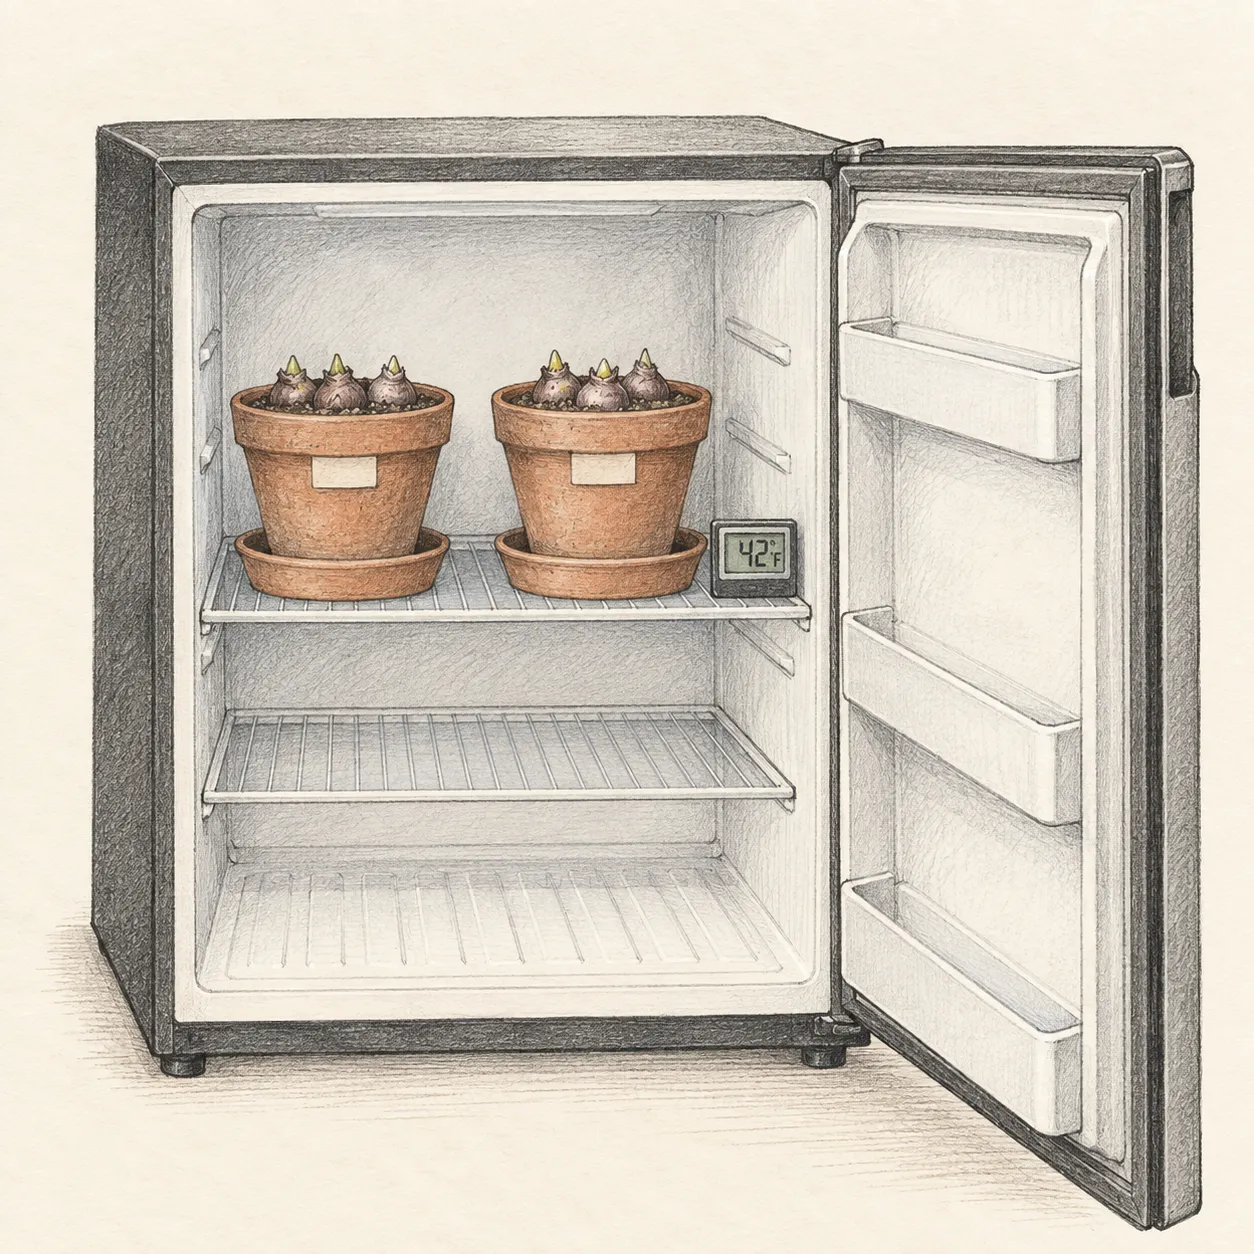
A cold frame or outdoor trench needs additional management of rain, temperature and access. Those can be useful regional methods, but a pot left on an exposed porch does not reproduce the controlled storage described here. If dependable cold storage is unavailable, reconsider the project before the bulbs are committed to it. Documented pre-chilled stock may reduce the remaining cold requirement; paperwhites offer a different indoor-bulb project that does not require this prolonged cold treatment.
Inspect the rooting pots while keeping the dates intact
Check the mix periodically and water when needed to maintain moisture. Lift the pot from its tray before watering so you can see the runoff, then return it after draining. A practical inspection combines the moisture check, the thermometer reading and a look at the exposed bulb tissue. Record a change when it matters, such as a pot drying markedly faster than its neighbor. Repeated small splashes on every visit can conceal how wet the lower mix remains.
Watch for a bulb becoming soft or collapsing and separate a suspect pot for assessment. NC State links poorly drained conditions with bulb rot; moisture or surface discoloration alone does not identify the organism involved. Inspect the drainage and retain the bulb label when seeking advice. A damaged bulb should not be kept among sound stock merely to maintain a symmetrical arrangement of three. The original pot design can be adjusted later.
Shoots may emerge before the full cold period has elapsed. Their appearance is a cue to protect their space, not an automatic signal to place the pot in a warm room. Move anything resting above them and handle the pot by its rim. Inspect drainage openings for roots as the review date approaches, keeping the bulb seated in the mix. Pulling it up to see underneath sacrifices the rooting progress you are trying to assess.
Hand a rooted, fully chilled pot over to the flowering stage
At the scheduled review, bring the planting record and the actual pot together. Confirm the required cold time, look for root development at drainage holes and emerging shoots, and check that the bulb remains sound. If the expected development is absent, investigate the recorded temperature and moisture before changing stages. A calendar that looks correct cannot establish that an unmeasured cellar stayed cold enough or that a dry pot supplied rooting moisture.
Once the batch is ready, move into the gradual light-and-temperature transition covered in the related chilled-hyacinth guide. Keep later pots in their appropriate cold conditions until their own review. Store the packet and shelf notes through flowering, then add the actual date the first flowers opened. That record will tell you whether the same cultivar and household storage arrangement can reasonably be started at the same time next autumn. Treat another winter’s bloom date as a fresh estimate, even when the previous display went well.
Steps
- Level
- moderate
- Time
- One potting session, followed by 12–15 weeks of cold storage for ordinary bulbs
- Tools
- Small scoop, Watering can, Minimum–maximum thermometer, Waterproof marker, Gloves
- Materials
- Firm labelled Hyacinthus orientalis bulbs, Pots with drainage holes, Commercial potting mix, Plant labels, Drainage trays, Fruit-free cold-storage space
- 1Reserve the shelf before shopping
Measure the usable shelf width and vertical clearance with the intended pot and tray in place. Test the temperature beside that position and decide how it will remain dark and fruit-free. If the available garage or cellar fluctuates outside the chosen range, arrange another location before acquiring more bulbs than it can hold. Plan access for lifting each pot and emptying its tray during the rooting period.
- 2Separate the bulb batches
Put each packet beside a label and copy the cultivar, treatment description and supplier instructions. Mark ordinary, prepared or documented pre-chilled stock distinctly. Select firm bulbs and set aside damaged ones before any mix is poured. Keep separate pots for different treatment histories. Save a photograph of the packet so that a lost paper sleeve will not erase the information needed to calculate the cold period.
- 3Assemble one pot and inspect its profile
Place supporting mix in the pot, position the bulbs with gaps between them, and fill gently around their sides. Examine the arrangement at rim level: tips exposed, mix below the rim, and enough depth under the bases. Adjust the mix before watering. Check the drainage holes from underneath and insert a label where it remains readable while the bulbs stay undisturbed.
- 4Begin the dated cold period
Water thoroughly, allow drainage, empty the tray and transfer the labelled pot to the tested storage position. Record the date cold treatment actually begins, which may differ from the purchase date. Calculate the earliest review from the applicable instructions; for the ordinary potted method, use the 12–15-week range and preserve any longer cultivar requirement. Keep the shelf card where a watering check will also prompt a temperature check.
- 5Review moisture and development together
At each inspection, look at the mix, tray, thermometer and bulb noses before deciding whether to water. Give emerging shoots clearance and leave the bulbs rooted in place. Near the review date, look beneath the pot for root evidence and compare the batch with its treatment record. Move a ready pot into the flowering-stage routine; record any uncertainty about temperature or health before expecting it to meet a display date.
Related reading
Sources
- How to Force Spring-Flowering Bulbs Indoors. Iowa State University Extension and Outreach. Source record · Accessed 2026-10-02.
- How to grow hyacinths. Royal Horticultural Society. Source record · Accessed 2026-10-02.
- Forcing Bulbs. University of Wisconsin–Madison Division of Extension. Source record · Accessed 2026-10-02.
- Hyacinthus orientalis. North Carolina Extension Gardener Plant Toolbox. Source record · Accessed 2026-10-02.
- Hyacinth. Royal Horticultural Society. Source record · Accessed 2026-10-02.