Grow · amaryllis midwinter potting and start
Pot and Start an Amaryllis Bulb for Midwinter Bloom
Pot an amaryllis bulb in a tight draining container, keep the neck exposed, and sequence warmth, light, watering, and cooler display temperatures for a straight midwinter show.
Published Last updated
In this guide
- Count backward from the display you want
- Use bulb activity to change the watering stage
- Choose a tight pot with enough ballast
- Leave the shoulder exposed and the root zone airy
- Warmth, light, and water happen in sequence
- Straighten the scape before it becomes a rescue job
- Choose now between a holiday bulb and a keeper bulb
- Steps
Count backward from the display you want
Midwinter amaryllis is easier to time when the calendar is tied to the bulb you actually bought. Clemson notes that indoor bulbs planted in early to mid-November commonly flower in roughly four to eight weeks, while Illinois Extension describes a four- to six-week run after a controlled rest for reblooming bulbs. That range is wide enough that a sprouting boxed bulb, a fully dormant bare bulb, and a rebloomed bulb should not all be promised for the same dinner. Write down the cultivar or box label, note whether leaves or a bud are already visible, and then count backward from the day you want the flowers open rather than from the day you remembered to shop.
The first flowering of a purchased holiday bulb is not the same job as rebloom control. A fresh bulb sold for indoor display does not need a long chilling treatment before potting, so the useful question is not whether it has been cold enough, but whether it has enough stored energy and enough time left before your target date. Large bulbs generally produce more stems and more flowers than smaller bulbs of the same cultivar. Start by choosing the firmest, driest bulb you can find, with no sour smell, no soft basal plate, and no mold or deep injury on the shoulder or neck.
This early planning step saves the rest of the article from becoming contradictory advice. If you only want a bright holiday display, the potting and bloom stage matter most. If you want the bulb again next year, the aftercare becomes equally important and the first flowers are just the front end of a much longer cycle. Decide that now. It changes how aggressively you feed after bloom, whether you move the pot outdoors in summer, and whether you ever bother with an induced rest to control a later bloom season.
Use bulb activity to change the watering stage
After potting at the specified level, distinguish an inactive bulb from one beginning active growth before repeating irrigation. Keep the vessel draining and match warmth and light to the forcing stage. When flowers finish, choose between discarding the bulb and maintaining its green leaves for reuse; a future rest period belongs to a deliberate rebloom plan.
Choose a tight pot with enough ballast
Amaryllis grows best when the container fits closely around the bulb instead of offering a tub of wet compost. Clemson recommends a pot only one to two inches wider than the widest part of the bulb, and Minnesota similarly advises a narrow container with drainage holes and enough height for root development. That close fit is not stinginess. A slightly rootbound bulb is easier to keep evenly moist, and a narrow pot also reduces the temptation to keep watering a mass of unused mix while the roots are still sparse. Heavy clay, ceramic, or another stable pot is worth the weight because the eventual flower stalk can easily make a light plastic pot topple.
Drainage is nonnegotiable. Every source in this set assumes a pot with an open bottom and a free-draining medium. Use fresh potting mix rather than garden soil, which compacts too easily indoors and stays wet too long around the basal plate. Illinois describes a soil-less, well-draining mix, while Clemson suggests a high-quality medium with strong aeration. The practical consequence is simple: the bulb wants a root zone that can stay moist after watering without becoming airless, sticky, or anaerobic. If your decorative outer pot has no drain hole, treat it as a cachepot and water the planted pot in a sink instead of hoping the wrapper will behave like a nursery container.
Pot size also affects how calmly the plant carries its flowers. A large-flowered cultivar in a skinny lightweight pot behaves like a lever. If you are potting several bulbs for one container display, widen the base as much as you need to counterbalance the top growth. This is one reason a handsome low bowl is often worse than a heavier, deeper pot for single specimens. The goal at this stage is not just to make the bulb fit. It is to give the roots enough room to establish, the stalk enough support to stay upright, and the gardener enough control that later staking becomes refinement rather than emergency repair.
Leave the shoulder exposed and the root zone airy
Planting depth matters because the bulb neck and shoulders dislike being buried in wet compost. The exact amount left above the surface varies by source and bulb size. Clemson and Illinois both describe leaving about one-third to one-half of the bulb visible, while the RHS guide says two-thirds of the bulb should remain above the surface. Those instructions agree on the principle even if they differ in proportion: keep a substantial part of the bulb exposed and never cover the neck as though you were planting a tulip outdoors. The roots rest in the mix; the bulb body sits proud of it.
Set some mix in the pot first, spread the existing roots over that layer, and then backfill around the bulb until it is held firmly without being buried. Leave enough headspace that you can water thoroughly without washing compost over the exposed shoulder. Illinois points out that about an inch between the soil line and the rim makes watering much easier. That sounds like a minor convenience, but it reduces sloppy overflow and helps keep the exposed bulb nose dry. Clemson connects that exposed nose to lower risk of red blotch and related neck problems, which is exactly why this step deserves more attention than a generic instruction to pot it up.
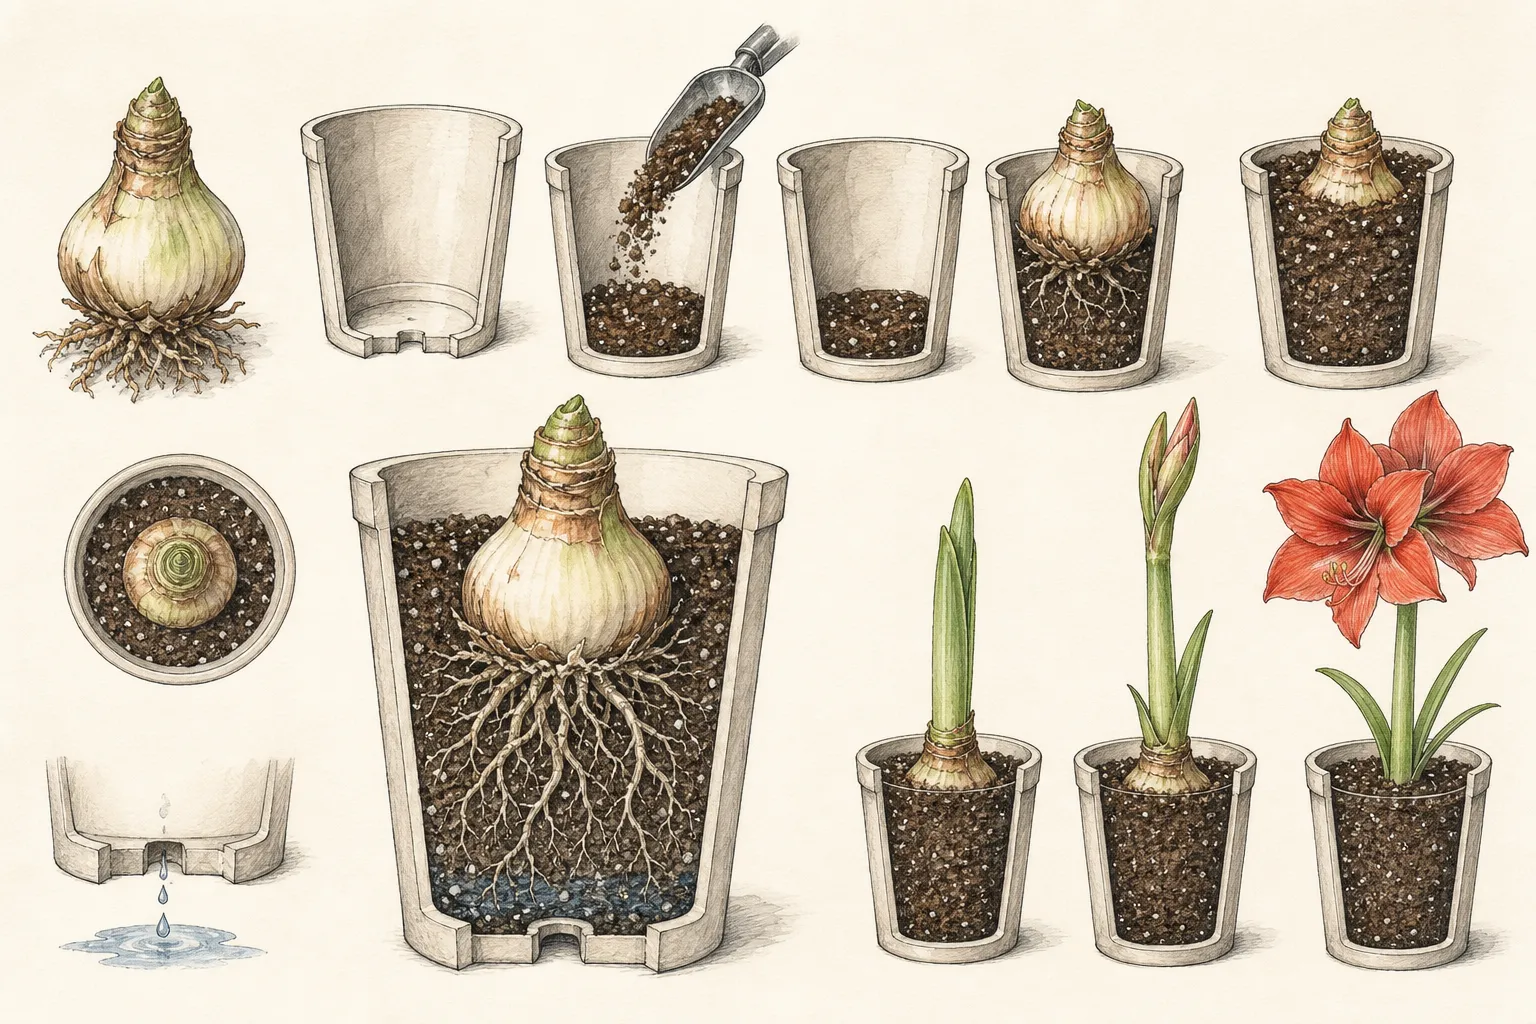
Once the bulb is seated, water it in thoroughly and let every bit of excess drain away. That first soaking settles the mix around the roots and establishes contact without requiring another round of watering the next day. After that, the pot should not live in a saucer of stagnant water. At this stage the bulb has not yet developed the active root system that will process constant moisture, so repeated light sips are less useful than one complete soak followed by patience. If the pot looks elegant only when the shoulder is hidden under moss or decorative bark, the decoration is wrong for the plant.
Warmth, light, and water happen in sequence
A newly potted amaryllis needs warmth and bright light, but it does not need houseplant-style daily watering from the first hour. Clemson places the early growth stage around 70 to 75 degrees Fahrenheit, and the RHS describes a well-lit spot around 21 degrees Celsius, which is roughly the same zone. Think of this as the rooting and launch phase. The bulb is using stored reserves to push a scape and leaves while the roots catch up. A bright south window is excellent if it is not frigid at the glass. East or west exposure can also work if the light is strong and the pot is turned regularly.
Watering has to lag behind rooting instead of marching ahead of it. Clemson waters thoroughly at planting, waits before watering again, and then keeps the mix only slightly moist. The RHS says to water sparingly until the new leaves develop and only then shift to more regular watering. Illinois uses the practical finger test of waiting until the upper mix dries. These are all versions of the same discipline: do not keep the compost continuously wet while the bulb is still proving that it has active uptake. Let the upper layer dry, then water fully and drain fully. Empty the saucer every time.
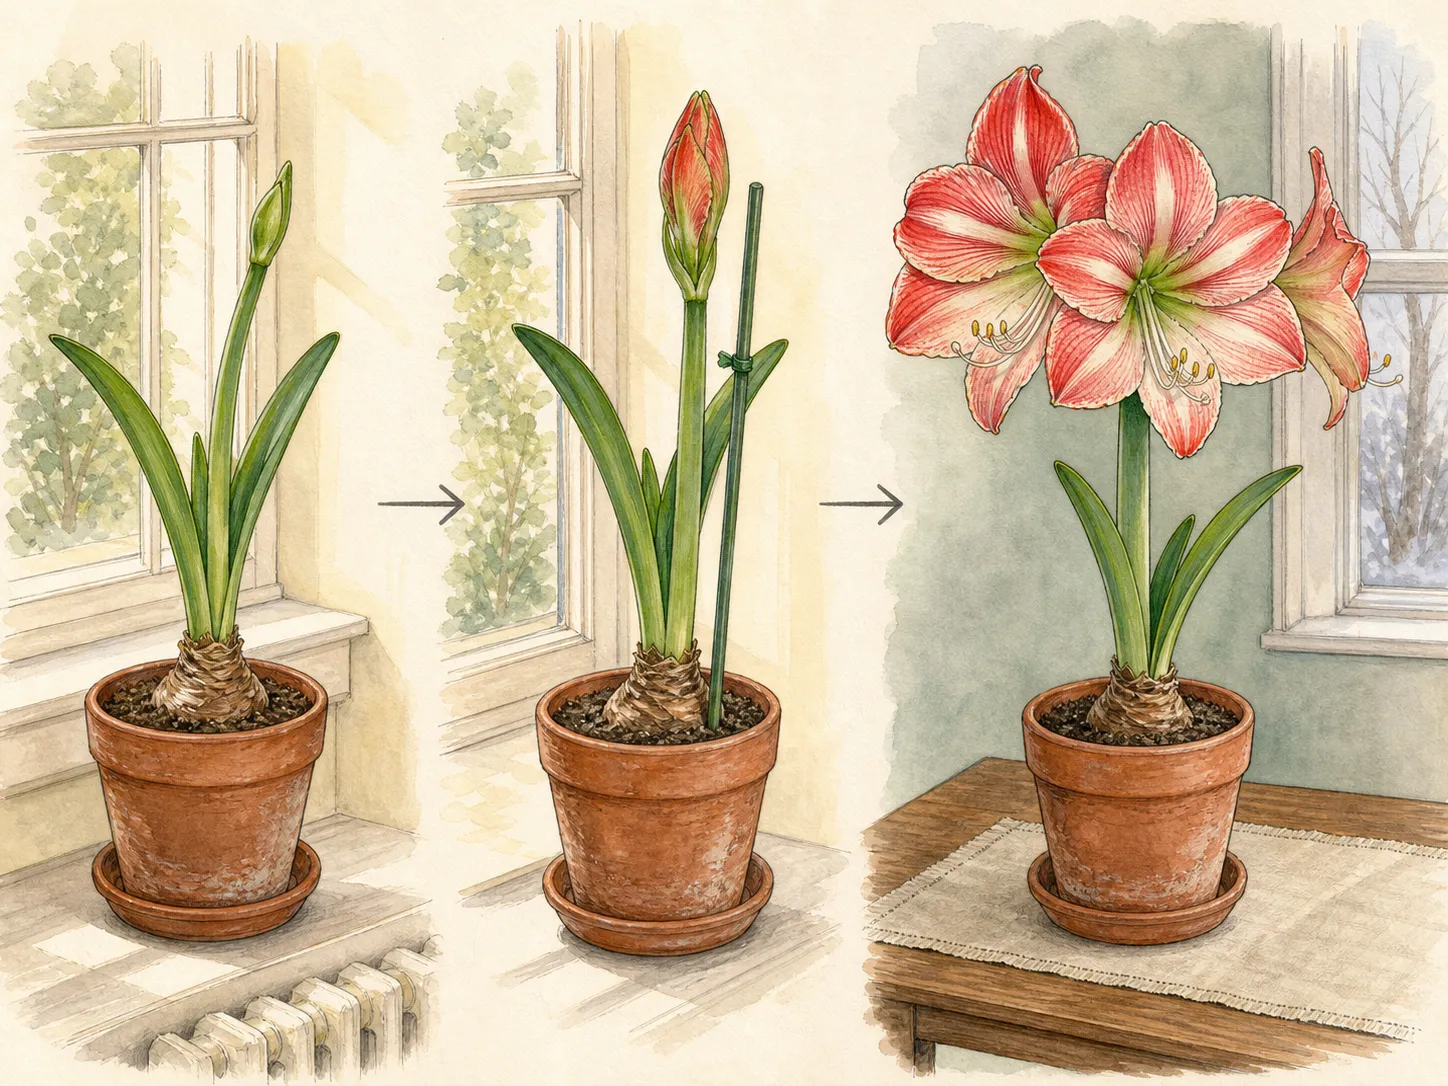
This sequencing is what keeps a showy bulb from becoming a soft one. If you overwater early, the roots have no reason to search outward and the basal plate sits in a cold sponge. If you underwater once growth is underway, the heavy scape and large flowers are built on a shrinking hydraulic system and the stalk may stall or abort. Use the stage of growth to set your watering rhythm. The first rule is restraint. The second rule, once leaves and scape are moving, is consistency. Neither stage is well served by a standing reservoir hidden inside a foil wrap.
Straighten the scape before it becomes a rescue job
Amaryllis rarely grows perfectly symmetrical under one-sided window light, which is why both Clemson and the RHS tell gardeners to turn the pot regularly. Do it from the moment the scape is obviously elongating, not after it has already bent hard toward the glass. A quarter turn every few days is usually enough. This is easier to manage if the pot sits on a saucer you can rotate without dragging soil crumbs across the sill. Rotation is one of those quiet, almost old-fashioned habits that makes the eventual display look composed instead of improvised.
Large-flowered cultivars also benefit from staking before the open flowers make the imbalance obvious. The plant is not weaker because it needs help. The breeding that gives you dinner-plate blooms can easily outpace the mechanical strength of a tall smooth scape indoors. Use a discreet stake and soft tie while the stem is still mostly straight, or you will end up forcing a corrective bend that never really disappears. If the stalk does lean too far, Clemson notes that the cut scape still performs well in a vase, which is useful salvage knowledge but not a substitute for earlier support if the goal is a potted display.
Once the bud begins to show color, shift the display strategy. Illinois recommends moving the plant out of direct sun and ideally into a cooler place to make the flowers last longer, and Clemson similarly says the life of the bloom is prolonged at about 65 degrees Fahrenheit. That cooler bloom stage is not a rebuke to the warm start. It is the second phase of the same schedule. Warmth gets growth moving; cooler conditions preserve what has opened. Keep the blooming plant away from heaters, air vents, and any shelf that traps dry rising air around the scape.
Choose now between a holiday bulb and a keeper bulb
Many gardeners enjoy amaryllis as a one-season display, and there is nothing dishonest about that choice. If the goal is only the current bloom, then success is simply a straight scape, a stable pot, and flowers that hold well for the week or two you actually plan to admire them. If you want to keep the bulb, however, the job changes the moment the flowers fade. Remove spent blooms to prevent seed formation, but do not strip away healthy green tissue simply because the show is over. Green leaves and even the green scape continue feeding the bulb and rebuilding reserves.
Every source that addresses reblooming makes the same larger point: future flowers are paid for by the months after the first display, not by one dramatic watering ritual in December. Minnesota and Illinois both tell gardeners to keep the plant in the brightest practical indoor position after bloom, water regularly, and feed when active growth continues. Once frost danger has passed, the bulb can be acclimated outdoors gradually and then given a sunny summer run. The outdoor move is not cosmetic. It is a practical way to give the plant more light and a longer season for recharge than most winter interiors can provide.
Dormancy is optional for a healthy bulb but useful if you want calendar control. Illinois and Minnesota both describe a cool, dark rest in roughly the 45 to 60 degree range for about eight to twelve weeks, with watering withheld during that time. That is not the right move for every gardener and every bulb. It is a management tool. If you want a bulb to rebloom at an intentional season, forced rest helps. If you simply want to keep it growing and let it decide its next cycle, a continuously maintained bulb can also flower again. The important thing is not to confuse neglect with controlled dormancy.
Steps
- Level
- easy
- Time
- One potting session, then four to eight weeks of staged care
- Tools
- Heavy pot with drainage, Fresh potting mix, Watering can, Soft ties and a stake
- Materials
- Healthy amaryllis bulb
- 1Set the target bloom date first
Check whether the bulb is already sprouting and count backward from the dinner, gift date, or room display you want. Fresh gift bulbs commonly flower within several weeks, so timing begins with the bulb's condition, not with a generic holiday month.
- 2Choose a pot only slightly wider than the bulb
Use a stable container with drainage that is about one to two inches wider than the bulb and tall enough for roots below it. Favor weight and ballast over decorative thinness so the eventual stalk does not topple the pot.
- 3Pot the bulb high
Place roots on fresh well-drained mix and backfill only until a substantial portion of the bulb remains exposed. Keep the neck and shoulders visible, leave watering headspace at the rim, and firm the mix so the bulb sits steady without being buried.
- 4Water once, then pause
Soak the pot thoroughly at planting and let it drain completely. After that, wait until the upper mix dries and growth is underway before resuming routine watering. Early saturation is one of the easiest ways to lose a bulb before it has rooted properly.
- 5Start the plant warm and bright
Keep the pot in a well-lit warm room or sunny window around 70 degrees Fahrenheit while roots, leaves, and the flower scape begin to move. Rotate the pot every few days so the stalk does not bend hard toward the light.
- 6Stake and cool the bloom stage
As large buds expand, add support before the scape leans and move the plant to a cooler position out of hot direct sun once the flowers begin showing color. Cooler air around 65 degrees helps the blossoms last longer.
- 7Decide on aftercare while foliage is still green
If you want the bulb again, remove spent flowers, keep the leaves growing in bright light, and continue watering and feeding during active growth. Use outdoor summer growth and, if desired, an eight- to twelve-week rest later only if you need to control the next bloom date.
Related reading
Sources
- Amaryllis. Clemson Extension. Source record · Accessed 2026-08-19.
- Hippeastrum. Royal Horticultural Society. Source record · Accessed 2026-08-19.
- How to take care of amaryllis and get them to rebloom. Illinois Extension. Source record · Accessed 2026-08-19.