Grow · grafted tree peony autumn planting depth
Autumn Planting for Grafted Tree Peonies in UK Gardens
Plant a dormant grafted tree peony using the RHS UK depth recommendation, identifying the union, allowing room for roots and preserving the woody framework through establishment.
Published Last updated
In this guide
- Set a confirmed graft below the finished soil surface
- Check whether you have a grafted woody plant
- Choose a place for the mature shrub before digging
- Inspect the delivery and protect the roots while waiting
- Measure from the final ground level to the union
- Backfill gently and recheck after watering
- Retain living wood through the first winter
- Judge establishment by growth and watch the shoot origins
- Steps
Set a confirmed graft below the finished soil surface
For a dormant grafted tree peony in a UK garden, follow the RHS recommendation to place the graft union about 15cm (6in) below the finished soil level. Identify that junction first, then make a hole that accommodates the roots beneath it. This deeper setting encourages the woody scion to develop its own roots. It is a specific instruction for grafted tree peonies, separate from the shallow eyes of a herbaceous garden peony.
Autumn is the preferred planting season in the RHS tree-peony guide. October is useful for choosing the permanent site and preparing for a bare-root delivery, although specialist stock may arrive later in autumn. Work with the actual delivery and soil conditions. Waterlogged or frozen ground calls for a delay and suitable temporary protection of the roots, even when the calendar says it is planting season.
The worked method below uses the RHS UK depth and ordinary garden planting conditions. The American Peony Society describes a 4–6in buried union, while Cornell's tree-peony notes give 5–6in or more. These support the distinction from herbaceous crowns; they are not measurements to add together. If your nursery specifies a different depth for the supplied stock, establish what plant and junction that instruction refers to before planting.
Check whether you have a grafted woody plant
Read the label and order description for tree peony or woody peony, the cultivar name, and whether the plant is grafted or grown on its own roots. Oregon State describes tree peonies as deciduous shrubs whose woody stems persist through winter. Many cultivated plants sold under Paeonia suffruticosa represent complex hybrids. A large peony flower photograph cannot tell you how the nursery propagated the particular plant in your parcel.
A typical grafted specimen joins a woody tree-peony stem, the scion, to the root of a herbaceous peony. The rootstock supports the young graft while the upper plant becomes established. RHS describes the union as a slight bulge near the stem base. Look for a change in thickness or tissue at that join, using the supplier's description or photograph where available. The illustration is a schematic example, so the actual scar may be less regular.
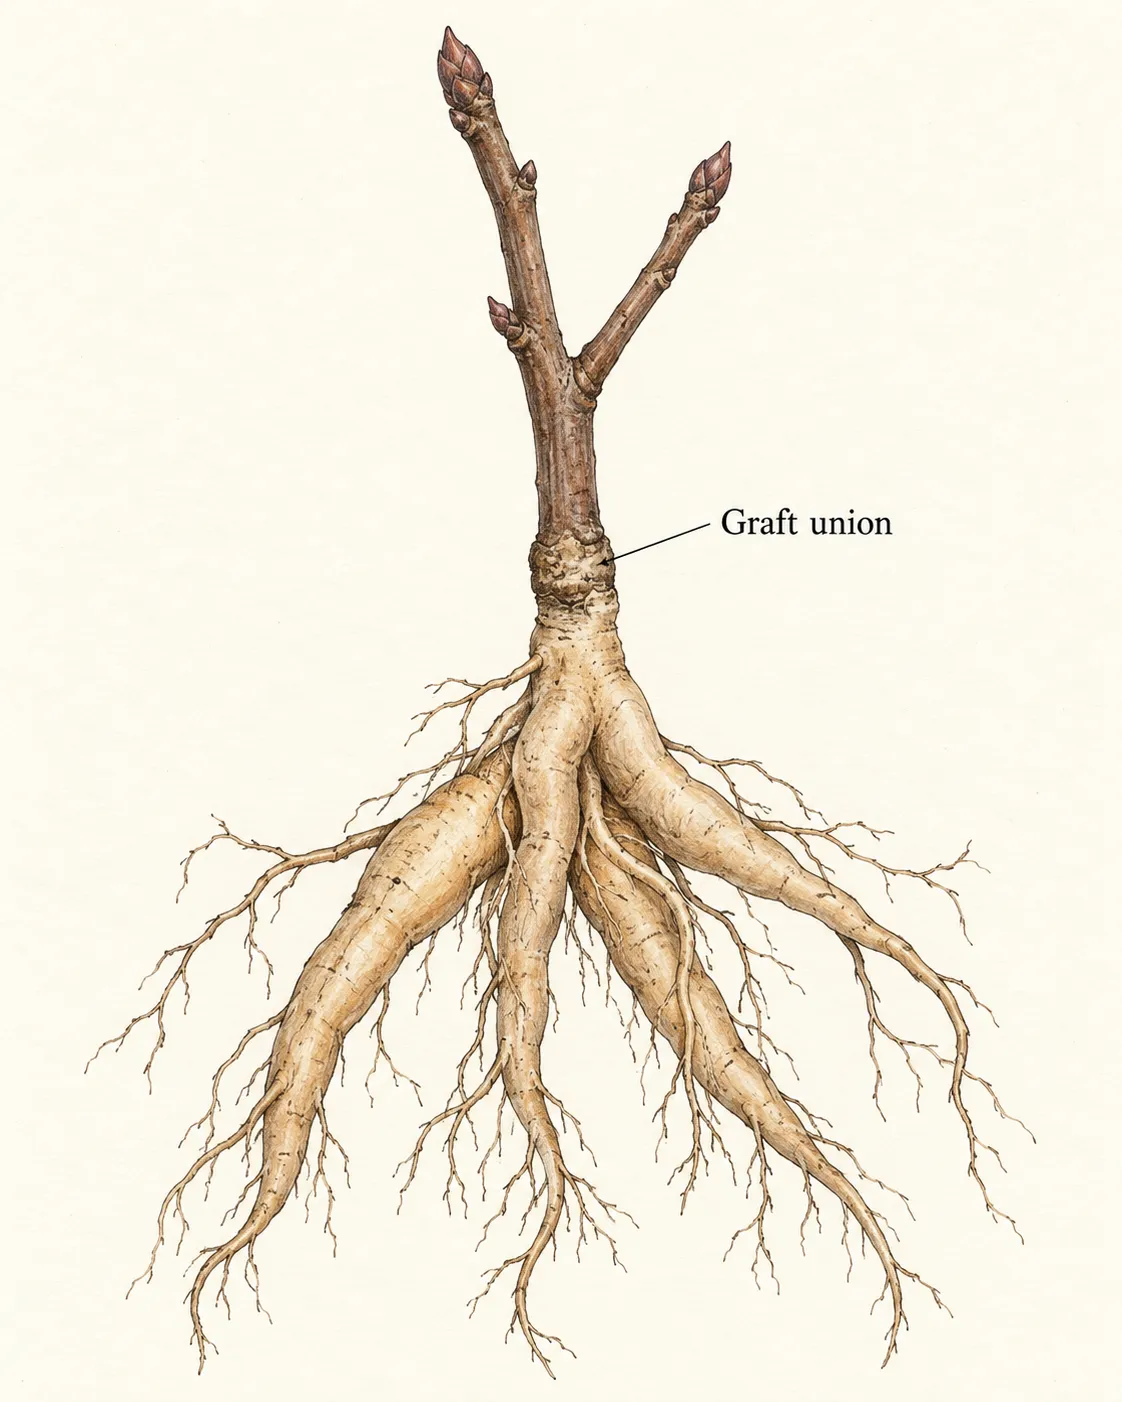
Handle the plant with its roots supported while locating the union. Keep the bark intact and use gentle observation to find the junction. A natural root swelling, a bud or the point where several roots branch is not automatically the graft. If the join remains unclear, send the supplier a clear photograph of the full root-and-stem assembly and ask them to identify it. Guessing the reference point can turn a correct depth measurement into an incorrect planting.
Own-root tree peonies have no graft union to measure from. Intersectional or Itoh peonies are another group and need their own planting instructions. The 15cm figure here applies to neither by default. Keep ordinary herbaceous divisions separate at the planting bench as well. Their visible eyes and fleshy roots can look familiar beside a grafted nurse root, but the aboveground woody structure and propagation label change the task.
Choose a place for the mature shrub before digging
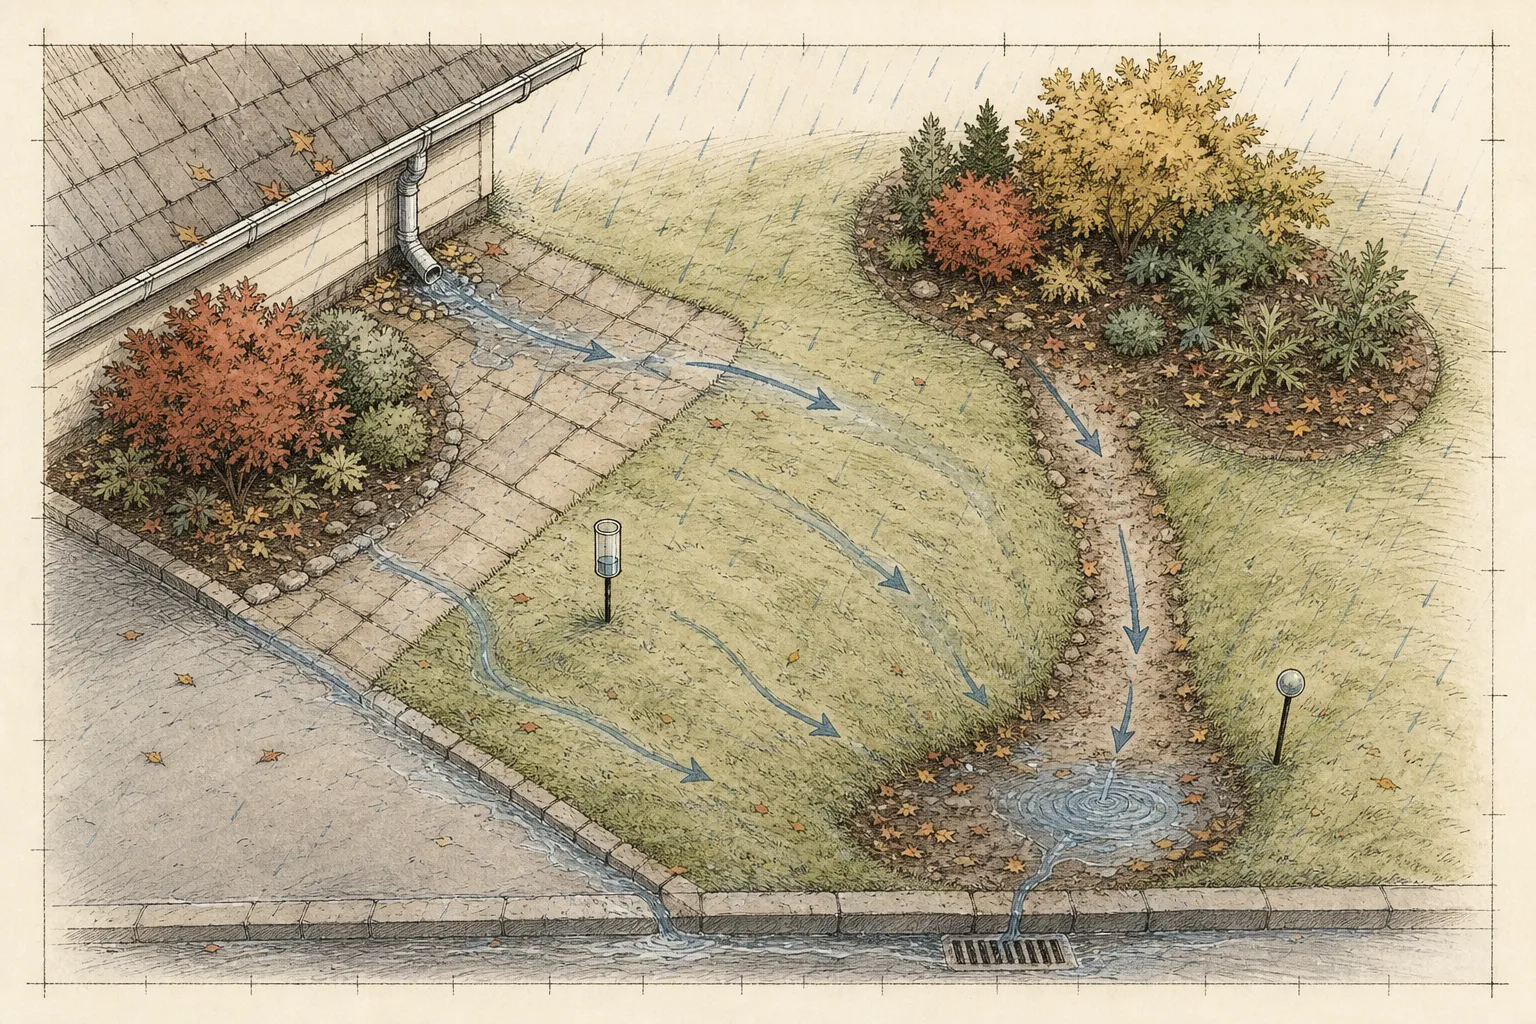
Select a sunny or lightly shaded site sheltered from strong wind and late-frost pockets. Those are the RHS's principal placement conditions for tree peonies. Shelter protects the eventual foliage and large flowers, while drainage remains essential below ground. A warm-looking wall bed that collects roof runoff can still be a poor permanent position. Watch where autumn rain travels through the proposed area before making the hole.
The American Peony Society emphasizes long-term placement and space away from competing tree and shrub roots. That is particularly useful when the planting spot is at a woodland edge: light shade may suit the peony, but a dense network of established roots creates a different problem. Find a genuine planting pocket with room for the peony's roots. Forcing the new plant between large roots leaves little freedom to set its graft and orientation accurately.
Reserve space for the mature woody shrub. Cornell gives 4–5ft (about 1.2–1.5m) spacing for tree peonies, and Oregon State describes some mature plants reaching 6–8ft tall. Use those as reminders to check the named selection's expected dimensions, not as a promise that every cultivar stays within one outline. Leave a viewing and maintenance gap beside a path, and enough separation from neighboring crowns to see emerging shoots.
RHS favors fertile, well-drained soil near neutral, while tolerating some acidity or alkalinity. A soil test is more useful than automatically adding lime to every planting hole. The APS discussion reflects its own soils and growing experience; this UK method does not import a universal lime dose. Persistent winter saturation also needs a site decision. A deeper graft setting cannot make a wet planting hollow suitable.
Inspect the delivery and protect the roots while waiting
Open the parcel promptly and compare the contents with the nursery label. A dormant tree peony may be small, with few branches or supplier-shortened stems. APS notes that shipped woody peonies can arrive already cut back. Assess the supplied plant against its description; height alone is a poor measure of quality. Take a photograph showing the roots, graft and retained buds before unpacking material is discarded.
Keep exposed roots protected from drying while you prepare the planting position. Unwrap only the plant you are ready to handle, and retain its identity throughout the job. Check for broken woody stems, a split join, or extensive soft deterioration. Contact the supplier about substantial damage before removing tissue that might be needed to assess the problem. A bruise or unusual color alone cannot establish whether a graft is viable.
If the ground is unsuitable on arrival, make a temporary plan immediately. RHS's general shrub guidance recommends heeling in bare-root stock when permanent planting is delayed: the roots are temporarily covered with soil to protect them from drying. Use a suitable drained holding place and the nursery's instructions. Leaving the roots exposed in the opened box while waiting for a dry weekend creates a new problem unrelated to planting depth.
A container-grown tree peony is a different starting condition. The University of Washington's Miller Library discusses the trade-off between holding a potted plant and planting it outside the ideal season, emphasizing the need for summer water. That question does not justify dismantling an established root ball to search for an old graft. This method concerns new bare-root grafted stock; seek stock-specific guidance for a mature potted or own-root plant.
Measure from the final ground level to the union
Lay a straight cane or board across the planting hole, resting on the surrounding soil. It represents the finished ground level. Hold the supported plant beside that reference and measure down to the identified graft union. Under the RHS method, that distance is about 15cm. The root tips must then fit comfortably below and around the junction; the hole depth is determined by both measurements, not by a universal spade depth.
Make the hole wide enough for the roots to spread in their natural directions. APS specifically cautions against squeezing a woody peony into a tight hole. Enlarge the excavation where a long root meets the side. Bending fleshy roots sharply upward merely to fit a small opening can shift the plant and makes it harder to keep the union at its intended level during backfilling.
The cutaway shows the graft below the soil, with a length of woody scion buried above it and nurse roots extending below. The measurement ends at the graft, not at the lowest root or the uppermost bud. A small plant may consequently have little woody stem showing above ground. If the supplied plant is unusually short or the recommended depth would cover all growth, confirm its intended orientation and depth with the nursery before improvising.
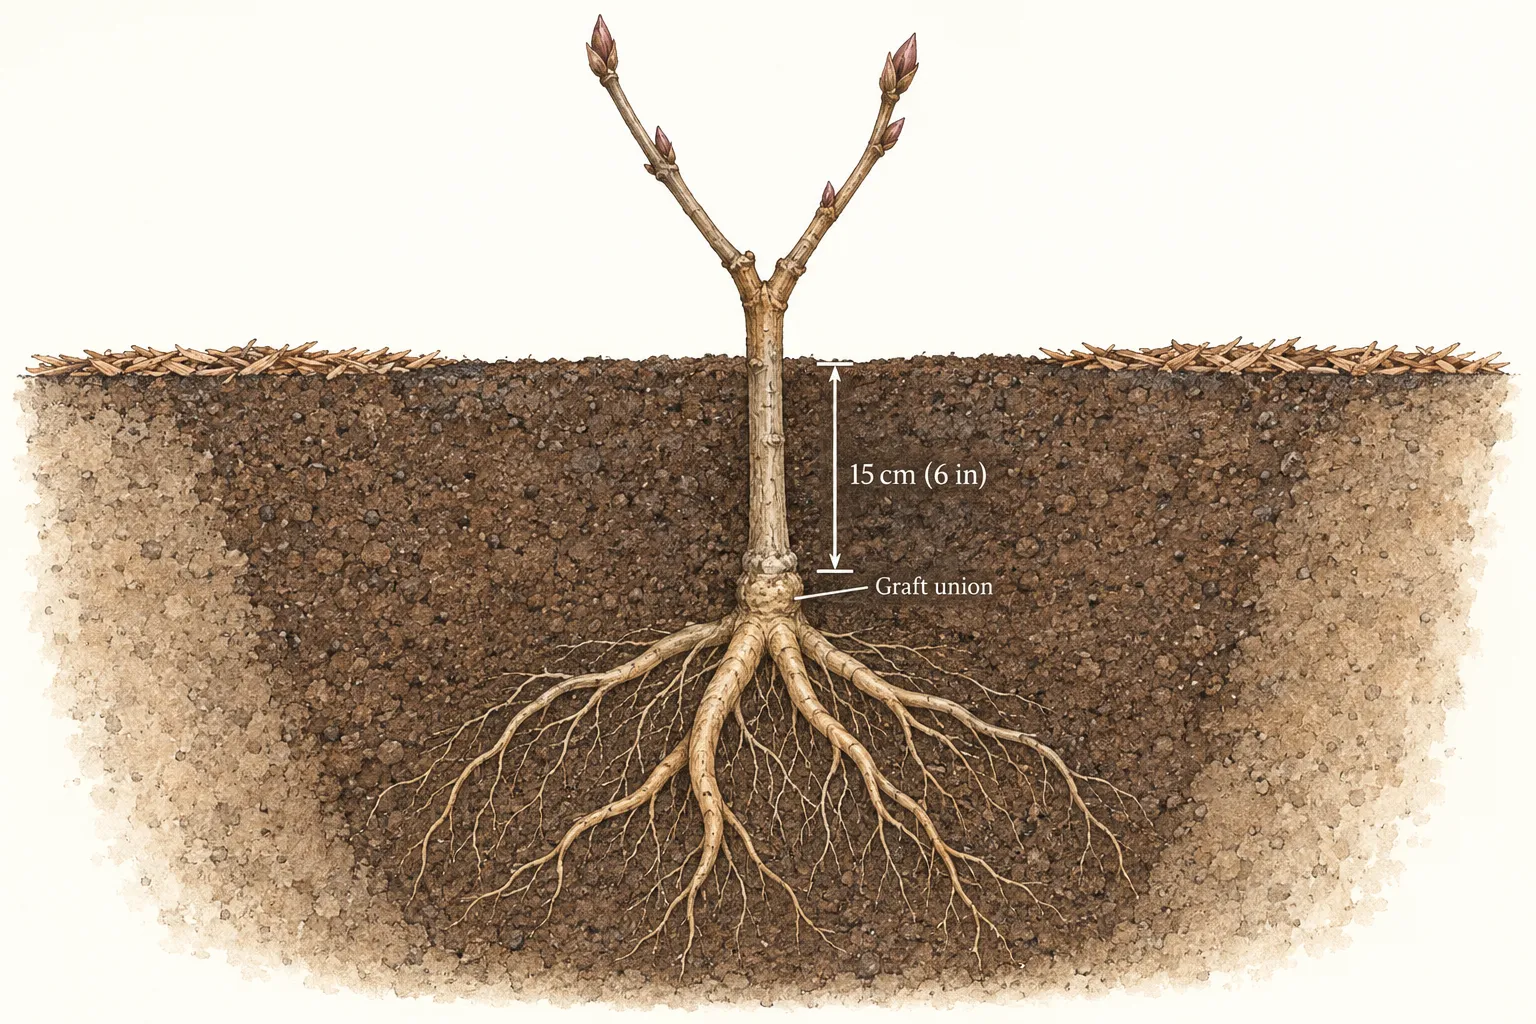
Use settled soil as the upper reference. Mulch is a separate surface layer, so a thick mulch covering does not count toward the 15cm of soil above the union. Likewise, a temporary mound of loose excavated soil will settle and change the result. Decide the permanent surface level before planting and retain that reference while filling. The figure illustrates an ordinary level bed, not a solution for a waterlogged site.
General tree-and-shrub planting advice often calls for keeping the root flare at surface level. A grafted tree peony is a specific exception to that general placement rule. Use the tree-peony guidance for its buried union, and use general planting guidance for matters such as workable soil, gentle backfilling and aftercare. Mixing those two depth instructions would leave the central decision unresolved.
Backfill gently and recheck after watering
Support the plant at the chosen level while returning soil around its roots. Work the soil into spaces gently, checking that the roots remain comfortably arranged. A deeply loosened pocket directly beneath the plant may settle later; RHS general planting guidance also cautions that a rich organic layer in the hole bottom can decompose and cause sinking. Keep the depth reference visible through the filling process.
Water to settle soil around the roots, then complete the backfill and firm carefully by hand. Check the union's measured relationship to the surface before it disappears from view, and record the planting depth. Once filled, verify that the plant sits securely and the final soil line agrees with your straightedge. Further settlement after the first watering is easier to correct at planting than after new roots have occupied the surrounding soil.
Finish with the organic surface mulch appropriate to the bed, keeping it clear of the emerging woody stems. RHS warns that piling mulch against stems can encourage rot. The graft can be deliberately buried in soil while the visible stem bases remain free of an additional wet mulch heap; these are different parts of the same planting arrangement. Keep the label where it can be read after leaves fall.
Photograph the finished soil line and the remaining woody framework. Include a fixed nearby feature so the record remains useful if a marker moves. The purpose is to detect a changed surface or damaged stem later, not to prove that roots have formed. Own-root development is a longer establishment process below ground, and repeated excavation would disturb the plant you have just settled.
Retain living wood through the first winter
A tree peony loses its leaves but normally retains woody stems. NC State and Oregon State distinguish that persistent structure from herbaceous peonies. Leave sound woody growth and its buds in place during autumn cleanup. The cutting-back routine used for an ordinary garden-peony border should end at the boundary of this new woody planting.
Collect fallen peony foliage and keep the young plant visible. Cornell's care notes distinguish leaf cleanup from removing the tree peony's living stems. Check after storms for a loose plant, shifted mulch or physical damage. Where the surface has moved, first establish whether soil has washed away or the plant itself has been displaced. Adding an unmeasured mound around every problem changes the original depth relationship.
A leafless stem is not necessarily dead. RHS places removal of dead shoots in late winter, cutting back to a healthy bud. On a new plant, wait until you can distinguish sound buds and damaged wood before making corrective cuts. More drastic renovation advice belongs to established plants and particular circumstances, not to routine care of a newly planted graft.
Judge establishment by growth and watch the shoot origins
During the first year, check soil moisture in dry spells and water the root zone when needed. RHS specifically emphasizes the first summer. Autumn planting reduces some immediate demand, but it does not remove the following year's aftercare. A newly planted peony beside a thirsty hedge can dry faster than the same plant in an open bed, so base watering intervals on moisture in the actual root area.
Expect a period of establishment. NC State notes that woody peonies may fail to flower for the first year or two after transplanting. That makes the first flush of healthy growth more informative than an immediate flower count. Keep the plant's label and arrival photograph, and compare the developing framework with them. Lack of flowers alone is a weak reason to dig up the roots or change the planting depth.
Grafted plants can produce shoots from the herbaceous rootstock. Oregon State advises removing rootstock suckers, but a new basal shoot is not automatically an unwanted one: the woody scion can also make new growth low down. Establish the shoot's origin and identity before cutting. Compare it with the retained woody plant and seek the supplier's help when uncertain; color or vigor by itself is insufficient proof.
Leave the graft undisturbed while the plant develops. Burying the union encourages roots from the scion, but there is no fixed date on which every plant can be treated as fully independent of its nurse root. Continue observing soil moisture, stem health and emerging growth. The intended result is a well-sited shrub that can remain for years, with a known planting history that makes future care decisions easier.
Steps
- Level
- moderate
- Time
- About one hour for one plant in a prepared bed, followed by first-year checks
- Tools
- Spade and hand fork, Straight cane or board, Ruler or tape measure, Watering can, Plant label and pencil
- Materials
- Dormant bare-root grafted tree peony with nursery instructions, Excavated garden soil for backfilling, Garden compost or other suitable organic surface mulch
- 1Confirm the stock and mark the union
Check the cultivar label and confirm that the plant is a grafted woody peony. Locate the healed join between scion and nurse root, supporting the roots during inspection. Photograph the junction before planting. If it is unclear, obtain the nursery’s identification; keep the roots protected while waiting. Separate herbaceous and own-root plants from this depth procedure.
- 2Prepare a drained permanent position
Choose sun or light shade, wind shelter and enough room for the named shrub’s mature spread. Check autumn drainage and competing roots. Dig only when the soil is workable. Make the hole broad enough to receive the roots naturally. A delayed delivery or wet planting day should lead to temporary root protection, not a rushed hole in saturated ground.
- 3Set depth from the surrounding soil
Rest a straightedge across the hole on the final surrounding soil level. Position the confirmed graft about 15cm (6in) below it for this RHS UK method. Allow the roots beneath and around the union to fit freely. Recheck the reference before covering the junction. Keep mulch height and root-tip depth out of this measurement. Measure vertically; an angled ruler can make the junction appear farther below the surface than it actually is.
- 4Fill, water and verify the level
Return soil gently around the roots while supporting the plant at its intended depth. Water to settle it, finish backfilling and firm lightly by hand. Check for settlement and stability before leaving the site. Apply surface mulch with a clear space around visible stems, then label and photograph the completed planting for later comparison. Keep the final soil line visible during mulching so the two surface layers remain distinguishable.
- 5Keep the woody framework and follow the first season
Retain living stems when leaves fall and collect fallen foliage. Recheck the site after storms, then watch for healthy buds and shoots in spring. Water during first-year dry spells as needed. Confirm any suspected rootstock sucker before removing it, and allow establishment time before judging the plant by its flowers. Record a material change before deciding to disturb the graft.
Related reading
Sources
- How to grow tree peonies. Royal Horticultural Society. Source record · Accessed 2026-10-09.
- Growing & Planting Woody (Tree) Peonies. American Peony Society. Source record · Accessed 2026-10-09.
- The Culture of Herbaceous and Tree Peonies. Cornell Cooperative Extension – Suffolk County. Source record · Accessed 2026-10-09.
- Paeonia suffruticosa. Oregon State University. Source record · Accessed 2026-10-09.
- Paeonia – Woody Types. NC State Extension. Source record · Accessed 2026-10-09.
- Trees and shrubs: planting. Royal Horticultural Society. Source record · Accessed 2026-10-09.
- Ideal time to plant tree peonies. University of Washington, Elisabeth C. Miller Library. Source record · Accessed 2026-10-09.