Grow · camassia moist clay autumn planting
Plant Camassia Bulbs in a Moist Clay Border in Autumn
Plant garden camassias in autumn where clay retains spring moisture but releases excess water, with measured bulb depth, lasting groups and room for the leaves.
Published Last updated
In this guide
- Choose spring moisture, then check where excess water goes
- Wait for a workable autumn day
- Buy the right camassia and inspect it promptly
- Lay out a permanent group among the existing crowns
- Measure depth to the base, not to the bulb tip
- Finish the planting with a map and moisture check
- Keep spring foliage working through the border handoff
- Allow summer rest and assess the next cycle
- Steps
Choose spring moisture, then check where excess water goes
Plant camassia bulbs in autumn in clay that stays moist during spring growth but still releases surplus water. Choose full sun or light shade. Wait until the soil is workable, set the bulbs at the depth specified for the named stock, and leave their leaves to die back naturally after flowering. This method concentrates on locally hardy garden forms of Camassia leichtlinii in temperate borders. Their tolerance of heavier soil makes them useful where a dry-loving bulb would be a poor choice, but it does not turn a permanently flooded planting hole into a suitable home.
The seasonal pattern matters as much as the word clay. USDA's great-camas account describes habitats rich in silt and clay that dry later in the year, with moisture available during active growth. A University of Washington propagation account likewise describes moist spring conditions and summer dormancy. In a garden, look for the part of the border that remains moist as camassia leaves and stems develop, then becomes less wet after they finish. A gutter outlet delivering water all summer is a different situation.
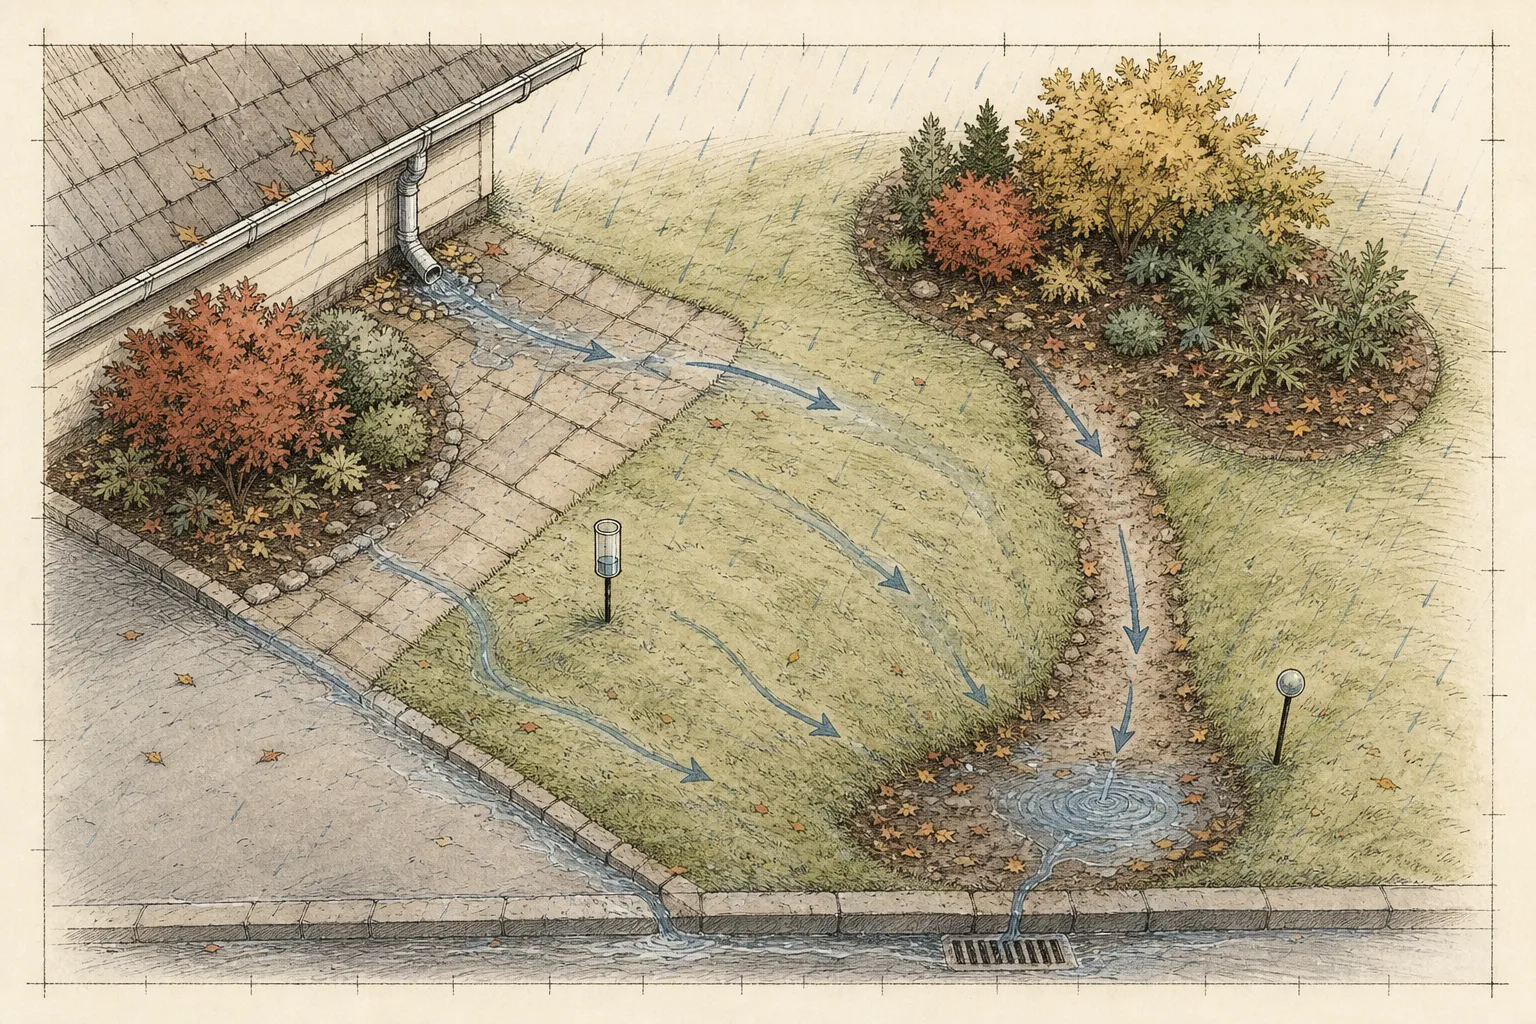
Observe the proposed ground after substantial autumn rain. Check a trowel-depth sample as well as the surface, and compare it with a nearby area that drains more readily. Glossy standing water, a persistent saturated layer or runoff collecting against paving needs investigation before bulbs go in. Camassias are often pictured beside ponds; the RHS still specifies moist soil with drainage. A pond-side border above the waterline and a submerged pond shelf should therefore remain separate planting choices.
Wait for a workable autumn day
For UK gardens, the RHS Camassia trial account gives September to November as the planting season. Late October falls within that window, provided the bed is ready. The same report records a practical exception: persistent rain prevented preparation in October 2023 at Bridgewater, so planting waited until November. That is a useful precedent for a heavy-soil garden. Receiving a parcel or having a free weekend does not make wet clay ready to excavate.
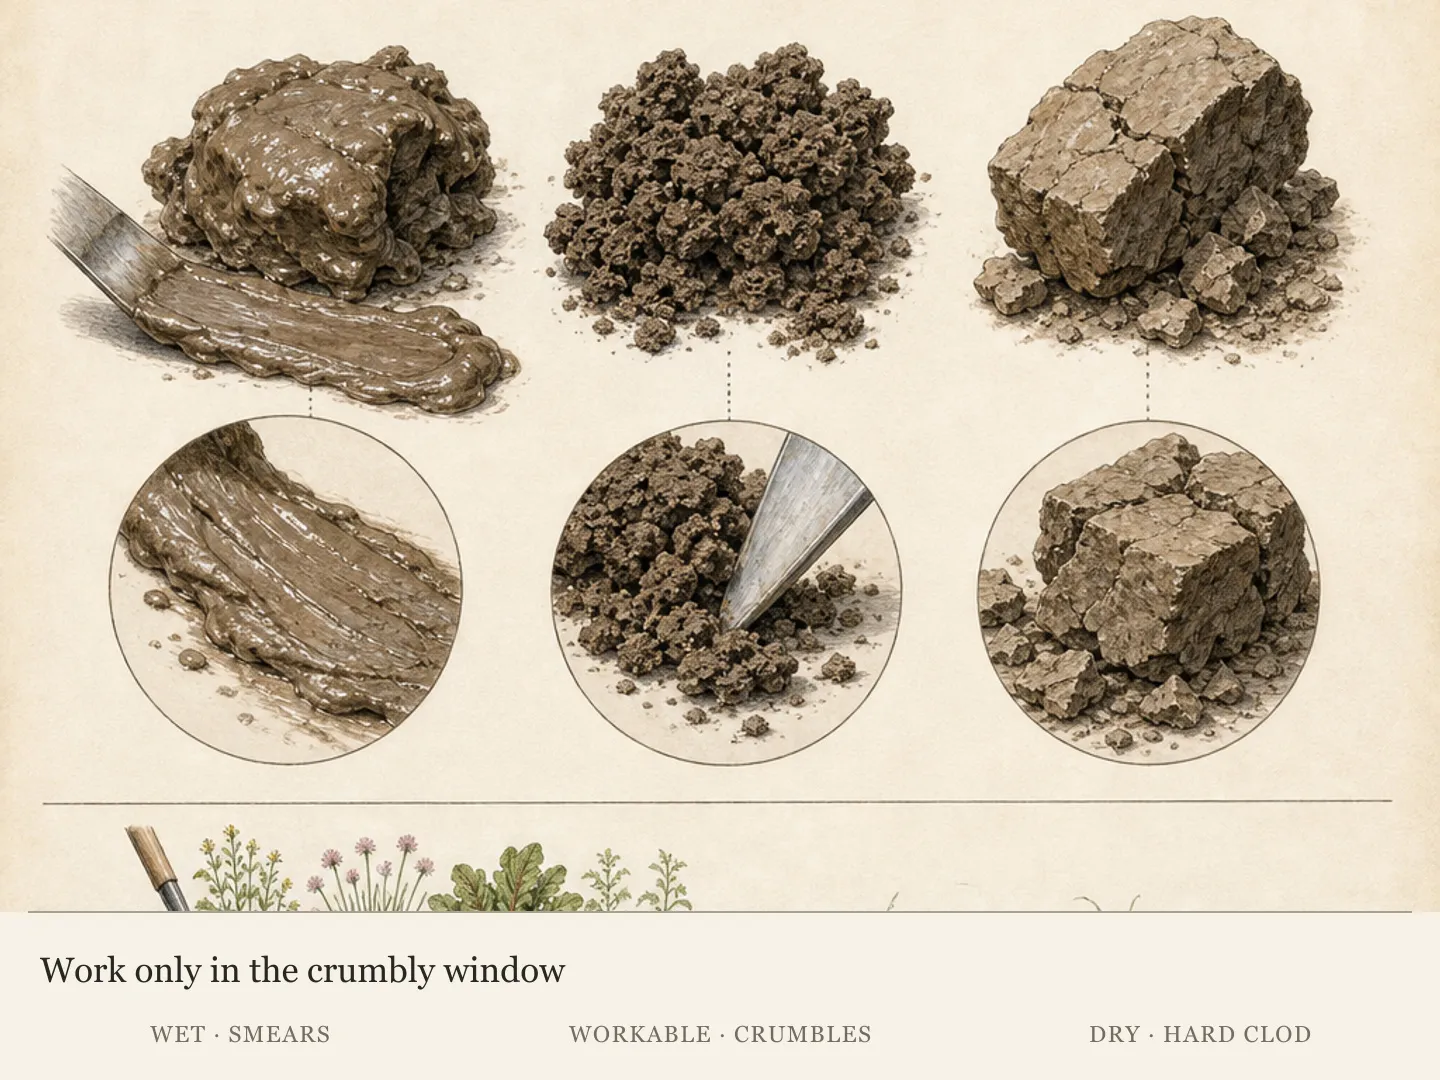
Take a small sample from the depth you intend to work. Clay naturally feels smooth and can be shaped when moist, so the test is how readily it can be loosened for planting. If your tools polish the sides of the hole and the soil sticks in dense wet slabs, stop. RHS clay-soil guidance warns that digging or walking on wet clay damages its structure. Work from the path where possible and keep the future bulb group out of a repeatedly trodden access route.
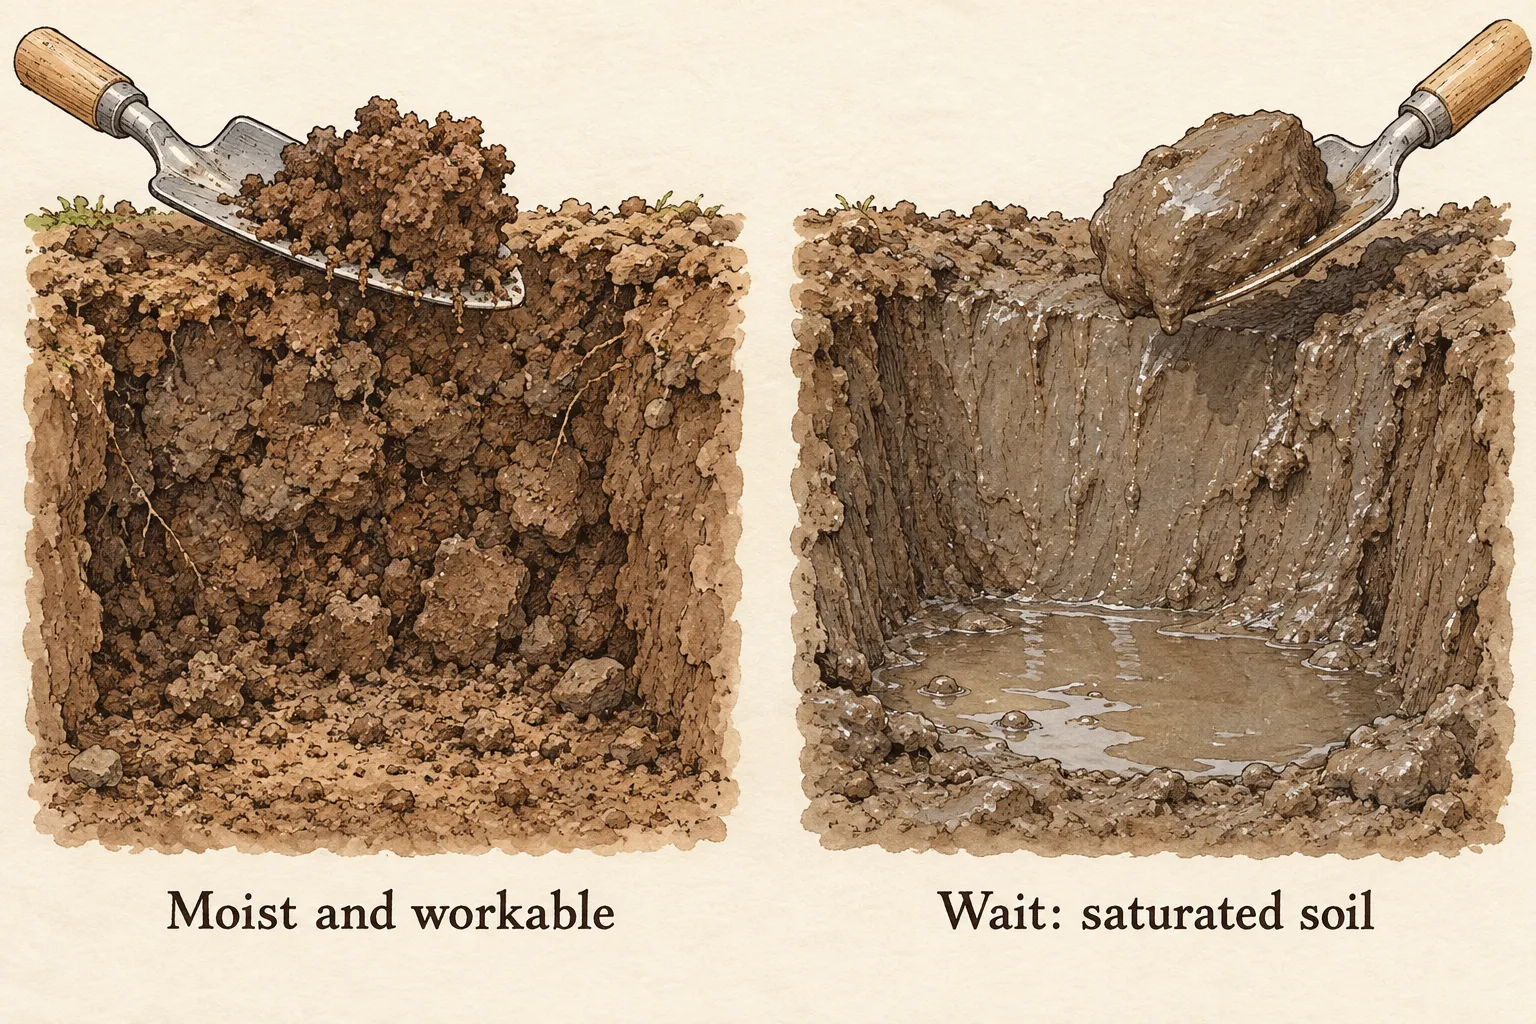
Where preparation is needed, improve the usable planting area before laying out bulbs. Mature organic matter can help the structure of heavy soil; a small handful of grit in each hole is not a reliable transformation of the whole bed. The RHS notes that enough grit to substantially dilute clay would require very large quantities. Choose an already suitable part of the garden, improve the broader area or reconsider the site if drainage remains poor. Keep the bulb purchase proportional to the ground you can actually prepare.
Buy the right camassia and inspect it promptly
Keep the botanical and cultivar names with the bulbs. Camassia leichtlinii is commonly offered for tall border displays, while C. quamash and particular dwarf or variegated selections can be much shorter. The RHS lists the blue Caerulea Group of C. leichtlinii at about 1–1.5 metres, a significant presence among perennials. Use the named selection's height when planning the view; a mixed bag marked only 'blue bulbs' gives too little information about what will emerge. Check locally demonstrated hardiness of the named selection before ordering.
Look for firm, sound bulbs with a recognizable base and growing end. Remove any that are soft or rotting from the planting batch and contact the seller if the delivery is in poor condition. Keep loose papery tunic material in perspective: the useful question is whether the bulb beneath is firm. Inspect over a tray and preserve labels while unpacking, especially if several different spring-bulb orders have arrived together.
Plant promptly once the site and weather permit. If a brief delay is necessary, keep the bulbs cool, dry and ventilated in appropriate breathable packing, inspecting them before planting. A warm enclosed parcel left beside a radiator is a poor holding place. Purchase propagated nursery stock for the garden. The garden name camassia covers plants with different geographic origins, and a cultivated C. leichtlinii display is a different project from restoring a local wild plant community.
Lay out a permanent group among the existing crowns
Mark the positions of neighboring perennials before their tops disappear. Camassias flower above a rosette of long, narrow leaves and then leave a summer gap. Put them where later growth can soften that gap while their own spring foliage still receives light. A middle-border opening often works better than the very front of a neat bed, where yellowing leaves may invite premature cutting. Keep the bulbs clear of the solid center of an established perennial crown.
Start with a small, legible group that can remain undisturbed. As a worked layout, place nine bulbs in three loose groups of three, with about 15–20cm between centers within each group. That uses the wider end of the USDA flower-bed spacing range and is close to the 6-inch spacing given by Piedmont Master Gardeners. Leave more space between the groups according to the neighboring plants' mature outlines. The three-group arrangement is a design option, not a requirement for flowering.
For example, if an existing clump already spreads across one of the proposed positions in summer, move that camassia group into a real gap now. A bulb fits into a small autumn hole, but its future leaves still need usable space. Set out canes first, then view them from the path before digging. Keep a narrow route from the border edge to the labels so spring inspection can take place from firm ground beside the hidden bulbs.
Use one named form through the initial planting so its timing and height can be judged together. Repeat the groups across similar light and moisture conditions; reserve other pockets for plants suited to those positions. If you want a shorter front-edge camassia later, treat it as a separate selection with its own dimensions. Keeping one named form and a consistent planting method makes the first season easier to assess: you can compare how that form responds across the border.
Measure depth to the base, not to the bulb tip
Follow a clear species or supplier instruction for the named bulbs first. A useful cross-check is the RHS Camassia guidance of planting at two to three times bulb size. Its separate bulb-planting instructions explain the measurement with a concrete example: a bulb 5cm high goes at the bottom of a hole 10–15cm deep. This is depth to the bulb base from finished soil level, not 10–15cm of soil above the pointed tip.
For a 5cm-tall bulb in a 15cm-deep hole, the bulb occupies the lowest 5cm and the soil above its top is about 10cm. Measure your own bulbs before marking the trowel. A fixed hole copied from a photograph may suit one grade of bulb and place another differently. The depth illustration identifies the two endpoints of the measurement; loose mulch added later is excluded from the finished-soil reference.
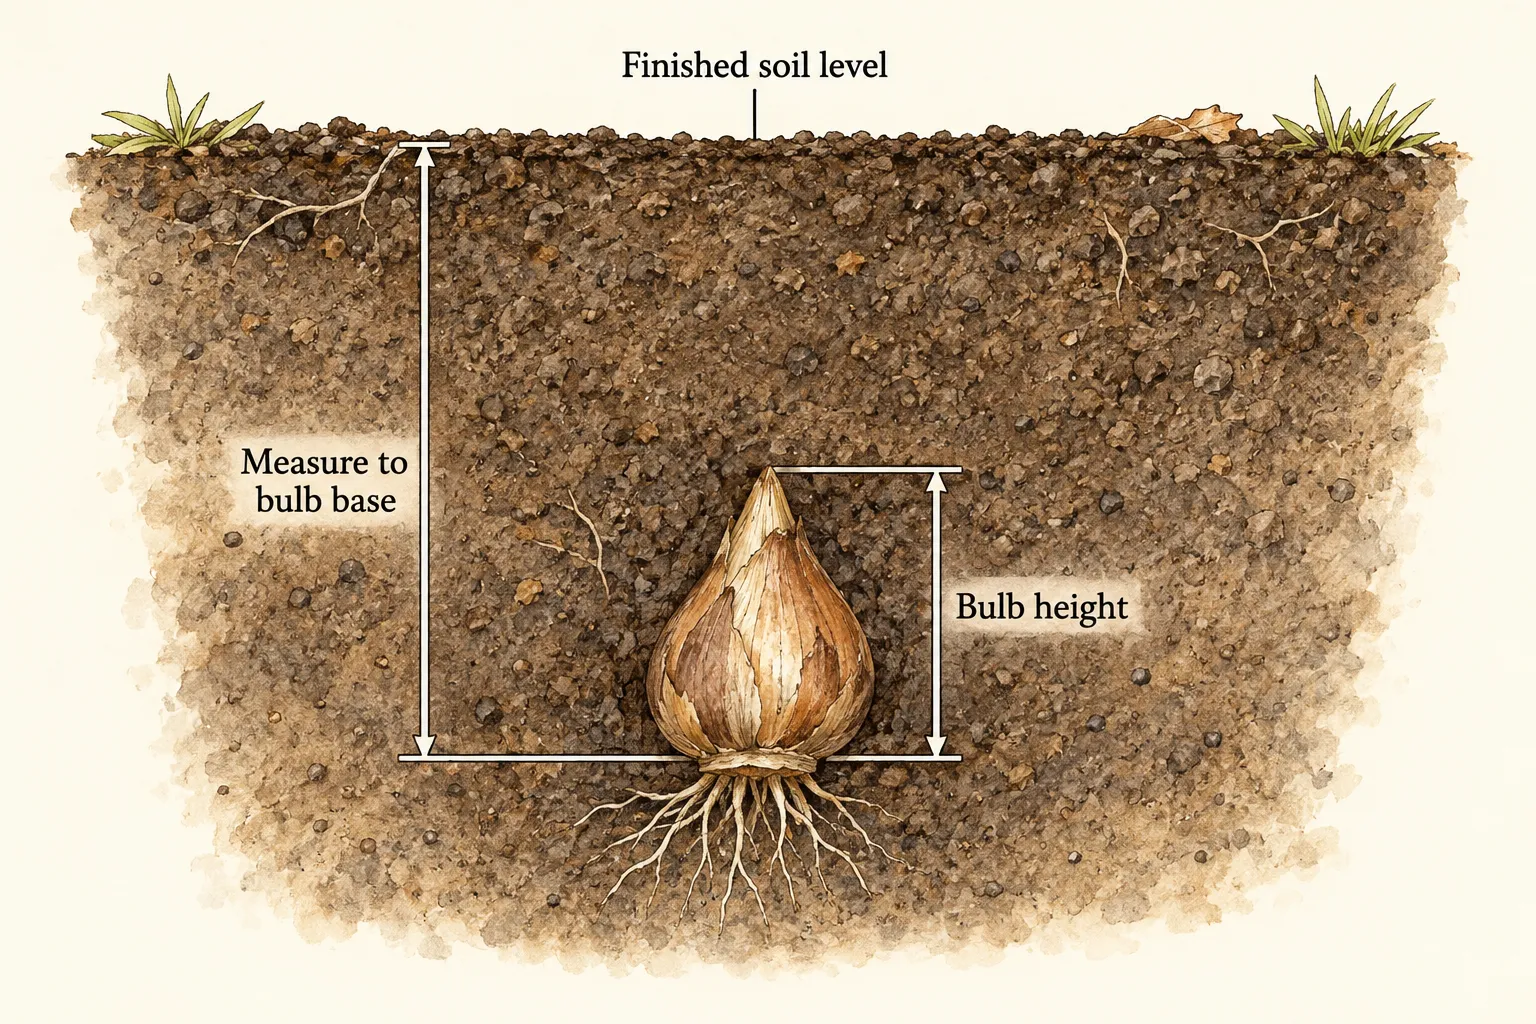
Published recommendations are not all identical. USDA expresses a general ratio using bulb diameter, while the RHS example uses height; those dimensions can differ on an elongated bulb. Piedmont Master Gardeners gives a 4–6-inch planting depth for its garden advice. These are checks to interpret with the actual stock, not numbers to average. Keep one documented convention for a named lot and clarify an ambiguous packet instruction with its supplier before committing the whole group.
Open a hole broad enough to place the bulb gently, with the flatter base down and the growing nose up. Settle it on a stable bed of prepared soil, keeping any existing roots intact. Fill around it with crumbly site soil and restore the intended surface level. Firm gently by hand or with the back of a tool; heavy foot pressure over a new bulb group adds compaction precisely where you want future roots to grow.
Finish the planting with a map and moisture check
Keep the backfilled surface continuous with the surrounding border. A depression left over each bulb can collect rain, whereas an exposed bulb tip signals that the depth needs checking. If loose fill settles markedly, correct the level while the positions are still clear. Then place the label beside the group, with the name, date and depth convention recorded on a simple plan. The bulbs will be invisible for part of every year, so that plan is part of protecting the planting.
Water according to the soil you have just replaced. RHS general bulb advice says additional water is not critical when the ground is already moist or bulbs are autumn-planted. If the prepared soil is dry, water it gently enough to settle around the bulbs, allowing excess to drain. A heavy bed that was moist before planting usually needs observation more than another soaking. Check again after the next substantial rain to see whether water is accumulating where you expected it to leave.
Plan protection from actual local activity. The Bridgewater trial encountered squirrels digging bulbs and used temporary surface wire, which was removed as shoots emerged. That experience supports inspecting a disturbed bed; it does not prove that every garden needs wire. If you use a temporary cover, make its removal part of the spring plan and keep sharp edges away from paths. Marking it now prevents the protective measure becoming an obstacle to new growth.
Keep spring foliage working through the border handoff
Watch for the first narrow leaves before hoeing or filling gaps. Emergence varies with climate and exposure, and clay warms slowly. A neighboring sunny bed can be ahead of your group. When shoots appear, check their soil during dry spells. Heavy ground can dry even when it held ample moisture earlier in the season. Spring is the period in which the actively growing camassia needs its water supply, even when the eventual summer routine will be much drier.
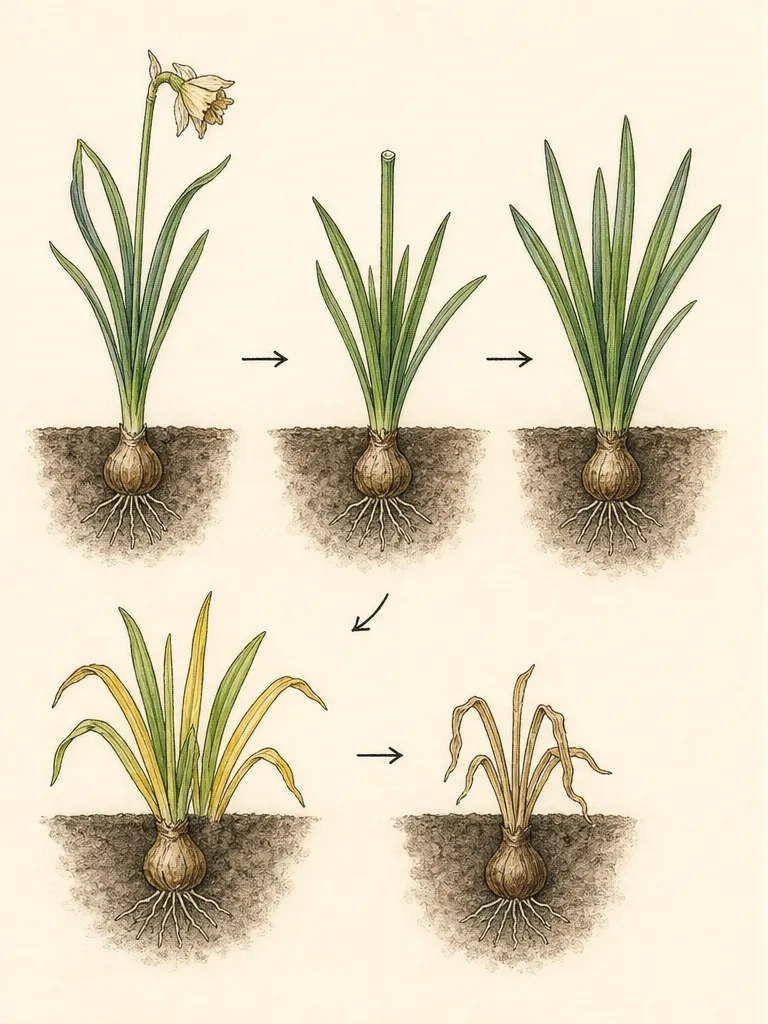
Once the flower spikes fade, choose whether seed heads have a place in the planting. Removing finished stems can keep a border tidy, while leaving seed allows a different, slower kind of increase. In either case retain green leaves until natural yellowing and dieback. The RHS warns that early foliage removal can reduce or prevent the following year's flowering. Take a photograph of the entire leaf footprint now, while it can still inform where later perennials and annuals belong.
Let established summer companions occupy the visual gap as the camassia foliage fades. Planting a new summer annual directly over a dormant camassia is an easy way to damage it. Use the spaces shown on the map and keep deep cultivation away from the group. If the border's maintenance requires removing every fading leaf immediately after bloom, reconsider the placement before expanding it. The leaf phase is part of growing the bulb, not an optional untidy interval.
Allow summer rest and assess the next cycle
After the foliage has senesced, reduce the extra irrigation directed at the camassia group. The Washington account describes summer dormancy requiring no follow-up watering, and the RHS trial keeps its dormant bed dry. These statements describe a seasonal change, not a demand to shield an ordinary border from every shower. Keep the bulbs out of a persistently wet summer irrigation pocket while managing nearby plants according to their own needs.
Leave a successful colony in place. RHS notes that camassias increase when undisturbed and are poor long-term candidates for repeatedly repotted containers. If the group eventually becomes too crowded or must be moved, plan that work for dormancy and retain the original labels. A permanent border is the primary method here. Pots can hold bulbs when unavoidable circumstances interrupt planting, but they should not quietly become the long-term substitute for the site you intended.
If a group returns weakly, compare its light, drainage, planting record and previous leaf treatment before buying more bulbs. Missing bulbs accompanied by disturbed soil suggest a different investigation from healthy leaves with few flowers. A persistently saturated patch calls for a site correction; leaves cut early call for a change in maintenance. Record these distinct observations through one full growing cycle. Expand a group once its seasonal needs fit the border and its flowering performance has been observed. That first season provides a useful basis for the next purchase.
Steps
- Level
- moderate
- Time
- About one to two hours for a small prepared border group, plus observation through the first growing season
- Tools
- Garden fork and hand trowel, Ruler or marked planting tool, Short canes for bulb positions, Weatherproof labels and a camera
- Materials
- Named nursery-grown Camassia leichtlinii bulbs, A suitable prepared border with spring moisture, Mature garden compost if broad soil improvement is needed
- 1Match the bulb order to a real border opening
Confirm the Camassia species, cultivar and expected height on the order. Mark a location with adequate spring light, accessible soil and room for the later leaf footprint. Compare the spot after rain with adjacent ground, then select only the area that can be prepared while its clay is workable.
- 2Prepare the group before unpacking outdoors
Clear the small planting area of weeds and map neighboring crowns. Work from the path where possible. If the soil smears or holds water around the intended planting depth, leave the bulbs in their short-term cool, ventilated holding place and revisit the site when conditions improve.
- 3Inspect and position the named lot
Keep firm bulbs together under their original label and set damaged material aside. Lay out the intended centers using canes; for the worked group, use roughly 15–20cm between centers. Check the arrangement from the viewing path and shift any position that would cut through an established perennial crown.
- 4Set and record the actual depth
Measure a representative bulb, interpret the supplier’s instruction and mark the chosen base-to-surface depth on a tool. Place each bulb nose upward, preserve roots and backfill gently. For the illustrative 5cm bulb in a 15cm hole, the base is 15cm below finished soil and about 10cm of soil covers its tip. Check the smallest and largest bulbs separately so an unusually sized bulb is not assigned the example depth automatically.
- 5Finish the surface and preserve the map
Restore the border level, check for unexpected settling and water only as the initial soil condition requires. Put a durable label beside the group and photograph the positions against a permanent edge. Note any temporary animal cover and its planned removal before emerging shoots become obstructed.
- 6Follow the leaves into summer dormancy
Keep the active spring root zone adequately moist, leave foliage attached after bloom, and keep later planting tools outside the recorded bulb footprint. Reduce additional watering after dieback. Note missing shoots, premature cutting or a repeatedly wet pocket separately so that the next autumn decision addresses the actual cause.
Related reading
Sources
- Camassia. Royal Horticultural Society. Source record · Accessed 2026-10-13.
- Camassia (quamash) trial 2024–2026. Royal Horticultural Society. Source record · Accessed 2026-10-13.
- Bulbs: planting. Royal Horticultural Society. Source record · Accessed 2026-10-13.
- Clay soils. Royal Horticultural Society. Source record · Accessed 2026-10-13.
- Great camas: Camassia leichtlinii ssp. suksdorfii. USDA Natural Resources Conservation Service. Source record · Accessed 2026-10-13.
- Camassia leichtlinii (Bak.) S. Wats.. University of Washington plant propagation protocols. Source record · Accessed 2026-10-13.
- Camassias. Piedmont Master Gardeners. Source record · Accessed 2026-10-13.