Grow · spring bulb foliage aftercare
Care for Spring-Flowering Bulb Foliage From Last Bloom to Dormancy
Remove spent flowers selectively, keep spring-bulb leaves working in light, water by soil condition and wait for real yellowing before the dormant-season cleanup.
Published Last updated
In this guide
- Confirm which underground plant you are tending
- Separate the flower's job from the leaf's job
- Read the foliage stage, not a countdown
- Keep active leaves supplied without keeping bulbs wet
- Deadhead selectively and preserve exceptions
- Make fading leaves part of the border
- Remove finished foliage without losing the map
- Use next spring's return as the aftercare test
- Steps
Confirm which underground plant you are tending
This routine is for hardy spring-flowering bulbs and corms that finish their display while leaves remain above ground: familiar daffodils, tulips, hyacinths, crocuses and many smaller bulbs. Garden speech often calls every underground storage organ a bulb, but bearded iris rhizomes and spring perennials with fleshy roots may need different division, moisture and cleanup decisions. Identify the plant before applying one post-bloom rule across the bed.
Decide whether the planting is intended to return for future years. A perennialized daffodil drift needs its leaves to rebuild the bulb, while a one-season forced display may have another destination after flowering. Even then, moving or discarding the pot is a separate decision from cutting green leaves. State the aim first so a tidy-up does not quietly contradict the reason the bulbs were planted.
Keep cultivar and regional performance in view. Some tulips are managed as seasonal display plants because their repeat performance is unreliable in a particular climate or garden, while daffodils and many small bulbs may persist readily in a compatible site. No foliage technique can supply winter chill, summer drainage or cultivar longevity that the bulb lacks. Good aftercare preserves the potential already present; it does not guarantee identical bloom every year.
Mark the bulb clumps while foliage is visible. Use discreet labels or a plan showing species, cultivar, flower color and the boundary of each group. That record prevents accidental digging during summer dormancy and lets you connect next spring's return with this year's leaf condition. It also distinguishes a small bulb whose leaves fade quickly from a larger tulip or daffodil that naturally remains visible for several more weeks.
Separate the flower's job from the leaf's job
After petals fall, the flower stalk and the leaves are no longer doing the same work. Where seed is not wanted, remove the faded flower or developing pod with its stalk according to the species guidance. Leave the green leaves attached. Deadheading a true bulb will not create another spring flower immediately; it limits seed production while the remaining foliage continues supporting the underground storage organ.
The leaves still intercept light and make carbohydrates through photosynthesis. Illinois and Minnesota Extension both connect that post-bloom leaf period with stored energy and future flowering. Cutting or mowing while leaves remain green shortens the productive period. The result may not appear until a later season, when bulbs return smaller, flower less strongly or fail to persist. Preserve function even when the color display has ended.
Do not remove all green tissue with a long cut-flower stem. When harvesting tulips or daffodils for indoor use, retain substantial leaves on the plant. The exact number and stem length depend on species, bulb size and production aim, so avoid a universal formula. A short flower stem with the leaf fan intact gives a perennial bulb a better route than stripping the entire above-ground shoot for one vase.
Seed can be an intentional exception. Species bulbs or a naturalizing project may be allowed to mature seed when genetic variation and a long establishment period are acceptable. Keep the decision explicit and species-specific. Seedlings may take years to flower and named cultivars generally will not reproduce identically from seed. Retaining one seed head does not require keeping every pod in a formal display.
Read the foliage stage, not a countdown
Use the leaf itself as the primary cleanup signal. Immediately after flowering, a healthy leaf is green, upright or arching, and firmly attached. As dormancy approaches, green drains away, tissue becomes yellow and straw-like, and leaves collapse or release with little resistance. Remove foliage only when it has reached that final nonfunctional condition, rather than when neighboring perennials make the bed look untidy.
A period around six weeks after bloom appears in institutional guidance for familiar hardy bulbs, but it is an observation window rather than permission to cut on a fixed date. Small bulbs may finish sooner; large leaves may remain green longer; cool weather, moisture, shade and species alter the pace. The safe rule is cumulative: enough time has passed and the leaf has yellowed and withered naturally.
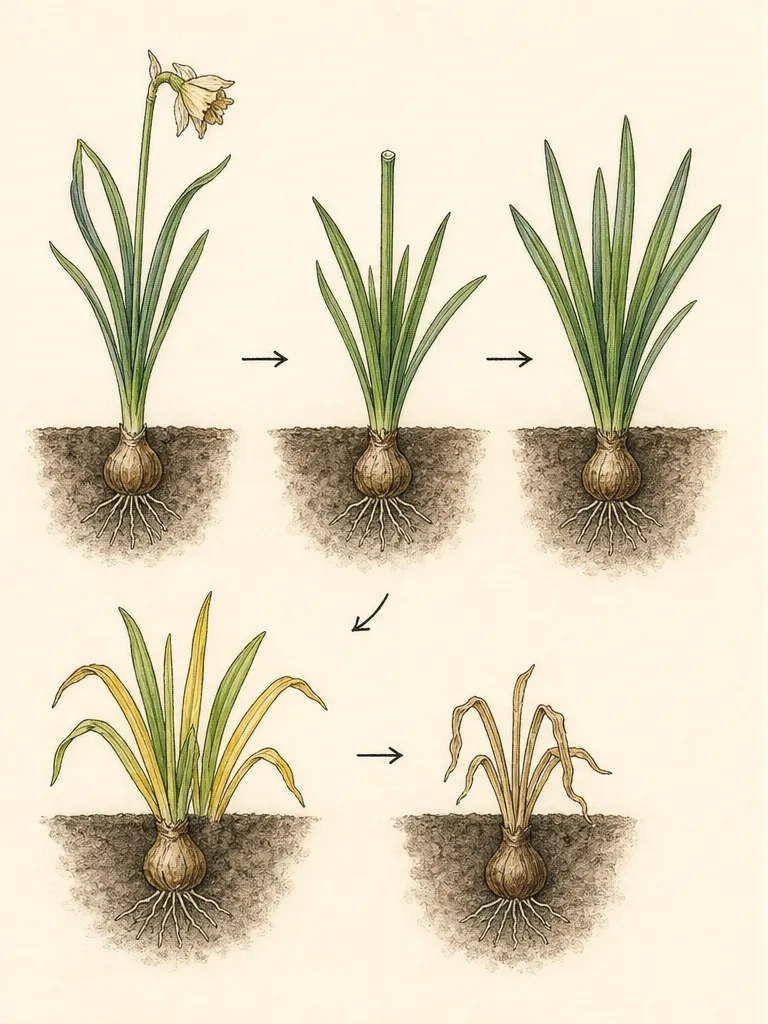
Distinguish senescence from injury. Natural dormancy usually advances broadly through a clump, with leaves losing color and substance over time. A sharply spotted leaf, a distorted stripe, sudden collapse at the base or one isolated plant dying while neighbors remain green may signal physical damage, poor drainage or disease. Do not call abnormal decline readiness. Photograph the pattern and seek local diagnosis before moving suspect bulbs through the garden.
Avoid tying, knotting or braiding leaves to make them disappear. RHS guidance specifically warns against this treatment because bundled foliage receives less useful light and can remain damp in a dense mass. Let leaves spread naturally. If they fall across a path, guide them gently behind a low support or protect the clump with a visible edge; do not crease, bind or trim the working blades.
Keep active leaves supplied without keeping bulbs wet
Check soil while leaves remain green. Active bulbs need enough moisture to support foliage, but the bed should still drain and the interval should follow rainfall, soil and species. RHS guidance continues watering through active growth and reduces it as foliage dies. That sequence is not an instruction to water an already moist spring bed. Probe below mulch and water when the occupied soil is dry enough to need it.
Apply water to the soil rather than flattening leaves with a forceful spray. Let it penetrate to bulb depth, then allow drainage. A shallow sprinkle can wet the surface without reaching roots, while repeated saturation raises rot risk. In containers, check drainage holes and lift inner pots from decorative covers before watering. Confined bulbs can be wet below even when the top looks dry, so inspect more than the crust.
Feeding recommendations vary with soil, bulb, container status and local practice. Where a bulb fertilizer or high-potassium liquid feed is recommended, follow its label and the timing supplied by the regional source; stop as foliage begins to die. Do not add fertilizer to force yellow leaves back to green or apply a generic bloom product because this year's flowers have ended. A soil test and plant record should govern uncertain in-ground fertility.
As dormancy becomes visible, reduce water rather than maintaining the spring pattern into a dry-rest period. The exact transition differs among bulbs and climates. Some beds receive summer rain naturally, while certain tulips perform poorly in wet summer soil. Keep drainage open, stop automatic irrigation from treating the dormant bulb zone like an actively growing annual bed, and use species guidance where summer dryness is important.
Deadhead selectively and preserve exceptions
Trace the spent flower stalk to its base without gathering the leaves into your hand. Snip or break the faded flower and developing seed structure according to the plant's anatomy, leaving green blades uninjured. With daffodils, the leaf fan and the flower stem are easy to confuse in a crowded clump; follow the stem upward first. A cut made by identity is safer than shearing everything to one height.
Leave ornamental allium heads or other persistent structures where they contribute deliberate form and seed production is acceptable. The choice belongs to the species and garden purpose. A retained head must not become a reason to keep diseased foliage, and a formal front edge may still justify removing an unattractive pod. Write which groups are seed keepers so a later cleanup does not reverse the plan inconsistently.
Separate cut material at the bed. Sound faded flowers may follow the local compost route, while suspicious spotted or rotting tissue should be handled according to local sanitation advice. Clean tools after cutting diseased material and before moving to a healthy clump. Avoid carrying wet debris over open leaves, because damage and contamination introduced during tidying can outlast the brief visual improvement.
Do not pull flower stalks while the base resists. A clean cut avoids disturbing the bulb or tearing adjacent leaves. Later, fully dry foliage may release easily, but even then support the soil with one hand and stop if the bulb lifts. The aim is to remove a finished top without loosening roots or exposing the storage organ before its dormant-season plan is clear.
Make fading leaves part of the border
The most effective solution to fading foliage begins at planting. Place bulbs among perennials whose spring leaves expand as the flowers finish, while preserving enough early light for the bulbs. Emerging hostas, daylilies and other site-suitable foliage plants are common examples in Extension guidance, but the partner must match the bed's light, soil and moisture. Use the role, not a copied plant list, when conditions differ.
Keep companions beside the bulb clump rather than directly over the same crown. A vigorous perennial can hide leaves and also compete, shade them too early or make the bulbs impossible to reach. Draw mature footprints on the plan and leave a narrow service gap. The screen should redirect the view while every bulb leaf remains open to light and the gardener can still check soil and remove the finished top.
Use repeated drifts rather than isolated leaves at the front edge. A broad bulb group behind a low perennial reads as a seasonal layer; scattered single tulips through an exposed path edge can look accidental once each develops a yellow strap. Where bulbs already occupy the wrong position, mark the clump now and move it only at the species-appropriate time after foliage has finished.
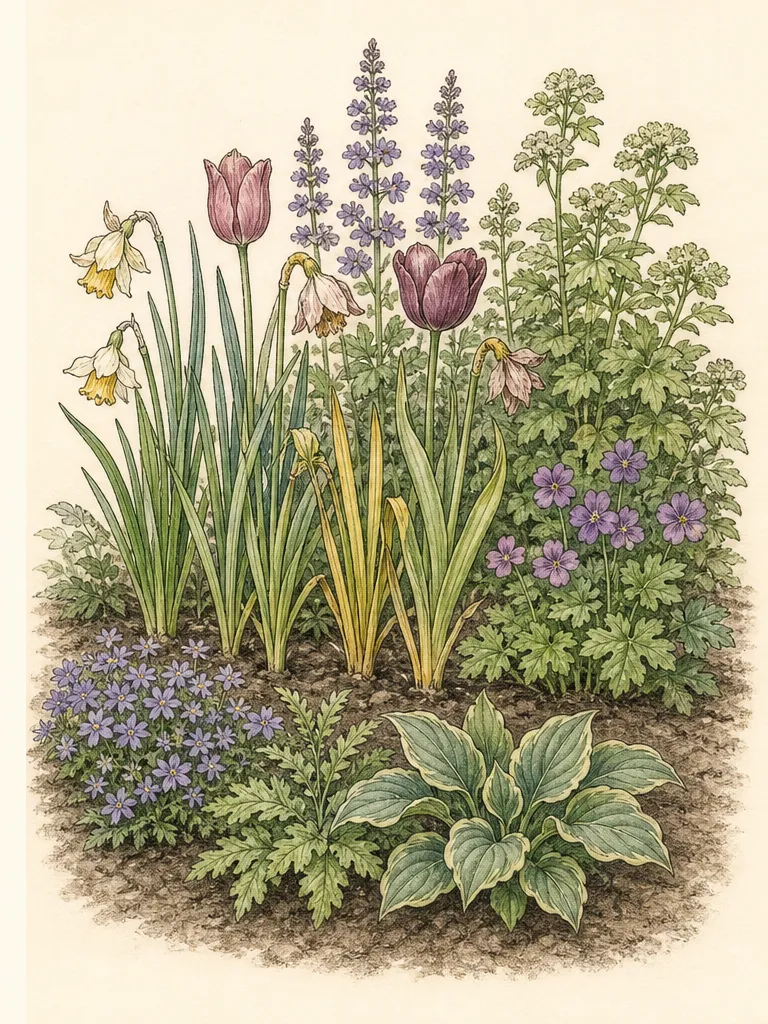
Temporary supports can keep long daffodil leaves out of circulation. Use a low unobtrusive hoop or a few twiggy branches that hold the foliage in its natural arc without compressing it. Preserve the path width and do not push leaves beneath dense neighboring growth. The support's job ends at dormancy; remove it with the dry foliage so it does not become a hidden obstacle during summer work.
Let mulch remain a soil surface, not a disguise piled onto leaf bases. Pull displaced material away from crowns and keep labels visible. Deep fresh mulch over fading foliage can trap moisture, obscure abnormal collapse and alter planting depth. If the bed needs mulching, wait until clump locations are mapped and apply a suitable layer around, not through, the visible emergence points.
Remove finished foliage without losing the map
When leaves are fully yellow, straw-like and no longer firmly productive, cut them near the soil surface with clean shears or lift away material that releases without force. Work one labeled clump at a time. Do not pull a resistant bundle, because bulbs and roots can rise with it. The finished bed should show intact soil, a visible marker and no wet mat covering the dormant position.
Update the plan before the location disappears. Mark clumps that flowered well, groups that produced only leaves, and places where foliage was repeatedly trampled or shaded. Photograph the bed from fixed points and include permanent features in the frame. This dormant map prevents summer digging through bulbs and gives the autumn planting plan evidence beyond a memory of the spring display.
Leave sound bulbs in place when the species, site and design support naturalizing. Dig only for a stated reason: crowding, declining bloom, a drainage problem, planned relocation or a bulb that requires dry summer storage in the local climate. Minnesota guidance places ordinary lifting after leaves have yellowed and withered. Handle named groups separately and label them before soil obscures their identity.
If bulbs are lifted, reject soft, damaged or diseased material and follow species-specific storage or immediate replanting guidance. A universal paper bag in a hot garage is not safe for every bulb. Some are best moved in active growth, some dry-rest well and some lose viability when stored poorly. The exact plant identity and regional source determine the route after the foliage stage is complete.
Use next spring's return as the aftercare test
Poor flowering next year should reopen the whole site record. Early leaf removal is one possible cause, but increasing shade, crowding, shallow or deep planting, wet summer soil, weak cultivar persistence and inadequate winter conditions can create the same result. Compare this year's foliage duration and condition with the mapped exposure and bulb history before buying fertilizer or replacing every bulb.
Leaves without flowers still deserve a season of diagnosis. Confirm whether the bulb is immature, recently divided or shaded after trees leaf out. Check planting depth and drainage at the appropriate lifting time, not by excavating an active clump in frustration. Preserve healthy foliage during the investigation because cutting it again repeats one potential cause while concealing the others.
A successful cycle has distinct stages: flower, green leaf, gradual yellowing, clean dormancy and a protected underground position. The border can change around those stages without forcing them to happen early. When companion plants, labels and access are planned together, the unattractive interval becomes a readable transition rather than a maintenance emergency.
Keep the final rule narrow and reliable. Remove a spent flower when seed is not part of the plan. Keep healthy green leaves open to light and supplied according to soil conditions. Reduce water as genuine senescence advances. Clear only the fully finished top, preserve the map and let the next emergence show whether plant, site and aftercare remained aligned.
Steps
- Level
- easy
- Time
- Short weekly checks from petal fall until natural yellowing; cleanup takes one focused session
- Tools
- Clean hand snips, Narrow soil probe, Low foliage hoop if path clearance is needed, Camera or garden map
- Materials
- Weather-resistant bulb labels, Separate container for suspect plant debris, Species-specific bulb fertilizer only where locally recommended
- 1Identify the bulb group and its return plan
Confirm the species or cultivar, distinguish true bulbs and corms from rhizomes or fleshy-rooted perennials, and decide whether the display is meant to perennialize. Mark each clump while leaves remain visible. Record any regional limitation, such as unreliable tulip return or a need for summer drainage, before applying a general cleanup rule.
- 2Remove only the finished flower
Where seed is not wanted, trace the faded flower stalk to its base and remove the flower or developing pod without gathering or cutting leaves. Retain seed heads only for a stated design or propagation purpose. When cutting flowers for a vase, keep the harvest stem short enough to leave substantial green foliage on the bulb.
- 3Keep leaves open, green and readable
Leave foliage untied, unbraided and exposed to useful light. Protect long leaves from paths with a low loose support rather than a knot. Compare broad gradual yellowing with isolated spotting, distortion or basal collapse; treat an abnormal pattern as a diagnostic question, not as permission to clear the whole clump.
- 4Water by active growth and soil condition
Probe below the surface and water the occupied soil only when it is dry enough to need it. Apply water to the root zone, allow drainage and avoid repeated shallow sprinkling. Reduce the spring pattern as foliage genuinely senesces. Follow local and product guidance for any feeding, and stop rather than trying to fertilize yellowing leaves back into growth.
- 5Screen the transition without smothering it
Use site-suitable emerging perennials beside bulb groups to redirect the view while preserving light, air and a narrow service route. Keep mulch and companion crowns off the bulb emergence points. Mark clumps that need relocation and wait until the species-appropriate stage instead of digging through active green foliage.
- 6Wait for complete natural yellowing
Use elapsed time only as a reminder to look. Proceed when leaves are yellow, straw-like and no longer functional, not merely because a common six-week interval has passed. Small and large bulbs, weather and region change the pace. Support the soil and cut near grade or lift only material that releases without pulling bulbs upward.
- 7Map dormancy and review the return
Photograph and label the dormant location, remove wet mats and note flowering strength, crowding, shade and drainage. Lift only for a stated reason and follow exact storage or replanting guidance for that bulb. Next spring, compare emergence and bloom with the record before assigning weak return to foliage removal alone.
Related reading

Sources
- Caring for Spring-Blooming Bulbs After Flowering. University of Illinois Extension. Source record · Accessed 2026-08-19.
- Planting Bulbs, Tubers and Rhizomes. University of Minnesota Extension. Source record · Accessed 2026-08-19.
- How to Grow Bulbs. Royal Horticultural Society. Source record · Accessed 2026-08-19.