Grow · balled burlapped shrub planting
Plant a Balled-and-Burlapped Shrub at the Root Flare
Keep the soil ball intact while finding the true root flare, setting the shrub on firm soil, and removing twine, synthetic fabric, burlap, and obstructive basket sections safely.
Published Last updated
In this guide
- Confirm that the site and shrub belong together
- Locate the true flare before measuring the hole
- Handle the shrub by the soil ball
- Expose the flare before measuring the hole
- Dig a wide hole with a firm center
- Set the intact ball and verify grade
- Remove wrapping only after the ball is stable
- Backfill without reburying the root flare
- Mulch and water as two visible root zones
- Inspect the planting before the hole disappears
- Steps
Confirm that the site and shrub belong together
Choose the planting site from the shrub's exact species or cultivar needs, mature spread, hardiness, light, drainage, and soil reaction. Balled-and-burlapped stock is heavy and arrives with a reduced root system inside a field soil ball, so site correction after delivery is difficult. Mark utilities and obtain required permissions before digging. If the mature shrub would block an entrance, foundation vent, meter, sight line, or path, change the site before handling the ball.
Inspect the stock while it is still supported. The ball should be firm enough to move as one unit, the trunk or stems should not wobble independently inside it, and the wrapping should still protect the soil from crumbling. Reject a badly broken, dry, loose, or undersized ball and a shrub with serious stem injury. Do not accept hidden defects merely because foliage currently looks full.
Identify how the ball is assembled. Look for natural or synthetic burlap, nylon or natural twine, straps, nails, a wire basket, plastic film, or an outer pot used for transport. Do not assume brown fabric is biodegradable. Plan the cutting tools and disposal route before the shrub is in the hole, and arrange competent help or mechanical lifting for any load that cannot be controlled safely by hand.
Locate the true flare before measuring the hole
Judge planting depth from the shrub's actual root flare, not the top of its wrapped field-soil ball. Keep that ball supported while lowering and clearing the upper root zone. After backfilling, check moisture inside the original ball and in adjacent soil separately. Settlement or a hidden flare requires correction before mulch disguises the final grade.
Handle the shrub by the soil ball
Support and lift the shrub from beneath the ball, never by the trunk, branches, twine, or basket rim. The wrapping is packaging for root-soil contact, not a carrying handle. Keep the ball shaded, upright, and evenly moist before planting without leaving it standing in water. A cracked ball can tear fine roots and create internal gaps that are impossible to repair by tightening the outer twine.
Move the shrub on equipment rated for the load and protect paving, steps, slopes, and people along the route. Keep hands and feet away from pinch points when rolling or lowering. Do not improvise with a trunk as a lever. If the ball must be repositioned in the hole, lift or slide from beneath it with appropriate equipment rather than pushing the top growth and breaking the root-soil connection.
Keep the structural wrapping intact during transport and initial lowering. Extra plastic film, an outer marketing pot, or loose straps that are not holding the ball may be removed when safe, but the burlap, twine, and basket that maintain the soil mass stay until the root ball is set. This sequence preserves stability while still allowing the obstructive material to be removed before backfilling.
Expose the flare before measuring the hole
Untie only enough material at the top to inspect the stem base while the ball remains fully supported. Gently remove nursery soil from around the trunk or principal stems until the widening root flare and upper structural roots are visible. Balled stock can be harvested with extra soil over these roots, so the apparent top of the wrapped ball is not reliable planting depth.
Distinguish the flare from a graft union, swollen stem base, adventitious roots in the added surface soil, or a cluster of fine roots. Probe carefully outward from the stem to find substantial lateral roots without scraping bark. If identification is uncertain, pause and ask the nursery, an Extension service, or a qualified arborist. Planting deeply to avoid making this decision can leave bark and upper roots below grade.
For the executable protocol in this article, use Colorado State University's landscape-tree-and-shrub guidance, which excludes roses: probe 3–4 inches out from the stem and expose at least two structural roots in the top 1–2 inches of the corrected ball; on fibrous-rooted stock, expose the top root within the upper inch. Measure from the firm ball bottom to that corrected root level, then dig 1–2 inches shallower so the corrected upper root level finishes 1–2 inches above grade. This scope does not make the same numbers universal for roses, bare-root stock, containers, or specifications governed by another authority.
Dig a wide hole with a firm center
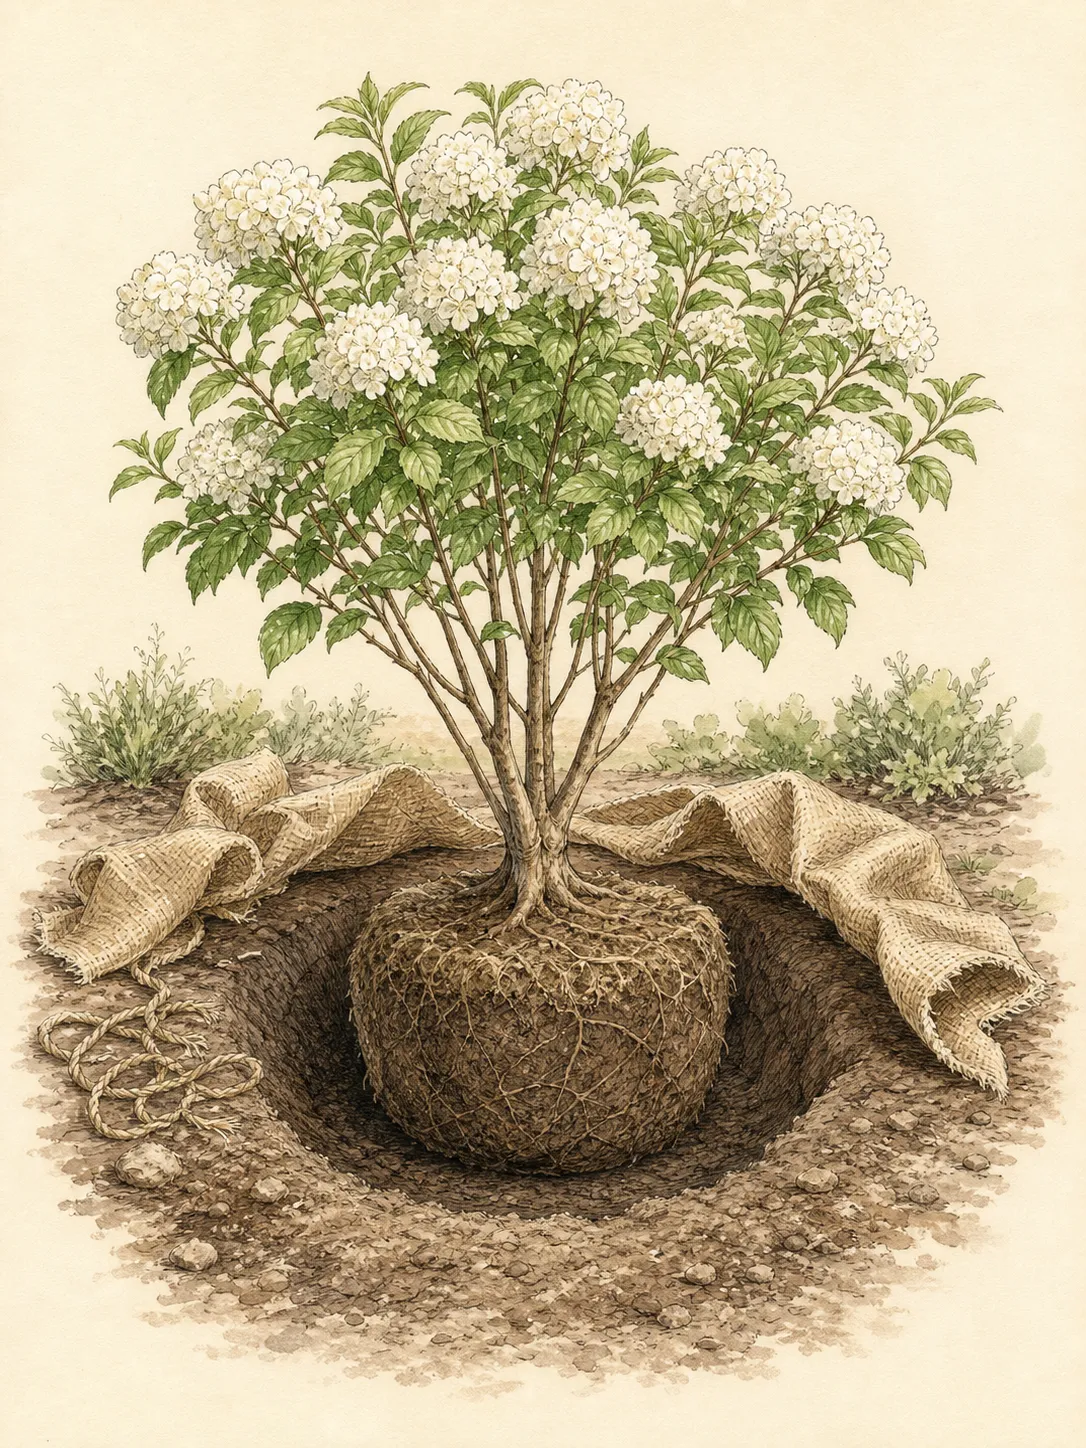
Under the adopted Colorado State protocol, make a saucer-shaped hole three times the root-ball diameter and 1–2 inches shallower than the corrected ball measurement. A 24-inch ball therefore receives a 72-inch-wide surface opening. Leave the central bearing area firm and undisturbed. If the hole is accidentally too deep, replace and compact suitable excavated soil before the shrub is lowered; a soft pedestal can settle under the ball and bury the flare after the work appears finished.
Roughen glazed sides where digging has polished compacted soil, but do not create a bathtub in poorly drained ground. Fill the empty hole with water only when a regional infiltration test specifically calls for it and time and interpret it as directed. Persistent saturation, buried construction debris, or water moving toward a foundation requires a site solution or another planting position, not a richer backfill mix.
Keep excavated soil separate from sod, rubble, and subsoil that should not return around roots. The default backfill is the site's usable excavated soil, which creates a continuous transition beyond the ball. Broad soil improvement may be justified by testing and local guidance, but a highly amended pocket can hold or shed water differently from both the field soil ball and surrounding ground. In wet soil, Colorado State raises roughly one-third of the corrected ball above grade and tapers soil to it; treat that as a scoped response to a wet but otherwise suitable site, not permission to bury the flare, install in standing water, or mound against stems.
Set the intact ball and verify grade
Lower the intact ball onto the firm center, orient the shrub for its best structural and garden relationship, and check the flare against a straight board laid across the surrounding grade. View multi-stemmed plants from several directions. If the shrub is too low or tilted, lift the ball back out and correct the base; do not pull on stems or wedge loose soil under one edge while the full weight remains in place.
Confirm that water will move away from stems without leaving the upper root ball perched and exposed. On a slope, the flare still relates to the local finished grade, while the backfill tapers into existing ground. Do not place excavated soil on top of the ball to hide a high setting. Soil over the root flare recreates the same burial that was corrected at the nursery surface.
Stabilize the lower part of the ball with a shallow ring of firm backfill while keeping upper sides open for wrapping removal. The shrub should remain upright without using the trunk as a brace. This small amount of support is not final backfill; it prevents the ball from rotating while cutters and hands work around the upper basket, burlap, and ties.
Remove wrapping only after the ball is stable
Remove every tie, rope, strap, and loop from around the trunk or stems. Cut rather than tug when pulling could disturb the ball. Remove synthetic fabric, plastic, and nylon because they should not be expected to decompose. Open and cut away burlap from the top so the root flare, upper roots, and root-ball surface remain exposed and no fabric can wick moisture above grade.
Cut away obstructive wire and wrapping from the upper and accessible sides while the ball stays supported. Never leave a basket rim, twine, or burlap collar against living stems or across the upper roots. Use bolt cutters and hand tools from a stable position, turn sharp wire ends away from the root ball and gardener, and remove nails or fasteners that could remain near the trunk or surface.
The retained institutions differ beyond the shared rule to stabilize the ball and clear stems and upper roots. University of Minnesota Extension directs peeling burlap back from the sides and allows material directly beneath the ball to remain. The Morton Arboretum says to remove as much burlap and wire as possible, with a documented exception for a low-profile basket. Colorado State directs removal from at least the upper 12 inches or upper two-thirds of the ball, whichever is greater, and does not accept wrapping left along the sides within its landscape-tree-and-shrub scope.
This article adopts the Colorado State protocol so the reader has one executable sequence: once the ball is set and held by a shallow stabilizing ring, remove all trunk and stem ties and every synthetic covering, then cut natural burlap and basket wire from the upper 12 inches or upper two-thirds of the ball, whichever removes more, including the sides in that zone. Turn cut wire down and away, and remove fasteners. If the ball begins to fracture before that zone is clear, stop backfilling and obtain direction from the supplier or responsible local professional rather than quietly switching protocols.
Do not fold intact burlap upward against the ball or leave material exposed above soil. If lower natural fabric remains under an intact ball under accepted local practice, it must not form a surface wick or collar. Photograph the cleared upper ball before backfilling. The image provides a useful record of flare location and confirms that hidden ties were not simply buried.
Backfill without reburying the root flare
Return usable excavated soil around the ball in lifts, breaking only large clods that prevent contact. Work soil gently into voids without pounding wet ground or compacting the whole root zone. Keep the shrub vertical and keep checking the flare. Stop the backfill at the corrected root-ball surface; do not cover the top with soil, compost, or leftover sod to make the grade look level.
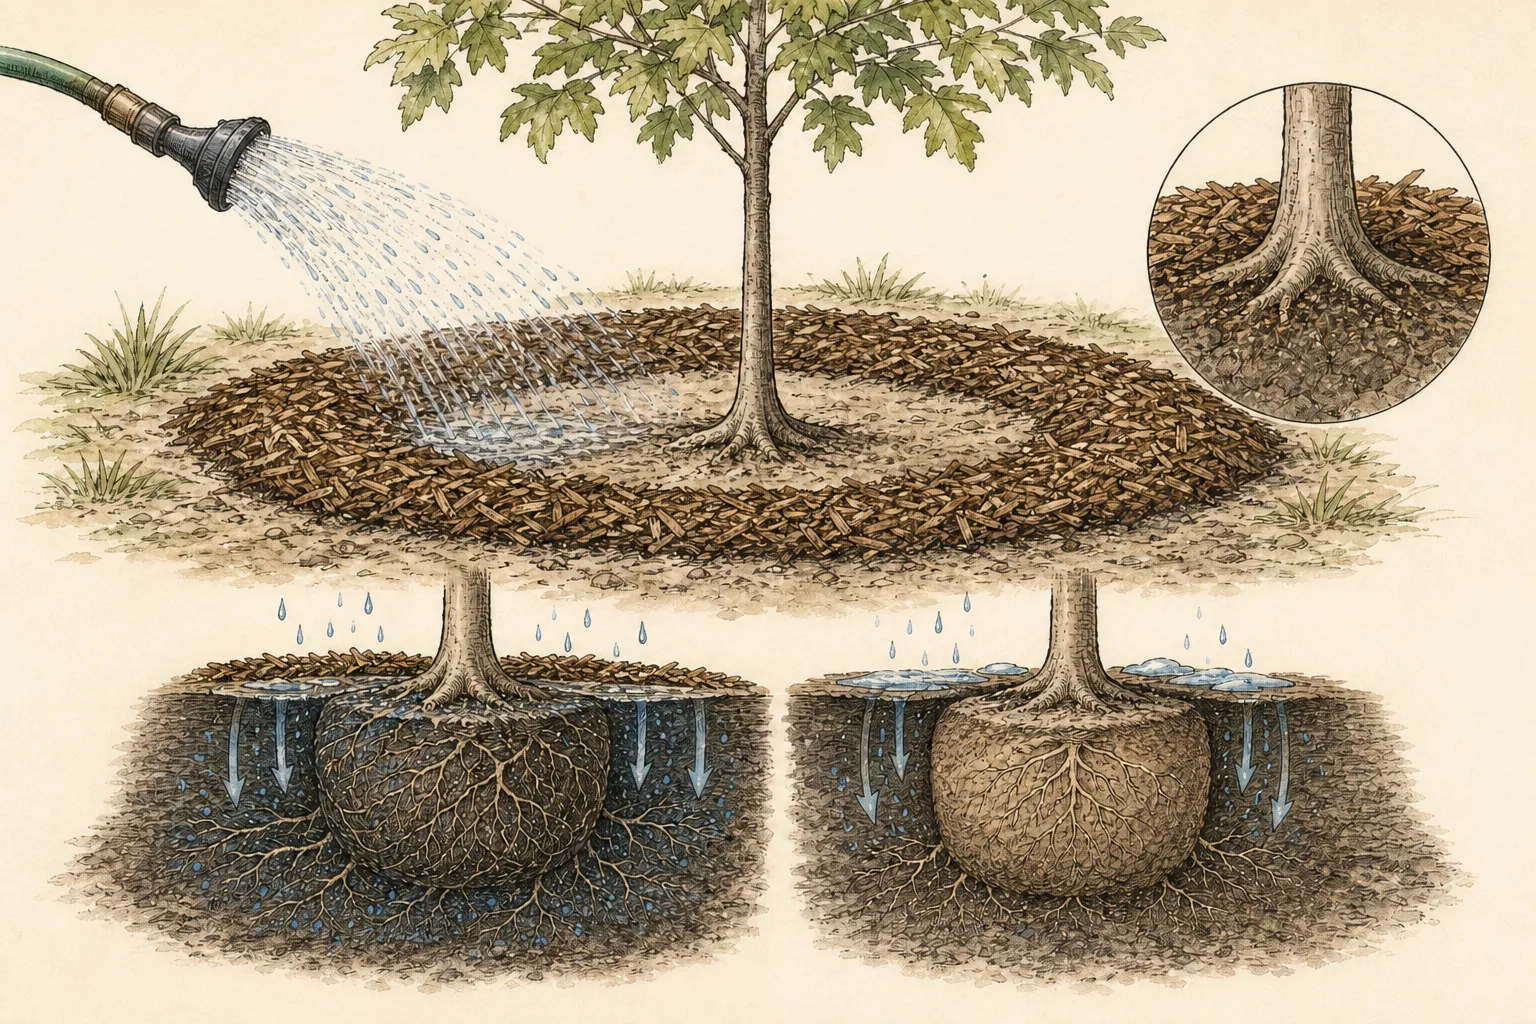
Water during or immediately after backfilling so soil settles against the ball and obvious air pockets can be corrected. Use a slow application that wets the field soil ball as well as surrounding backfill without washing fine soil away or creating a slurry. If water ponds persistently, stop and reassess drainage. More water is not a repair for an impermeable planting basin.
Do not add fertilizer to the hole unless a soil test and plant-specific regional recommendation call for it. New roots need contact with suitable surrounding soil and consistent moisture, not a concentrated product against cut or reduced roots. Prune only clearly broken or damaged branches at planting; routine top reduction does not replace the roots lost when field stock was dug.
Mulch and water as two visible root zones
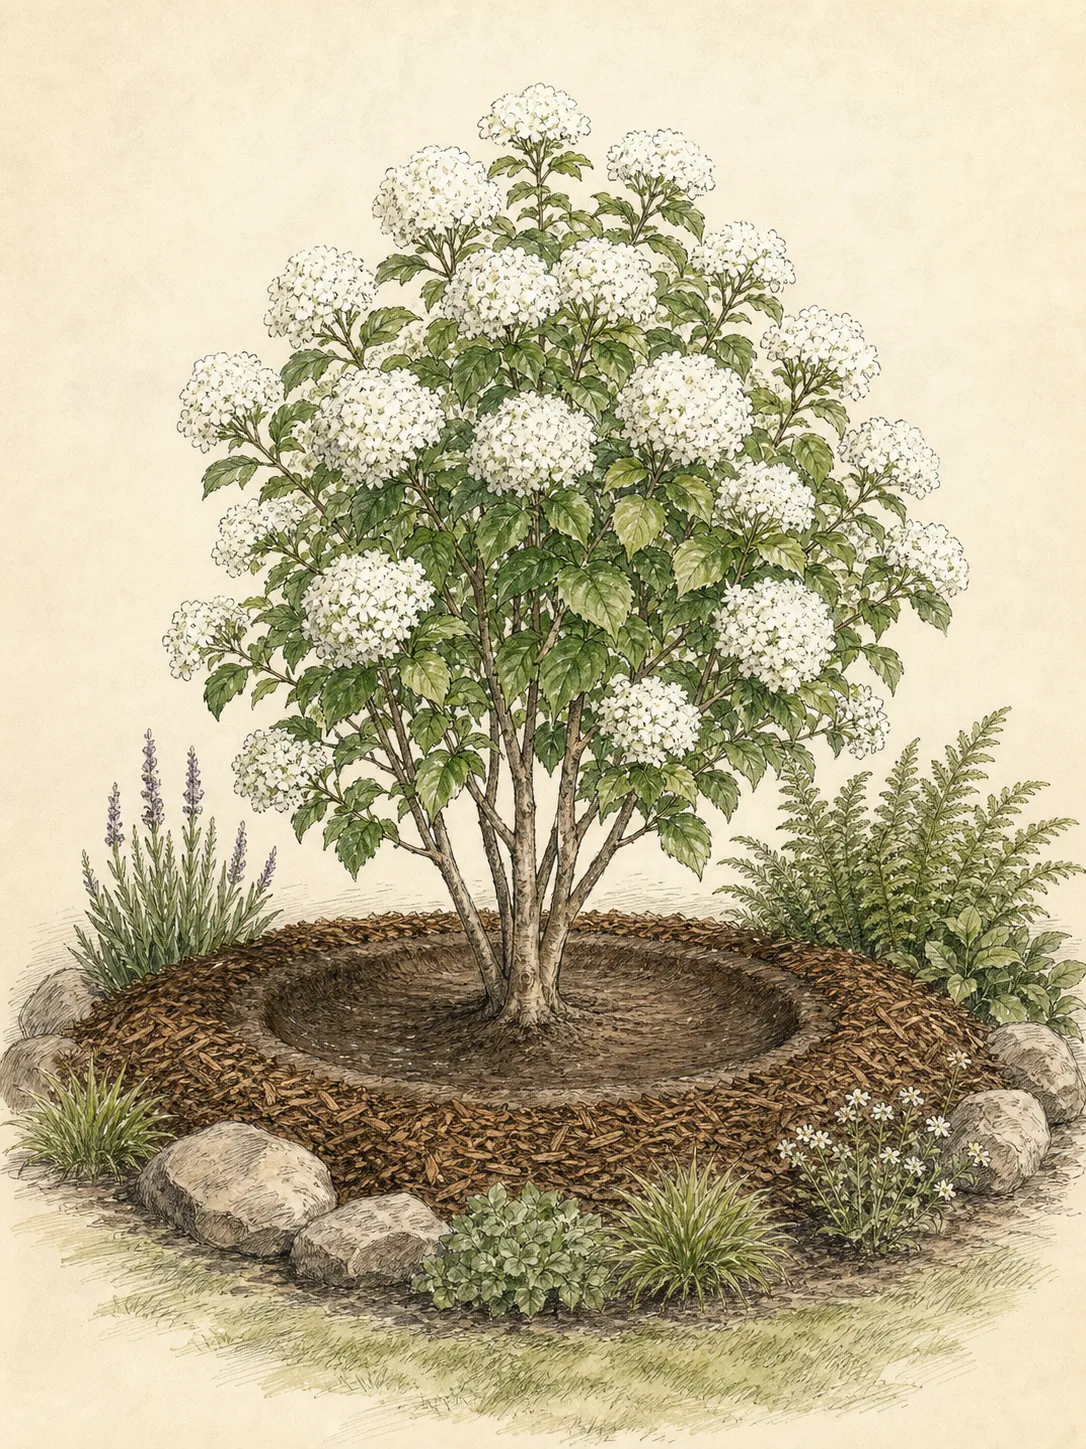
Apply a conservative organic mulch over the planting area and slightly beyond it, keeping the root flare and stems clear. Taper the material to nothing at living bark and do not use a mound to conceal the raised top of the ball. The visible flare is a permanent reference for grade, mulch movement, and future inspection; preserve it every time the bed is refreshed.
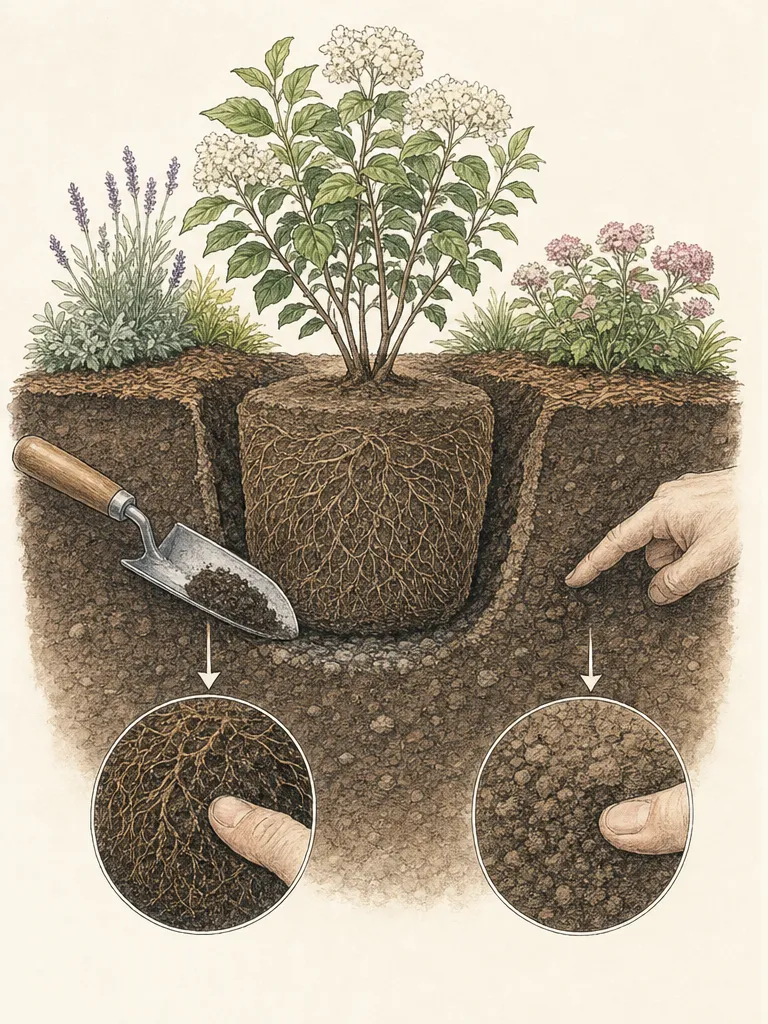
Check moisture inside the original field-soil ball and again in the surrounding soil. The two textures can dry at different rates even when the surface looks uniform. Water when those checks and plant-specific guidance indicate need, applying slowly across the ball and immediate root zone. Do not set an unchanging schedule from a national volume; weather, ball size, soil, drainage, and shrub demand control the interval.
Use temporary staking only if the properly set and stabilized shrub cannot remain upright in the actual site, and follow a regional method that keeps ties off bark and can be removed on time. Shrubs commonly do not need staking. A moving trunk within a firm ball, a rotating ball, or settling grade calls for diagnosis of stock or planting stability, not tighter guying that hides the fault.
Inspect the planting before the hole disappears
Before cleanup, confirm the exact shrub identity, flare elevation, vertical alignment, cleared stem collars, removed synthetic material, cut basket edges below the working surface, backfill contact, drainage, and mulch setback. Photograph the whole plant and the root zone. Store the nursery label and note ball type, planting date, and any lower material retained under local guidance.
Recheck after the first thorough watering and after the soil has settled. A newly buried flare, leaning crown, exposed sharp wire, dry center of the ball, or standing water needs prompt correction while the planting area remains accessible. Watch leaves and stems, but use root-zone moisture and grade as primary evidence; wilt can accompany both dryness and impaired roots in saturated soil.
Continue establishment checks through weather changes and extend care according to plant size, species, site, and regional guidance. Keep grass, edging tools, and deep cultivation away from the expanding root zone. The planting is successful when the flare remains visible, stems are free of packaging, the ball remains stable, roots can move into surrounding soil, and watering decisions become less frequent only as evidence supports them.
Steps
- Level
- moderate
- Time
- One site-preparation and planting session, with additional time and equipment for a heavy root ball
- Tools
- Measuring tape and straight board, Spade and shovel suited to the site, Narrow probe or screwdriver for locating upper roots, Heavy-duty scissors or utility knife, Bolt cutters sized for the wire basket, Work gloves and eye protection, Rated cart, dolly, straps, or mechanical lifting equipment as required
- Materials
- Site-compatible balled-and-burlapped ornamental shrub, Usable excavated soil, Water, Appropriate organic mulch, Plant label and planting record
- 1Verify the plant, site, and root ball
Confirm exact plant identity, mature fit, light, drainage, soil needs, utilities, and access. Inspect that the field-soil ball is firm and moist, the stems do not wobble within it, and the wrapping can be identified. Reject a broken or unstable ball and arrange lifting equipment appropriate to the actual weight.
- 2Find the true flare
Within the adopted Colorado State scope for landscape trees and shrubs other than roses, probe 3–4 inches out from the stem and remove excess nursery soil until at least two structural roots lie in the top 1–2 inches of the corrected ball; for fibrous-rooted stock, expose the top root in the upper inch. Measure from the firm ball bottom to that corrected root level.
- 3Prepare a wide, firm-bottomed hole
Dig a saucer-shaped opening three times the ball diameter and 1–2 inches shallower than the corrected measurement; for a 24-inch ball, make the surface opening 72 inches wide. Leave the central bearing soil firm. Correct an overdeep hole with compacted suitable soil, and stop if drainage, rubble, or utilities make the site unsuitable.
- 4Lower and stabilize the intact ball
Lift beneath the root ball, set it on the firm center, and verify that the corrected upper root level is 1–2 inches above finished grade. In wet but otherwise suitable soil, the adopted protocol places roughly one-third of the ball above grade and tapers soil to it without covering the flare. Correct a low or tilted ball, then add only a shallow stabilizing ring before cutting wrapping.
- 5Clear the upper root zone
After stabilization, remove every stem tie and all synthetic material. Under the adopted Colorado State protocol, cut natural burlap and basket wire from the upper 12 inches or upper two-thirds of the ball, whichever is greater, including the sides in that zone; turn wire ends down and remove fasteners. Stop and seek project-specific direction if the ball starts to fracture.
- 6Backfill to the root-ball surface
Return usable excavated soil around the ball, settle it gently, and keep checking flare height and alignment. Do not place soil or compost over the root ball. Water slowly to join the ball and surrounding soil, correct visible voids, and stop if persistent ponding reveals a drainage problem.
- 7Mulch with the flare visible
Spread a conservative mulch layer across the planting area while tapering it completely away from stems and the root flare. Do not use mulch to hide grade or retained wrapping. Record the planting and photograph the visible flare and cleared upper ball for later comparison.
- 8Check both soil zones during establishment
Sample moisture within the original field-soil ball and in adjacent backfill before watering. Adjust to weather, drainage, plant size, and regional guidance rather than a fixed national schedule. Recheck settling, alignment, sharp wire, stem clearance, and flare visibility after the first watering and throughout establishment.
Plants in this guide
Related reading

Sources
- Planting and Transplanting Trees and Shrubs. University of Minnesota Extension. Source record · Accessed 2026-08-19.
- The Science of Planting Trees. Colorado State University Extension. Source record · Accessed 2026-08-19.
- How to Plant Trees and Shrubs. The Morton Arboretum. Source record · Accessed 2026-08-19.