Grow · tuberous begonia autumn dormancy storage
Overwinter Tuberous Begonias from Pots as Autumn Leaves Yellow
Move potted tuberous begonias through autumn yellowing, gentle curing and cool winter storage, with clear limits for other begonia types.
Published Last updated
In this guide
- Start with yellowing leaves and a frost-free destination
- Confirm that the plant makes a storage tuber
- Reduce irrigation without confusing drought with dormancy
- Bring the container in before frost closes the window
- Release the root ball without pulling on the crown
- Let the stem attachment dry before cleaning
- Pack only after curing is complete
- Measure the shelf where the box will stay
- Check condition through winter, then plan the spring start
- Steps
Start with yellowing leaves and a frost-free destination
A potted tuberous begonia can be saved as a dormant tuber once its autumn foliage declines. Reduce watering as leaves yellow, move the container under frost-free protection, and let the remaining stems dry before cleaning and packing the tuber. For the method here, the final store should hold 40–50°F, approximately 4–10°C. A summer watering routine and a warm living-room display are no longer the aim once dormancy is underway.
This is a method for established, tuber-forming summer begonias, especially the familiar Begonia × tuberhybrida garden hybrids. It begins with a living pot or hanging basket and ends with whole tubers in labeled winter storage. A late-September check is useful in temperate Northern Hemisphere gardens, but leaf condition and the forecast determine the actual work date. A green basket in a mild coastal garden and a yellowing pot facing an early inland frost need different immediate attention.
If your pot still carries healthy foliage, use the time to identify it and prepare shelter. If it is already declining, check that the root zone is draining and organize its move. If frost is forecast, bring the pot into protection even when some leaves remain green. There is no advantage to leaving a movable container outside just to make its calendar resemble the lifting date for plants growing in a bed.
Confirm that the plant makes a storage tuber
Find the nursery label, receipt or spring planting photograph. A plant started from a flattened brown tuber has a much clearer storage history than an unnamed flowering gift. The word begonia on its own is insufficient. Fibrous-rooted wax begonias, cane types and foliage begonias cannot all be stripped and boxed using the same routine. If the identity is uncertain, keep the plant frost-free while the supplier or a knowledgeable local grower identifies the group.
The Royal Horticultural Society separates tuberous garden hybrids from semperflorens bedding begonias and hardy begonias. That distinction also prevents a misleading shortcut: the presence of a hanging basket does not prove the plant is a conventional large-tubered hybrid. Some trailing selections have smaller first-season tubers. Save the exact cultivar name when available, particularly if you bought a basket already in flower and never saw what was beneath it.
Check the contents of a mixed container before taking it apart. Draw a quick plan showing which stem group belongs to the begonia and which belongs to a companion. Separate labels now while leaves are recognizable. One pot can contain several independent begonia tubers, and several stems can also arise from a single tuber. Count storage pieces after lifting; counting stems beforehand can produce an entirely wrong inventory.
Reduce irrigation without confusing drought with dormancy
Minnesota Extension describes reducing water and ending fertilizer in late summer as preparation for the dormant season. Its end-of-August timing is regional guidance, not a date that every climate must copy. RHS uses natural leaf yellowing as the cue to reduce watering. Together these support an autumn transition guided by the plant, with fertilizer stopped as growth winds down and irrigation reduced as demand falls.
Look below the surface of the pot before giving more water. A pot sheltered beneath an eave may receive no rain, while a basket at the roof edge may collect runoff. Moving the two into the same holding area does not make their starting moisture equal. Empty an outer container or saucer if it holds water, and keep the nursery pot's drainage openings clear. Record which plants arrived wet so their drying progress can be judged fairly.
A suddenly limp green plant in dry compost has not necessarily begun its autumn rest. Likewise, one yellow leaf is not enough reason to put an actively growing basket into a dark box. Observe the broader change in the foliage and the condition of the tuber when it becomes accessible. Soft or decaying tissue belongs in a separate assessment, not in a healthy storage batch merely because its leaves are also yellow.
Bring the container in before frost closes the window
Reserve a sheltered position with room for the entire pot, including trailing stems. Lower hanging baskets onto a stable surface before handling them. Carry a pot by its container, supporting the base, and remove hooks or ties that obstruct the work. A shallow tray beneath it catches fallen leaves and loose compost while keeping the cultivar label with the plant. That tray is a work aid, not a reservoir for runoff.
The sources describe different frost boundaries. RHS advises lifting tuberous begonias before frost; Iowa State describes digging within a few days after a killing frost. Minnesota allows yellowing foliage or the first killing frost as lifting cues. These are workable regional pathways, but they do not require a potted specimen to be deliberately frosted. For a movable collection, use the protective option and finish senescence under cover.
If a frost has already struck the leaves, act promptly and inspect the recovered material. Blackened tops alone do not tell you whether the tuber froze, and a forecast air temperature does not measure the temperature inside the pot. Keep uncertain specimens away from the sound collection during assessment. Do not promise recovery from the appearance of the remaining stem; the storage organ's condition matters.
For a practical September 26 sorting session, assign each pot to one of three places: sheltered leafy plants still declining, lifted material undergoing drying, or cleaned tubers ready for packing. Keep these places physically distinct. The arrangement prevents someone tidying the greenhouse from watering a curing tray or putting an unfinished tuber into the winter box alongside dry stock.
Release the root ball without pulling on the crown
When the foliage is declining and you are ready to cure the tuber, slide the root ball out over the work tray. Support it with your hand and loosen the container if it sticks. A flexible nursery pot can be eased away from the root mass; a rigid pot may require working around its inside edge. Pulling on the old stems transfers force directly to the part you are trying to preserve.
Let loose compost fall away and expose enough of the tuber to understand its outline. There is no need to remove every dry root or soil crumb immediately. The first inspection is for an intact storage organ and obvious damage. Keep associated labels beside each lifted piece, then transfer them together to the drying tray. Deal with one cultivar at a time when several pots look alike.
For the Minnesota route followed here, shorten the remaining stems to about 5 inches, roughly 13 cm. Cut the stems above the tuber while supporting the plant. Iowa's alternative leaves a shorter 1-inch stub, so a longer stump is not a universal biological requirement. The important next step is drying before final removal; neither source directs you to cut a fresh socket into the upper surface of the tuber.
Let the stem attachment dry before cleaning
Place the lifted tubers in an open tray indoors, out of direct sun. Minnesota uses room-temperature curing until the stem remnants become dry and loose. Iowa gives a two-to-three-week curing period in a cool, dry place. Treat those as different descriptions of the drying stage, with actual stem release more useful than an appointment to finish every batch on the same afternoon.
Test a drying stem gently while supporting the tuber. A resistant attachment needs more time; a dry loose remnant can be removed without gouging the crown. The comparison drawing makes this distinction visible. It is an enlarged explanation of attachment and release, not a size standard or proof that every tuber will develop the same outline. The upper hollow and dry stem scar can be irregular.
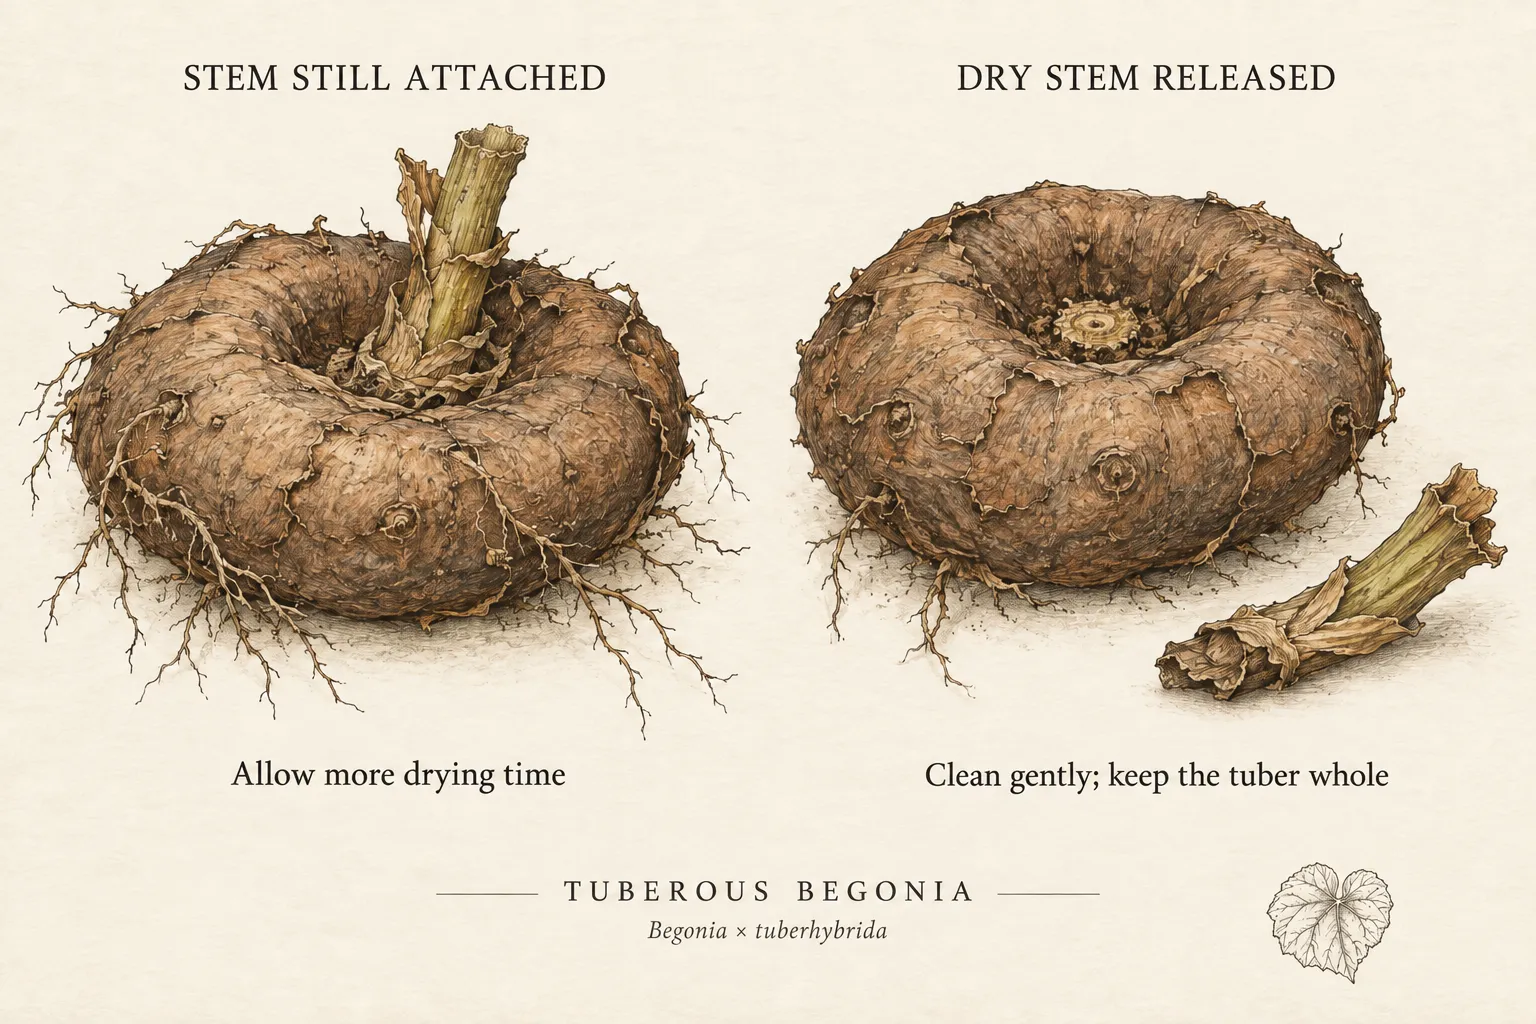
After the stems release, remove loose roots and remaining soil gently. Minnesota explicitly advises against washing the tubers. Keep this cleanup dry, using fingers or a soft brush where needed. Leave sound tissue intact even when it looks less tidy than a newly purchased tuber. A clean specimen is one you can inspect and pack without damp debris, not one polished until every natural surface mark disappears.
Autumn storage is also a poor moment to improvise division. Keep these tubers whole. Minnesota cautions that cutting them into pieces can lead to diseased or rotten sections, and RHS places division after shoots appear during active growth. A large irregular tuber does not need to be made round, and an apparent lobe is not automatically a separate plant. Reserve propagation decisions for an appropriate growing stage.
Pack only after curing is complete
Choose a small cardboard box and clean vermiculite for the Iowa packing method. Put packing below the tubers, arrange the sound pieces, then cover them with more material. Prepare a separate box for each named cultivar or use clearly labeled groups that can be retrieved without confusion. The box should be easy to open for inspection; a deep mixed pile defeats that purpose even if the outside label looks orderly.
RHS describes a different storage system using barely moist peat-free soil or sand, with occasional moisture to prevent shriveling. That does not mean a box should be watered like a summer pot. For the vermiculite method here, begin with cured tubers and inspect their condition during storage. If shriveling develops, review temperature and packing conditions and seek advice appropriate to the storage system before repeatedly wetting the crown.
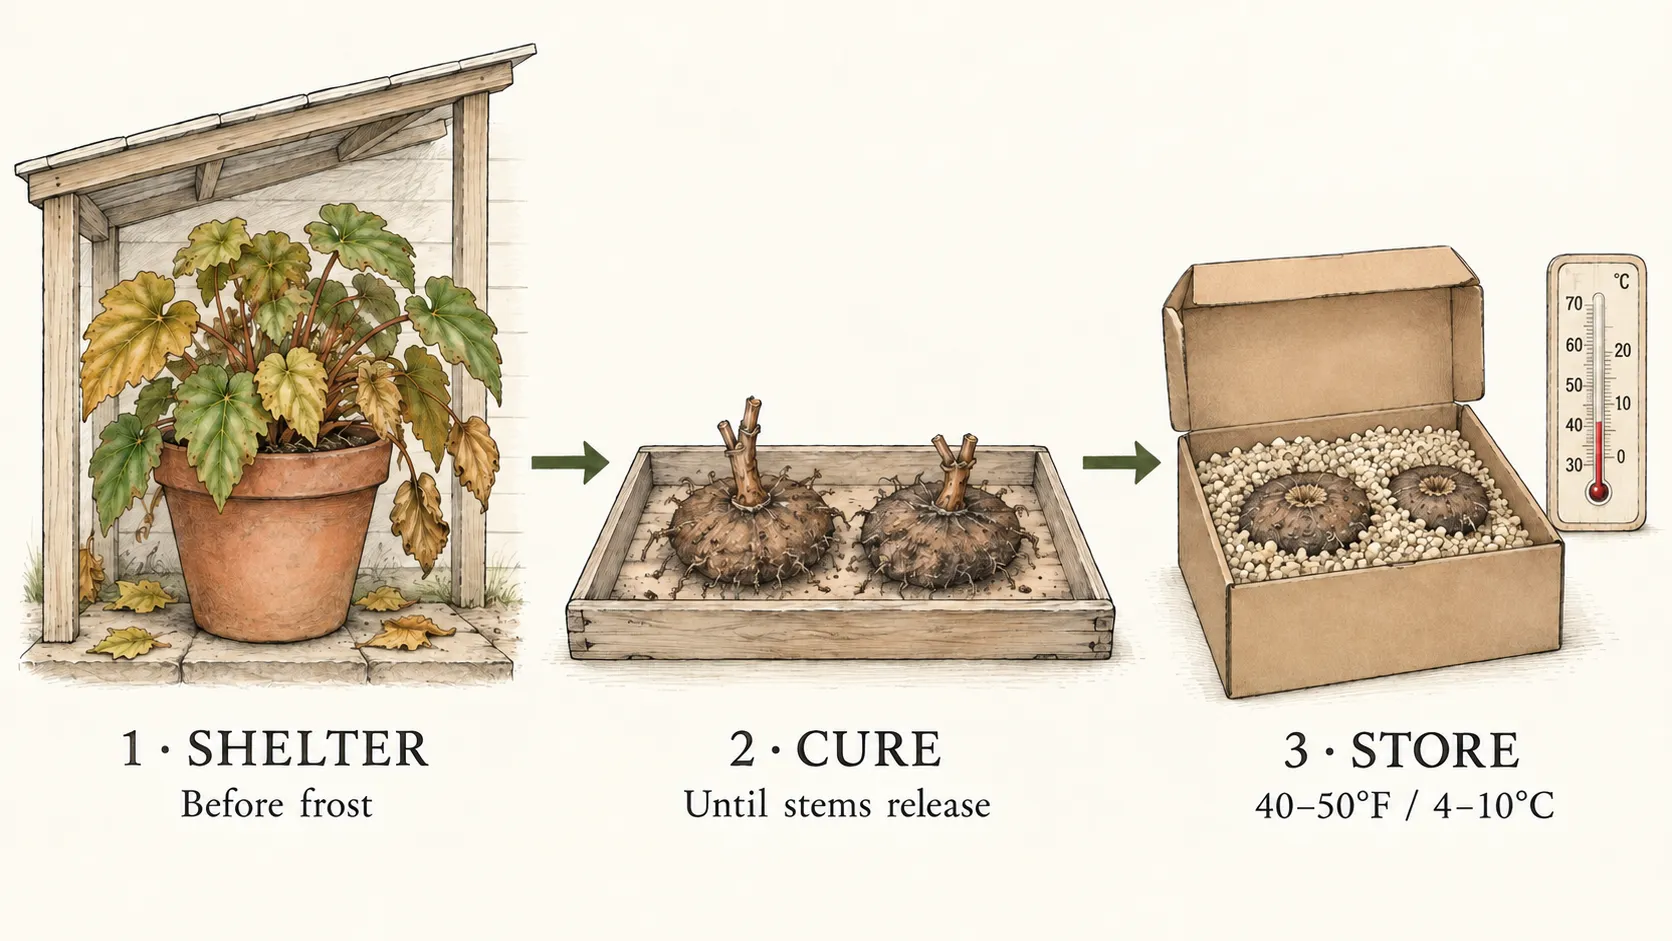
The sequence figure shows the box open during packing, before the final covering layer is added. Its arrows mark changes in the work: the leafy pot first needs shelter, the lifted tuber needs open drying, and the cleaned tuber enters the cool store. A roof over a garden pot does not by itself provide a measured winter temperature. Each stage needs its own suitable place.
Measure the shelf where the box will stay
Both Iowa State and Minnesota specify 40–50°F for stored tuberous begonias; the RHS ideal of 45°F sits within that range. Put a minimum–maximum thermometer beside the planned box location and read it across day and night changes. A basement may be too warm, and an unheated shed may freeze. The room's name is less useful than the readings at the shelf holding the tubers.
Check access as carefully as temperature. A box behind heavy holiday decorations is unlikely to be inspected, and one pushed against a damp exterior wall can be difficult to retrieve without spilling its contents. Choose a shelf you can reach with both hands. Keep its label facing outward and reserve enough clearance to remove the lid without tipping another collection onto the floor.
Write the cultivar, lifting date and packing date on the box. If several pieces are stored together, add a small sketch of their positions or use individual labels in the packing. The date matters when one group entered curing much later than another. It also makes it possible to connect a spring failure with the correct autumn batch instead of treating all the begonias as one undifferentiated lot.
Check condition through winter, then plan the spring start
Open the box occasionally to examine firmness and look for rot or withering, as Minnesota advises. Remove unsound tubers from the saved collection. Compare the tubers with their condition at packing and check the material beneath them as well as the visible tops. A photograph taken when the box was filled is useful here: old dry scars can look alarming when there is no record of their earlier appearance.
When several tubers change together, inspect the shelf temperature and packing before altering each specimen separately. Note whether the affected pieces share one box, one cultivar or one side of the storage area. This observation does not diagnose a pathogen, but it gives a local adviser something concrete to work with. Keep visibly soft material separate and do not return it to the main box while waiting for an answer.
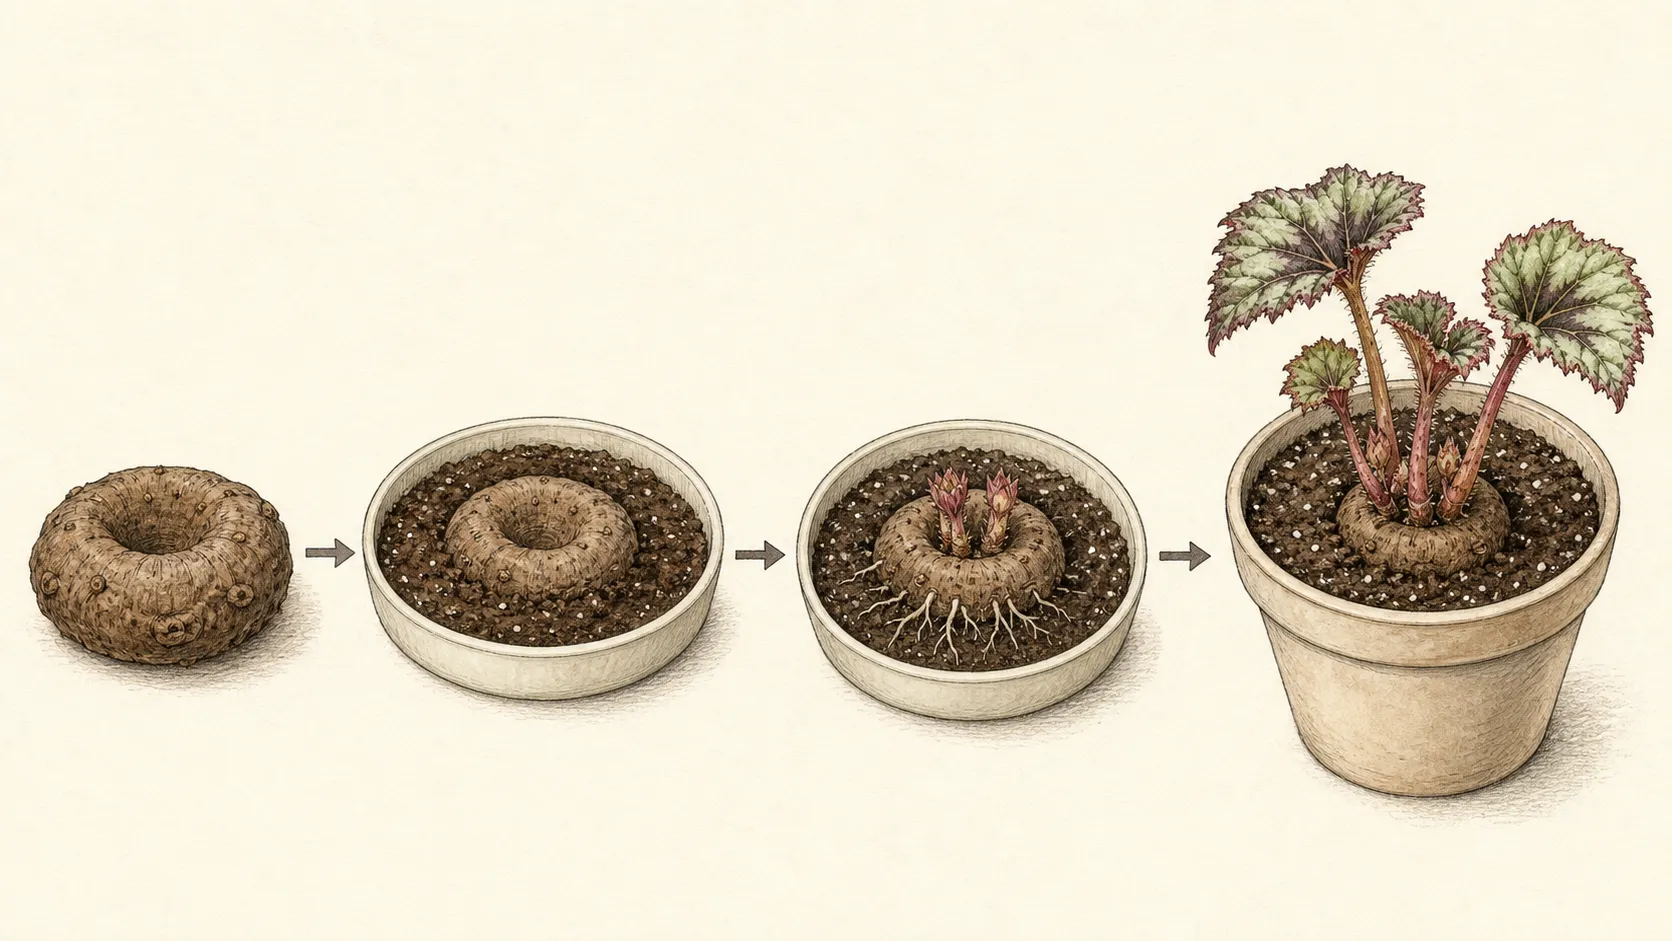
Before the regional spring starting period, reconcile the remaining tubers with your pots and indoor growing space. The separate spring-starting guide takes over at that point, covering orientation, warming and early irrigation. Autumn storage does not guarantee the next display: intact tubers, a suitable winter environment and competent spring growth all matter. Keep the cultivar labels through that transition so this year's best basket can be recognized again.
Steps
- Level
- moderate
- Time
- About 30 minutes per small collection, plus drying and periodic winter checks
- Tools
- Pruning shears, Shallow drying tray, Minimum–maximum thermometer, Soft brush
- Materials
- Established potted tuberous begonias, Small cardboard storage boxes, Vermiculite, Durable cultivar labels
- 1Sort the pots by identity and stage
Retrieve the cultivar labels before clearing the summer display. Separate confirmed tuberous begonias from wax, cane and unidentified types. Put a label beside every plant group in a mixed container, and choose a frost-free holding place for leafy pots. Take a photograph showing which group belongs to which label before moving trailing stems.
- 2Prepare the holding and drying spaces
Check the forecast, lower hanging baskets to a stable surface and carry pots by their bases. Empty standing water from saucers or decorative containers. Reserve an open drying tray separately from the area holding still-leafy plants, so routine greenhouse watering cannot soak material that has already been lifted for curing. Keep each receiving tray within reach of the pot being emptied.
- 3Lift and shorten the remaining stems
Ease the declining plant from its container over a tray, supporting the root ball instead of pulling the stems. Let loose compost fall away, identify the whole tuber and put obvious damage aside. Following the Minnesota route, shorten the stems to about 5 inches above the tuber and place each labeled specimen in its drying space.
- 4Wait for release and clean dry
Leave the material indoors out of direct sun until the remaining stems are dry and loose. Support the tuber while removing a freely releasing stem. Brush away loose soil and roots without washing or cutting the storage organ. Keep a stubborn attachment on its tray for further drying, with its label still beside it.
- 5Pack and record the finished batch
Lay sound cured tubers over vermiculite in a small cardboard box, then cover them with additional packing. Mark cultivar and lifting and packing dates on the box. Place it at the measured 40–50°F storage location. Leave enough access to open the box, inspect the contents and retrieve an individual piece without unloading the entire shelf.
- 6Inspect and allocate spring space
During winter checks, compare each tuber with its packing condition and remove unsound material. Record losses against the correct cultivar and inspect the thermometer before changing the storage arrangement. As spring approaches, count the sound survivors and reserve the pots and growing space they will need when the warming and starting stage begins.
Related reading
Sources
- How do I overwinter tuberous begonias?. Iowa State University Extension and Outreach. Source record · Accessed 2026-09-12.
- Begonias: outdoors. Royal Horticultural Society. Source record · Accessed 2026-09-12.
- Tuberous begonias. University of Minnesota Extension. Source record · Accessed 2026-09-12.