Grow · start tuberous begonias indoors
Start Tuberous Begonias Indoors Without Rotting the Tubers
Wake tuberous begonias in shallow, warm, lightly moist mix, then pot them on only after roots and shoots show steady growth.
Published Last updated
In this guide
- Use the biological cue for tuberous begonias
- Read the site and the whole plant together
- Set a visible finish line before beginning
- Prepare the work while every part is still identifiable
- Carry out the central operation in a controlled sequence
- Protect roots, crowns, and new growth after the work
- Diagnose a weak response before adding another treatment
- Leave a record for the next seasonal decision
- Steps
Use the biological cue for tuberous begonias
Begin about eight to twelve weeks before the safe outdoor planting window, using local frost dates and indoor light capacity rather than a fixed national date. A firm concave tuber with visible pink growth points is ready for the warm tray; a sound but completely dormant tuber can remain dry a little longer. Confirm that bright indirect light and separate pot space will be available when shoots reach about 1 inch. Starting too early under poor light exchanges storage convenience for brittle, elongated growth.
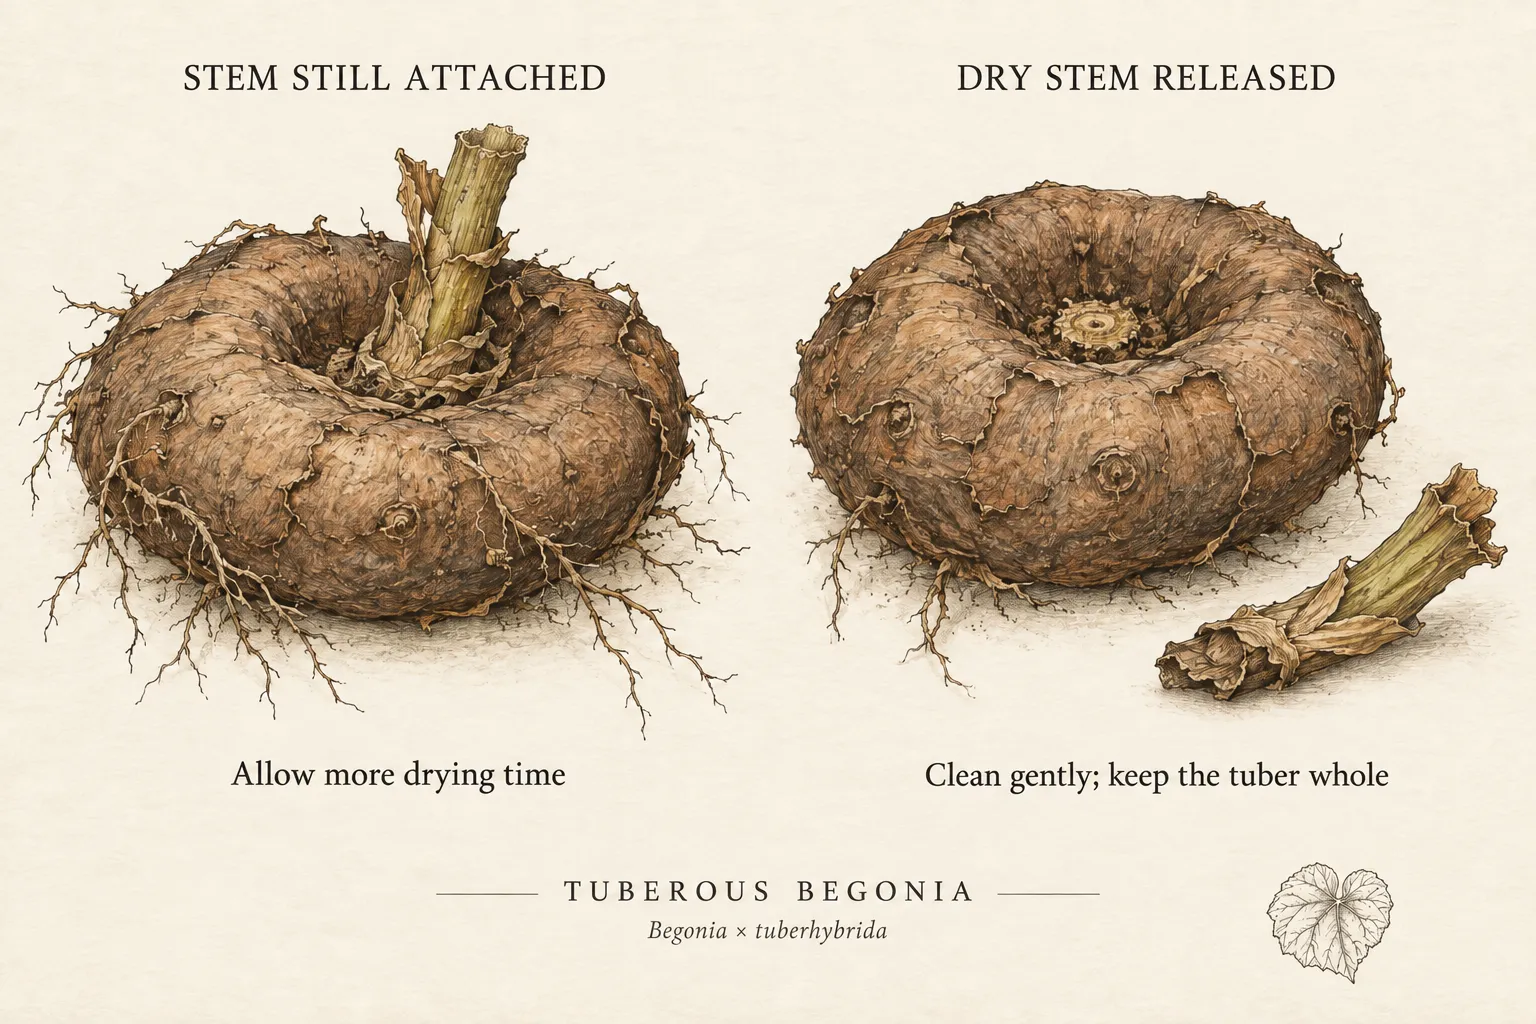
A sound tuber feels firm, carries its old stem scar on the concave upper face, and develops buds near that depression while roots emerge from the rounded lower surface. Handle each tuber separately and inspect the rim, hollow, and rounded underside, where a soft lesion may otherwise go unnoticed. Sort firm budding stock, firm inactive stock, and suspect stock onto labeled dry trays. The condition shared by several tubers can inform storage review, but one leaking piece is a poor basis for watering the rest.
Deep burial, saturated mix, and repeated watering before roots are active are the main avoidable causes of loss. Warning signs include water lingering in the hollow, mix staying dark and heavy, or a lesion expanding from the crown. Start the clearest tuber first if orientation or storage quality is uncertain and observe whether roots form near 70°F. Hold the remaining stock dry when the tray cannot drain or the room cannot supply steady warmth.
Cool coastal springs delay outdoor transition, while warm regions may treat tuberous begonias as a cool-season display protected from intense summer heat. Place indoor starting relative to the local frost-safe, warm-soil window and the likely onset of summer heat. The labeled habit also matters because trailing basket plants and upright large-flowered cultivars are managed differently after sprouting. Use regional guidance to adjust the interval, then let root formation and shoot quality decide when each tuber moves on.
Read the site and the whole plant together
A warm bright indoor position with air movement is useful, but direct heat from a radiator and a cold wet windowsill create opposite stresses. Compare morning and afternoon temperatures at tray height, and check whether the shelf remains level after watering. Leave clearance above the future shoots and a route wide enough to lift the tray without striking brittle stems. The final outdoor holding area should offer shade and wind protection for a gradual two-week transition.
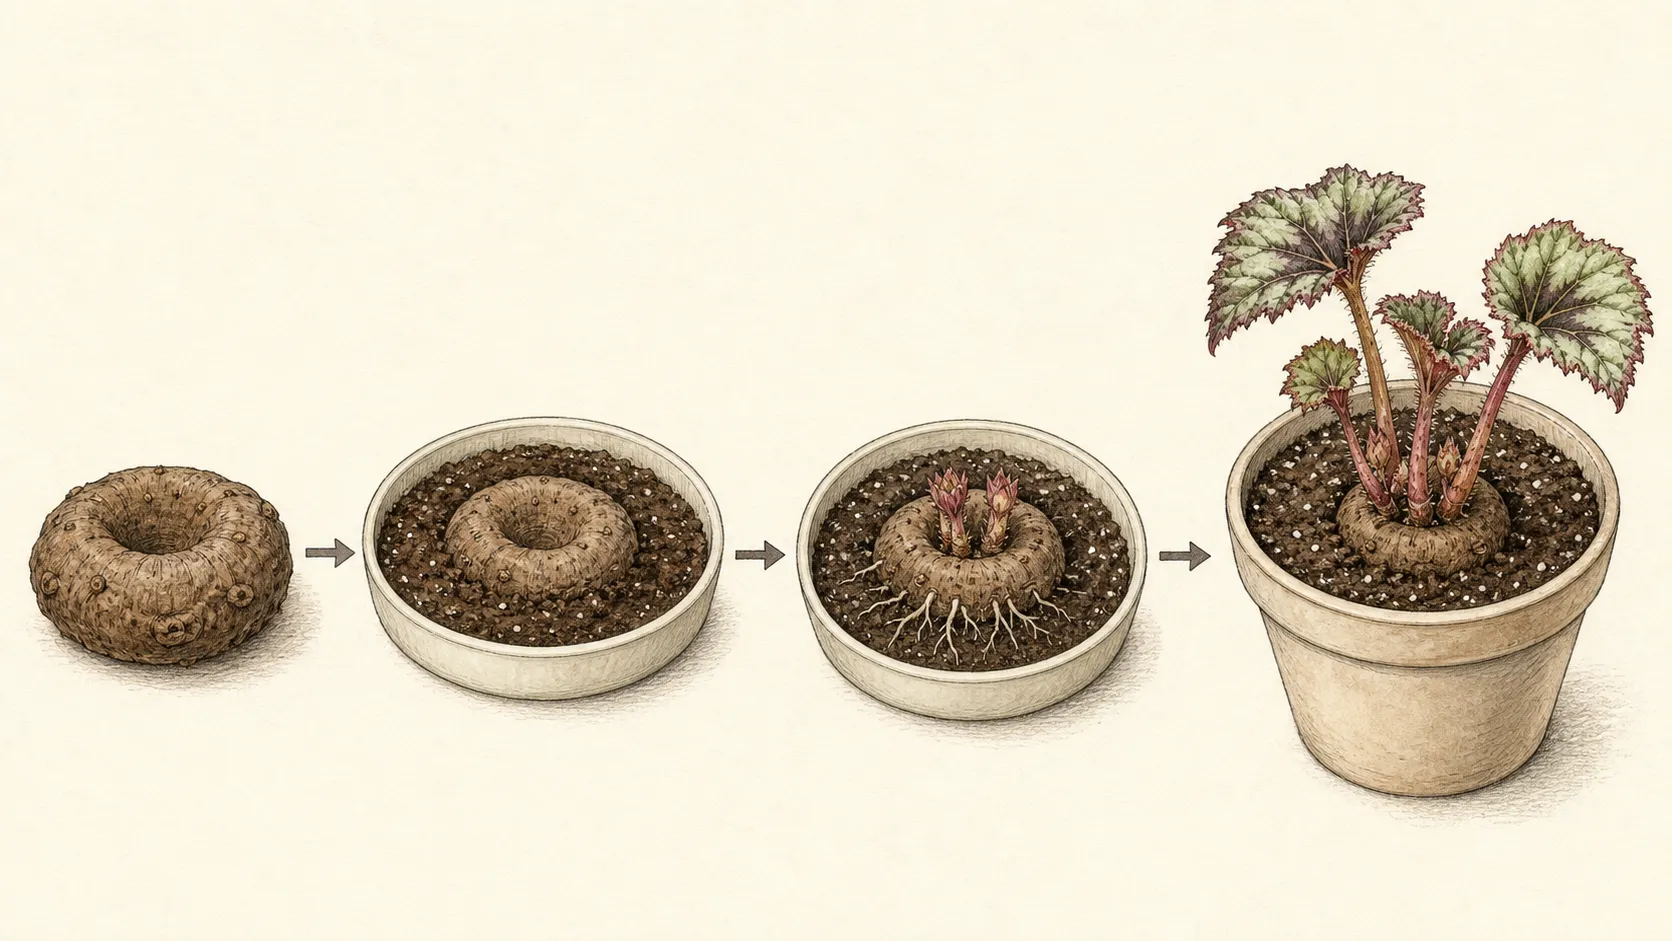
Map tuber condition by label and position. Firm crowns with buds and evenly moist surrounding mix support the normal routine; a slow but firm tuber stays under observation, while a dark or leaking crown moves to isolation. If several tubers soften along the cold window edge, the location is more suspect than the cultivar. If only one piece fails among sound neighbors, preserve the shared tray conditions for the healthy group.
The indoor finish is a compact rooted begonia with several leaves, prompt pot drainage, and a crown free of soft dark tissue. Confirm root formation when the shoot is near 1 inch and again after potting on; the tuber should remain stable when the pot is moved gently. A tall shoot without root hold is not ready for transplant. Crown firmness, root attachment, and balanced leaf spacing provide a practical handoff point.
Reserve the final container according to growth habit before roots interlace in the starting tray. A trailing basket cultivar needs rim space and may keep several shoots, while an upright large-flowered plant may be thinned and supported. Check that dappled light, watering access, and shelter from stem-breaking wind exist at the destination. Relocate the display plan now if the only available position receives intense midday sun.
Set a visible finish line before beginning
Write the handoff criteria beside each label: compact shoots, several leaves, roots holding the medium, free drainage, and a firm clean crown. Photograph the hollow at planting and the shoot profile beside a ruler at potting-on. These views preserve evidence that disappears as leaves cover the tuber and separate real crown change from temporary darkening after watering. Healthy tubers are rarely identical circles, and their buds need not emerge at equal speed. Retain harmless differences in outline and shoot number while keeping the concave top correctly oriented and visible; intervene when one side softens, shoots injure each other, or an upright cultivar's structure conflicts with its flower-size goal.
The most preventable losses begin with a deeply covered tuber sitting in saturated mix before roots can use the water. Pause when the upper face cannot be identified, the depression holds water, or a dark lesion continues past a marked boundary. Keep firm neighbors under their established moisture regime while the suspect is isolated. Resume potting after orientation, drainage, and warmth have been verified with one sound tuber.
Start sound tubers together and isolate questionable ones. A firm tuber with distinct buds can enter the warm tray; a soft, leaking, or spreading dark lesion can contaminate shared medium and should not be hidden among healthy stock. Keep one tuber per labeled position so the first month reveals which individual rooted and sprouted, rather than allowing interlaced roots to turn one failure into a disruptive group repotting.
Prepare the work while every part is still identifiable
Use a clean shallow tray, fresh porous mix, labels, and enough space to keep each cultivar identifiable. Mark the rounded base and concave face on a reference sketch before any tuber is covered, then place one label at every position. Pre-moisten the medium so later watering will not float the tubers, and reserve separate utensils for suspect stock. Complete the warm shelf, lights, and drainage setup while the storage organs are still dry and easy to inspect.
A small scoop and fingertips are sufficient for settling loose medium around a sound tuber. Cutting is justified only when a supported propagation plan calls for division; casual trimming of a questionable crown can expose more tissue and erase the lesion boundary. If a tuber cannot be held securely or decay extends deeply, isolate or discard it according to local waste guidance. Force is a warning that the shallow planting method has been lost.
Label cultivar, growth habit, and start date at the tuber’s position. Upright large-flowered plants and trailing basket types are thinned and supported differently; Minnesota Extension specifically exempts basket types from shoot thinning when many smaller flowers are the goal. Identity therefore governs both the indoor decision and the final container, not merely the eventual flower color.
Use a washable, stable surface away from food, children, and pets. Keep each concave depression free of loose mix and standing water as the tray is filled. Set lights and watering equipment before shoots appear, leaving room to move the flat without brushing brittle stems. Discard contaminated medium separately and keep the clean storage container uncontaminated.
Carry out the central operation in a controlled sequence
Set the rounded side down with the concave face at or just above the mix, moisten around the tuber, and add mix gradually as shoots lengthen. Plant the most clearly oriented specimen first and compare its shallow profile with the retained source guidance. Pour a measured amount around the perimeter and confirm that no water collects in the hollow. Repeat that depth and water volume only for tubers of similar size and form.
Keep the concave upper face and bud cluster visible enough for inspection during early rooting. As shoots lengthen, add loose medium around the sides while leaving the central depression free of standing water and compacted mix. At potting-on, preserve the same orientation and support the root mass beneath the tuber. This exposed reference point makes crown softening detectable before it spreads under foliage.
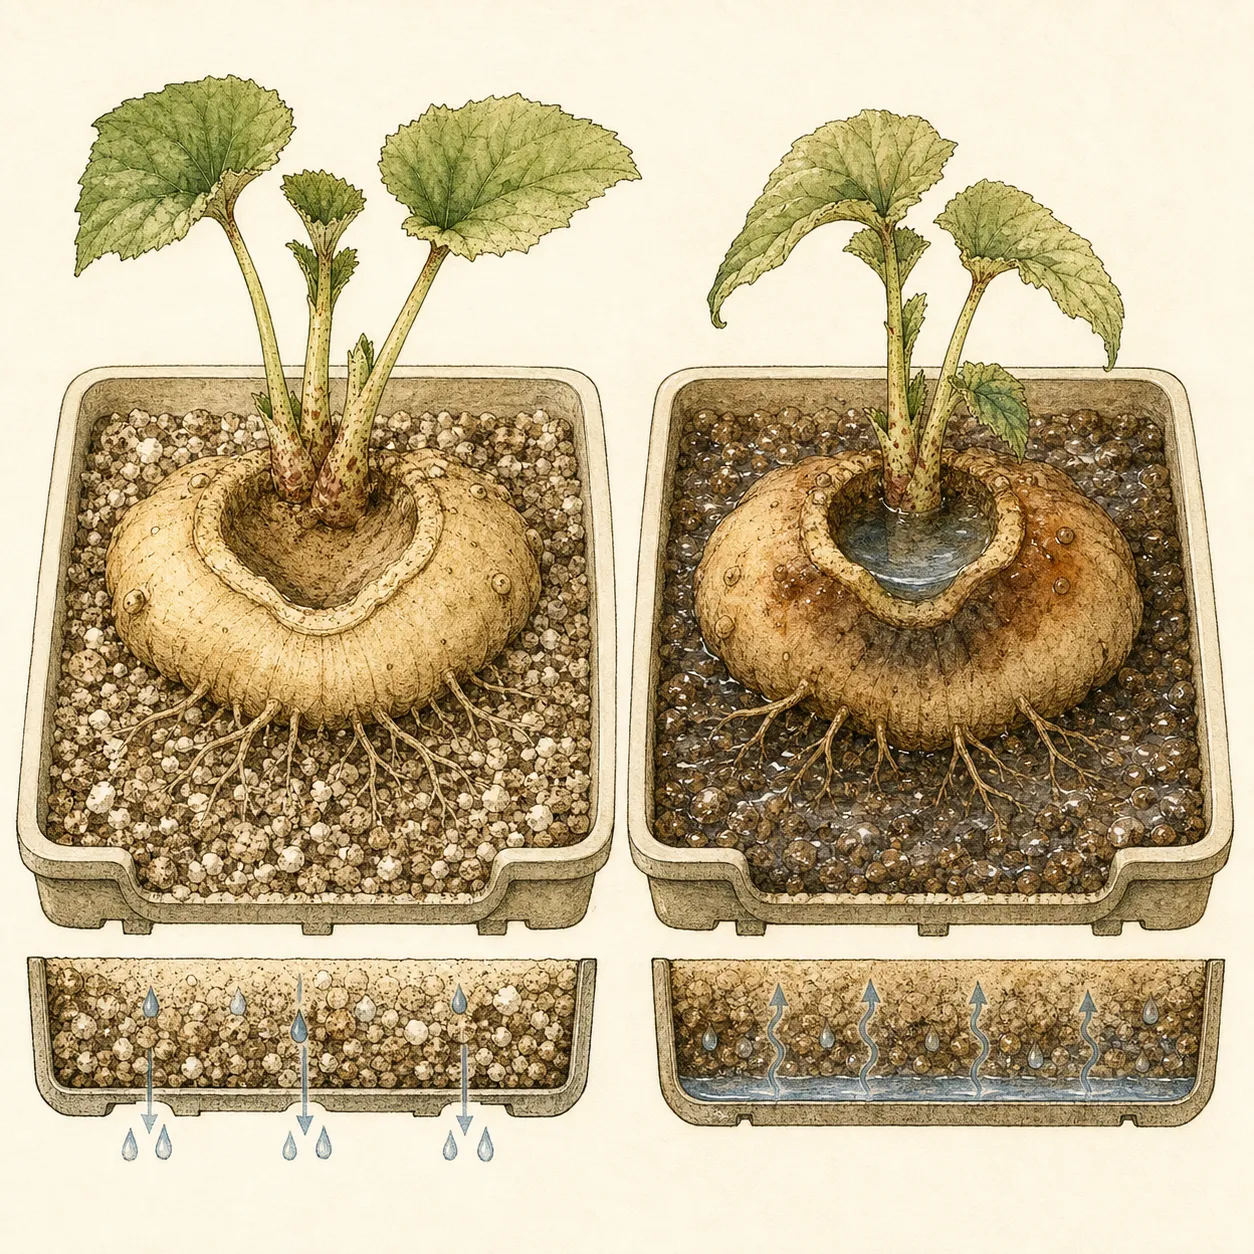
Watch for mix smearing against the hollow, a tuber rotating during watering, or drainage slowing beneath one position. Remove pooled water, restore the shallow level, and loosen only the surrounding medium while roots are short. A dark wet crown should be isolated immediately; adding dry mix over it only hides the evidence. Continue with healthy positions after their moisture and orientation remain unchanged.
Set the rounded side down and the hollow side up, then cover only to the source-supported shallow depth. RHS uses about 1 inch, while Minnesota advises that the starting medium just cover the tuber. Moisten the medium around it without filling the depression and keep the tray loose and aerated enough to reveal crown softening.
Protect roots, crowns, and new growth after the work
Move established starts into individual pots before roots become interlaced, maintain bright indirect light, and harden them off only after frost danger has passed. After potting, clear spilled medium from the crown, verify the label, and drain the saucer. Turn the pot only when leaf spacing shows a directional light response. Keeping the upper tuber visible and the bench clean makes a fresh lesion or broken shoot apparent at once.
Wait for active roots and several expanding leaves before beginning a normal container feeding program. Extra fertilizer cannot correct a cold saturated crown or a shoot stretched by weak light. When growth warrants nutrition, use a labeled dilution and note both product and date. Crown firmness and drainage remain the priority after every application.
The outdoor handoff takes about two weeks of gradual exposure. Start in a shaded, wind-protected position on warm days and bring plants inside before cool nights. Move toward the final dappled light slowly; tuberous begonias are tender and their stems are brittle. A warm afternoon cannot override a frost forecast or cold soil, and direct midday sun can scorch a plant that rooted successfully indoors.
A begonia can enter the hardening phase once its compact shoots carry several leaves, roots hold the potting mix, drainage is prompt, and the crown stays firm between waterings. At that point, inspect visually and lift by the pot rather than testing the stem or tuber repeatedly. Brittle shoots and new roots are easily damaged by unnecessary handling. Recovery after each longer shaded outdoor session is the useful measure of stability.
Diagnose a weak response before adding another treatment
Check crown firmness, root development, leaf spacing, and pot weight twice weekly; change only the condition that is drifting. A lighter pot with new roots and a firm crown supports another careful watering, while a heavy pot with a spreading dark patch requires isolation and drier aerated conditions. Pale elongated shoots paired with sound roots point toward light, not moisture. Using these paired signs keeps one symptom from triggering several conflicting treatments.
A firm inactive tuber near 70°F may need more time; a soft crown, sour medium, or dark spreading tissue points to rot. Long pale shoots call for brighter light after emergence, not more water. Compare pot weight, root development, and crown firmness before feeding. Isolate a failing tuber and change only its condition so a healthy tray does not become wetter or warmer in response to one loss.
After a bud extends, continue checking the tuber and roots because stored reserves can drive a shoot before anchorage develops. A firm crown and new roots justify potting-on when shoots approach the supported 1-inch stage. A green shoot above a soft hollow remains a rot warning, while a firm inactive tuber may simply need more time. Let the combination of crown, roots, and shoot growth define viability.
Stop repeating water or warmth adjustments when the lesion crosses its marked edge, the medium smells sour, or a second nearby tuber begins to soften. Move the suspect away, photograph its crown, and retain one firm tuber under the previous regime for comparison. Seek Extension diagnostic help when deterioration continues after shallow depth and drainage are restored, especially across several tubers from one source.
Leave a record for the next seasonal decision
Close each label record with twice-weekly crown condition, root visibility, leaf spacing, and pot weight, plus the dates of bud movement and potting-on. Photograph the hollow from above before foliage obscures it and the shoots from the side beside a ruler. This history links a later problem to depth, moisture, light, or handling. It also provides a cultivar-specific reference for the following storage season.
Mark basket cultivars whose extra shoots were deliberately retained and upright cultivars thinned for larger flowers. Keep a firm but slow tuber under its original moisture treatment while a soft suspect is isolated. These notes stop later maintenance from thinning the basket group or repeatedly watering every tuber to match the fastest starter.
Revisit the regional assumption that cool coastal springs delay outdoor transition while warm regions may use tuberous begonias as a cool-season display protected from intense summer heat. Compare the hardening record with frost risk, soil warmth, and the arrival of strong sun at the final site. If rooted plants waited indoors for weather, shift the next start later; if heat curtailed display before flowering, test an earlier protected window. Keep those regional timing changes separate from a single slow tuber's behavior.
Record start date, first bud movement, the point shoots reached 1 inch, pot-on date, any thinning, and the two-week hardening period. The next decision is cultivar-specific: retain more stems for a basket, thin an upright plant for larger flowers, start later where indoor light was inadequate, or discard a tuber that repeatedly softened. End indoor monitoring once hardened plants establish outdoors.
Steps
- Level
- moderate
- Time
- One focused session, followed by scheduled checks
- Tools
- Shallow starting tray, Clean potting scoop, Plant labels, Watering can with fine rose
- Materials
- Firm tuberous begonia tubers, Fresh porous potting mix, Individual draining pots
- 1Start 8–12 weeks before planting out
Count back from the local frost-safe, warm-soil planting window and confirm indoor space can provide warmth and later brighter light. Use firm tubers with a recognizable hollow upper face and sound buds. Isolate or discard soft, leaking, or spreading dark tissue rather than placing a suspect tuber in a communal tray.
- 2Fill a shallow labeled tray
Use a clean tray about 3 inches deep with fresh porous medium, separate labels, and drainage. Keep it near 64–70°F according to the retained RHS and Minnesota guidance, away from a radiator or cold wet windowsill. Leave space between tubers so roots and shoots can be lifted individually after about a month.
- 3Set the hollow side upward
Place each tuber rounded side down and hollow side up. Cover shallowly so the medium just covers it, using roughly 1 inch as the RHS reference. Moisten around the tuber without leaving water in the depression. Keep the crown visible for inspection and the wet medium loose above the buds.
- 4Hold near 70°F and lightly moist
Give indirect light and stable warmth while roots form. Keep the medium fairly moist with free drainage; wait for the surface to begin drying before watering and direct water around, not into, the hollow. Inspect crown firmness twice weekly. More water cannot accelerate an unrooted tuber and is the main avoidable rot pressure.
- 5Pot on when shoots reach 1 inch
After about a month, when shoots are near 1 inch and roots have formed, move tubers into individual 4–6 inch pots without breaking the crown. Increase light for short sturdy stems. At about 3 inches, thin upright cultivars only when larger flowers are the goal; retain stems on basket types grown for flower quantity.
- 6Harden for two weeks after frost risk
Begin on warm days in sheltered shade, return plants indoors before cold nights, and gradually add outdoor time, brighter indirect light, and wind. Plant or place containers outside only after frost danger has passed and soil has warmed. Preserve labels and support brittle stems where the final container or site is exposed.
Related reading
Sources
- Tuberous begonias. University of Minnesota Extension. Source record · Accessed 2026-08-30.
- Begonias: outdoors. Royal Horticultural Society. Source record · Accessed 2026-08-30.
- Hybrid Tuberous Begonia. North Carolina State Extension. Source record · Accessed 2026-08-30.
- Toxic and Non-toxic Plants: Begonia. ASPCA Animal Poison Control Center. Source record · Accessed 2026-08-30.