Grow · gladiolus autumn lifting curing storage
Lift and Store Gladiolus Corms in Autumn for Cold Winters
Lift summer-flowering gladiolus for cold winters: judge autumn timing, identify the new corm, cure it, and move sound stock into cool, dry storage.
Published Last updated
In this guide
- Lift mature corms before the soil freezes
- Read flowering history alongside the forecast
- Set up the trays before opening the bed
- Lift from beneath and shorten the foliage
- Identify the replacement corm above the spent one
- Cure in an airy place, then clean
- Choose which cormels deserve a nursery row
- Move sound corms into measured cool storage
- Inspect the store and hand it back to spring planting
- Steps
Lift mature corms before the soil freezes
For summer-flowering hybrid gladiolus in a cold-winter garden, autumn storage begins with lifting the corms before hard freezing, drying them under cover, and keeping the sound new corms somewhere cool, dry, and ventilated. The warm drying stage comes first. Putting freshly dug material straight into its winter bag skips the preparation that makes the bag suitable for storage.
Use late September to assess the plants and arrange the space, not as a universal digging date. An early-flowering group may already be ready while a late planting is still flowering. University of Missouri Extension gives four to six weeks after flowering as a useful maturity window and says to lift before a hard freeze. Give healthy foliage its remaining growing time when weather permits. If hard freezing threatens, protecting the corms takes priority over completing an ideal interval.
Common summer-flowering garden hybrids need protection where winter conditions make outdoor survival unreliable. Confirm the name on the original package. Hardy Byzantine gladiolus and specialist species with different seasonal growth need their own advice. A neighbor's gladiolus returning outdoors does not establish that your cultivar can spend winter in the same way.
Read flowering history alongside the forecast
Write down when the last useful flowers finished for each planting group. If you planted successive batches, keep those groups separate during this assessment. The earliest planting date alone cannot tell you whether the final batch has had enough growing time after bloom. A photo of the border in flower may recover the approximate sequence when the planting notebook has gaps.
Green leaves are not an absolute instruction to postpone digging indefinitely. The Royal Horticultural Society explicitly describes lifting summer-flowering garden hybrids while leaves remain green, usually around six weeks after flowering. Its advice reflects UK growing conditions. The useful common ground with Missouri is time for corm development followed by protection from damaging winter weather; the two sources do not establish one leaf color or calendar date for every garden.
For a practical late-September example, compare a group that finished in mid-August with one that finished only last week. The first has had much more post-flowering time. Inspect and schedule it separately instead of clearing both because they share a bed. Keep the later group's label visible, follow the local forecast, and accept that a very late flowering batch may offer less mature material to save.
If a light frost has already marked the tops, assess the corms promptly and consult local guidance about the coming temperatures. Damaged leaves and deeply frozen soil are different situations. This method does not require deliberately exposing plants to frost. Equally, a faded flower spike alone is not a reason to strip away every green leaf while a safe growing window remains.
Set up the trays before opening the bed
Reserve a covered curing surface and a separate winter position before digging. A kitchen table available for one afternoon will not solve a drying period lasting weeks. Choose a tray arrangement that can stay in place, with access to turn or examine individual corms. For a small garden collection, separate shallow trays are easier to label and inspect than one deep container filled with several cultivars.
Match the number of trays to the groups you actually want to preserve. Put a cultivar label in each empty tray before taking it outdoors, and write the lifting date as material arrives. If a name is lost, use an honest description such as unknown white, with a photograph reference. A remembered flower color is useful for planning; it is not enough to invent a cultivar identity.
A clean sheet or work board beside the border helps catch loose cormels and keeps soil off the sorting surface. Place the receiving tray within reach so a lifted group can travel directly into its assigned space. Remove ties or supports that would obstruct the tool. These small preparations matter most in a mixed border, where fallen foliage can conceal which gladiolus stem belongs to which cluster.
Lift from beneath and shorten the foliage
Start the fork or spade outside the visible cluster and work beneath the planted corms. Use the remembered planting depth as a guide, allowing room below it. Lever the soil gently, then support the loosened mass as it rises. Pulling on the leaves before the soil releases makes it harder to recover the whole group and its small offsets.
Shake away loose earth carefully. Iowa State's home-garden method then leaves a stem stub of 1–2 inches, approximately 2.5–5 cm, above the corm. Make that cut with shears while the corm is supported on the work surface. There is no need to cut flush into the rounded storage tissue to produce a tidy-looking specimen.
Cleaning instructions vary: Missouri describes washing adhering soil away, while Iowa describes shaking it off and drying. For a small collection that releases its loose soil readily, follow the latter route. If local guidance and sticky soil lead you to rinse, restore the corms to airy drying immediately; a washed batch cannot be put away wet. Scrubbing to a polished surface adds handling without helping you judge maturity.
Look over each group before it joins the curing tray. Set aside pieces with obvious soft decay, severe cuts, or crushed tissue. Keep uncertain stock separate and ask for an assessment if an important cultivar is involved. Healthy-looking corms deserve their own tray; the desire to retain every piece should not make visible damage disappear beneath a pile of better material.
Identify the replacement corm above the spent one
A freshly lifted gladiolus can look like two corms stacked together. Illinois Extension explains that the old corm remains directly beneath the newly formed one, with small cormels around the old corm's upper region. The substantial new corm is the replacement you are saving. The shriveled lower structure is the spent mother corm, not a second equally useful flowering unit.
Turn an intact example sideways before cleaning the whole batch. Find the shortened stem at the top, the rounded plump corm beneath it, and the compressed older piece below. The drawing shows this relationship enlarged so the small parts can be distinguished. Actual specimens vary in size, skin color, and the number of cormels; use position and condition together instead of matching a particular shade of brown.
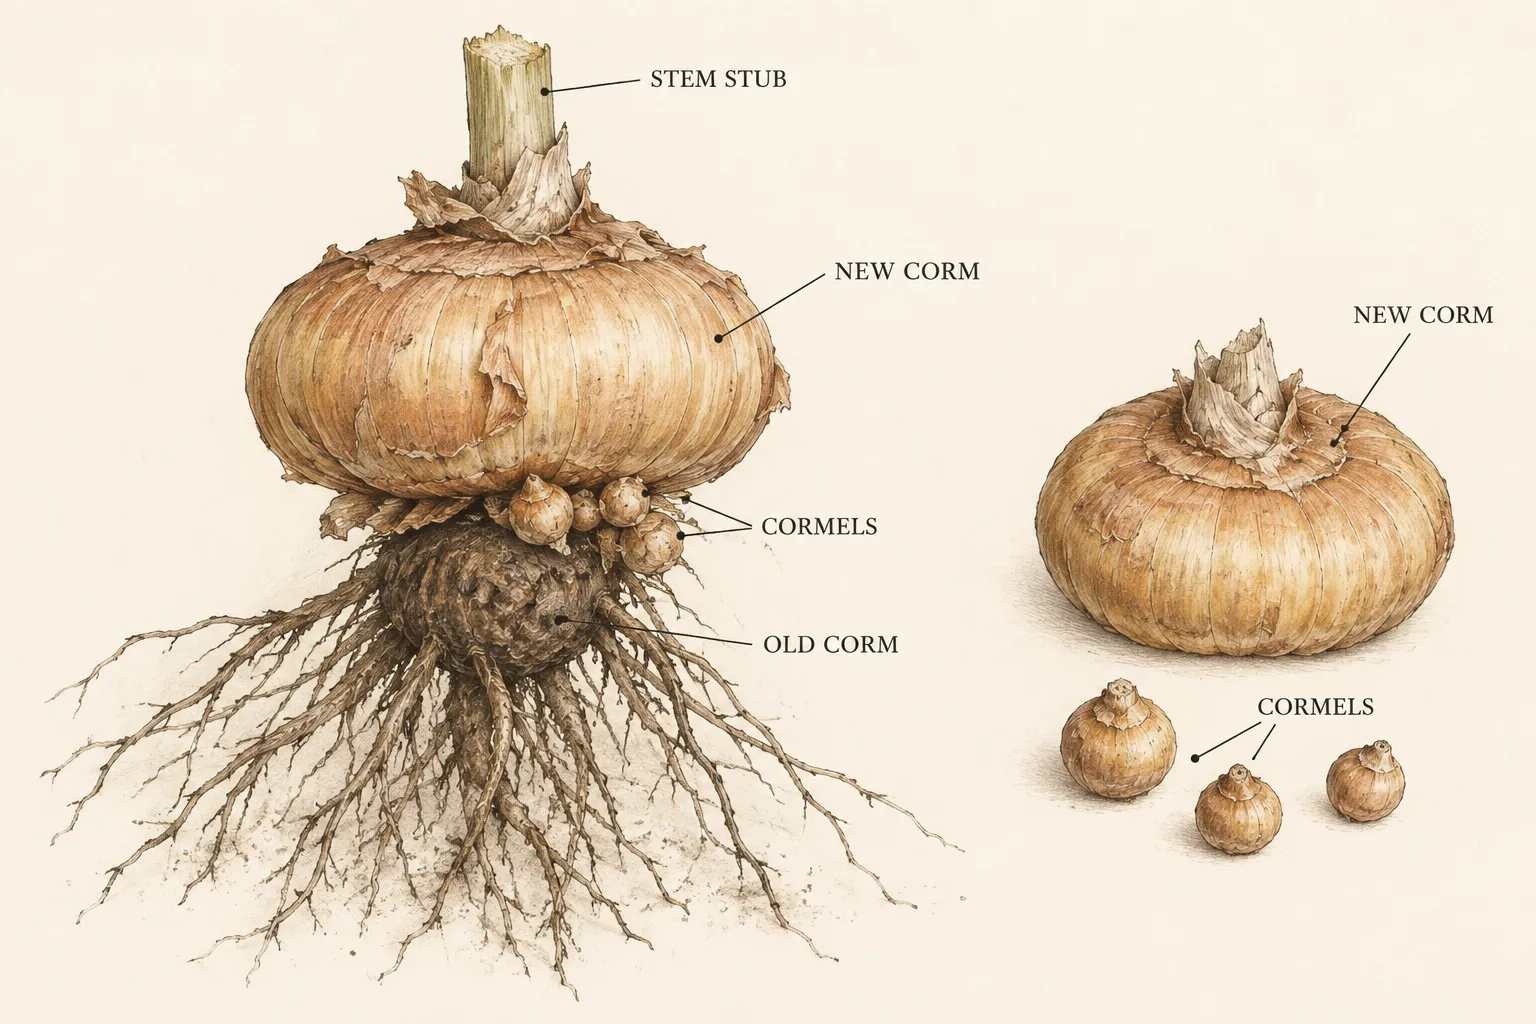
Leave the final separation until curing has progressed and the old piece releases readily. Prematurely forcing the two apart can turn a sorting task into a wound. Put one representative intact specimen at the front of the tray as a reference if you are handling gladiolus for the first time. Once you recognize the stack, sorting the rest becomes much less ambiguous.
Cure in an airy place, then clean
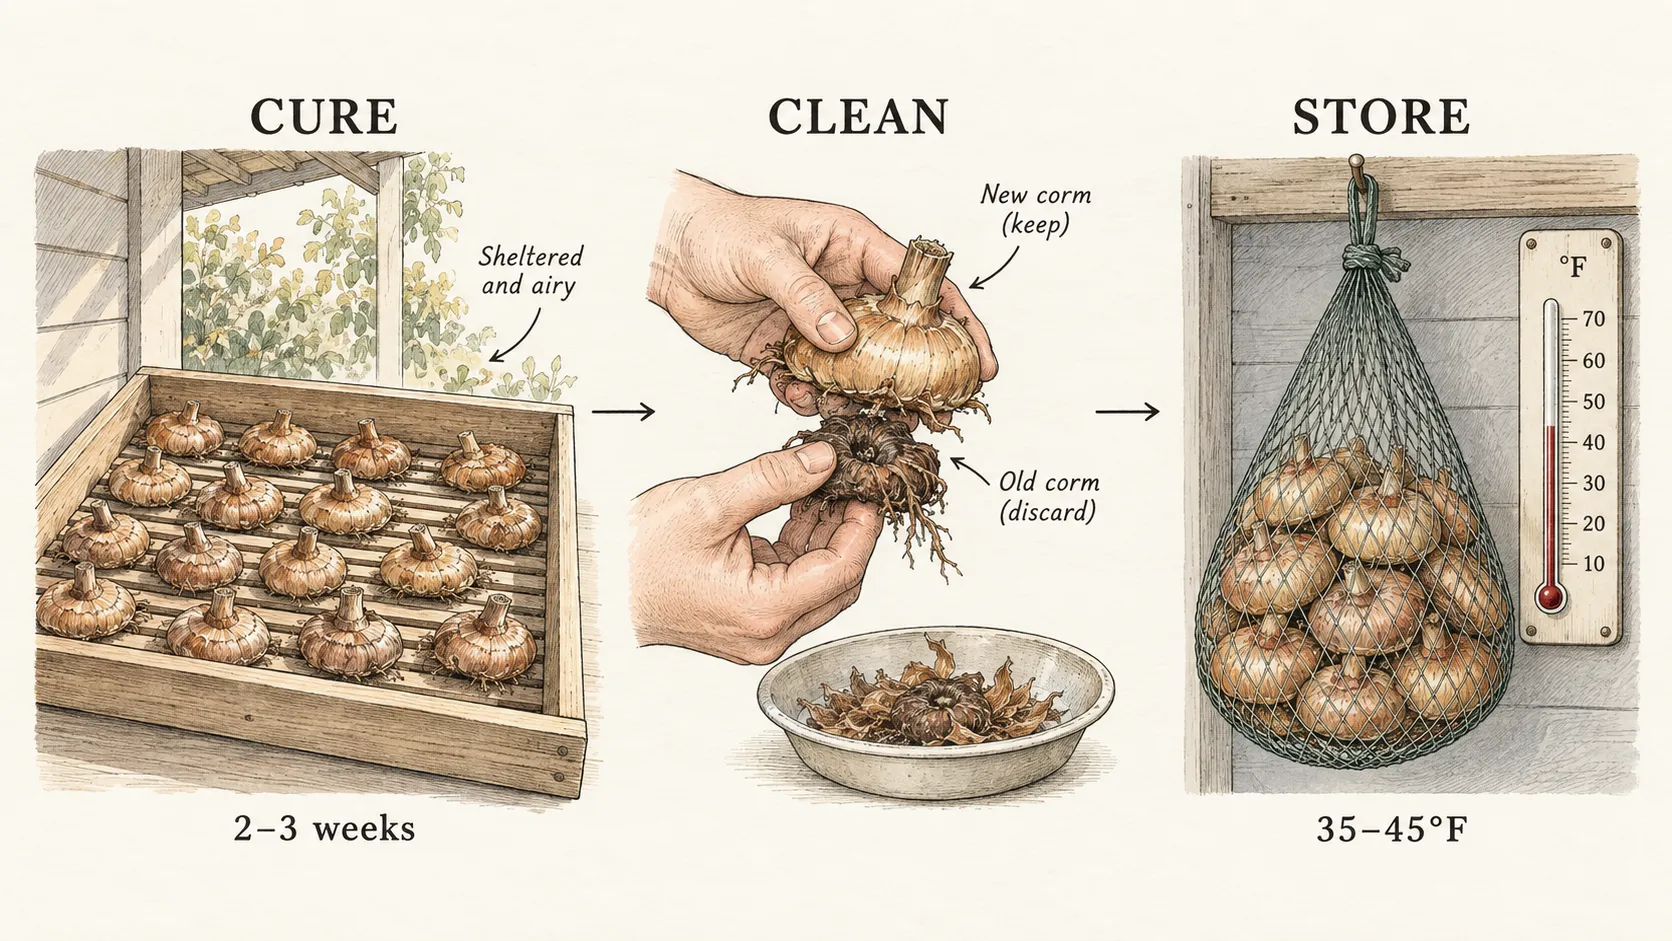
Curing and winter storage serve different stages. Iowa State recommends two to three weeks in a warm, dry, well-ventilated place before removal of the dried mother corm. That is a working duration, coupled with dryness and ease of separation. A cold, damp corner does not become an effective curing space simply because three weeks have elapsed.
Arrange the corms so they can be seen individually, with labels held clear of them. Protect the trays from rain and overnight freezing. Choose ordinary sheltered air movement; direct blasting with a heater is not part of this home-garden method. Check beneath the corms as well as above them, particularly if the tray has a solid base that could conceal damp soil crumbs.
When the old corm is dry and separates easily, detach it and remove loose remaining soil. Keep the new corm intact. Sort cormels into their own labeled container as you work, using a surface that makes them easy to see. Transfer only finished, sound material into the storage group. A batch lifted later can remain on its curing tray even after the early batch is ready to put away.
Treat a damp or soft specimen as an exception requiring attention, not as proof that the whole tray needs more heat. Remove obvious decay from the saved collection, as RHS advises. If several pieces remain damp, reconsider tray depth and the room's conditions before proceeding. The sequence illustration marks a change of environment at the last arrow: the final cool store is not the place where the freshly dug corms begin drying.
Choose which cormels deserve a nursery row
Saving cormels is optional. Their value is propagation, and they need growing space before they contribute like larger corms to a flower display. Missouri gives two to three years to reach blooming size. Regard that as a regional expectation, not a flowering appointment for every small offset. A tray full of cormels should therefore be counted separately from the stock intended for next season's main border.
Make the decision from the available garden space. If you want more of one named cultivar and can maintain a labeled nursery patch, save a manageable group. If the garden already has enough gladiolus, retaining only the better developed corms is reasonable. Storing hundreds of tiny offsets creates an obligation to sort and grow them later; quantity alone does not improve the coming display.
Use a fine enough ventilated container that the little pieces cannot fall through, and place their label inside a secure holder or attach it outside. Keep them beside their parent cultivar's inventory, with their own count or approximate quantity. This separation prevents a spring planting plan from confusing a bag of young propagation stock with a bag of larger planting material.
Move sound corms into measured cool storage
For the common hybrids covered here, Iowa and Missouri agree on winter storage at 35–45°F, approximately 2–7°C, with ventilation. Use that as the plant-specific target for this method. The room also needs to remain dry and above freezing. A warm living-room shelf may be convenient, but it does not provide the same conditions as the recommended cool store.
Put a minimum–maximum thermometer at the proposed bag or tray position. Read it through cold nights and changes in household heating. The name garage or basement is not a measurement: an exterior wall can be colder than the middle of the room, and a nearby heat source changes the conditions at one shelf. Choose a place that you can continue to check when winter weather becomes more severe.
Mesh bags, loose-weave baskets, and ventilated trays give several workable ways to organize the stock. Select the form that lets you see the contents and retrieve a suspect corm without emptying every cultivar onto the floor. Label each container with the cultivar, lifting date, and date it entered storage. These dates explain why two bags may have spent different lengths of time curing.
Keep the dry-storage method distinct from care for a living potted plant. These corms are not on a houseplant watering schedule. If the container or shelf becomes damp, investigate the source and move the stock to appropriate conditions. Adding water to a bag because winter has been long is not part of the cited gladiolus routine.
Inspect the store and hand it back to spring planting
Check stored corms occasionally through winter, looking for softening or visible rot and removing affected pieces. RHS explicitly includes this inspection in its storage guidance. Keep a simple count of removals by cultivar. That record makes a replacement order more accurate and may show whether one group was already in poor condition when it entered storage.
If a problem recurs, note where it occurs before rearranging everything. A damp wall, an overfilled basket, and one damaged corm are different observations. Correct the actual storage condition and keep questionable material separate for assessment. This article does not prescribe a pesticide dip or dust; the lifting and storage sequence can be followed without copying chemical recommendations from older growing manuals.
Before the regional spring planting window, lay out the remaining sound corms and reconcile them with the border plan. Keep cormels assigned to their nursery space. Use the separate gladiolus succession guide to plan planting intervals, spacing, and the final locally suitable planting date. Winter storage preserves the material you have; flowering still depends on its condition and the growing season that follows.
Steps
- Level
- moderate
- Time
- About 45 minutes for a small bed, followed by curing and winter checks
- Tools
- Garden fork or spade, Pruning shears, Minimum–maximum thermometer, Soft dry brush
- Materials
- Labeled summer-flowering hybrid gladiolus plants, Shallow ventilated trays, Mesh bags or loose-weave baskets, Durable labels and pencil
- 1Mark the groups that are ready
Walk the gladiolus planting with its labels and flowering record. Assign each group a lifting plan from post-bloom maturity and the local hard-freeze forecast. Leave a later group clearly marked if it still has a safe growing window. Carry a separate receiving tray for each cultivar you intend to save.
- 2Prepare both spaces
Set out shallow curing trays under cover and test the intended winter shelf with a minimum–maximum thermometer. Have labels, shears, and a soil-catching work surface ready at the bed. Confirm that the drying area can remain available for several weeks, with each batch accessible throughout that period. Give later lifting batches their own tray space so an unfinished group does not get mixed into one already ready for cleaning and storage.
- 3Release and lift the corms
Loosen soil around and below the cluster, lift the supported mass, and shake off loose earth. Shorten foliage to the 1–2-inch stub used in the Iowa method. Put visibly damaged or decaying pieces aside before sound material enters its labeled tray; collect loose cormels on the work surface.
- 4Finish curing before separation
Spread the lifted material in the warm, dry, airy position. After the recommended drying period, check that the old lower corm is dry and releases readily. Remove it without cutting into the new corm, brush off loose dirt, and reserve only sound replacement corms for the storage container.
- 5Separate propagation stock
Decide whether you have room to grow small cormels on in a nursery area. Put those worth saving into their own ventilated, escape-proof container with the parent cultivar identified. Count them separately from larger stock so the spring flower-bed plan does not depend on immature material. Write the intended nursery location on the label while the next season’s space is being allocated.
- 6Transfer and keep checking
Move finished corms to labeled airy containers in the measured cool store. Record the transfer date and check temperature after substantial weather changes. During winter inspections remove visibly rotten pieces and update the remaining count. Reassess the stored collection before planning spring planting batches.
Related reading
Sources
- How do I overwinter gladiolus bulbs?. Iowa State University Extension and Outreach. Source record · Accessed 2026-09-11.
- How to grow gladioli. Royal Horticultural Society. Source record · Accessed 2026-09-11.
- Summer Flowering Bulbs: Gladiolus. University of Missouri Extension. Source record · Accessed 2026-09-11.
- Bulbs. University of Illinois Extension. Source record · Accessed 2026-09-11.