Grow · autumn container drainage
Keep Ornamental Containers Draining as Autumn Rains Return
Prepare outdoor ornamental pots for autumn rain by checking the drainage hole, freeing saucers and cachepots, testing the potting mix, and moving vulnerable containers before cold weather.
Published Last updated
In this guide
- Let the pot tell you whether autumn rain is enough
- Audit the drain path before the next storm
- Make the potting mix answer the question
- Correct compaction without burying the crown
- Do not add a gravel layer to the planted pot
- Set a wet-weather position and move only when needed
- Reset watering and fertilizer after the rain pattern changes
- Read symptoms before you move the plant
- Make one autumn inspection after every heavy rain
- Steps
Let the pot tell you whether autumn rain is enough
Prepare an outdoor ornamental container for autumn rain by inspecting the whole route that water must take: through the potting mix, out of the drainage hole, across the space below the pot, and away from the saucer or cachepot. Then feel the mix below the surface before adding any water. A short shower may wet only the upper few centimetres, while a blocked hole or a full saucer can leave the lower root zone saturated for much longer. The useful autumn routine is therefore a check-and-correct sequence, not a calendar instruction to water less.
This guide is for ornamental pots, troughs, and movable planters kept outdoors in a temperate Northern Hemisphere garden as nights cool and rainfall becomes less predictable. It covers healthy containers that need a drainage audit, not a rescue protocol for a plant with a confirmed root disease. Plant needs still govern the final decision: a drought-tolerant rosemary, a newly planted shrub, a pansy display, and a dormant bulb pot will not share one moisture target. Keep the container's plant list beside the pot as you work.
Autumn is a good time to correct small drainage failures because the containers are still accessible and many plants have not yet entered winter dormancy. The aim is not to make every pot dry. Roots need a balance of moisture and air, and most container plants prefer a moist mix that is not continually waterlogged. A pot that drains freely can receive rain without being treated as a sealed bucket; a pot that cannot release water needs a physical correction before more weather exposes the problem.
Audit the drain path before the next storm
Start at the bottom. Lift or tilt the pot only when you can do so safely, and look for an open drainage hole, roots pressed against it, a shard, a mat of moss, or a saucer that has fused to the base. Check whether the pot sits flat on paving that holds water against the hole. A pot can have a perfectly visible opening and still drain poorly if its underside is sealed to a wet surface. Stable pot feet, a purpose-made stand, or a firm slatted surface can create the space needed for the outlet to work.
Trace the water after it leaves the container. A detachable saucer is useful only when it is emptied before its water reaches the base of the pot again. In a decorative outer pot, the planted inner pot must sit high enough that its drainage holes do not stand in collected water. University of Illinois Extension describes this double-pot arrangement as a way to keep a decorative container while allowing the liner to drain; it also warns that a permanently attached or unemptied saucer can keep roots waterlogged. The outer vessel is a catchment, not a reservoir for an ordinary ornamental plant.
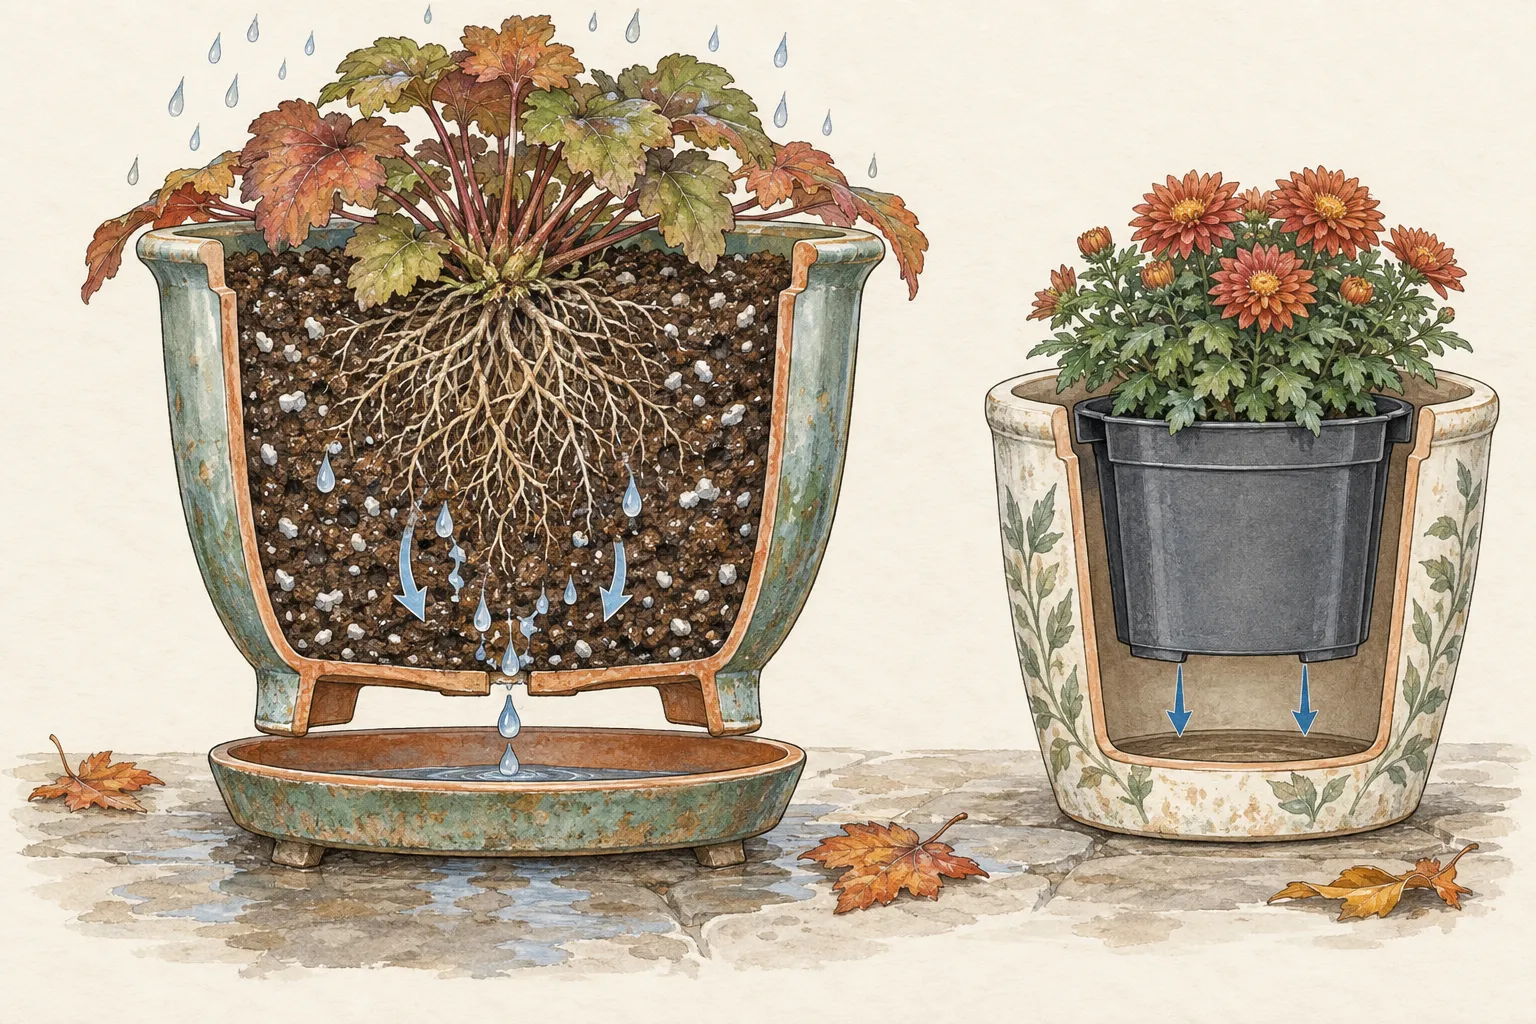
Record the result with three simple labels: open, slow, or trapped. Open means water can leave and the receiving surface remains clear. Slow means the mix stays wet or the outlet dribbles after a thorough check, so the pot needs investigation before the next prolonged rain. Trapped means water is visible below the liner, inside the cachepot, or in a saucer that cannot be emptied. Move trapped pots to a safe draining location immediately, then correct the hardware or container arrangement.
Make the potting mix answer the question
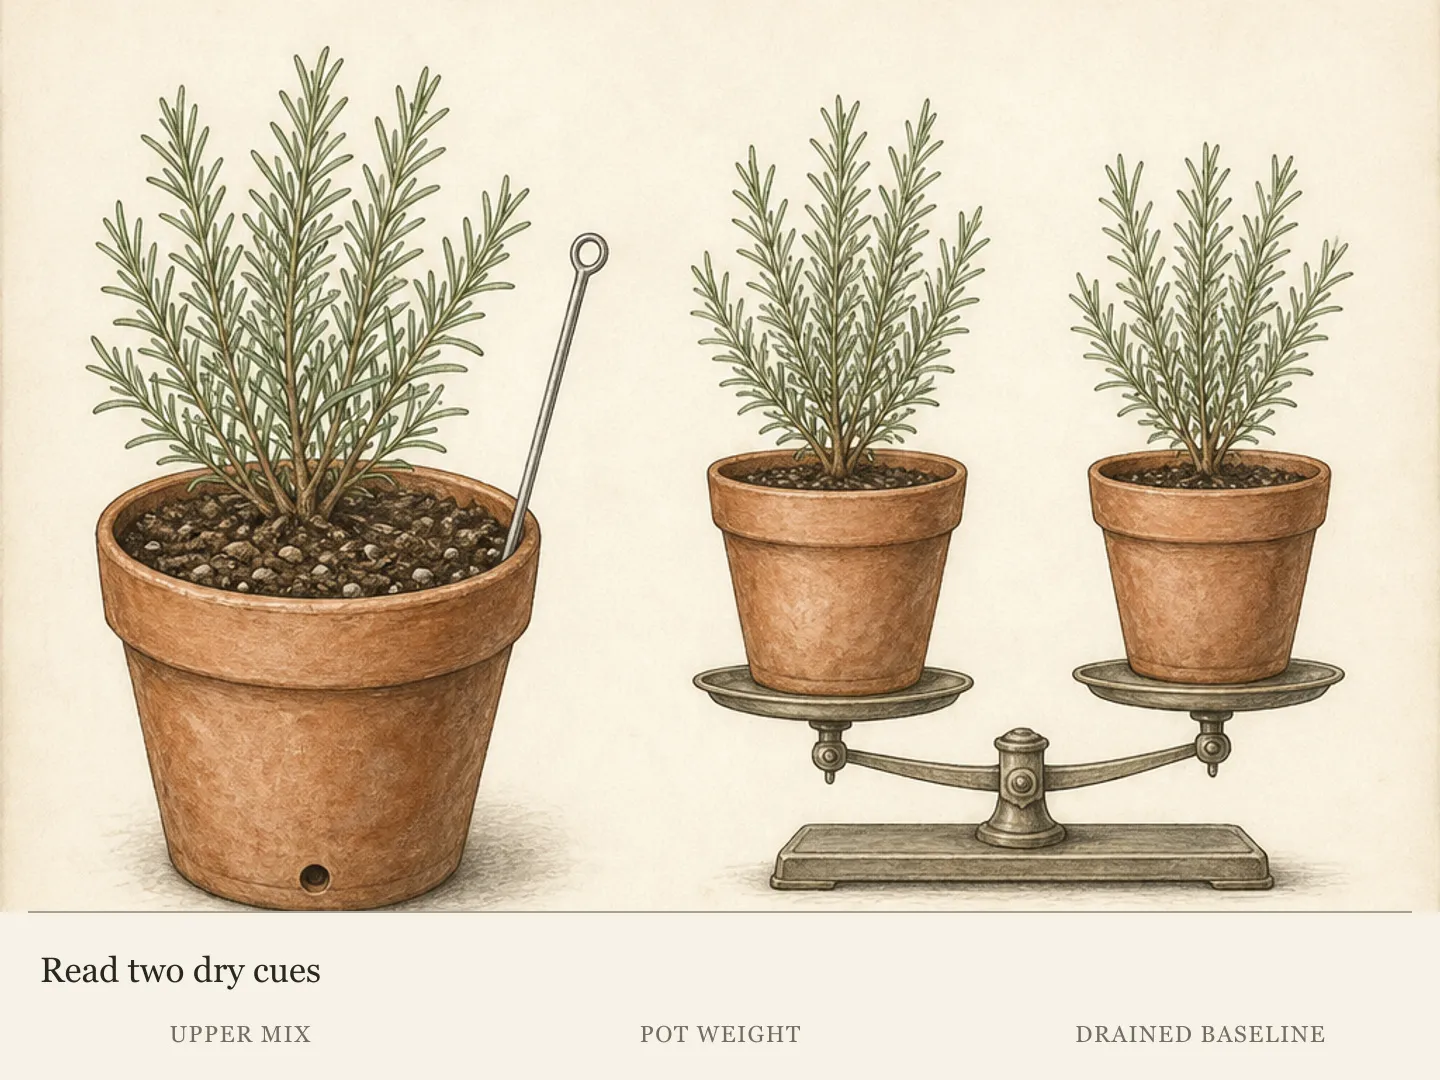
Test moisture at about one-third of the way down the pot, not only at the surface. The Royal Horticultural Society recommends checking at that depth because a crusted or dry surface can conceal a moist root zone, while a damp top after rain does not prove that the entire container is wet. Push a clean finger into the mix where roots will not be torn, or use a narrow wooden label as a feeler in a dense planting. Compare the result with the plant's normal requirement and the forecast, then water only if the deeper mix is dry enough to justify it.
If water beads on the surface, runs down the gap at the pot wall, or takes a long time to enter, the mix may have dried and shrunk away from the sides or become sealed at the surface. Re-wet a very dry pot slowly in several passes, allowing each pass to enter before the next. Do not convert a slow-to-wet pot into a flood test. Once it is evenly moist, the drainage check will tell you more than repeated watering from above. If the mix is already wet and the plant is wilting, stop adding water and inspect the root zone, outlet, and saucer instead.
A pot that has been reused for several seasons can behave differently from the day it was filled. NC State Extension notes that organic matter in container media decomposes over time, reducing particle size, pore space, drainage, and aeration. That does not mean every established container needs autumn repotting. It does mean a mix that stays saturated, collapses below the rim, or has become a dense root-and-media block deserves a planned renewal, preferably when the plant and local growing season can tolerate root disturbance.
Correct compaction without burying the crown
For a shallow surface crust, loosen only the upper layer with a hand fork or label, staying clear of the crown and major roots. Remove leaves, algae, and windblown debris that form a mat over the mix. Check that the existing substrate line is still visible: settled mix can expose roots, while added material can bury the crown. NC State's container guidance treats the substrate line as a working boundary because planting too deeply can smother the growing point and planting too shallowly can expose roots to drying.
Top up a settled container with a compatible potting mix only when the plant's crown and original planting level remain clear. Use a mix intended for containers and keep it loose; do not shovel garden soil into a pot to make up the difference. Colorado State University Extension explains that native soils with a high clay content compact easily in a container and reduce oxygen around roots. A denser material may look like a quick fix after rain, but it reduces the pore space the root zone needs.
If the lower mix is persistently saturated, the plant is unstable, or roots have filled the container, schedule a proper repot instead of trying to cure the problem with a surface layer. Choose a pot that matches the root system and intended growth, clean reused containers, and retain the plant at its existing depth. For an autumn display that is near the end of its useful season, a temporary drainage correction and a protected holding position may be kinder than a late, aggressive root disturbance.
Do not add a gravel layer to the planted pot
Skip the traditional layer of gravel, stones, or broken pottery inside the bottom of an individual planted pot. University of Illinois Extension explains that the finer potting mix above a coarse layer can hold a perched zone of water before excess moisture finally moves into the larger spaces below. The layer does not create a drier root zone and can reduce the volume available for roots. Keep the drainage solution at the container outlet and in the open space beneath it.
This is different from using an outer cachepot or a separate saucer to protect paving. In a double-pot arrangement, the planted liner remains the root container and the outer vessel catches drips. It still needs a free gap below the liner, and collected water must be emptied. A few inches of gravel in the wrong place cannot repair a blocked liner hole; an accessible outer vessel can make the water visible and easier to remove.
If a decorative pot has no hole and cannot be drilled, use it as an outer pot with a liner that has a real drainage outlet. Keep the liner removable so you can inspect its base, empty the outer vessel, and move the plant when weather changes. This setup is especially useful for a seasonal display, but it requires more observation than a single pot sitting on open feet. The decorative finish changes the container system; it does not change what roots require.
Set a wet-weather position and move only when needed
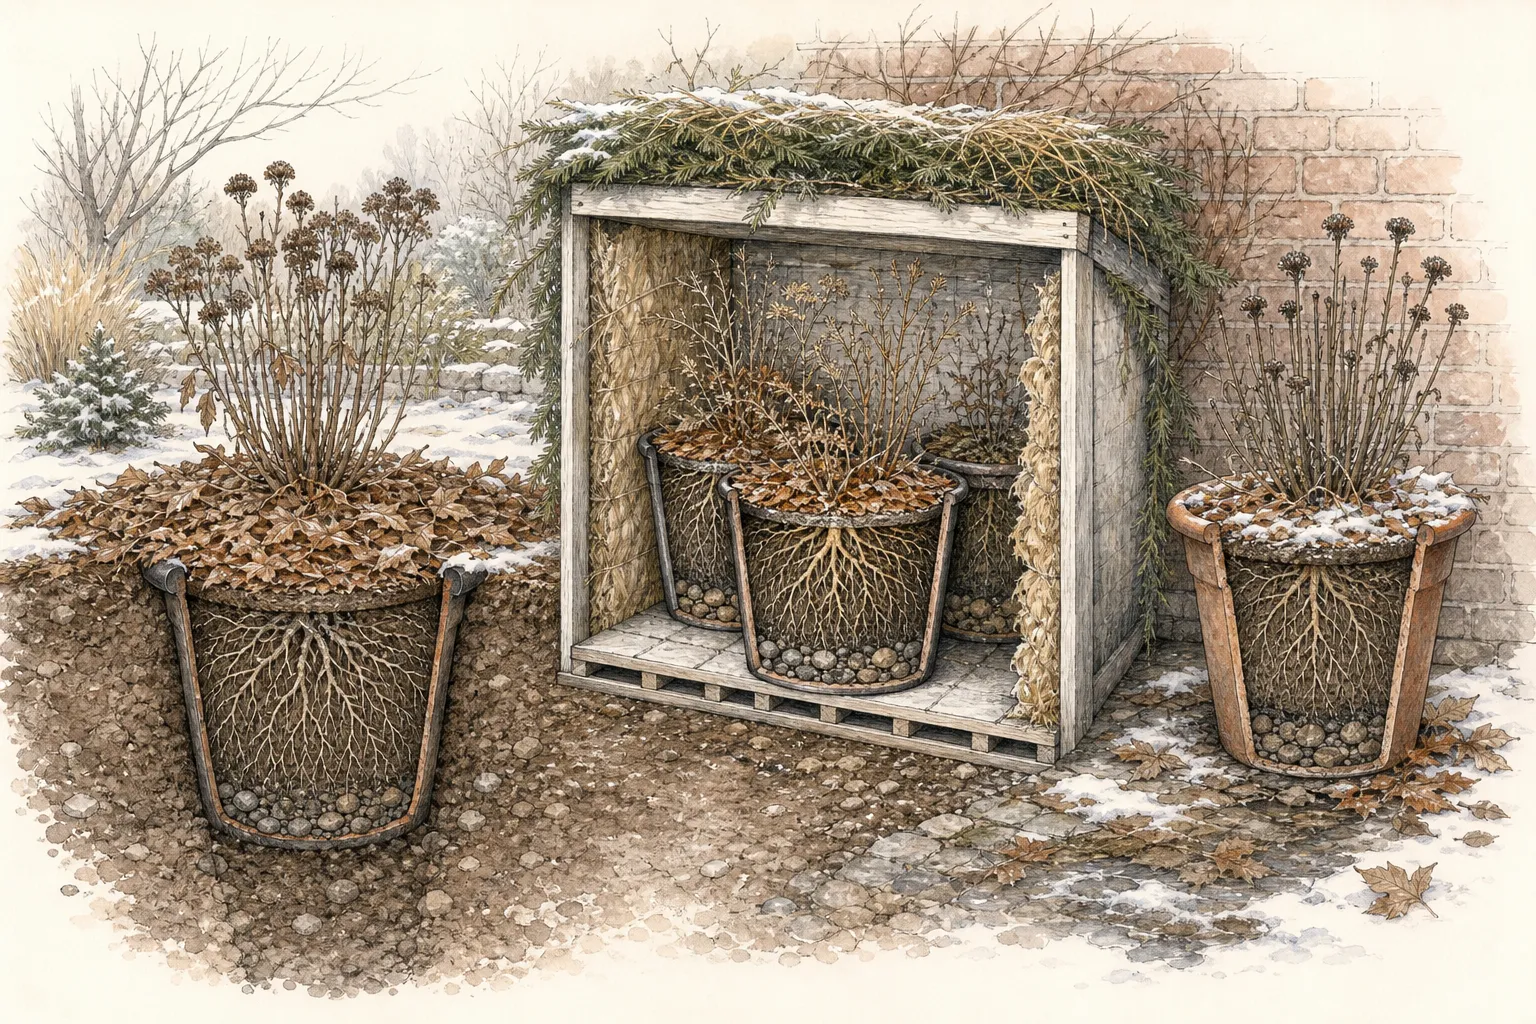
After correcting the drain path, choose a position that matches the plant and the pot material. A free-draining, frost-tolerant glazed pot can stay in an exposed place if the planting can handle the light and temperature. A porous terracotta or clay container needs more attention as freezing weather approaches because repeated moisture and freezing can damage the vessel. Colorado State University Extension recommends bringing porous containers under cover to prevent winter cracking; the timing depends on the local freeze pattern, not a universal calendar date.
Keep sheltered placement bright, ventilated, and accessible. A wall, covered porch, cold frame, or unheated shelter can reduce direct rainfall and make inspection easier, but a dark warm room is not automatically suitable for a hardy outdoor plant. Group pots only when their moisture and light needs align. Place the heaviest pots where they will remain stable in wind, and use a dolly or second person for a container that becomes unsafe to lift after rain.
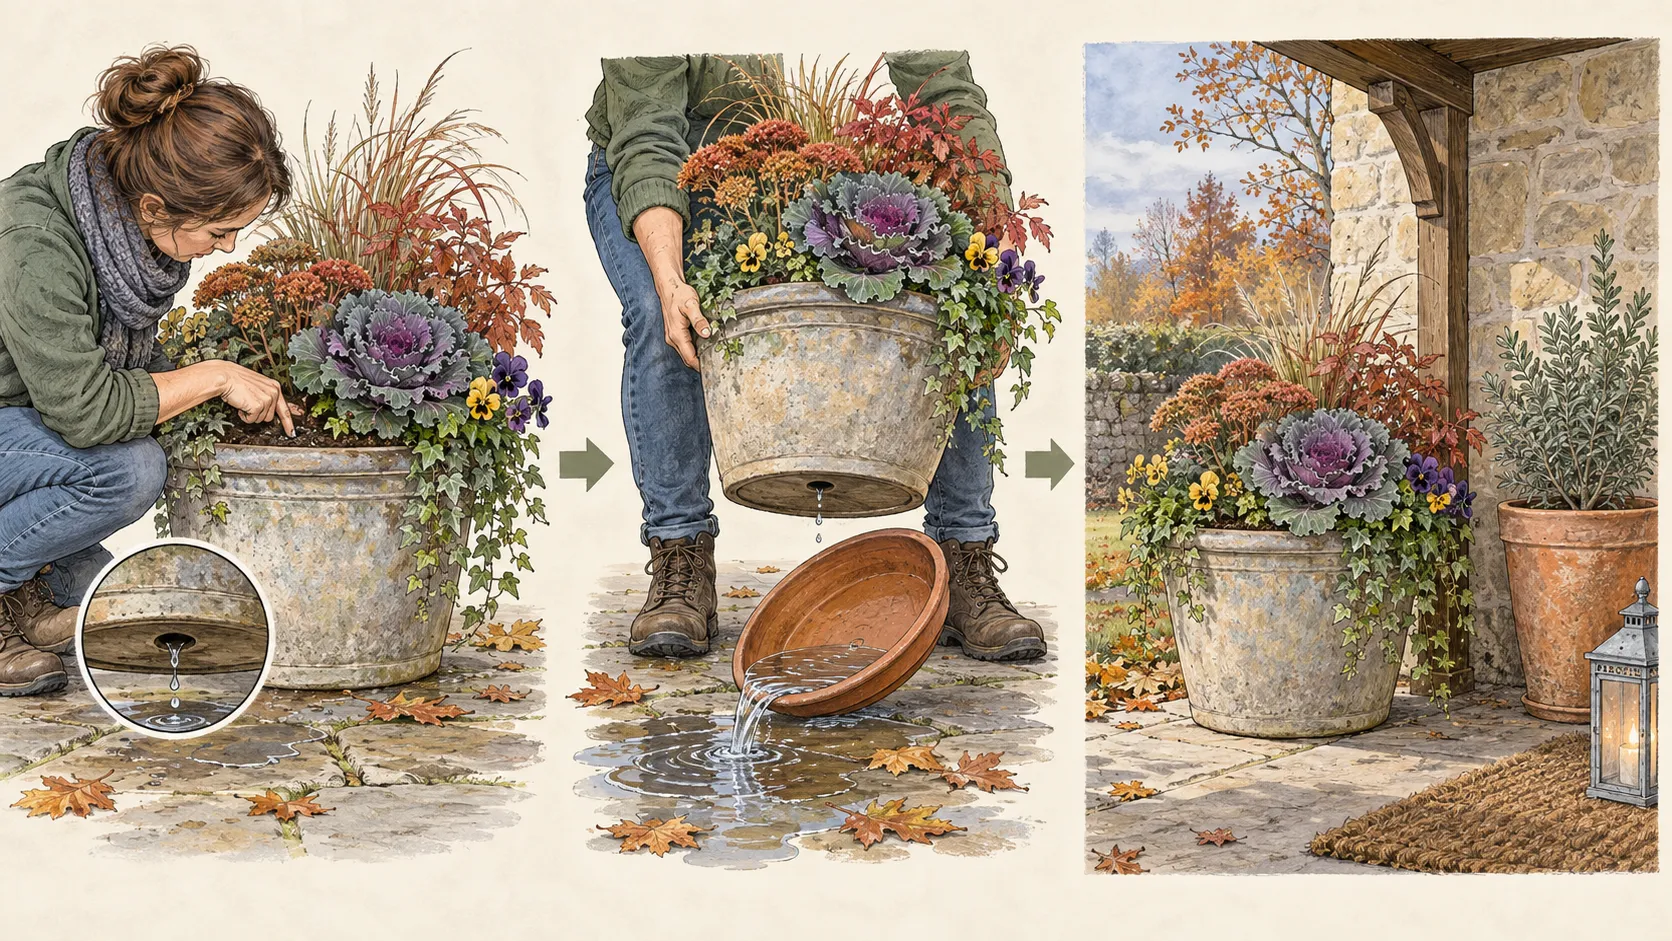
Move a container because its exposure, material, or plant vulnerability calls for it—not simply because rain is forecast. The sequence is simple: feel the mix, clear the outlet, empty the catchment, then decide whether the position remains appropriate. A portable autumn display can stay outside while it drains and receives light. A waterlogged or frost-sensitive setup should be moved early, while there is still time to choose a stable landing place and preserve the route back out.
Reset watering and fertilizer after the rain pattern changes
Stop using summer frequency as the default once temperatures, wind, and daylight change. The RHS emphasizes that there is no fixed container-watering schedule: inspect the actual moisture level, account for the container's size and material, and remember that light rain may not penetrate far. After a long wet spell, the correct action may be no water for several days. After a bright, windy interval, a shallow pot can still need a thorough drink even though the paving is damp.
Water slowly when the deeper mix is dry enough to need it, and let excess leave the bottom. NC State Extension advises watering until drainage begins and removing water from a saucer; the purpose is to wet the mix while preserving air around roots, not to maintain a bowl of standing water beneath the pot. Use the same check after a downpour. Rain that lands on foliage or runs off a dense canopy is not the same as water that has reached the root zone.
Review fertilizer before adding more. Repeated drainage can leach soluble nutrients from a limited container volume, but a rain event is not evidence that a plant needs an extra dose. University of Minnesota Extension recommends following the fertilizer label and warns that over-fertilizing can damage plants and send excess nutrients into the environment. As growth slows, remove the automatic feeding step unless the plant's label or a known deficiency calls for it.
Read symptoms before you move the plant
Use the whole plant as evidence. A plant that wilts, recovers after watering, and then wilts again may be in a small or crowded root system; a plant that remains wilted after the mix is wet deserves a check for root injury. NC State Extension connects continuous wilting after watering with roots that are no longer absorbing water, including roots affected by rot. Treat that as a diagnostic cue, not a reason to add more water.
Look for a wet lower zone, a sour or stagnant smell, leaves that yellow while the mix stays saturated, a crown that is soft, or roots that are brown and collapsing when the plant is removed for a justified repot. These signs do not identify one disease on their own. They tell you the water-and-air balance has failed and that the container should be isolated from healthy displays while you decide whether the plant can be salvaged. Clean tools and discard diseased media according to local guidance.
A dry surface, crisp leaves, or a pot that feels light points to a different problem. Test below the surface before changing the pot, and check whether the root ball has shrunk away from the wall. Correct a dry mix with slow, even wetting, then check whether water exits the base. Autumn care becomes more accurate when the same symptom is not assigned one cause: wilt can follow drought, root crowding, or a saturated root zone.
Make one autumn inspection after every heavy rain
Before a forecast wet spell, clear leaves from the pot rim, drainage hole, feet, saucer, and the surface beneath the container. Confirm that any cachepot or tray can be emptied without lifting a heavy planting. Check ties, stands, and dolly brakes, and move fragile terracotta where it will not fill and freeze. If the display includes a newly planted shrub or a plant with a known dry-side preference, mark it for a deeper moisture check after the rain instead of assuming the whole group behaves alike.
After the storm, inspect the lower route first. Empty standing water, lift the pot enough to confirm the outlet is free, and feel the mix at one-third depth. Record whether the container is open, slow, or trapped and note the weather that produced the result. A quick note turns a vague autumn impression into a usable pattern: one short shower may reveal no issue, while three wet days may expose a saucer, surface, or position that needs a permanent correction.
Before the first damaging freeze, repeat the audit with the container material and plant's winter plan in view. Keep hardy outdoor pots draining in a stable position, protect porous vessels from repeated freeze-and-thaw, and move tender or portable plants according to their light, temperature, and moisture requirements. The finished goal is modest: rain can leave, roots can breathe, and every pot has a position you can reach before the weather turns.
Steps
- Level
- easy
- Time
- About 45 minutes for the first audit, then brief checks after heavy rain and before freezing weather
- Tools
- Clean finger or narrow wooden plant label for checking mix depth, Stable pot feet, slatted stand, or plant dolly suited to the container, Hand fork for a shallow surface crust, Gloves and a towel for wet saucers and pot bases, Labels or a notebook for recording open, slow, or trapped drainage
- Materials
- Compatible container potting mix for a settled surface, Detachable saucers sized to leave the drainage outlet clear, A liner pot with drainage holes for a decorative cachepot, Weatherproof cover or sheltered space for porous pots before freezing, Clean replacement container if a pot is cracked, blocked, or too crowded
- 1Inspect the outlet
Lift or tilt the pot safely and check the drainage hole, underside, feet, saucer, and surface beneath it. Remove leaves, roots, and debris that block the route, and label the result open, slow, or trapped. Photograph a recurring blockage before you disturb it.
- 2Empty every catchment
Pour water from detachable saucers and decorative outer pots. If a liner sits inside a cachepot, keep a clear gap beneath it so the liner never stands in collected water. Check again after the next long shower.
- 3Feel below the surface
Check the mix about one-third of the way down. Do not water by the calendar: light rain may wet only the surface, while a blocked outlet can leave the lower root zone saturated. Compare that reading with the plant's normal moisture preference.
- 4Correct the surface
Clear leaves and crust, loosen only the upper layer away from the crown, and top up a settled pot with container mix if the original planting line remains visible. Keep added material below the crown and away from exposed stems.
- 5Skip the gravel layer
Keep gravel, stones, and broken pottery out of the bottom of the planted liner. Use a real drainage hole and open space below it; use an outer cachepot only as a catchment. Gravel cannot repair a blocked outlet or a saturated mix.
- 6Choose the position
Keep free-draining, frost-tolerant pots where their plants have suitable light. Move porous terracotta, tender plants, or waterlogged containers to a bright, ventilated, stable shelter before a damaging freeze. Plan the route while the ground and steps are dry.
- 7Reset water and feed
After rainfall changes, inspect moisture before watering and let excess leave the base. Follow the fertilizer label and remove automatic feeding when the plant no longer needs active summer growth. Never use extra fertilizer to compensate for a drainage problem.
- 8Repeat after heavy rain
Clear the outlet, empty the catchment, feel the mix, and record what happened after each prolonged wet spell. Use the record to fix a recurring blockage or change the container position. Repeat before the first damaging freeze.
- 9Confirm the freeze plan
Before the first damaging freeze, repeat the outlet check and confirm that porous pots, tender plants, and heavy wet containers have a bright, ventilated, stable destination and a safe route to it.
Related reading
Sources
- 18. Plants Grown in Containers. NC State Extension Publications. Source record · Accessed 2026-09-08.
- How to water containers: Expert Guide. Royal Horticultural Society. Source record · Accessed 2026-09-08.
- Container Drainage Options. University of Illinois Extension. Source record · Accessed 2026-09-08.
- Container Gardens. Colorado State University Extension. Source record · Accessed 2026-09-08.
- Fertilizing and watering container plants. University of Minnesota Extension. Source record · Accessed 2026-09-08.