Grow · harvesting
Harvest Lavender for Drying
Harvest lavender while the buds are strongly colored and only partly open, then use loose bundles, darkness, and moving air to dry the stems cleanly.
Published Last updated
In this guide
- Choose the stage by what the dried spike must retain
- Keep harvesting separate from structural pruning
- Clear surface moisture before the stems touch
- Edit the batch before making bundles
- Build each bundle around an open center
- Use darkness and circulation as separate tests
- Let the center stems authorize storage
- Steps
Choose the stage by what the dried spike must retain
For dried bundles, cut lavender while the spikes still hold strongly colored buds and only part of the flowers have opened. That stage keeps more of the spike intact through bundling, hanging, and storage. Colorado State University uses roughly half-open buds as a harvest cue, while Utah State University emphasizes flowers that still look bright and vivid. Read those cues together: color should be strong, the spike should still be substantially in bud, and the first open flowers should show the character of the bloom without dominating it.
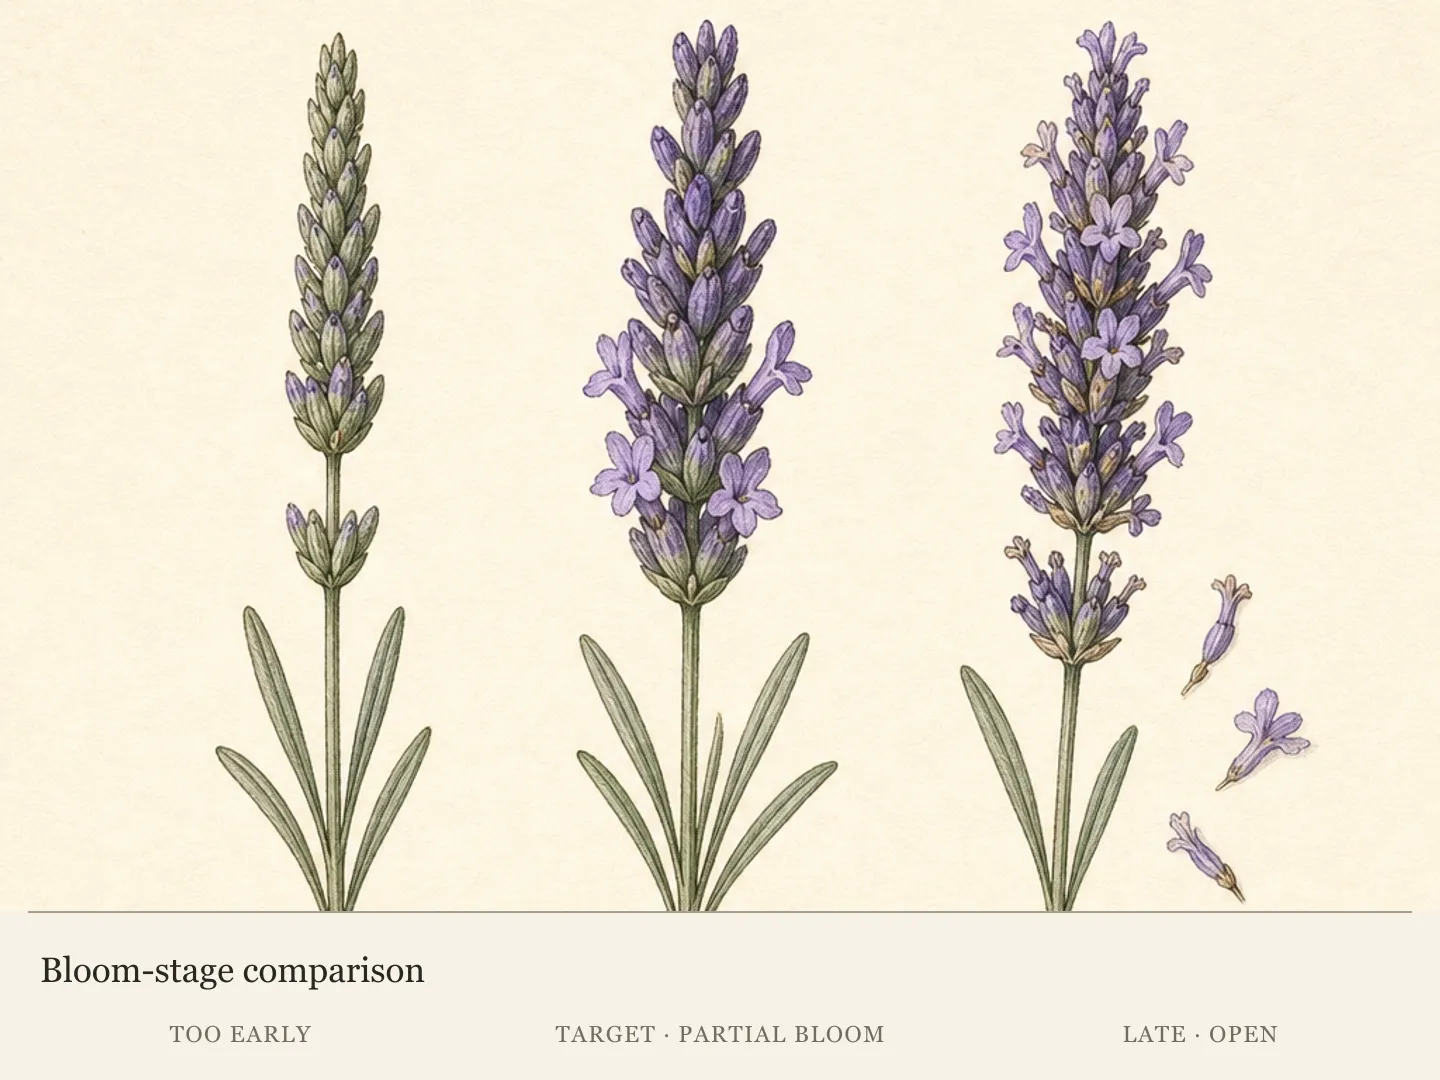
A plant rarely reaches one uniform stage at once. Spikes exposed to more sun may advance before those inside the mound, and separate flower stems can present different proportions of buds and open florets. Judge the stems you will cut, not the average appearance of the whole plant. An early pass can take the ready spikes while tighter stems remain on the plant; a later pass can collect those after their color develops. This selective approach protects the narrow harvest window without requiring every stem to qualify on the same morning.
The intended object is a dried flowering stem, so the spike itself supplies the useful decision. Tightly closed, weakly colored buds have not yet reached the bright appearance used for this harvest, while extensively open spikes carry more loose flower material into handling. Roughly half-open is the late edge of a useful home-garden window, not a command to wait until that exact fraction appears everywhere. Once a spike has moved beyond the form you want to preserve, leave it for another use or remove it during the plant's normal flowering and pruning cycle.
Use a representative handful only to understand variation, not to average incompatible stems into one answer. A spike with vivid buds and a few open florets can qualify beside a tighter one that remains on the plant. An extensively open spike does not become suitable because several neighboring stems are early. Stem-level selection keeps the stated cue attached to the material that will actually enter the drying batch.
Keep harvesting separate from structural pruning
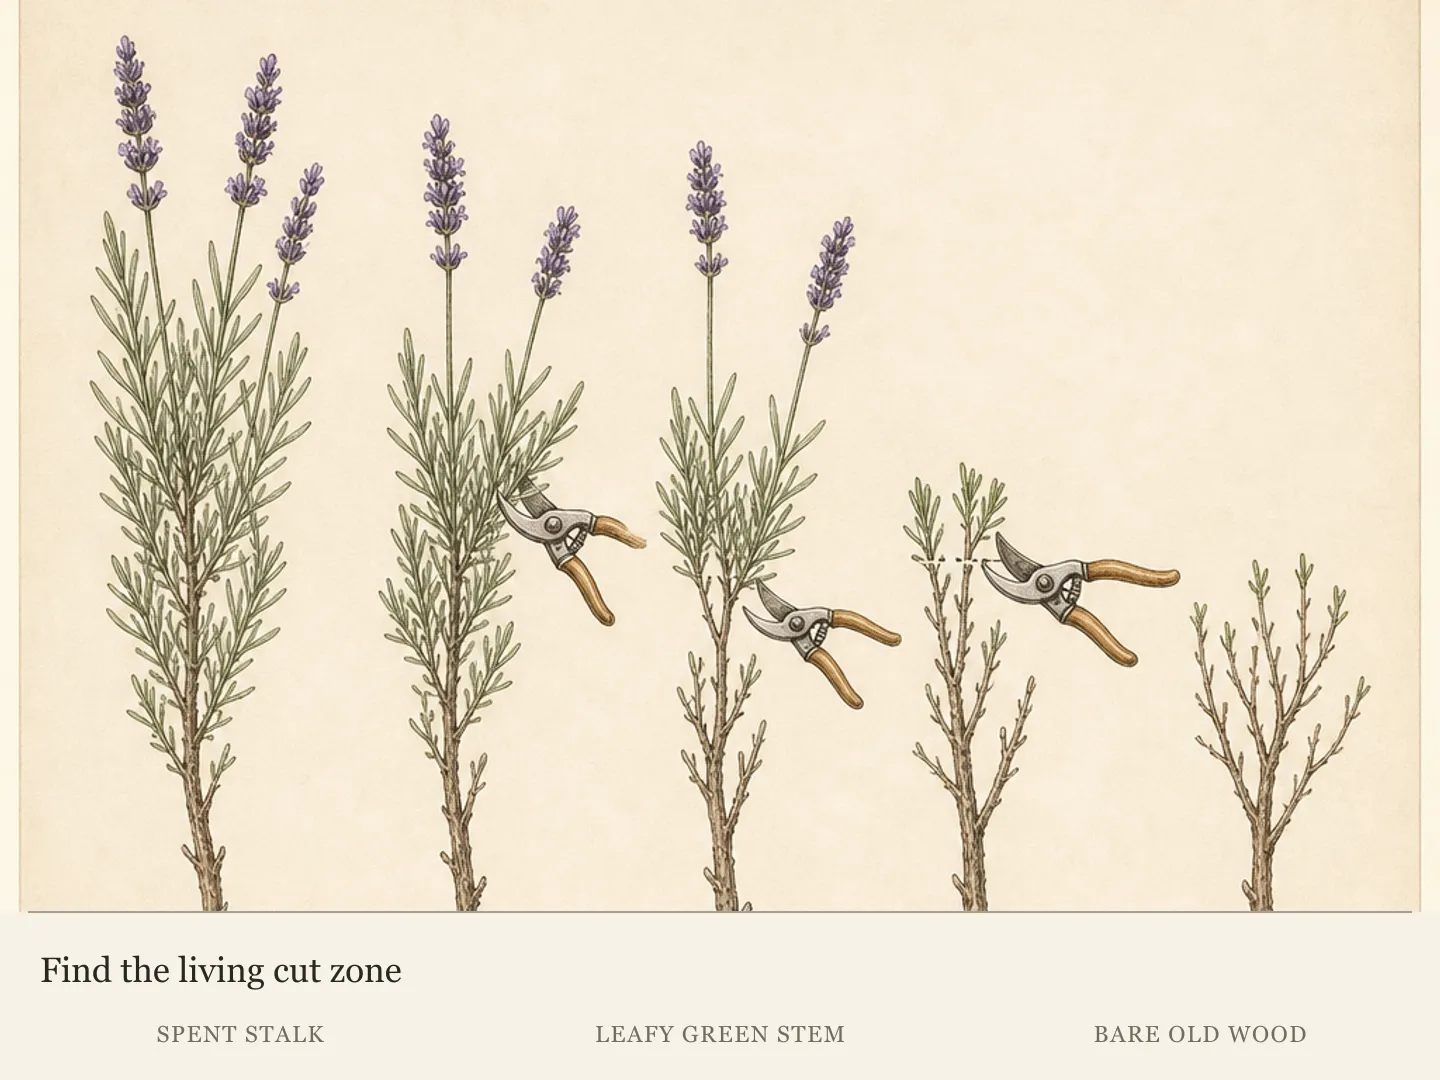
A harvest cut and a shaping cut answer different questions. Harvest concerns the quality and length of a flowering stem at one bloom stage. Structural pruning concerns the living leafy shell and long-term woody framework of the shrub. Treating a harvest as an opportunity to level the mound can turn selection of usable stems into an unplanned reduction of the whole plant.
The distinction is visible in what each decision values. Drying favors intact spikes and sufficient stem length for handling; pruning evaluates plant form, season, live growth and the boundary above old wood. A flowering stem may qualify for harvest while neighboring nonflowering growth has no reason to be shortened. Conversely, a stem unsuitable for the drying batch may still belong to a later plant-care decision.
Mixed bloom stages make visual symmetry especially misleading. Removing only ready spikes can leave an uneven outline while tighter buds continue developing. That temporary appearance is evidence of selective harvest, not failed shaping. Leave broader correction for the plant's pruning window rather than following the convenience of shears already in hand.
Keep the post-harvest plant and the drying crop as separate records. Stem quality, surface moisture and bundle capacity explain why material entered the batch; live leafy growth and the woody boundary explain later plant care. That separation prevents success in one task from being used as evidence that a deeper structural cut was timely or safe.
Clear surface moisture before the stems touch
Morning is useful because it can combine developed flower color with moderate temperature, but the clock is not the readiness test. Dew lodged between buds can remain after exposed leaf surfaces look dry. Once flower heads touch in a bunch, that hidden film moves into the least ventilated part of the batch and becomes much slower to lose.
Rain and overhead irrigation create the same issue on a larger scale. Sun on the path or a dry-feeling outer floret does not prove that leaf joints and the interior of the spike are clear. Surface moisture is a separate variable from bloom stage: a spike can be botanically ready and temporarily unsuitable for a drying harvest.
Extra room heat or a tighter hanging arrangement cannot reliably compensate for a wet start. Heat can reduce aromatic quality, while crowding removes the circulation needed to carry moisture away. Before cutting, confirm that the ready stems coincide with a dry weather interval, a shaded handling route and enough open drying space for the full batch.
Surface moisture also changes during handling. A deep bucket of warm stems can create a damp center even when the plant was dry, while a loose shaded layer preserves the condition observed outdoors. The interval between plant and hanging setup is therefore part of moisture control. A batch awaiting space in sun or compression has left the conditions under which its readiness was judged.
Edit the batch before making bundles
A drying batch is only as uniform as the material hidden at its center. Bruised, soiled, discolored or damaged tissue carries a different moisture and decay risk from sound stems, while over-open spikes shed differently from mostly budded ones. Once dozens of ends are aligned, those distinctions become difficult to recover. Editing is therefore a quality classification, not a cosmetic pass.
Washing changes the state of the batch even when it improves cleanliness. Water added for the intended use must leave again before stems share a confined center. A clean wet spike and a dirty dry spike fail for different reasons; neither should be treated as ready simply because the hanging station is available. The decision belongs to the actual surface condition after cleaning.
Identity also fades during drying. Cultivar, color and harvest-date differences that are obvious when fresh can become subtle after the spikes lose water. A label preserves those distinctions only if it remains associated with the lot and does not alter bundle geometry. Keep separate batches whenever those differences must remain traceable after drying.
Questionable tissue should not be diluted into a larger sound group. One bruised or discolored stem still occupies the center conditions of the bunch and becomes harder to trace after drying. Excluding it protects the lot's interpretability: if the remaining batch develops an odor or uneven texture, the cause can be sought in airflow and moisture rather than in material already known to be compromised.
Build each bundle around an open center
Colorado State University describes crop bundles of 50 to 100 stems, but a count detached from stem geometry can mislead a home gardener. Thick, branched stems and heavy flower material close space faster than slender straight stems. Oregon State University's warning about mold in dense herb bunches supplies the controlling principle: air must reach the center, whatever the nominal count.
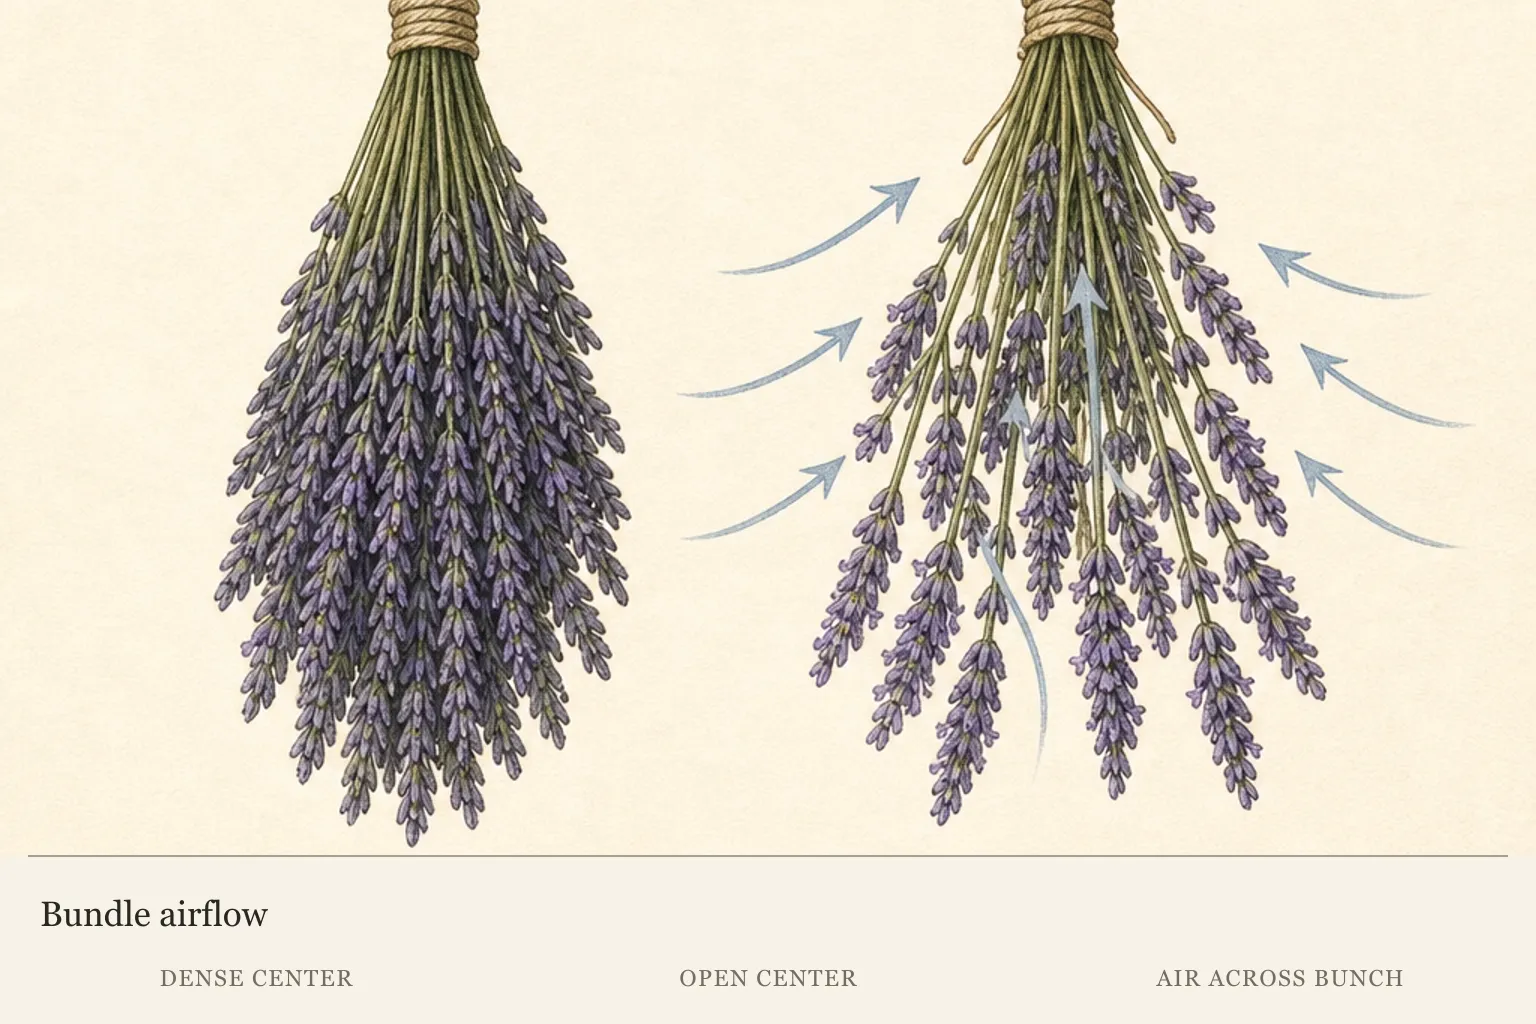
The center is a three-dimensional passage, not a circle visible only from the outside. Flower heads may look separate while crossing stems create a compact interior. Local humidity raises the consequence of that restriction because the surrounding air accepts moisture more slowly. A smaller batch can therefore be the higher-capacity drying unit when it preserves movement through the core.
Stem shrinkage adds another design constraint. As water leaves, a rigid tie can loosen and drop stems, while excessive restraint can collapse the open center the setup needs. Rubber bands are useful because their tension follows the changing diameter. The correct restraint holds the cut ends as a group without turning leaves and flowers into a sealed mass.
Available hanging space sets the upper limit for the harvest batch. Separate bunches that touch at their widest points behave like one larger wall, reducing the outside air path even if each center began open. Assemble only as many bundles as stem geometry, room humidity and spacing can keep as independent ventilated units.
A simple count can still be recorded as context, provided it is paired with the physical result. Note whether the center remained visibly open and whether stems varied in thickness or branching. If a later batch dries unevenly, that record is more informative than knowing only that both bunches contained the same number of stems. It turns bundle size into a local observation rather than a copied quota.
Use darkness and circulation as separate tests
A cool, dark place with good circulation combines three independent protections. Darkness slows color loss, moderate temperature protects aromatic quality, and moving air carries evaporated moisture away. A sunny window can provide movement while failing the light test; a closed cupboard can protect color while holding stagnant air. One favorable label does not cancel the missing condition.
Room names are poor proxies for the microclimate around the spikes. An open spare room may become still when rails are packed, while a modest dark area can serve a small separated batch. The relevant path begins where air enters, continues around and through each bunch, and ends where damp air can leave. A hot blast against one side is not equivalent to steady exchange through the center.
Drying capacity is therefore a property of spacing, not floor area alone. Every additional bunch consumes part of the shared air path. When flower heads overlap, independent units behave like a continuous wall and the center gradients steepen. This explains why bloom stage and room capacity jointly determine how many ready stems can enter one harvest pass.
Differences between outer and inner stems are diagnostic evidence. Papery flowers outside with flexible stems inside identify restricted movement through the core rather than a calendar problem. Uniformly slow drying across all surfaces points more toward the room environment. The location of the lag determines whether bundle geometry or shared ventilation is the dominant limit.
Musty odor, condensation or soft discolored tissue marks deterioration, not merely incomplete drying. Additional time cannot return compromised material to clean quality. Treat ordinary flexible stems, an airflow gradient and visibly damaged tissue as different conditions rather than one problem with one remedy.
Let the center stems authorize storage
Dryness is a material state rather than elapsed time. Oregon State University describes dried herbs as crumbly, with stems brittle enough to break when bent. Lavender supplies two linked signals: flower material loses pliability and the supporting stem changes from folding to snapping. Either signal alone can miss moisture retained by the other tissue.
A bunch dries from its most exposed surfaces inward, so the crisp outer stem is the earliest and least demanding evidence. The center carries the higher burden because it began with less air access and may include thicker stems. Variation within the bunch matters as much as the average feel; one flexible interior portion means the batch is not uniformly ready for closure.
Airtight storage changes incomplete drying from a visible process into trapped moisture. Darkness inside the vessel then makes condensation or softening harder to notice until quality has declined. Labels preserve identity, but they cannot compensate for a mixed moisture state. The storage threshold must be satisfied throughout the material being enclosed.
Loose decorative bundles and enclosed culinary or craft material may have different final containers, yet both depend on the same physical finish line. Brittle stems and readily crumbling flowers should characterize the slow center as well as the edge. Sample the least-dry portion before storage; neither the calendar nor the best-looking outside stem can authorize transfer.
Mixed stem thickness deserves separate attention because the thickest stems can lag after fine stems already snap. One result cannot be generalized across a visibly varied bunch. When readiness differs, separate the batch by physical state instead of relying on the scheduled drying period. Storage quality depends on uniform condition at closure, even when harvest date and cultivar are shared.
Steps
- Level
- easy
- Time
- One garden session, followed by air-drying
- Tools
- Clean pruning shears, Rubber bands, Paper labels
- Materials
- Dry lavender stems, Airtight storage container
- 1Choose the bloom stage
Walk around the plant and inspect individual spikes. Select stems with bright, vivid color, substantial closed bud, and only part of the flowers open. Treat roughly half-open buds as the late edge of the useful drying window. Mark or mentally separate tighter spikes for a later pass, and leave extensively open stems outside this bundle rather than waiting for the whole mound to reach one average stage.
- 2Wait for dry surfaces
Choose a dry morning after dew has evaporated. Touch the flower clusters, leaf joints, and the places where stems will press together. Postpone cutting when rain, irrigation, or dew remains inside the spikes even if the outer surface looks dry. Set up the shaded work area, bands, labels, and hanging space before the first cut so harvested stems can leave direct sun promptly.
- 3Inspect and label the batch
Spread each cut batch loosely in shade and remove bruised, soiled, discolored, or visibly damaged stems. Separate spikes that differ too much in bloom stage or stem size for the same bunch. If the intended use requires washing, rinse gently in cool water and delay bundling until all surface water has drained and evaporated. Label cultivar, color, or harvest batch while the fresh distinctions remain clear.
- 4Cut useful stem length
Use clean pruning shears to take long flower stems one at a time. Follow the chosen stem down, support it, and make a deliberate cut that supplies useful length without leveling surrounding leafy growth. Keep this pass focused on harvestable flowers. If the mound later needs structural work, make that decision on its own pruning schedule with the live framework visible.
- 5Make breathable bundles
Align the cut ends without crushing the flower heads and look into the center of the handful. Divide it whenever stems form a dense core or air cannot pass between them, even if the bunch is smaller than the published 50-to-100-stem crop range. Secure the cut ends with a rubber band, leaving the flowering portions loose. Confirm that the band holds while the bundle retains an open center.
- 6Hang in darkness with moving air
Suspend every bundle flower-side down in a cool, dark, ventilated room. Leave open space between flower heads and arrange rows so air can cross the bunches. During drying, compare the outer stems with those in the center. Split a bunch whose inside remains flexible, and isolate any material that becomes musty, soft, discolored, or associated with condensation before it affects the rest of the batch.
- 7Test before storage
Take stems from the slowest-drying center and bend them. Continue drying whenever they flex, even if the outside of the bunch feels papery. Storage begins only when center stems break crisply and the flower material crumbles readily throughout the batch. Move the dry lavender into a clean airtight container, retain the label, and keep it in a cool, dark, dry place.
Plants in this guide
Related reading
Sources
- Growing Lavender in Colorado. Colorado State University Extension. Source record · Accessed 2026-08-15.
- Drying herbs. Oregon State University Extension Service. Source record · Accessed 2026-08-15.
- How to Grow English Lavender in Your Garden. Utah State University Extension. Source record · Accessed 2026-08-15.