Plant problems · lavender problems
English Lavender Turning Brown: Diagnose Before Cutting
For English lavender and lavandin, separate normal woody structure and spent bloom from wet-root decline, drought, winter injury and pruning damage by checking pattern, tissue and soil together.
Published Last updated
In this guide
- Map the browning before changing care
- Trace brown tissue to its living boundary
- Reconstruct what changed around the plant
- Recognize normal brown structure without ignoring change
- Read a wet crown as a site-and-root warning
- Confirm drought inside the occupied root ball
- Let winter exposure reveal its own pattern
- Trace bare patches back to the pruning boundary
- Use response over time to close the diagnosis
- Diagnosis
Map the browning before changing care
Brown color alone cannot diagnose English lavender or lavandin. First locate the boundary between sound and affected tissue. Brown spent flower stalks above a firm leafy mound describe a completed bloom cycle; discoloration rising from a dark crown in wet soil describes active decline. One exposed side turning straw-colored after winter creates a third map. The position of the damage changes which explanation deserves the next check.
Stand back and photograph the whole plant before cutting. Compare the top with the base, the windward side with the sheltered side, and the outside green shell with the woody interior. Mark one apparently healthy stem and one affected stem. These reference points allow later change to be seen without relying on a general impression that the mound looks better or worse.
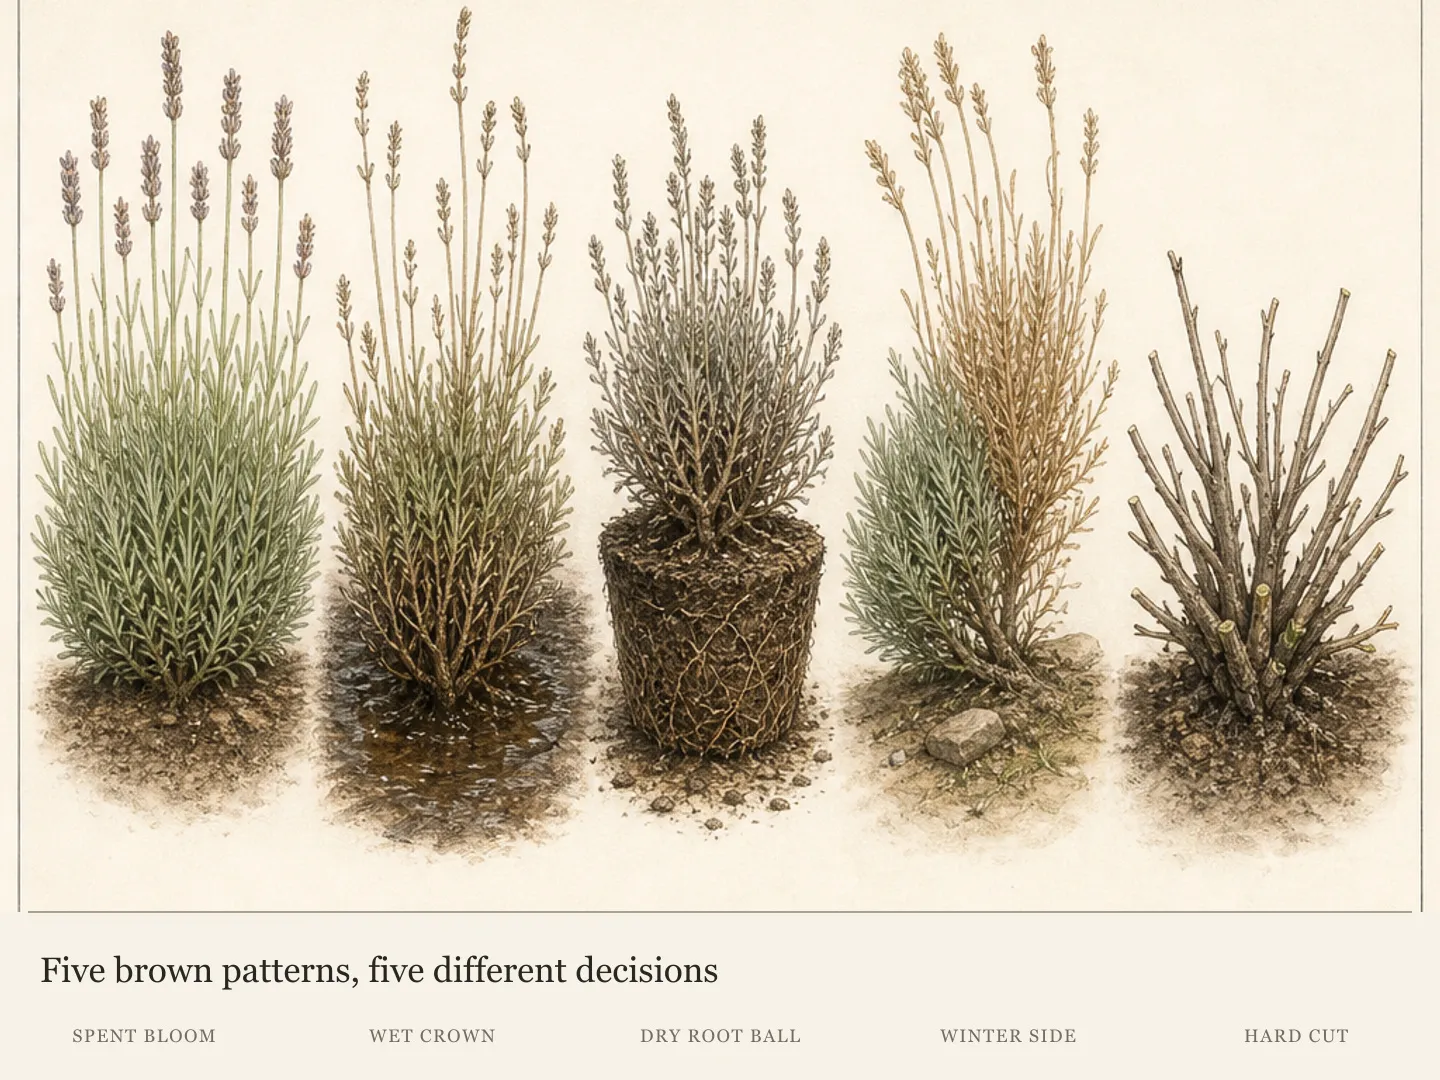
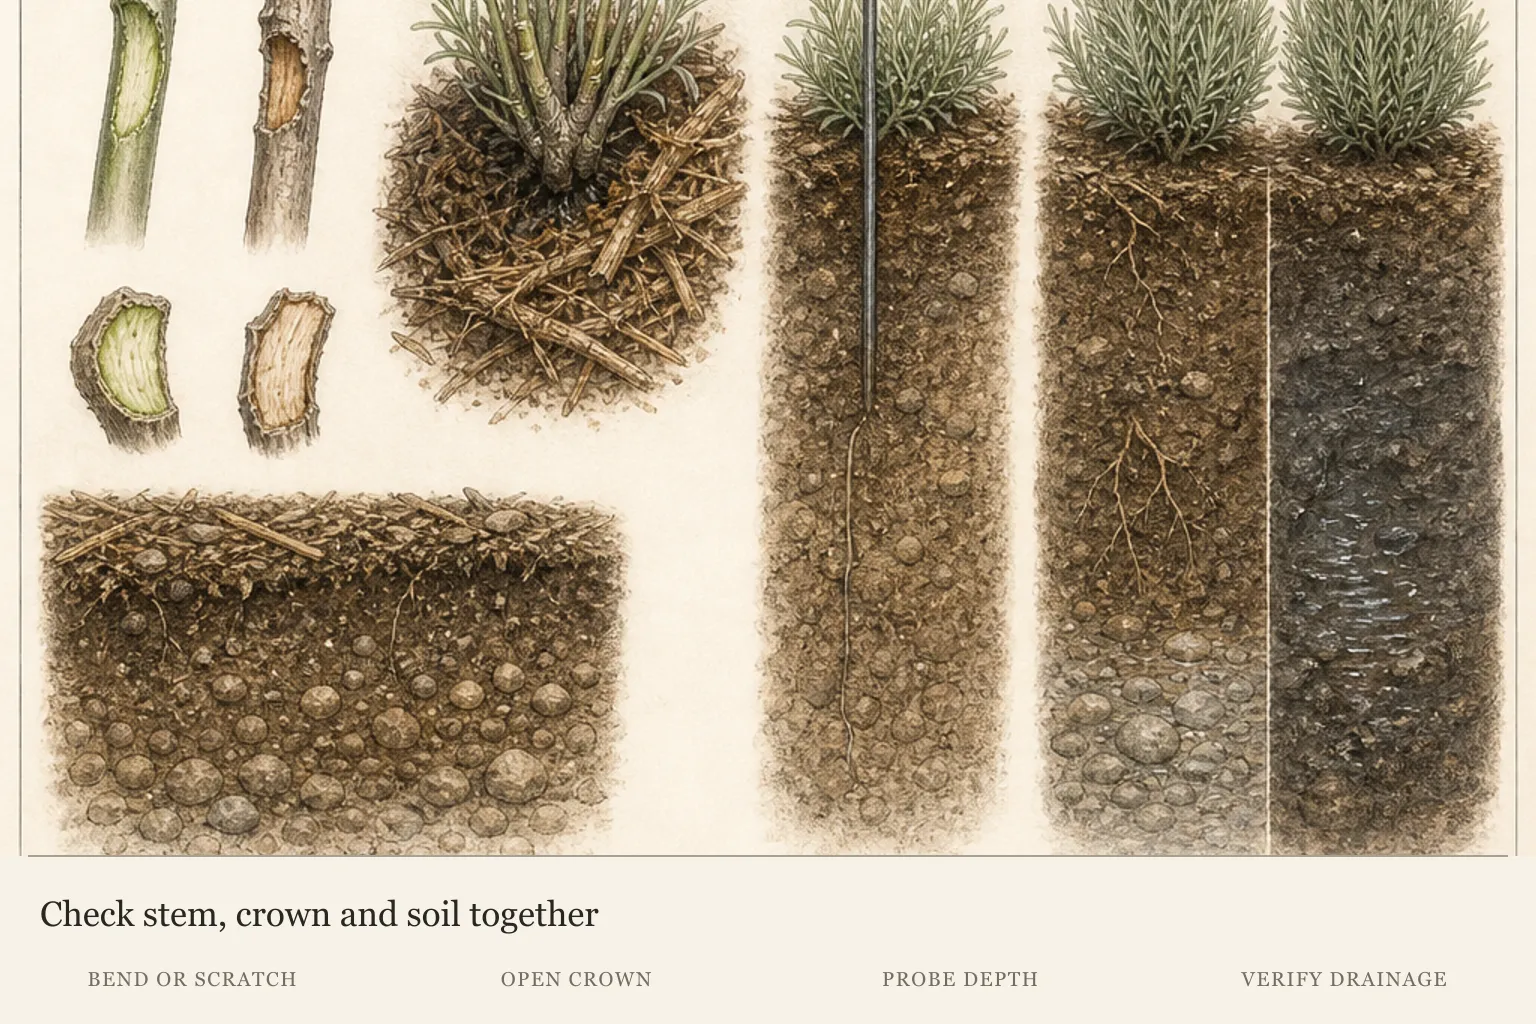
Next, test tissue quality. Flexible shoots with green beneath a small bark scratch remain different from brittle stems that are dry through their cross-section. Touch the crown and trace each questionable branch toward a living side shoot. Brown tissue can be old, spent, injured, or dead; its texture and connection to live growth help place it in the correct category.
Finish the first survey below the surface. Pull mulch away from the point where stems meet soil and probe the occupied root zone, not only the exposed top. Note whether the site remains wet, whether a container feels unusually heavy or light, and whether mix has pulled from a pot wall. Foliage and roots must tell a coherent story before water, pruning, or another intervention begins.
Trace brown tissue to its living boundary
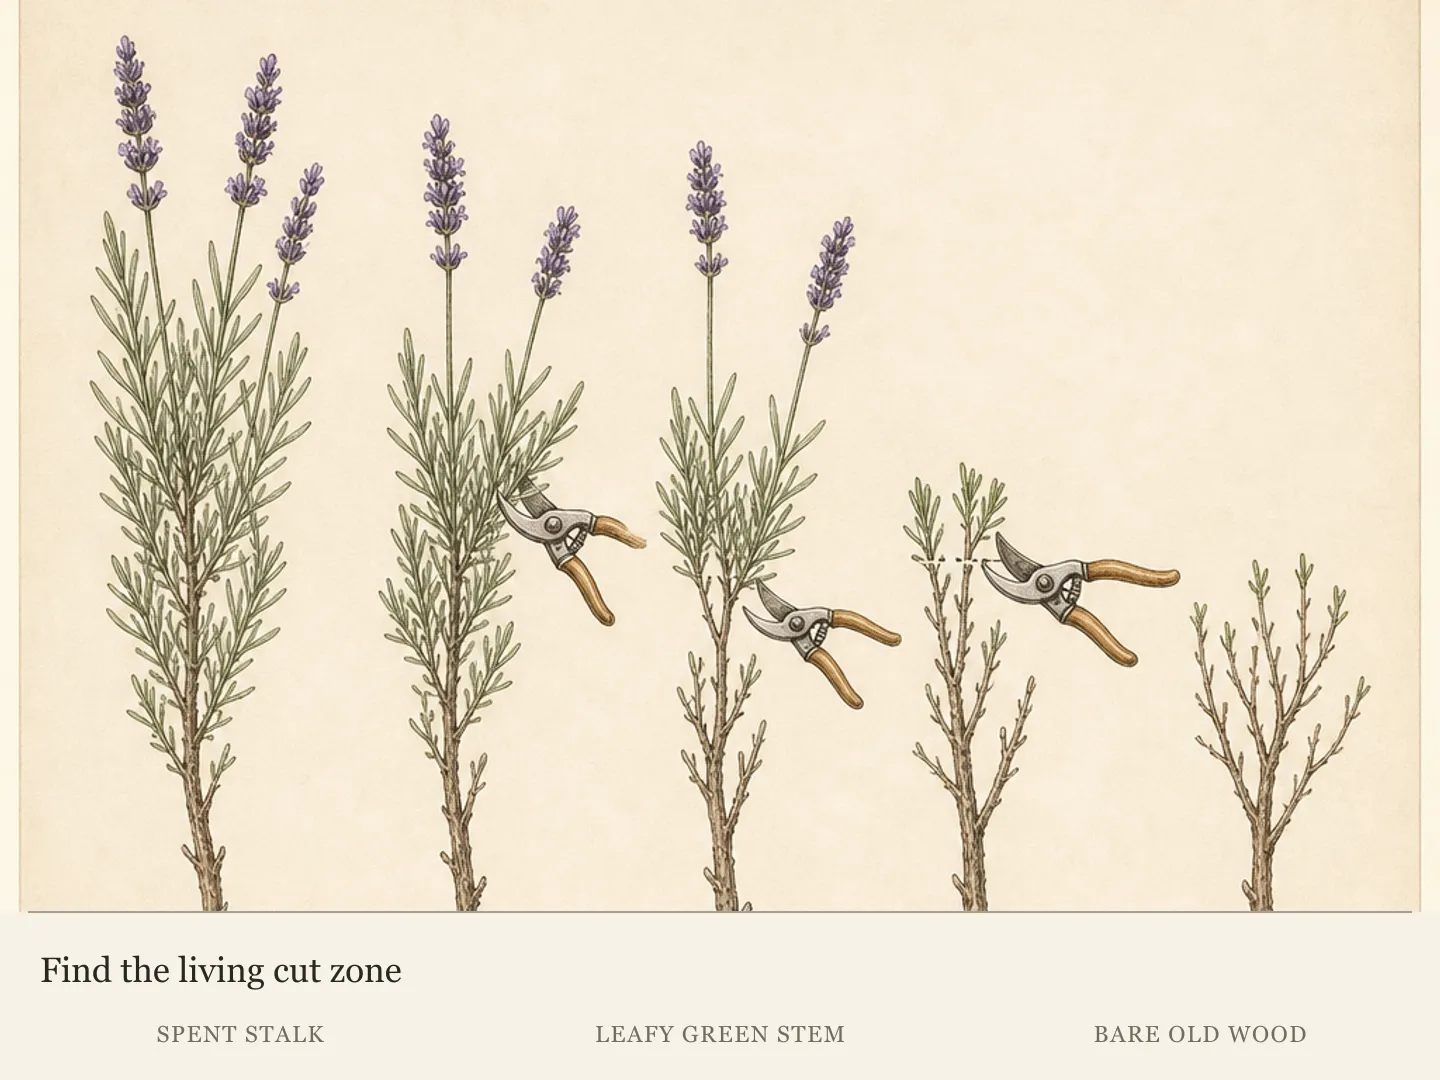
A spent flower stalk or old supporting branch can be brown while the outer lavender remains alive. Trace it to leafy growth before cutting. Expanding softness, a dry establishing root ball, winter exposure and an old hard-cut hollow require their own checks. Preserve the living shell while diagnosing the route, and do not lower healthy foliage merely to hide normal woody structure.
Reconstruct what changed around the plant
Record recent rain, irrigation, freeze-thaw weather, transplanting, and pruning. The sequence matters. Browning that follows a hard cut and ends at leafless stems has a different premise from discoloration that begins at a persistently wet crown. Winter exposure that affects the windward face should not be interpreted as uniform root-zone failure without additional evidence.
Look for direction and pace. A static group of brown flower stalks above green foliage may simply remain from bloom, while darkening that continues outward from the base deserves prompt attention to drainage and crown condition. A single photograph provides a baseline; another view after an observation interval shows whether the boundary moved.
Avoid changing several conditions during this reconstruction. Extra irrigation, fertilizer, hard pruning, and a site move made together can blur the relationship between cause and response. Correct the strongest observed condition first, preserve marked stems, and watch the next growth evidence. A plant that continues declining in a correctly moist, freely drained root zone needs local diagnostic help rather than a more elaborate sequence of guesses.
The immediate priority is different for wet and dry patterns. A saturated crown should not receive more water while the site is assessed. A confirmed dry occupied root ball should not remain dry merely because overwatering is a known lavender risk. Diagnosis protects the plant from receiving the remedy for the opposite condition.
Recognize normal brown structure without ignoring change
Established lavender develops a brown, sparsely leafed framework inside its outer green shell. That woody center is normal architecture, not a diagnosis of death. Follow an interior branch outward. If it supports flexible leafy shoots, the brown section is functioning as framework even though it does not carry dense foliage itself.
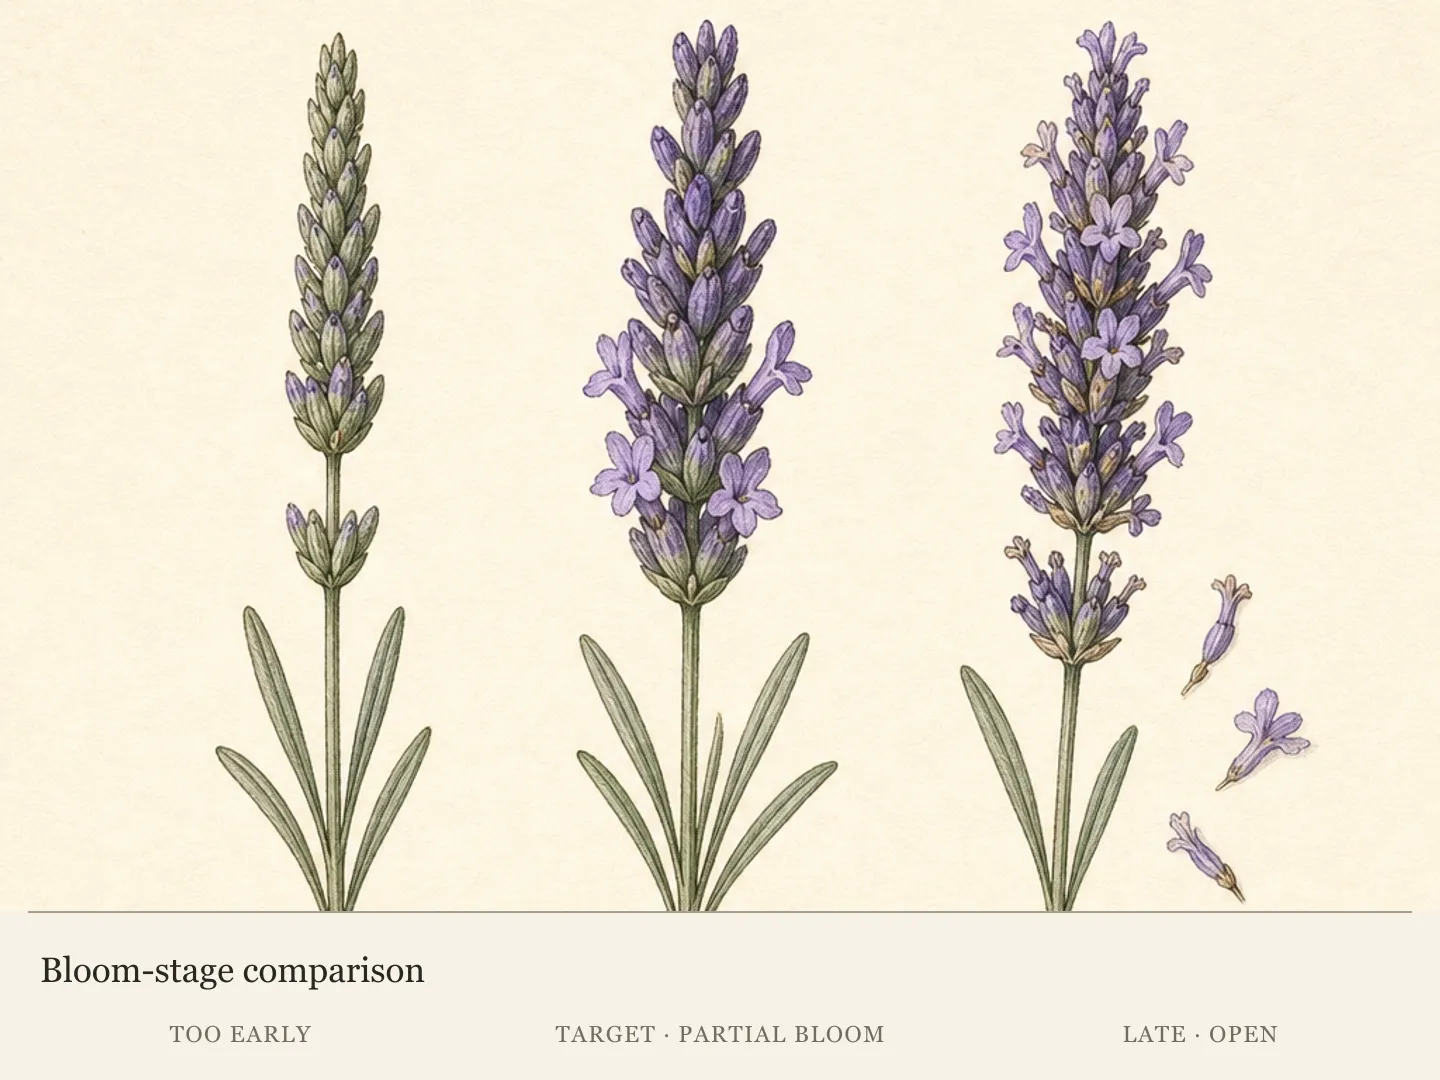
Spent flower stalks create another expected brown layer. They rise above or through an otherwise firm green mound and connect to live leafy shoots below. Their dry appearance is localized to the completed bloom structure. Remove them during routine pruning within the living boundary; do not lower the entire shrub to the height of interior wood simply to erase every brown line.
Questionable stems need an individual test. Bend the tip gently and scratch a tiny patch of bark where doing so will clarify tissue. Living material retains some flexibility and shows green beneath the surface. A stem that is brittle, dry through the cross-section, and connected to no living side shoot can be treated as dead, but that finding applies to its path rather than the whole mound.
Normal wood can coexist with a new problem, so the label should not end the inspection. Compare the established brown framework with any softening crown, expanding outer discoloration, or sudden loss of flexible shoots. The old center is stable architecture; a moving boundary or changed tissue quality is the feature that requires another diagnostic branch.
Read a wet crown as a site-and-root warning
Pull mulch and debris away from the crown so the stem bases and adjacent soil are visible. A healthy comparison is firm tissue at an open crown with water able to leave the root zone. Concern increases when the base is dark or soft, the plant occupies a low wet position, or soil stays saturated after nearby ground has drained.
Foliage cannot identify a root or crown disease by itself. Lavender above damaged roots may brown, wilt, or lose vigor in ways that resemble drought because the canopy is not receiving normal root support. That overlap makes the below-surface check essential. A heavy wet root zone and soft crown point away from adding water, even when the leaves look dry.
Stop irrigation while the root zone is already saturated, clear any obstruction that keeps runoff at the crown, and assess the drainage condition. Do not perform a broad shaping cut to make the top look orderly before the base has been evaluated. Removing canopy tissue does not correct a low wet site or establish which root problem is present.
Active crown decay or root loss warrants local diagnostic help. The correct response depends on what is actually affecting the roots and whether a suitable drained site can be provided. Avoid naming a pathogen from leaf color or applying a treatment from appearance alone. Preserve a sample or the relevant plant tissue as advised locally, and keep water from being used as the automatic answer during the assessment.
Confirm drought inside the occupied root ball
Containers and newly planted lavender can dry before their roots occupy surrounding soil. Probe the actual root ball or established root zone because the surface can misrepresent moisture below. In a container, compare the pot's weight with its freshly watered state and look for mix that has pulled away from the wall. In the ground, inspect where the new roots and original root ball are located.
A markedly light pot, dry mix through the occupied depth, and brittle decline across the plant support a dry-root interpretation. Several cues should converge. One brown tip or a dusty surface does not establish that the whole root ball lacks water, just as a recent irrigation does not prove that water penetrated the occupied mass.
Re-wet a confirmed dry root zone slowly and observe penetration. Water should enter the occupied mix and then leave through a functioning drainage path rather than running around a shrunken ball or collecting at the crown. Verify the result below the surface. The purpose of this correction is to restore moisture to the roots, not to begin frequent shallow watering.
After the correction, return to condition-based checks. Watch the marked stems and the moisture change through the root zone. If the plant continues to decline even though the occupied mix is moist but not saturated and drainage is working, drought no longer explains the entire pattern. Escalate to diagnosis without alternating between repeated soaking and long unobserved drying.
Let winter exposure reveal its own pattern
Winter injury often follows exposure. The windward side or upper canopy may turn straw-colored while sheltered lower buds and shoots remain green. Compare directions before declaring the whole plant dead. A one-sided pattern linked to freeze-thaw weather or drying wind carries different evidence from browning that rises evenly from a wet crown.
Do not choose the final pruning depth while the survival line remains uncertain. Gray stems can conceal living tissue lower down, and the next spring growth provides a clearer boundary. Wait for buds and shoots to show which sections remain connected to life, then trace dead portions toward those living junctions.
When growth appears, remove only confirmed dead wood. Keep healthy sheltered sectors at their own leafy height, even if the damaged side sits lower. Cutting the entire mound down to match winter injury sacrifices living tissue and can expose more old wood. The repaired outline may remain uneven while surrounding shoots occupy the available space.
Prevention for the next winter belongs to the site and plant choice as much as the shears. Review drainage, wind exposure, and cultivar suitability in light of the observed pattern. The diagnosis does not guarantee that one adjustment will prevent every future injury, but it identifies the conditions that should inform the next planting or protection decision.
Trace bare patches back to the pruning boundary
A bare patch that follows a hard cut into leafless stems often records the location of that cut. Trace the edges of the opening and look for living side shoots below or beside it. If green growth ends above the cut surface and the remaining stem is bare old wood, the gap reflects a pruning boundary that was crossed.
Do not enlarge the opening by cutting neighboring healthy shoots down to the same level. Preserve foliage around the gap and shorten future stems only while leaves remain below the blades. Surrounding growth may soften the outline over time, but another hard shear removes the very shoots available to do that work.
Dead fragments within the patch can be removed to a living junction when one exists. A brittle piece with no live connection has a clear endpoint; a rigid brown branch that still supports leafy shoots remains part of the framework. Treating every brown stem as dead would convert normal lavender architecture into unnecessary damage.
The observation checkpoint is new growth around the retained leafy edge. Photograph the patch, leave the crown visible, and compare the same points during active growth. If browning expands from the base or the soil stays wet, the pattern is no longer explained by the old cut alone and the root-zone branch of the diagnosis should be reopened.
Use response over time to close the diagnosis
After identifying the strongest pattern, make the narrow correction that fits it and preserve the marked healthy and affected stems. Normal spent bloom moves into routine pruning. Saturated roots move into drainage assessment and local diagnosis. Confirmed dryness receives a slow rewetting. Winter uncertainty waits for spring growth, and pruning injury keeps future cuts within foliage.
Compare the location, tissue quality, and root-zone condition again after the correction has had time to be observed. The important question is whether the boundary stabilizes and living shoots continue, not whether existing brown tissue becomes green. Dead or spent material will remain brown; success appears in the behavior of the retained live portions and the absence of advancing decline.
Continuing decline in a correctly moist, freely drained root zone does not justify cycling through more water, fertilizer, and indiscriminate cutting. Those actions address different premises and can add stress without resolving the cause. Seek local diagnostic help with the recorded timeline, whole-plant photographs, and observations of crown, roots, exposure, and prior pruning.
A closed diagnosis gives the next gardening decision a boundary. It tells you which tissue can be removed, which condition must be corrected, what evidence should appear next, and when the available observations are insufficient. That is more useful than assigning one cause to the word brown, because English lavender can display the same color in normal framework, spent bloom, dry injury, wet-root decline, winter damage, and old-wood pruning scars.
Diagnosis
Dry brown flower stalks rise above an otherwise firm mound, or brown sparsely leafed branches remain inside a flexible green outer shell. The brown material is localized to completed bloom or established framework while the crown stays firm and outer shoots retain living tissue.
- Check
- Trace a brown flower stalk into the mound and confirm that it meets flexible leafy growth. For interior wood, follow the branch outward to living shoots, bend a questionable tip gently, and scratch a tiny bark patch where needed. A firm crown, green tissue beneath bark, and a stable outer shell support normal structure; an expanding soft boundary does not.
- Cause
- Normal spent bloom and the mature woody framework of established English lavender or lavandin. Flower stalks naturally dry after bloom, and older supporting branches remain brown and sparsely leafed inside the green shell without being dead along their full length.
- Action
- Remove spent flower stalks during the plant's routine pruning window, shortening only where leaves remain below each cut. Retain the living outer shell and the mature woody branches that support it. Remove an interior fragment only when it is brittle, dry through its section, and connected to no living side shoot; do not lower the whole mound to erase normal brown framework.
Browning begins low on the plant and advances from a dark or soft crown while the occupied root zone remains wet. Stems may detach easily, the site may hold water after nearby soil drains, and the canopy can look dry despite a heavy, saturated root zone.
- Check
- Pull mulch and debris away from the crown, then inspect the stem bases and probe below the surface in the occupied root zone. Compare the site's drainage with nearby soil and examine roots when decline is active. A dark soft crown, persistent saturation, and loss of healthy roots warrant local diagnosis; leaf browning by itself cannot name root or crown disease.
- Cause
- Poor drainage with possible root or crown rot. Persistent wetness at a low or covered crown can damage roots and base tissue, but foliage symptoms alone cannot identify a pathogen or prove which disease is present; the cause remains a diagnosis, not a visual certainty.
- Action
- Stop adding water while the root zone is saturated. Clear mulch or trapped runoff from the crown, correct the drainage condition that can be observed, and obtain local diagnostic help for active crown decay or root loss before choosing treatment or replacement. If replacement is advised, use a site with suitable drainage; canopy pruning alone cannot repair a persistently wet root zone.
Brittle decline appears across a container plant or a newly planted root ball while the occupied mix is dry below the surface. A container feels markedly light, potting mix may pull from the wall, and there is no soft wet crown to support the opposite diagnosis.
- Check
- Probe the actual container ball or original planting zone, not only the surrounding surface. Compare pot weight with the fully watered and drained state, look for mix pulled from the wall, and test whether a slow application reaches the occupied depth before draining. Require several dry cues together and verify that the crown is not soft or sitting in wet soil.
- Cause
- Drought stress confined to a container or establishing root ball. The surface may not reveal moisture at the occupied depth, and water can fail to penetrate dry mix evenly, leaving active roots dry even when the surrounding area or top layer has recently received water.
- Action
- Apply water slowly to the confirmed dry occupied root ball, pausing so shrunken mix can accept it, and verify that moisture penetrates before excess drains away. Remove standing runoff and resume checks based on root-zone moisture and container weight. Avoid frequent shallow applications, and seek diagnosis if decline continues after the root ball is moist but not saturated and drainage is functioning.
One windward side or the upper canopy turns straw-colored after winter while sheltered lower buds, stems, or the opposite side retain green tissue. The boundary follows exposure and freeze-thaw weather more closely than it follows an evenly wet or dry root zone.
- Check
- Compare the windward, upper, and sheltered portions of the same plant. Mark lower protected buds and flexible green stems, review the timing of cold, drying wind and freeze-thaw weather, and wait for spring shoots to reveal the survival line. Reopen the root-zone diagnosis if browning instead rises from a wet crown or spreads without an exposure pattern.
- Cause
- Cold, drying wind, freeze-thaw exposure, or winter-wet injury affecting the most exposed tissue. Cultivar, drainage, and shelter influence the observed pattern, so one damaged side does not establish that every stem or the entire root system has died.
- Action
- Wait for spring growth to identify the living boundary, then remove only stems confirmed dead back to a live junction when one exists. Keep sheltered healthy sectors at their own leafy height. Review cultivar suitability, drainage, and wind protection for the next winter in light of the exposure pattern, without assuming that one-sided damage requires cutting the entire mound evenly.
A bare opening appears where the plant was cut into rigid leafless stems. Green shoots remain around or above neighboring cuts, but the affected section has no leafy tissue below the old cut and does not fill on the same pattern as the retained living shell.
- Check
- Match the bare patch to the location and depth of a previous pruning cut. Inspect adjacent stems for cuts that retained foliage, and trace the affected old wood for any green tissue or living side shoot below the opening. Confirm brittle dead fragments individually; brown branches that still support leafy growth remain framework and should not be classified as dead wholesale.
- Cause
- Pruning into old wood below the living leafy boundary. Bare lavender stems may not produce replacement shoots after a hard cut, leaving a persistent hollow where no live side shoot remained to continue the green outline.
- Action
- Keep every future shaping cut above visible living foliage. Remove brittle dead fragments to a live junction, preserve green shoots around the gap, and allow those retained shoots to soften the outline as growth continues. Do not deepen the hollow by shearing neighboring healthy stems to match bare old wood. Reopen the crown and root-zone checks if browning expands beyond the original cut pattern.
Plants in this guide
Related reading
Sources
- Growing Lavender in Colorado. Colorado State University Extension. Source record · Accessed 2026-08-16.
- How to Grow English Lavender in Your Garden. Utah State University Extension. Source record · Accessed 2026-08-16.
- Phytophthora Root Rot. Oregon State University Extension Service. Source record · Accessed 2026-08-16.
- Lavender Growing Guide. Royal Horticultural Society. Source record · Accessed 2026-08-16.