Grow · hosta october division
Can You Divide Hostas in October Before the Soil Freezes?
Use local soil-freeze timing, clump condition, and workable ground to decide whether an October hosta division can establish before winter.
Published Last updated
In this guide
- October is a question about the ground, not the date
- Make the go or wait decision at the actual site
- Plan the cut so every piece has a crown and roots
- Lift, divide, and reset the clump in one session
- Care for the roots through the remaining fall
- Know when spring is the better answer
- Read next spring’s result without guessing
- Steps
October is a question about the ground, not the date
You can divide a mature hosta in October if its soil is workable and it is still several weeks before the ground normally freezes. In colder districts, October may already be too late. Iowa State University Extension recommends at least four to six weeks for fall divisions to establish before soil freezes, and University of Minnesota Extension uses the same interval. Neither recommendation is a promise that a division made exactly four weeks before freeze will thrive. If the forecast and local soil-freeze history leave little margin, leave the clump intact and divide it when the eyes emerge in spring.
The first autumn frost is not the same event as frozen soil. A cold night can flatten hosta leaves while the ground remains open and roots can still grow. Conversely, a run of cold weather can close the planting window even when a few leaves remain green. Check the typical local soil-freeze date through a regional extension service or weather record, then count backward four to six weeks. Give yourself extra margin if a newly prepared bed is exposed, poorly drained, or difficult to water. This is a regional decision, not an October rule that travels unchanged between Iowa, the Pacific Northwest, and a mild UK garden.
The RHS explicitly allows hosta division in autumn and early spring, while its broader perennial advice includes late autumn for congested clumps. Its UK seasonal calendar cannot be applied as a direct date prescription to a colder continental garden. Iowa State names mid-August through September as the usual late-summer and early-fall window in Iowa. The apparent conflict resolves when you compare climate and ground-freeze timing: October can still be practical where soil stays unfrozen longer, while a northern interior garden may be past the establishment window. Let those local conditions overrule the name of the month.
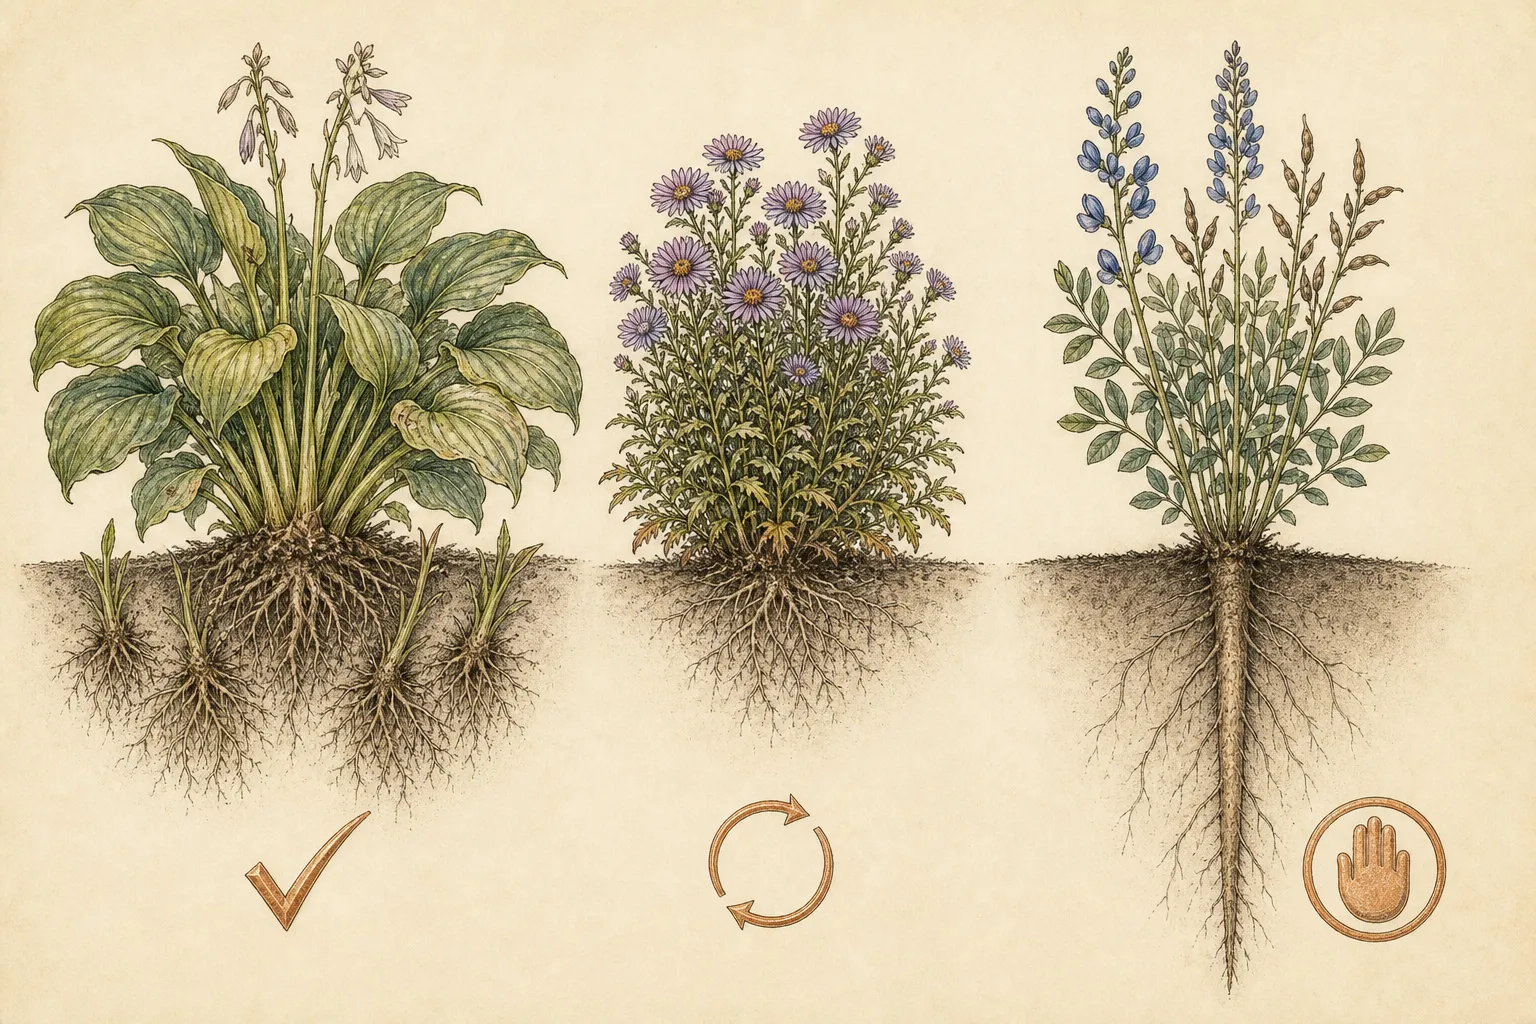
A hosta does not need routine division merely because autumn has arrived. Iowa State lists a dead center or crowding as reasons to split a clump, and notes that hostas may remain undisturbed for years. An otherwise healthy mound with enough room is safer left alone when the window is short. If the crown is diseased, splitting and sharing it can spread the problem; diagnose the unusual symptom before using a blade. The useful October question is whether a particular clump needs intervention now and has time to root again, not whether every hosta in the border should be lifted.
Make the go or wait decision at the actual site
Look at the clump after a normal autumn rain. The planting soil should be moist enough to hold around roots but loose enough to work and retain a crumbly structure. Soil that stays waterlogged will not become a suitable receiving bed just because hostas appreciate moisture. A receiving position with shade, drainage, and access to water is essential before lifting the parent plant. Prepare that position first so exposed roots are not waiting while a new border is designed. If the bed is saturated or already crusted by frost, postpone the division.
Find out what happens at the site after a cold night. A thin frozen skin that thaws by afternoon differs from soil frozen down into the rooting zone. Dig a small test hole away from the crown; if a spade requires hard prying to penetrate, this is no longer a gentle transplanting day. Check the coming forecast and the ordinary freeze date together. One warm afternoon after a hard spell does not restore several weeks of establishment time. If you cannot estimate that time reliably, the conservative choice is to mark the hosta and wait for spring.
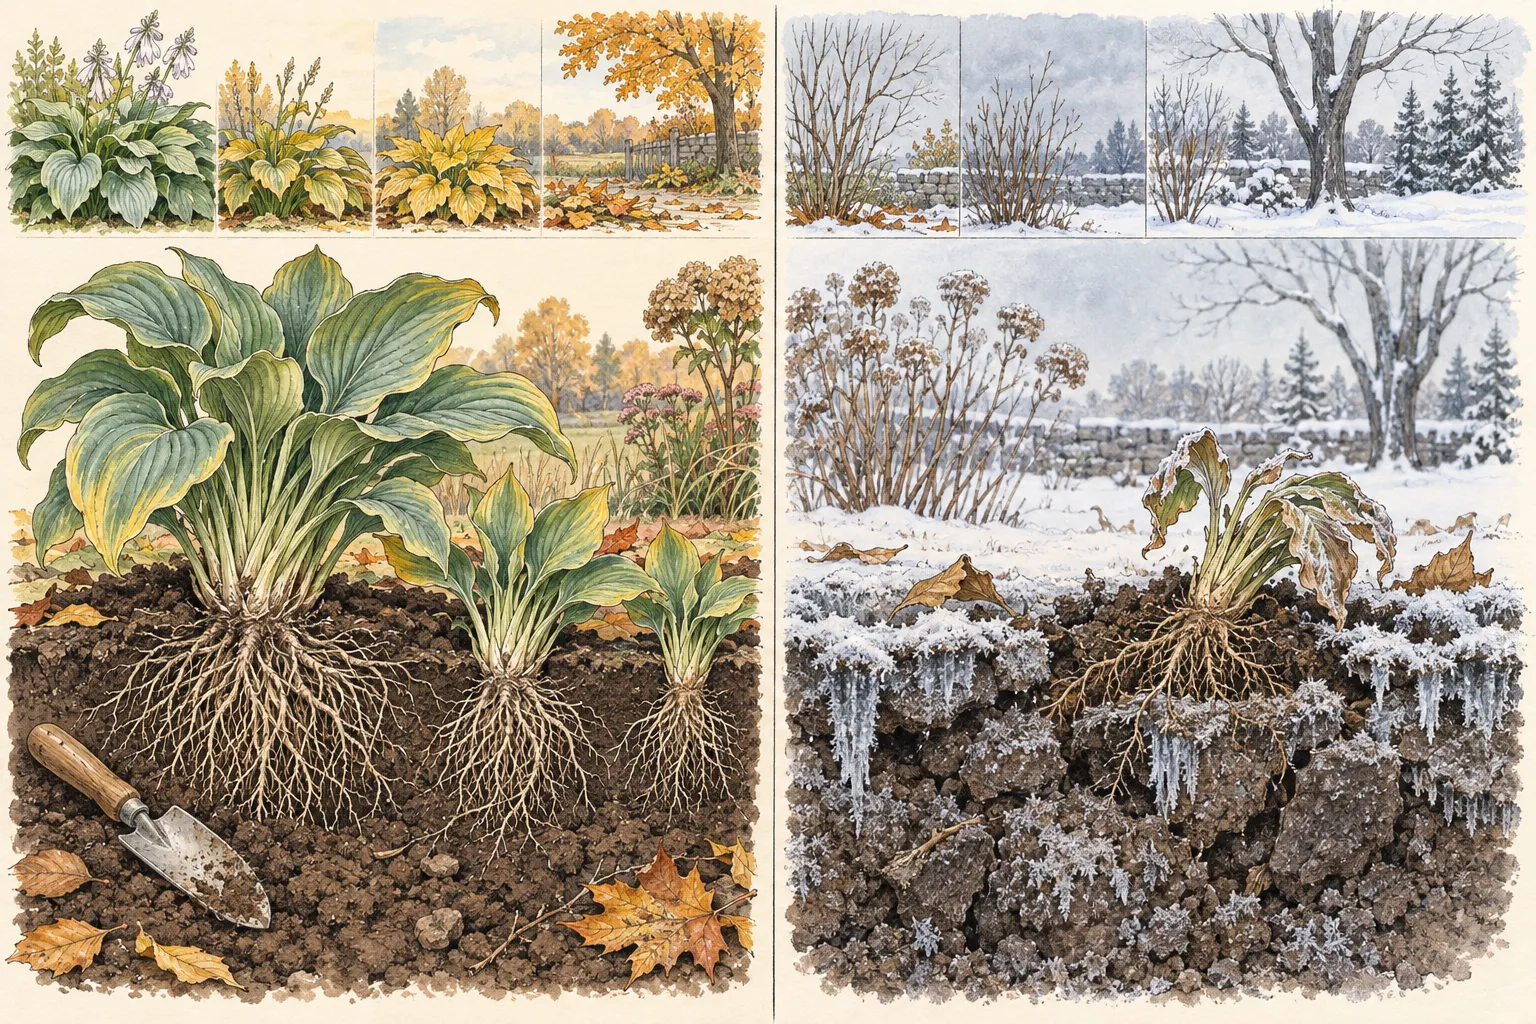
Inspect the parent clump for a reason to divide it. A hollow or dead center, a plant pressing into a path, or a cultivar that has outgrown its allotted width can justify the work. Separate that condition from seasonal leaf decline: yellow and collapsed hosta leaves in autumn are normal and alone say nothing about crown failure. Feel and examine the crown gently at soil level. If the entire crown is soft, discolored, or unexpectedly stunted, seek local plant-disease diagnosis before moving pieces to other beds. A healthy clump with only fading leaves can remain where it is.
Decide where each piece will go. The receiving bed needs enough room for the mature cultivar, using the mature cultivar width for spacing. Mark holes where the original depth can be replicated and the crown will sit near the surface. Assess tree-root competition and summer moisture while the site is visible; a fall planting may appear easy because the canopy is dormant, then struggle in dry shade the next July. If you have room for only one robust piece, take fewer larger divisions. Iowa State notes that larger divisions establish and look full sooner than small fragments.
Plan the cut so every piece has a crown and roots
Hostas grow as crowns with clusters of shoots and fibrous roots. They are not bulbs, and a leaf or detached root alone is not a useful division. When foliage has collapsed, gently clear it enough to see the crown; locate the crown itself, since last summer’s leaf positions are unreliable. The RHS hosta guide says each piece should carry one to three good buds, while its broader dividing guide describes larger sections with several shoots for tough clumps. Those are different workable sizes, not a reason to slice a cold-season crown into the maximum number of pieces.
Lay out a few possible cut lines between shoot clusters before the spade goes through. Keep a visible growing point, substantial crown tissue, and a generous share of roots with each section. Thin slivers are easy to make but have fewer reserves and less time to re-establish before winter. Discard the truly dead center of an old clump and keep it out of the divisions. If the roots part naturally, tease them apart; where a dense crown resists, a clean sharp spade or knife gives a controlled cut. The RHS describes both approaches according to root texture.
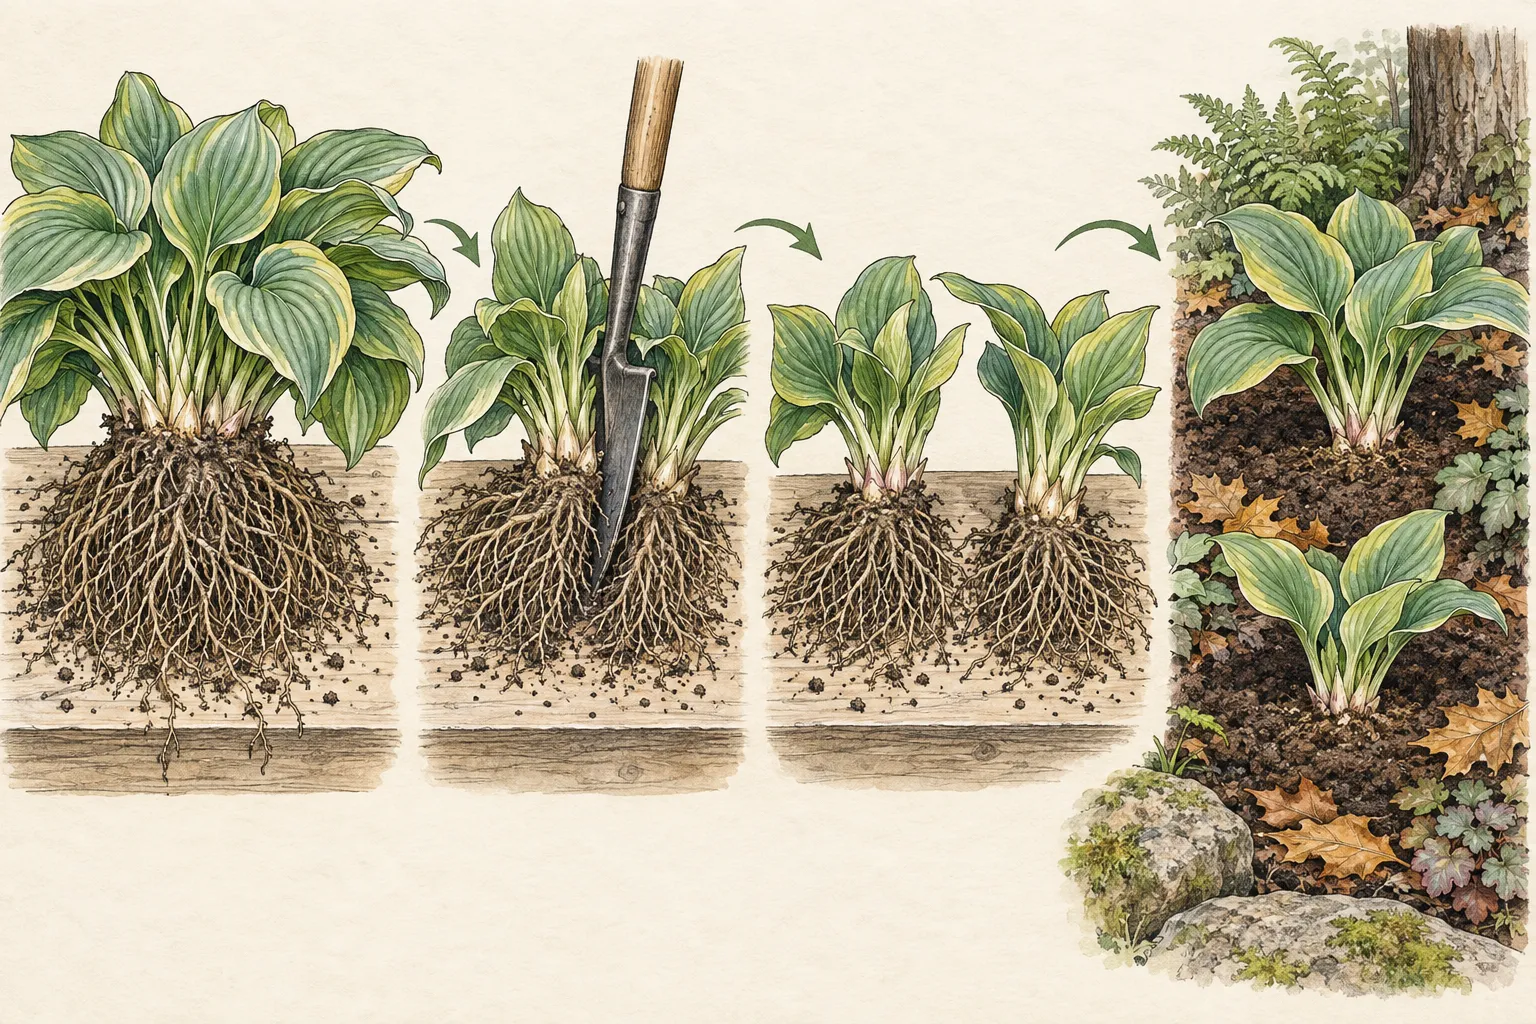
The illustration shows one lifted clump, a cut between shoots, rooted pieces, and replanting at the old depth. Use it to understand the relationship between the crown and roots, not as a fixed number of divisions. Every cultivar and clump age makes a different shape. Preserve enough of the root mass that the piece can anchor in its new hole with roots spread outward. An oversized clump can be awkward to carry, so put it on a board or sheet beside the prepared bed before you cut. This also keeps soil around roots and makes it easier to find healthy buds.
Clean the cutting edge before moving to another clump, especially if any crown has abnormal streaking, spotting, or decay. Propagate only a plant confirmed healthy. Hold the crown gently; tugging a leaf stalk can break it, and keep the separated roots out of drying wind and direct sun. Iowa State advises immediate replanting; if delayed, it recommends temporarily holding divisions in a container in protected shade, with water when the root ball dries. Treat that as a short holding measure, not an excuse to leave October divisions unplanted through winter.
Lift, divide, and reset the clump in one session
Water the parent bed ahead of time if it is dry enough that soil falls away from the roots, but wait for workable conditions if it is sodden. Start the spade beyond the visible crown and loosen around the full circumference. Lever the root mass upward gradually, preserving as many roots as practical. Lift the clump intact before cutting through the middle. Soil attached to the roots helps keep them from drying, although enough can be shaken away to see the crown. The goal is a manageable lifted plant whose natural divisions are visible.
Place the clump on a board or sheet and inspect the center. Remove dead, hollow tissue. Choose a cut through healthy crown between shoot groups, ensuring each resulting piece has buds and roots. A dense fibrous mat may take more effort than a loose young clump; use a steady controlled stroke with hands clear of the blade. Use one controlled cut between growing points. If a root breaks, trim the torn end cleanly and keep the division intact. Reassess each division before moving it to a hole; only a piece with a sound bud counts as a new plant.
Open the receiving hole wide enough to spread roots into the surrounding soil. Set the division at the same depth as the original crown. Iowa State and the RHS both emphasize original planting depth; a buried crown is not a winter-protection tactic. Backfill with the excavated soil, settle it gently, and water thoroughly so soil contacts roots. If the garden soil is heavy, use a prepared planting area whose soil drains beyond the hole. Work within a well-prepared receiving area, or choose a different site when drainage is plainly unsuitable.
Put the parent or one strong piece back in its former position if that still fits the design. Replace any removed dead center with sound soil so a hollow basin does not collect water around the new crown. Label pieces with cultivar names where known. A division can look bare after autumn leaf removal; the label protects it from accidental digging and lets you compare next spring’s emergence with the original clump. Map the new locations as well. If you need to stop halfway, replant the lifted material promptly so its roots remain protected while you plan a second destination.
Care for the roots through the remaining fall
Water newly set divisions after planting, then check the soil to set the watering interval. The objective is evenly moist soil that still drains. Autumn rain may supply all subsequent moisture in one district and none in another. The RHS warns against letting divided perennials dry out while establishing, and Iowa State emphasizes watering after division. Monitor the root zone under tree canopies, where rain can miss the ground. Stop watering into already saturated soil. If the foliage has collapsed, a dry-looking top does not prove the roots have enough water.
Mulch can moderate soil temperature and reduce freeze-thaw heaving, but it belongs around the crown in a level layer. Iowa State specifically notes that late-summer or early-fall hosta plantings benefit from winter mulch because repeated freezing and thawing may heave them. Its broader perennial guidance describes a substantial straw layer applied in November and removed in early April in Iowa. Use that calendar and thickness only in comparable local conditions. Use local guidance for material and timing, keep the crown identifiable, and check that the mulch does not stay waterlogged.
An exposed division can rise when the soil repeatedly freezes and thaws. On a suitable unfrozen day, inspect the surface and firm any raised root mass back into contact with soil. Wait until the soil is workable, then reset the crown at its former depth. The need for repeated correction suggests the division was late, shallow, or poorly anchored. Keep a simple record of the planting date, soil conditions, and any heaving so future divisions can be scheduled earlier. That record is more useful than judging success from a single warm spell.
Fading leaves can be removed once they have naturally died back, as described in the RHS hosta guide. Leave sound crown tissue intact. A hard frost may make the top look finished even while roots are still active in unfrozen ground; conversely, green remnants are no guarantee of enough remaining rooting time. Protect the decision you made by checking soil moisture, drainage, and crown position until freeze-up. The division should enter winter firmly settled at its previous depth, with roots in contact with soil and no standing water over the planting.
Know when spring is the better answer
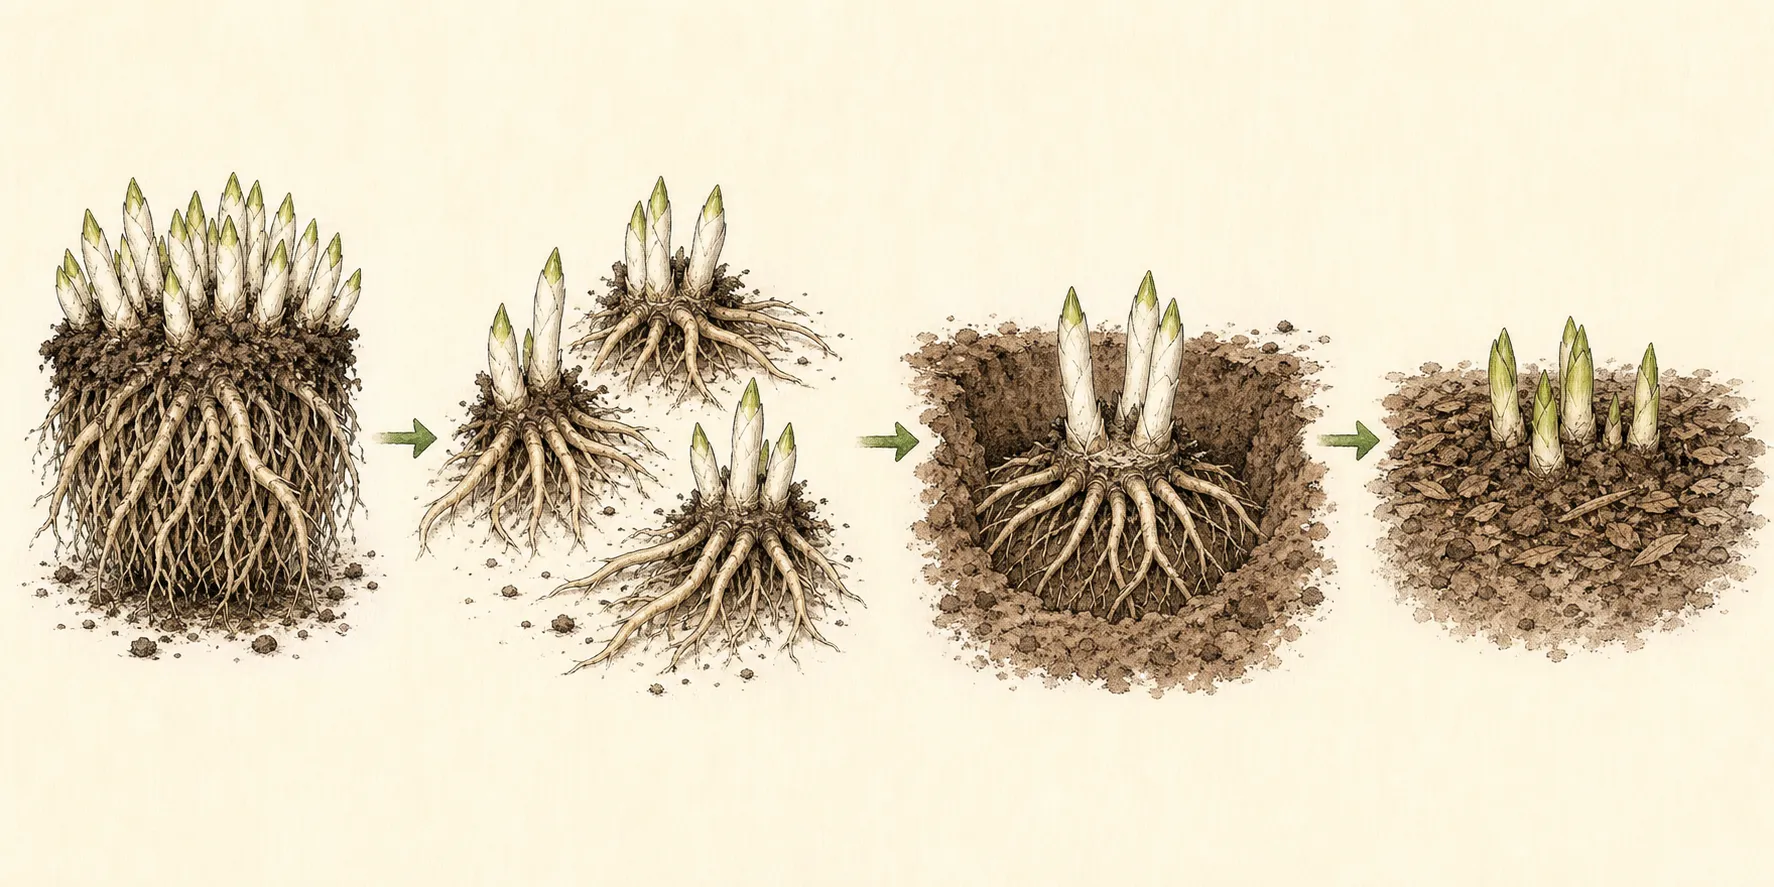
Choose spring when the normal freeze date is fewer than four to six weeks away, the receiving ground is already cold and unworkable, or the only available site stays wet. In a cold region where October usually arrives inside that window, the answer to “Can I divide now?” will often be no. Mark the clump’s extent and reserve its destination instead. Iowa State names early spring, as foliage emerges, as a good general division window. The existing Flora & Field spring hosta guide explains how visible compact eyes help identify sound crown pieces.
A hosta that must be moved for a construction or site emergency is a different problem from voluntary propagation. Move as much intact root mass as possible into a prepared place while ground is workable, and accept that it has less establishment time. Keep the intact root mass together for the move. If no suitable bed exists, seek local extension guidance on holding the intact plant; the normal division instructions assume immediate replanting into a usable site. Preserve the parent clump first, then multiply it in the proper season.
Wait as well when the goal is to diagnose a sick plant. Dividing a clump with unexplained mottling, stunting, or crown decay can disperse the problem. The seasonal yellowing of otherwise sound leaves is different from a persistent pattern present during active growth. Keep photos from summer if available and consult a local diagnostic service. Healthy divisions can be shared; uncertain ones should stay out of other gardens until identified. This is especially important when the requested new locations are close to valued hostas.
Spring also offers a clearer view of buds when autumn foliage and old stems obscure the crown. If the clump is large but not urgent, the extra visibility can make fewer, better cuts. The aim is not to win an October deadline. It is to leave each new plant with a sound bud, adequate crown and roots, correct depth, and enough growing conditions to re-establish. October can meet those conditions in a mild, unfrozen garden; in a short-season garden the sound decision is to leave the parent rooted and work at emergence.
Read next spring’s result without guessing
Locate each marker as growth starts, then look for emerging shoots and a firm crown. Divisions may emerge and fill at different rates according to their size and site. Iowa State observes that larger divisions establish and look full sooner, so a smaller but healthy piece should not be declared a failure merely because it trails the parent in its first season. Keep the soil moist but drained as growth resumes. Remove any winter mulch at the locally appropriate time so new shoots are visible and the crown does not sit under a thick wet blanket.
If a piece is missing, check the specific place before blaming October alone. A heaved crown may have dried above the soil; a wet hollow may have rotted roots; a misplaced marker may simply hide the surviving piece. Compare the new divisions with the parent and with the soil conditions recorded at planting. Where one division fails in the wettest corner while another thrives a few feet away, a site issue deserves attention. A failure across all late divisions suggests timing or handling deserves review, and inspection is needed to identify the mechanism.
Allow the plants time to rebuild their display. Iowa State says many newly divided perennials flower poorly until the second growing season. Hosta is grown largely for foliage, yet the same establishment principle explains a smaller first-year mound. Water during dry spells, protect the crown from accidental digging, and let the new piece mature before considering another division. The known cultivar’s eventual spread should govern any later move. Keep notes on shade and moisture when the leafy canopy returns, because October conditions conceal much of the coming summer environment.
For the next division, use the record to choose a safer window in your own garden. If October ground stayed workable for many weeks and the pieces rooted securely, that evidence may support a similar timing in a comparable year. If the soil froze soon after planting or heaving was persistent, move the task earlier or use the visible-eye stage in spring. Climate guidance provides the starting interval; your site observations refine it. The useful outcome is a hosta bed with healthy crowns and deliberate spacing, not the largest possible count of tiny divisions.
Steps
- Level
- moderate
- Time
- About 60 to 90 minutes for one prepared clump, plus autumn moisture checks
- Tools
- Spade or garden fork, Sharp knife or spade for the crown, Watering can or hose, Plant labels
- Materials
- Established healthy hosta clump, Prepared receiving bed with workable soil, Locally appropriate winter mulch if needed
- 1Check the local window
Find the usual soil-freeze timing for your location. Allow at least four to six weeks before ground freeze; when the margin is shorter or uncertain, leave the clump rooted for spring. Use a regional soil-temperature or extension reference to estimate soil freeze, since first-air-frost dates answer a different question. Look at the next several weeks of weather and the receiving bed as well; a suddenly frozen or saturated site changes the answer even if the typical date looks favorable.
- 2Prepare a destination
Choose shade and moist but draining soil, and make a hole large enough for the division’s roots. Plan mature cultivar spacing before disturbing the parent. Open the hole before lifting the parent. Keep the new crown near its former soil level, make enough width to spread roots, and allow the named cultivar its mature spread. If no suitable place is ready, postpone voluntary division.
- 3Lift the whole clump
Moisten dry soil, dig around the perimeter, and lever up the fibrous root mass intact. Work a circle beyond the shoots to preserve roots. Put the lifted clump on a board or sheet in shade, with its root soil attached. If it is too heavy to move safely, ask for help or work in a smaller controlled section.
- 4Make a few strong divisions
Find healthy buds and cut between shoot groups with a clean sharp tool. Keep crown tissue and ample roots with each piece; discard a dead center. A few large pieces are more useful this late in the season than numerous weak slivers. Inspect each for a sound growing point, crown, and fibrous roots before planting. Set aside soft or unexplained diseased tissue for diagnosis.
- 5Replant at the old depth
Spread roots in the prepared hole, reset the crown at its original level, backfill, and water to settle the soil. Label the location. Firm soil gently around roots, leaving the crown at its previous depth. If moving pieces to a tree-rooted site, check moisture below the surface after rain; overhead leaves can deflect water. Record the cultivar and date so spring comparison is meaningful.
- 6Monitor until freeze-up
Keep soil moist but not saturated. Apply regional winter mulch guidance around the crown, check for heaving, and inspect emergence the following spring. Inspect after freeze-thaw events on days when the soil is workable. Return any raised roots to soil contact, keeping mulch around the crown. Remove or reduce the winter layer at the locally appropriate spring time so new shoots can emerge.
Plants in this guide
Related reading

Sources
- How to Divide and Transplant Perennials. Iowa State University Extension and Outreach. Source record · Accessed 2026-09-25.
- How and when to divide perennials. University of Minnesota Extension. Source record · Accessed 2026-09-25.
- How to grow hostas. Royal Horticultural Society. Source record · Accessed 2026-09-25.
- Perennials: dividing. Royal Horticultural Society. Source record · Accessed 2026-09-25.
- Do hostas need winter protection?. Iowa State University Extension and Outreach. Source record · Accessed 2026-09-25.