Grow · divide hostas at eye stage
Divide Hostas While the Eyes Are Visible and Compact
Lift and divide a crowded hosta as spring eyes emerge, keeping viable buds, crown tissue, and roots together in every division.
Published Last updated
In this guide
- Use the biological cue for mature hosta clump
- Read the site and the whole plant together
- Set a visible finish line before beginning
- Prepare the work while every part is still identifiable
- Carry out the central operation in a controlled sequence
- Protect roots, crowns, and new growth after the work
- Diagnose a weak response before adding another treatment
- Leave a record for the next seasonal decision
- Steps
Use the biological cue for mature hosta clump
Divide a hosta in spring when its pointed eyes have broken the soil but the leaves are still folded. At that stage the growing points can be counted, the crown can be cut between shoots, and the plant carries little leafy surface to tear or dehydrate. Iowa State University Extension calls the emerging points bullet-shaped noses and recommends lifting as the leaves begin to appear. University of Minnesota Extension likewise starts spring division when the eyes emerge.
Use division for a defined purpose. Minnesota Extension states that a mature hosta does not require splitting for health; gardeners divide to make more plants or reshape an oversized clump. The RHS says older clumps can benefit at roughly four- to five-year intervals, but that interval is context, not a compulsory cycle. A well-proportioned plant with a full center and enough room can remain intact.
The crown must be visible and the soil workable on the chosen day. Wait while frozen soil holds the roots or saturated soil smears against the spade. Move promptly once leaves begin to unfurl, because later handling leaves a ragged canopy for the season. Spring is the clearest window in the retained Midwestern guidance; the RHS also lists autumn, and Iowa State allows division through late summer when winter protection can be supplied.
Read the site and the whole plant together
Count eyes from several sides and trace the outer edge of the crown at soil level. The first editorial image presents the sequence from emerging points to separated crown pieces. Look for natural gaps between clusters and note where the fleshy roots extend beyond the leaves’ former footprint. A cut planned only from the top can divide a growing point or leave a small crown with most of its roots attached to the other piece.
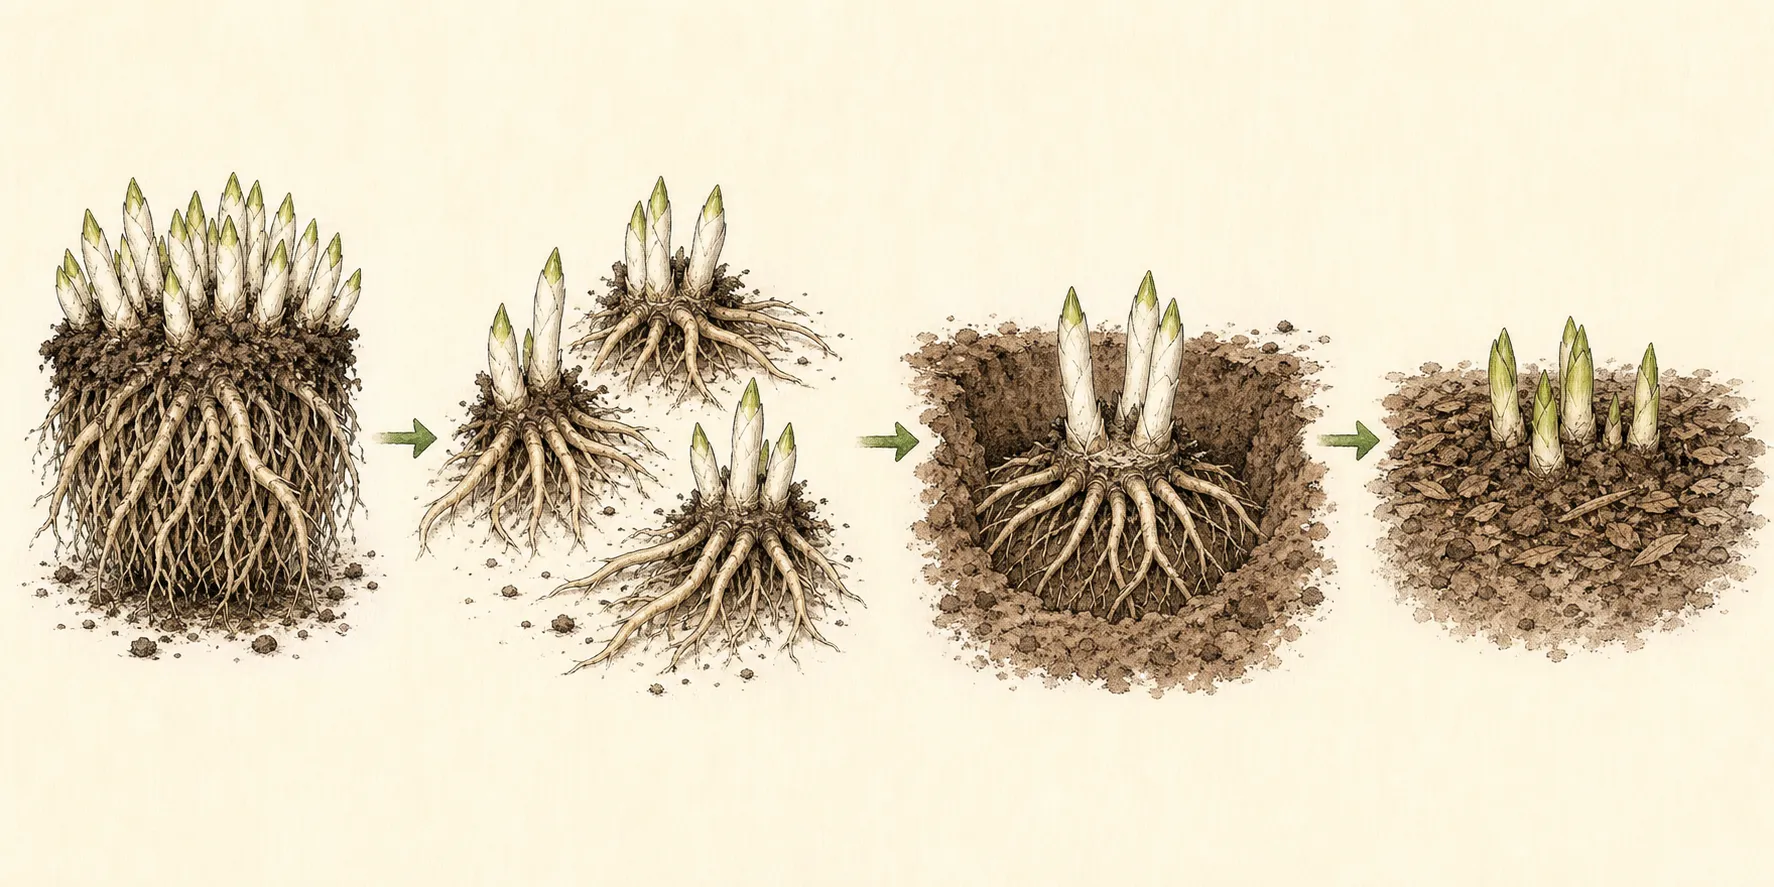
Choose every destination before the parent plant is lifted. Hosta cultivars range from about six inches tall and a foot or less across to three or four feet tall and five or six feet across in Minnesota Extension’s overview. Set spacing from the known cultivar’s mature spread. A tiny spring division can quickly become the same large mound that crowded the original position.
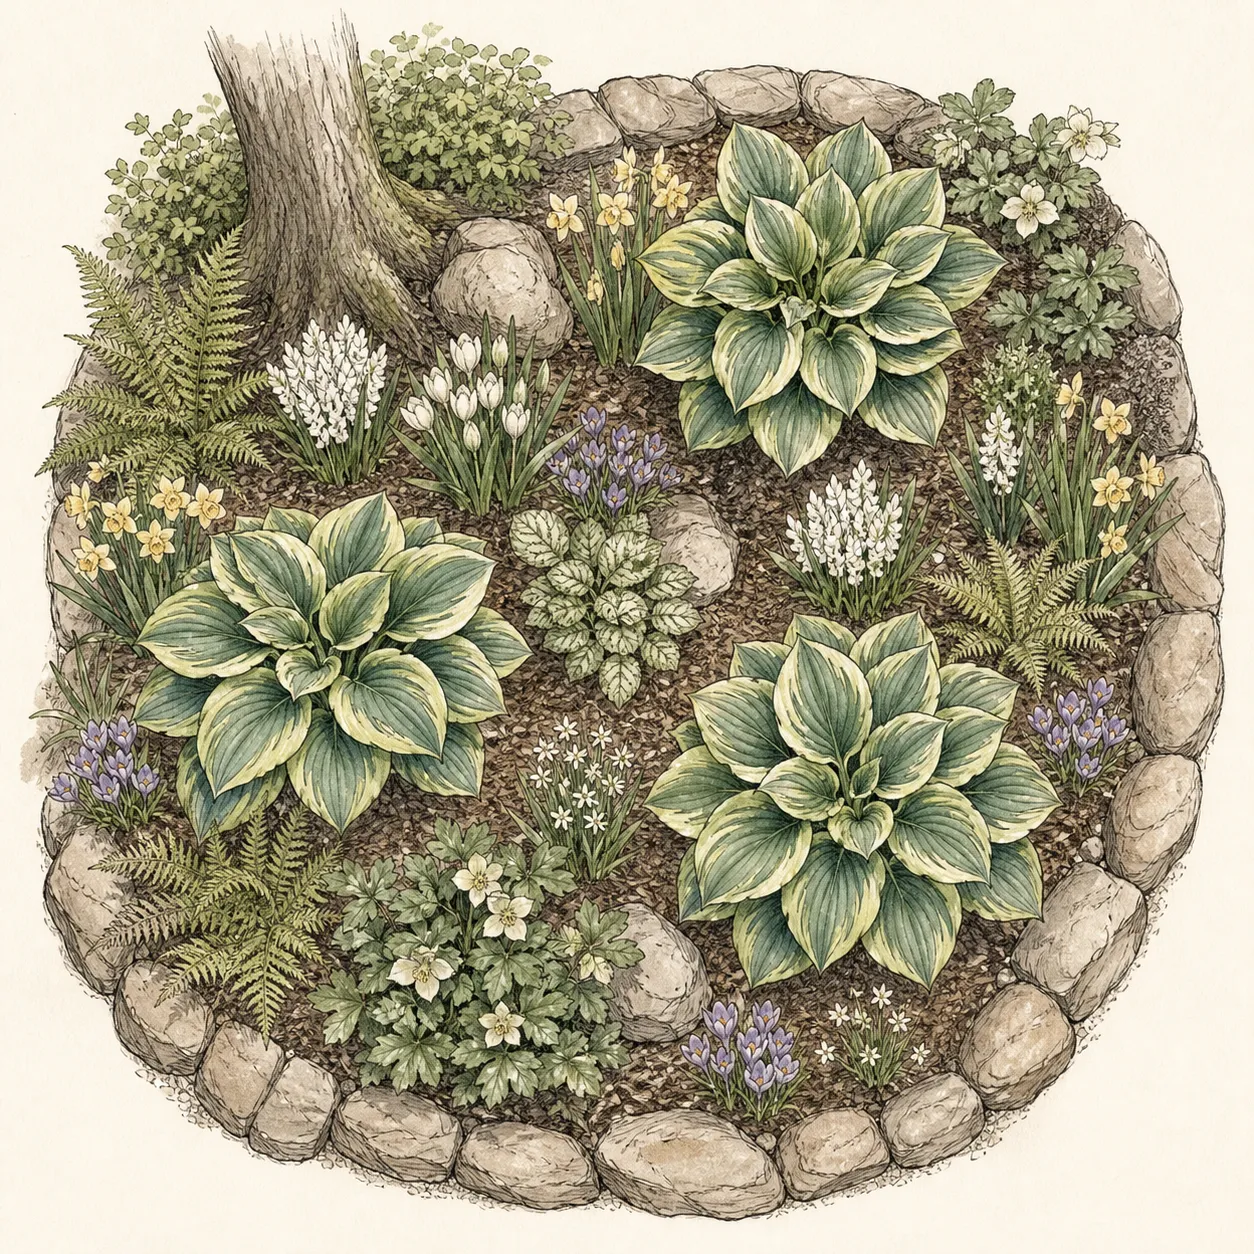
Match light to leaf character and local exposure. Minnesota Extension favors filtered or dappled shade for much of the day, notes that gold foliage can color well with two to three hours of morning sun, and places blue-leaved hostas in more shade to protect their waxy coating. A division moved into stronger afternoon sun may scorch even when the cutting and planting were accurate.
Inspect the receiving soil for drainage, root competition, and access to water. Hostas prefer rich, moist, well-drained ground, yet dry shade beneath shallow-rooted trees demands extra irrigation. Open all planting holes before lifting the clump. The root-to-hole journey shown in the visual plan should take minutes, not the length of a second bed-preparation session.
Set a visible finish line before beginning
Plan ordinary divisions with two or three visible points, a substantial piece of crown, and a generous share of roots. Iowa State specifies at least two or three points with crown and root tissue. The RHS accepts pieces with one to three good buds, so a sound single-eye piece is possible, though it will make a smaller first-year plant. Match piece size to the speed and display expected from the new position.
The planting finish has three visible checks. Growing tips sit at the surface, the crown’s root-shoot junction meets the surrounding grade, and the division stands firm after watering. Minnesota Extension directs bare-root hostas to that level; both it and the RHS return divisions to their previous depth. A mound over the eyes or a sunken crown fails the finish even if the soil looks neatly raked.
Limit the session to pieces that already have prepared homes. Replanting immediately is part of Iowa State’s division guidance, and fleshy roots lose their advantage when they sit in sun or drying wind. Keep one substantial portion in the original site if the goal is propagation. That decision preserves the known planting while the smaller pieces establish elsewhere.
Prepare the work while every part is still identifiable
Water dry ground the day before lifting so soil leaves the roots in a coherent, workable condition. Prepare holes to the width of each expected root fan and stage labels at their destinations. Keep a tarp or board beside the parent clump, plus a damp covering for pieces waiting a few minutes. These arrangements protect roots while the crown is being read.
Select a digging fork or spade for lifting and a sharp knife or spade for separation. Clean the cutting edge before it enters crown tissue. A large, old hosta can be heavy; divide the lifted mass on a stable board at ground level and recruit another person when the clump cannot be moved with a controlled, upright lift.
Write the cultivar name on every destination label before making the first cut. Leaf color, texture, and mature dimensions may be invisible at eye stage, and several separated crowns can look identical. Add the number of eyes to the label or map. That count provides a fair baseline when the new mounds are compared later in the season.
Carry out the central operation in a controlled sequence
Circle beyond the crown and loosen the root mass from several sides. Lever upward in small increments, supporting the heavy clump as roots release. Shake or tease away only enough soil to reveal the crown’s divisions and the path between eyes. Smaller hostas may pull apart along natural seams; dense old crowns require a decisive vertical cut with a sharp tool.
Set the clump on the prepared board and group the eyes before cutting. Align the blade through crown tissue between groups, with the supporting hand outside the projected exit line. The second editorial image shows how each finished piece carries growing points above, firm crown in the middle, and fleshy roots below. Preserve that complete vertical unit in every division.
Inspect the first separated piece before making more. Retain as much root as possible, as Minnesota Extension advises, and trim only roots torn badly enough to prevent a clean fit in the hole. A division that received too little crown or root can be recombined with an adjacent section while the layout is still clear. Place accepted pieces under the damp covering beside their labels.
Replant each division at the soil mark carried from the parent crown. Spread the roots into loosened soil, return earth among them in stages, and settle the hole with water. The eyes remain visible at the surface after settling. Recheck mature spacing from center to center, because the bare spring pieces conceal the width their leaves will occupy.
Protect roots, crowns, and new growth after the work
Water the parent site and every new hole thoroughly after planting. Minnesota Extension gives established hostas a useful benchmark of about one inch of water per week, delivered in deeper, less frequent applications. New divisions, sunny positions, dry shade, and sites beneath shallow-rooted trees can need closer checks. Measure rainfall and feel the root zone so the benchmark responds to actual weather and soil.
Mulch helps conserve that moisture, but the crown needs open air and a visible grade. Minnesota Extension maintains a two- to four-inch organic layer after the soil warms, held back from the central crown. Around a fresh division, taper the material to bare soil at the eyes. The visible gap makes settling and accidental burial easy to detect.
Use fertility evidence from the site. A soil test determines whether amendment is needed; division by itself does not diagnose a nutrient shortage. Rich soil may need only its ordinary organic mulch. Strong feed applied to a stressed, poorly rooted piece cannot correct a buried crown, an air pocket, or competing tree roots.
Protect newly emerging leaves from an exceptional late frost with the garden’s established covering method, then remove the cover when conditions moderate. Spring divisions have the growing season to root, while late-summer pieces face freeze-thaw heaving. Iowa State recommends several inches of insulating material in late fall for those later divisions; mark their crowns so the protection can be pulled back as spring warms.
Diagnose a weak response before adding another treatment
Compare a slow piece with another division from the same parent. Eye count, attached root mass, and planting grade explain much of the early difference. One good bud within the RHS range can establish, yet a two- or three-eye section begins with more stored tissue and growing points. Judge survival by firm new growth and root-zone moisture before expecting equal mound size.
Check the soil line when emergence is delayed or the crown rocks. Water can settle loose backfill below the original grade, leaving roots poorly supported, or wash soil over a low-set eye. Lift loose soil away from a covered growing tip and restore contact around exposed roots with gentle pressure. A firmly anchored crown at the correct level needs time more than repeated resetting.
Read browned margins across the site. Minnesota Extension associates sunscald with brown, scorched leaf surfaces or tips and advises more shade or water. Damage concentrated on a new sunnier placement supports that explanation. Similar symptoms beneath a maple or spruce may reflect root competition and a dry profile. Probe six inches deep, the RHS moisture-check depth, before changing the watering interval.
Look separately for feeding, pest, and disease evidence. Minnesota Extension lists slugs and deer as common hosta problems and also records less common crown rot, viruses, foliar nematodes, and leaf spots. A product chosen from chewed holes will not solve distorted growth, and irrigation changes will not identify mottling. Photograph the distribution and submit uncertain symptoms to a local diagnostic service.
Leave a record for the next seasonal decision
Map each division by cultivar, eye count, and destination. Add the lifting date, soil condition, and the date leaves opened. A same-angle photograph at planting and again after full expansion reveals whether a small mound began with a small piece or actually lost vigor. Keep that distinction attached to the plant record.
Record the final soil line and mulch gap. After the first soaking rain, note any crown that settled, exposed roots, and the correction made. Include weekly rainfall or irrigation during establishment. Those observations are more useful next spring than a general note that the plant looked wilted after moving.
Compare mature spread with the space actually reserved. A successful division may fill a path edge, crowd a neighboring crown, or lose leaf color in stronger light as it approaches adult size. Move the next piece only after identifying which site factor changed. The cultivar’s ultimate dimensions, not the modest first-season leaves, set the long-term layout.
Close with the next decision and its trigger. Continue moisture checks until the crown is anchored, pull late-fall protection back when spring warms, or leave a healthy plant undivided through another cycle. A four- or five-year interval can be a useful review point, yet size, purpose, vigor, and available space determine whether another split belongs on the calendar.
Steps
- Level
- moderate
- Time
- One focused session, followed by scheduled checks
- Tools
- Garden fork, Sharp spade or soil knife, Clean bucket, Weatherproof labels
- Materials
- Compost only when the bed needs a surface amendment, Mulch, Water
- 1Choose the eye stage and a reason to divide
Schedule the lift when pointed hosta eyes are visible and the leaf blades remain folded. Count the shoots, confirm that the soil crumbles cleanly, and state the reason for splitting: propagation, size control, or renewal. Leave a healthy, well-placed clump intact when none of those purposes applies.
- 2Mark destinations and rooted eye groups
Assign every piece a labeled hole using the cultivar’s mature width, foliage response to light, drainage needs, and access to irrigation. Check for shallow tree roots and buried garden lines. Photograph the crown pattern, then mark groups of two or three eyes that can leave with balanced root portions.
- 3Prepare holes, tools and labels
Water dry soil the previous day. Open the destination holes, clean a fork, spade, and dividing knife, and set a board plus damp cloth beside the plant. Put cultivar and eye-count labels at their final positions so each accepted crown can travel directly from the cutting board into soil.
- 4Separate sound crowns with attached roots
Loosen the clump beyond its crown, lift from several sides, and place it on the board. Expose seams between eye groups, pull apart small natural sections, or cut vertically through dense crown tissue. Accept pieces that hold good buds, solid crown, and abundant fleshy roots; cover them while the remaining cuts are made.
- 5Replant at the former soil line
Plant each section immediately at its former soil line. Arrange roots through loosened earth, backfill, and water until the hole settles. Keep the growing tips visible and taper mulch to open soil around the crown. Confirm center-to-center spacing against the adult cultivar size before tools leave the bed.
- 6Check crown level and expanding leaves
Inspect after the first soaking rain and through leaf expansion. Log crown level, root-zone moisture, eye count, scorch pattern, and mound width. Reset only a loose or buried crown. Continue deep watering as rainfall and soil require, then reduce checks once each division is anchored and producing firm foliage.
Related reading

Sources
- Hostas. University of Minnesota Extension. Source record · Accessed 2026-08-30.
- When is the best time to divide hostas?. Iowa State University Extension. Source record · Accessed 2026-08-30.
- How to grow hostas. Royal Horticultural Society. Source record · Accessed 2026-08-30.