Grow · divide daylilies
Divide Daylilies After Bloom and Rebuild the Clump
Lift a crowded daylily after flowering, separate sound fans with roots attached, reset the crown at grade, and water the divisions through establishment.
Published Last updated
In this guide
- Confirm that division will solve the problem
- Choose timing and prepare the destination
- Lift the root mass beyond the crown
- Separate sound fans with roots attached
- Reset the crown at the finished soil line
- Water for establishment without holding crowns wet
- Read recovery over the next several weeks
- Preserve the record and next season’s expectations
- Manage a division that cannot be replanted immediately
- Rebuild a large display without recreating congestion
- Steps
Confirm that division will solve the problem
Divide daylilies after flowering when a crowded clump blooms poorly, outgrows its space, traps weeds, or needs to supply more plants. Lift the root mass, separate sound fans with roots attached, and replant at the finished soil line with room for mature growth. Early spring is another option; choose a local window that avoids severe heat and allows establishment before cold weather. First rule out shade, drought, planting depth, excess nitrogen, or cultivar habit as the reason for sparse bloom: division will not correct those conditions.
Identify the plant as a daylily, Hemerocallis, with arching straplike leaves arising in fans and flowers carried on separate scapes. True lilies grow leaves on upright stems from bulbs and follow a different procedure. Iris, agapanthus, and other strappy perennials also differ. If no label remains, photograph flowers, foliage, crown, and roots before division so the identity can be confirmed and each new plant can keep an accurate name.
Choose healthy stock. Do not distribute divisions from a clump with unexplained streaked foliage, distorted growth, soft crowns, orange rustlike pustules, or extensive root decay until the problem is identified. Normal spent outer leaves and heat wear are different from a pattern moving through young fans. Keep suspicious material isolated and seek local diagnosis rather than multiplying a problem across the garden.
Choose timing and prepare the destination
Daylilies can be divided in early spring or after flowering, with regional timing determining how much establishment weather remains. After-bloom division lets the gardener see the cultivar and finish the floral display before lifting. Avoid the hottest dry interval when possible, and allow enough time for roots to establish before the local cold season. In very warm climates, local guidance may favor a different window.
Prepare planting holes before lifting so roots spend less time exposed. Select a site with the light, drainage, and spacing appropriate to the cultivar. Loosen a broad area rather than creating a small polished pot-shaped hole in compacted soil. Correct drainage and perennial weeds now. Do not add a rich pocket of fertilizer or uncomposted organic material directly beneath the crown.
Water the source clump the previous day if soil is dry, then work after excess water drains. Slightly moist soil releases roots with less breakage; saturated soil smears and compacts. Label the clump, count the destination spaces, and decide how many divisions are actually needed. A plan prevents the common outcome of fragmenting one plant into dozens of weak fans with nowhere suitable to go.
Lift the root mass beyond the crown
Cut spent flower scapes at the base and remove only dead or damaged foliage needed for access. Tie or hold green leaves loosely so the crown is visible. Insert a fork or spade outside the fan perimeter and work around the clump, loosening from several sides. The goal is to lift a broad root mass, not cut a tight cylinder through every outer fan.
Use two forks back to back or a sturdy spade only after the clump is free from the soil. Do not lever against one living crown. Support the root mass as it rises and place it on a tarp in shade. Large old clumps can be heavy; divide the mass into manageable sections with a clean tool while preserving recognizable groups of fans and roots.
Keep roots cool and moist, not submerged. Cover the lifted mass with damp burlap or work in small batches. Direct sun and wind can dry fine roots quickly. Do not leave divisions in a bucket of water for hours; prolonged submersion reduces oxygen and can spread contamination. A brief rinse or gentle soil removal is useful only when it helps reveal crowns and roots.
Separate sound fans with roots attached
Begin at the outside, where younger fans often separate more easily. Tease adjoining crowns apart by hand, following natural gaps. Each division should contain at least one sound fan with a firm crown and a useful root system; groups of two or three fans establish a fuller display sooner. A leaf fan without basal tissue and roots is not a complete division.
Use a clean knife or spade where crowns are tightly joined. Make decisive cuts through the narrow connection instead of shredding tissue with repeated prying. Trim broken, hollow, or decayed roots back to firm material, but retain healthy roots even when they are long and awkward. Discard soft crowns and keep any suspicious symptom separate from the sound planting stock.
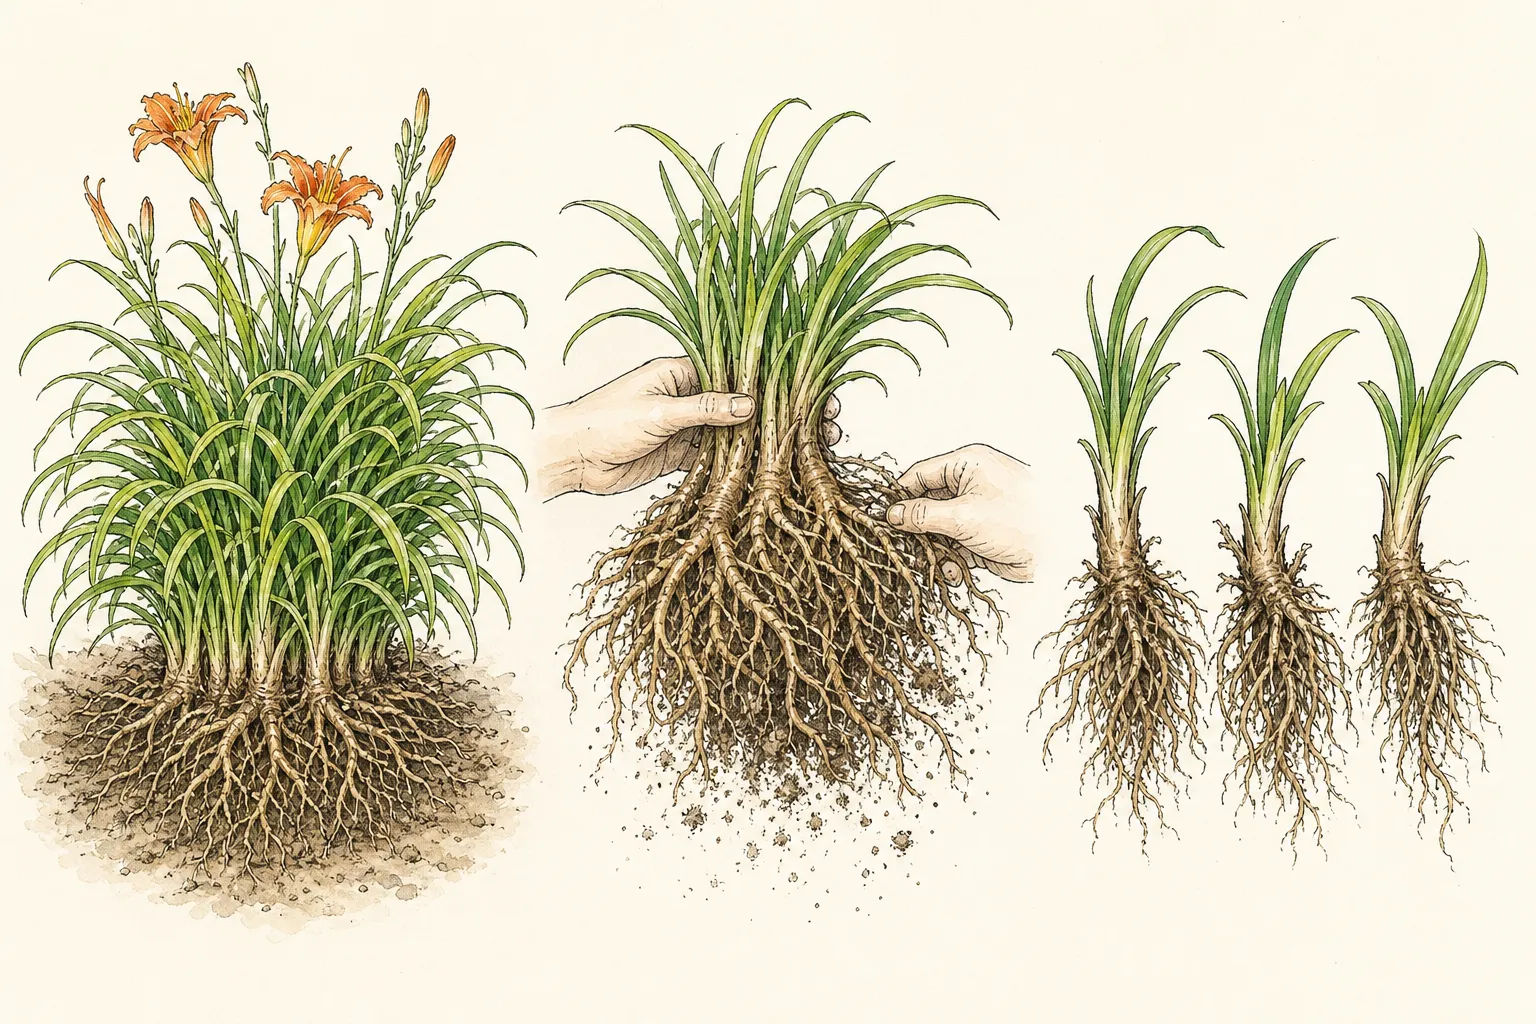
Do not maximize the number of pieces. Tiny single fans can survive under good care, yet they dry faster and may take longer to flower. Match division size to the purpose and aftercare available. Keep the best labeled units for the intended design, offer only healthy correctly named extras, and avoid leaving an oversized remainder to desiccate while every possible fragment is counted.
Reset the crown at the finished soil line
Shorten leaves only enough to reduce tangling and make planting manageable, using a clean cut that preserves green area. Build a small mound of soil in the hole, spread roots downward and outward, and place the crown at the finished soil level. Daylily crowns planted too deeply can establish poorly; roots left exposed dry. Set depth after accounting for how loose soil will settle.
Backfill with the site soil, working it among roots without packing a hard collar. Water once to settle the soil, then add or remove soil so the crown remains at grade. Do not pull the plant upward after firming; that can leave air gaps beneath the crown. If it sinks, lift and reset the division properly while the soil is still workable.
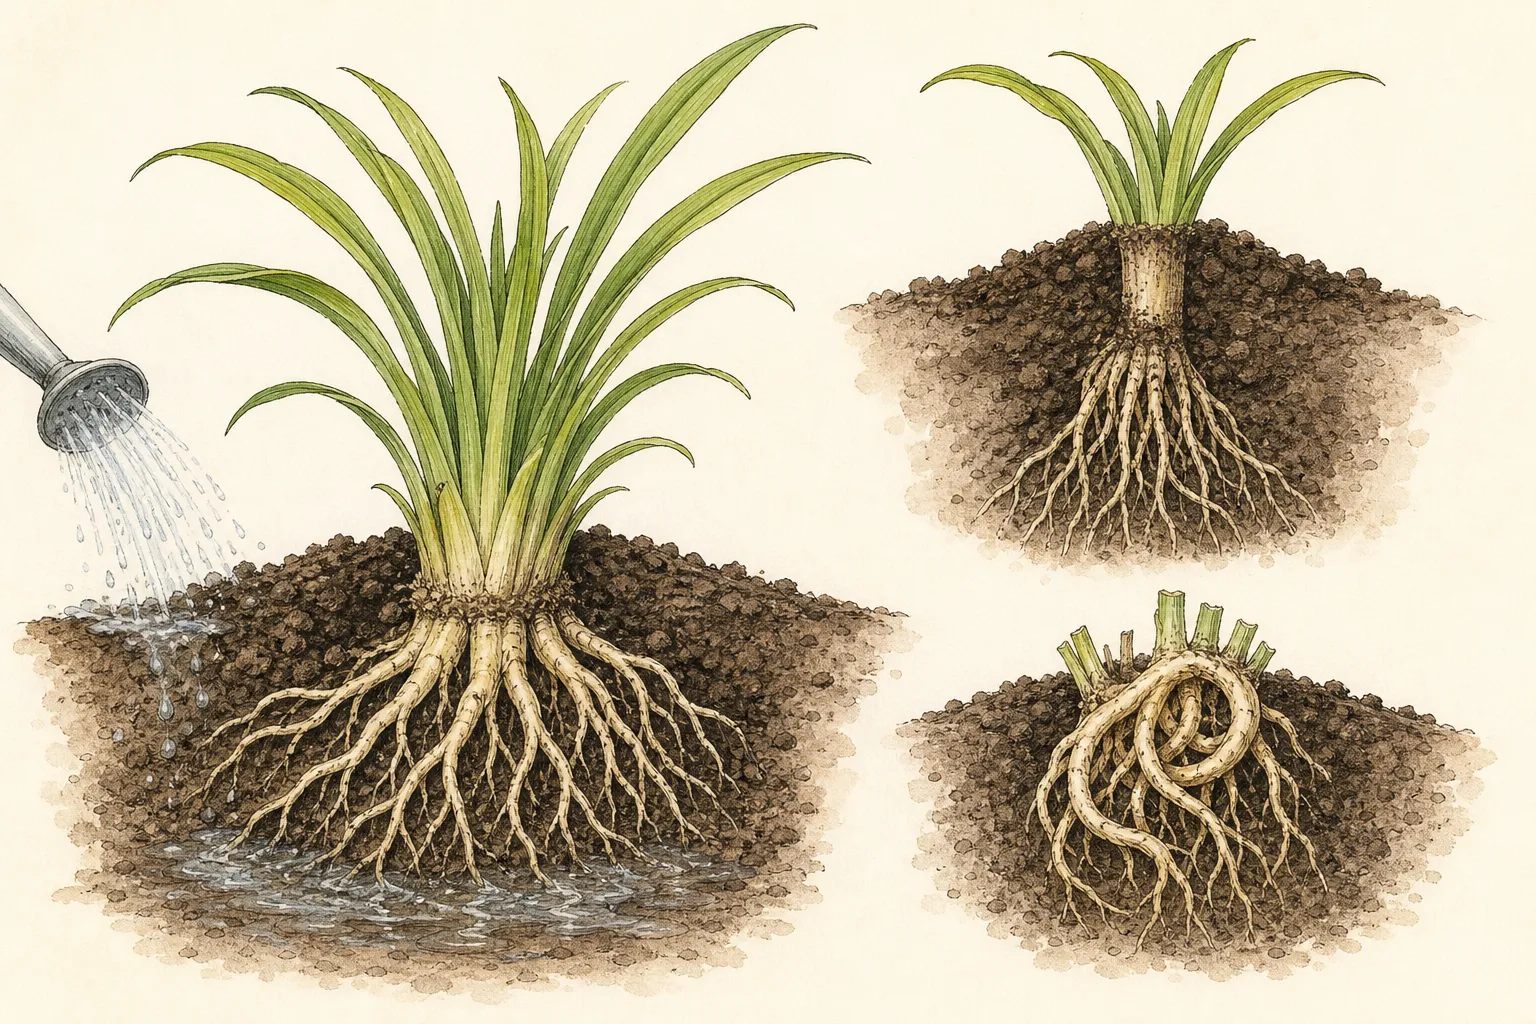
Space divisions for mature spread and design purpose. A massed border may begin closer than a specimen grouping, but crowns should not be placed so densely that the original crowding returns quickly. Keep cultivar vigor in mind and preserve access for weeding. Place labels slightly away from the crown so future digging does not sever roots while searching for the name.
Water for establishment without holding crowns wet
Water thoroughly after planting and check moisture through the root depth during establishment. The disturbed root system needs consistent access to water, but the crown should not sit in saturated soil. Adjust frequency to weather and soil texture. A daily surface sprinkle can leave deeper roots dry, while automatic irrigation in heavy soil can keep the planting hole waterlogged.
Apply a light organic mulch around the division to moderate evaporation and weeds, leaving the crown and leaf bases clear. Old mulch plus new mulch determines total depth. Do not heap material over the fans to make the bed look finished. A visible crown allows the gardener to spot settling, rot, animal disturbance, and new growth.
Provide temporary shade from extreme afternoon heat only when necessary and without enclosing the plant. Established daylilies generally flower best with adequate sun, so temporary protection should not become a permanent dark site. If leaves wilt at first, inspect soil moisture and root contact before repeatedly flooding the planting. Some foliage decline after division is normal; crown firmness and new root growth matter more.
Read recovery over the next several weeks
Expect older leaves to yellow or crease after handling. Remove them only when they detach easily or become a sanitation problem, and preserve healthy green fans. Mark one central leaf on each division and watch for fresh extension from the crown. New growth, firm attachment, and stable soil are stronger evidence of establishment than the appearance of the original cut leaves.
Recheck planting depth after heavy rain or irrigation. Soil can settle and expose roots or bury a small crown. Correct the grade gently without pressing soil into the leaf bases. Pull weeds while tiny so their roots do not entwine with the new division. Keep foot traffic and cultivation away from the recovering root zone.
Delay strong fertilizer until roots are functioning and follow soil-test or local guidance. A burst of soft leaves is not the same as establishment. If a division remains loose, develops a soft crown, or fails to produce new growth while neighbors recover, lift only that unit for inspection. Do not disturb the entire planting to investigate one failure.
Preserve the record and next season’s expectations
Label each cultivar and record division date, fan count, location, and weather. Photograph one representative planted crown at grade. Daylilies moved after bloom may not flower fully the next season, especially if divided small or stressed by heat. Set expectations around establishment and cultivar behavior rather than promising an immediate larger display from every piece.
Compare flowering and clump density in the following season. A division that grows strongly but does not bloom may need more time, more light, or a review of fertility and planting depth. A center that becomes crowded again quickly may have been replanted too densely. Use the evidence to adjust spacing, not to repeat annual division on a perennial that benefits from settling.
Keep sharing responsible. Give away only sound, labeled divisions, disclose when the exact cultivar is unknown, and avoid moving plants from a bed with unresolved disease or invasive weeds. The best result is not the greatest number of fans. It is a set of healthy crowns placed where their roots, light, and mature spread can support years of flowering.
Manage a division that cannot be replanted immediately
If weather or site preparation delays planting, keep divisions labeled, shaded, cool, and protected from drying. Wrap roots in damp material without sealing the crowns in plastic or submerging them. Plant as soon as practical. A fan held for days loses reserves and should not be cut into smaller pieces to make storage easier.
Heel divisions temporarily into loose well-drained soil when a longer delay is unavoidable and local conditions permit. Keep crowns at grade and roots covered, then water and mark them. This is a temporary nursery bed, not a pile. Inspect for soft tissue and keep cultivars separated.
Before final planting, recheck roots and remove only tissue that has become clearly dead or decayed. Do not shorten sound roots again. Adjust expectations for flowering and provide close establishment monitoring. The holding interval becomes part of the record when later performance is evaluated.
Rebuild a large display without recreating congestion
Lay divisions on the bed plan at mature spacing before digging every hole. Repeat groups of the same cultivar and preserve service access. A large clump divided into many pieces does not require every piece to return to the original footprint. Keep the strongest number the design can support and relocate or share sound extras.
Use staggered groups where the border needs continuity, but keep crowns far enough apart for air, weeding, and future lifting. Combine cultivars only when labels remain readable and their heights and bloom periods support the composition. A mixed anonymous row is difficult to evaluate and divide later.
Photograph the replanted pattern and count fans by group. Next season, compare fill and bloom without moving plants immediately. The record will show whether smaller divisions need more time or whether the spacing is truly too open. Let living growth close the planned gap rather than adding another crowded layer.
Steps
- Level
- moderate
- Time
- One to three hours for a mature clump, depending on soil and size
- Tools
- Garden fork or spade, Clean knife, Tarp, Watering wand
- Materials
- Plant labels, Damp burlap, Light organic mulch
- 1Confirm identity, need, and timing
Verify daylily fans and separate declining bloom caused by crowding from shade, drought, depth, or nutrition. Choose early spring or an after-bloom window with establishment weather remaining. Stop if young fans show unresolved streaking, pustules, distortion, soft crowns, or broad root decay.
- 2Prepare holes before lifting
Choose the final light, drainage, and spacing, remove perennial weeds, and loosen a broad planting area. Water a dry source clump the previous day and label the cultivar. Count destination spaces so the clump is divided into useful units instead of many homeless fragments.
- 3Lift outside the fan perimeter
Remove spent scapes, expose the crown, and loosen around the clump from several sides. Support the root mass onto a shaded tarp. Use clean tools to reduce a very large mass into manageable sections and protect exposed roots with damp burlap while work continues.
- 4Separate rooted crowns
Follow natural gaps from the outside and keep at least one firm fan with a useful root system in every division. Use groups of two or three for faster visual recovery. Cut tight joins cleanly, retain sound roots, and discard soft crowns or isolated leaf fans without basal tissue.
- 5Plant the crown at grade
Spread roots over a small mound and set the crown at the finished soil line. Work soil among roots, water to settle, and correct any sinking or exposed roots. Space for mature spread, keep labels nearby, and avoid rich fertilizer pockets under the crown.
- 6Keep moisture steady and crowns visible
Water through the root depth when needed, allowing air to remain in the soil. Add a light mulch around the plant but leave crowns and leaf bases open. Recheck grade after storms and remove small weeds before their roots mingle with new daylily roots.
- 7Judge establishment by new growth
Expect some original foliage to decline. Watch for firm crowns and fresh leaf extension, and delay strong fertilizer until roots function. Record date, fan count, cultivar, and location. Investigate only divisions that loosen, soften, or fail while nearby plants recover.
- 8Hold delayed divisions safely
Keep labeled divisions cool, shaded, and wrapped in damp breathable material for a short delay. Heel them temporarily at crown grade when necessary, then plant promptly. Reinspect for decay and record the holding interval instead of assuming performance matches immediately planted fans.
- 9Lay out mature groups before digging
Place the retained divisions on the plan at mature spacing, preserve access, and repeat labeled cultivar groups. Rehome healthy extras rather than returning every fragment to the original bed. Photograph fan counts and let the planned gaps close through establishment.
Related reading

Sources
- When can I divide daylilies?. Iowa State University Extension and Outreach. Source record · Accessed 2026-08-19.
- Daylilies. University of Minnesota Extension. Source record · Accessed 2026-08-19.
- Dividing Perennials. Penn State Extension. Source record · Accessed 2026-08-19.