Grow · ornamental border selective cutting
Cut Flowers from an Ornamental Border Without Hollowing Out the Display
Harvest a modest vaseful by distributing cuts across repeated groups, choosing stems by plant and opening stage, and preserving the border's foliage and silhouette.
Published Last updated
In this guide
- Treat the border as a display first
- Set the stem budget from the view that must remain
- Set a harvest budget before entering the bed
- Choose stems that leave a complete plant behind
- Match harvest stage to the exact flower
- Prepare water, tools, and route before cutting
- Cut across the border in deliberate rounds
- Condition the vaseful without extending the harvest
- Repair the view with observation, not filler
- Build future cutting into the planting design
- Steps
Treat the border as a display first
An ornamental border and a dedicated cutting bed have different priorities. In a cutting bed, a row can be harvested for yield; in a mixed border, every removal changes a view, a plant outline, and the relationship among neighboring forms. Begin with the promise that the border will still look complete from its principal viewpoints after the vase is filled. The harvest is a selective edit of the display, not a separate production target.
Walk the border without tools and identify its visual anchors: a flowering mass that terminates a view, a tall group that balances another, a repeated color that carries the eye, or a single specimen that needs all of its stems to read strongly. Mark these as protected. Then identify secondary repeats, interior stems, and plants temporarily hidden behind foreground foliage. Those are possible sources, subject to species-specific cutting guidance and plant health.
Decide where the finished vase will be seen and what it actually needs. A small vessel may need a handful of well-related stems, foliage, and one focal flower rather than a large armful. Choose a narrow palette before cutting. This reduces impulsive removal and allows the garden and arrangement to share a color story without requiring the border to surrender every bloom of one kind.
Set the stem budget from the view that must remain
Choose the vessel and protect the border's structural plants before collecting stems. Take small rounds from repeated source groups, then step back to reassess the same view. Stop when another removal would hollow the display or damage the plant's remaining role. The arrangement's desired fullness does not enlarge the border's safe harvest budget.
Set a harvest budget before entering the bed
Write a simple budget by role: perhaps one focal stem, several supporting flowers, a few linear or airy stems, and modest foliage. The numbers should be derived from the vessel and the current garden, not treated as a reusable formula. If the border cannot supply one role without exposing a gap, revise the vase plan. A smaller or simpler arrangement is a successful response to the garden's condition.
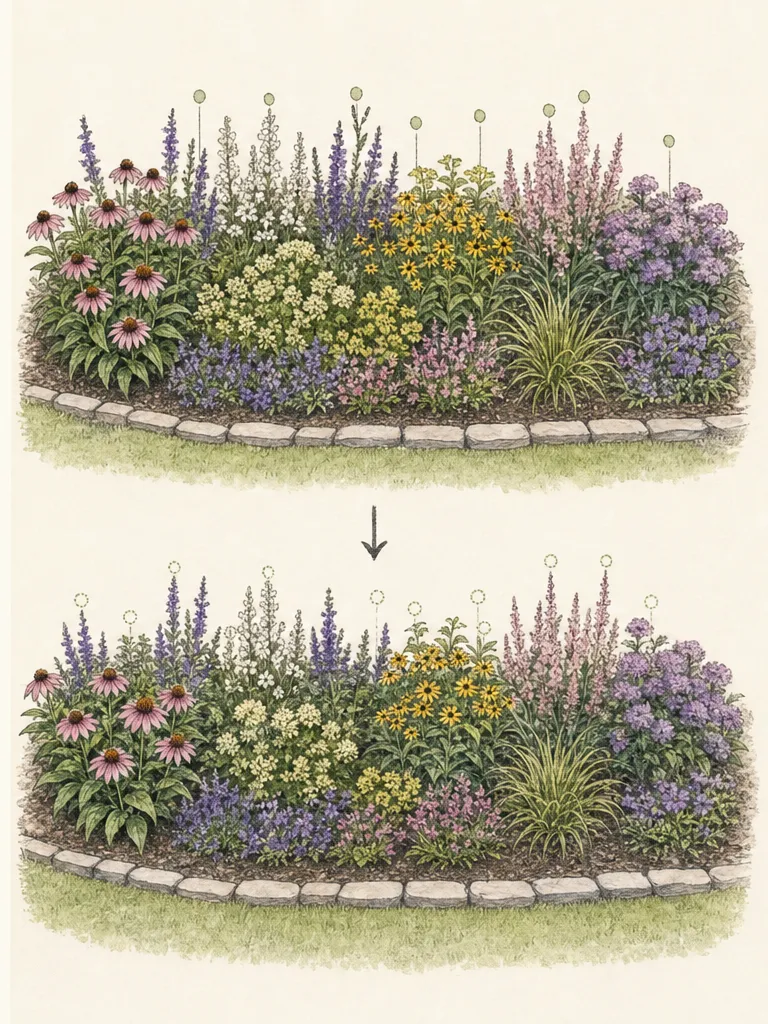
Spread the budget across repeated groups. Taking one stem from three established clumps usually changes the composition less than taking three adjacent stems from a single clump, but plant form and flowering habit still govern the decision. View each proposed source from the main path and from the house. Protect the front edge and the outer shoulders of a flowering mass when those positions define its silhouette.
Establish a stop rule before the first cut: when the intended vessel is supplied, when a repeated rhythm begins to weaken, or when the next suitable stem belongs to a protected anchor, the harvest ends. Carry a small bucket sized to the plan. An oversized empty container encourages the gardener to continue collecting after the visual budget has been spent.
Choose stems that leave a complete plant behind
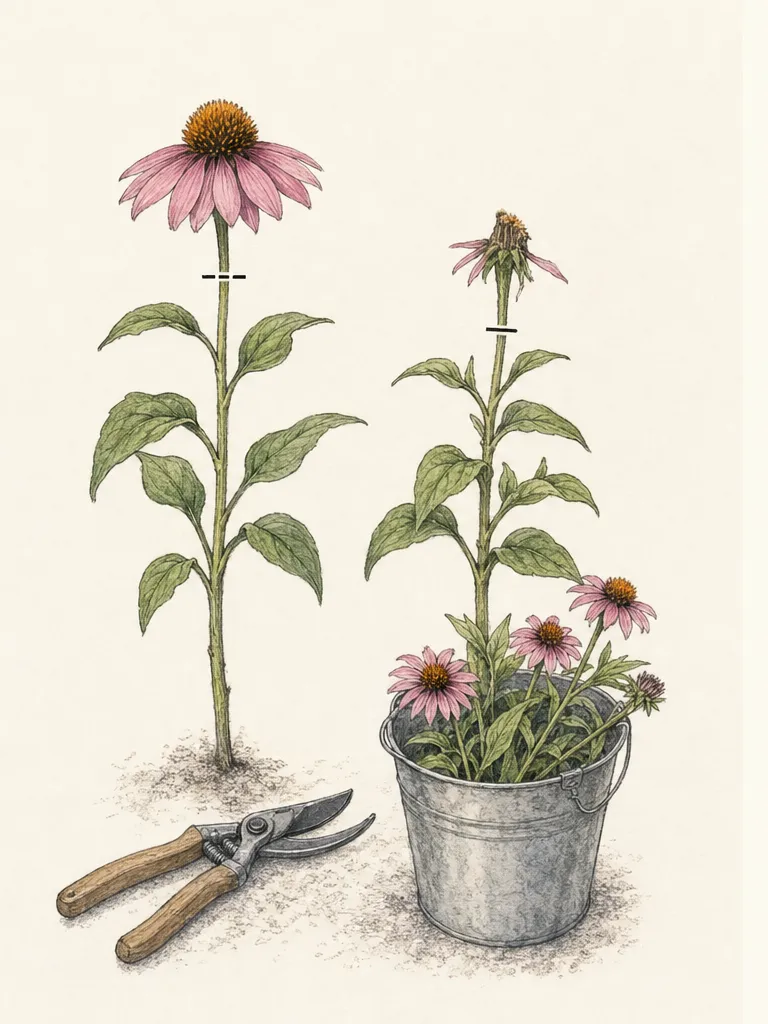
Trace a candidate stem from flower to its origin. Notice whether it rises from the center or outer face, whether side shoots remain below, and whether its foliage contributes to a solid mound. Prefer a stem whose removal is absorbed by neighboring growth and leaves a natural line. Avoid cutting a run of adjacent stems to the same depth, which can produce a flat notch or an open window into the crown.
The correct cutting point depends on the plant. Some branching ornamentals can be cut above a healthy leafy junction and retain useful structure; some single-stemmed plants have a different response; woody flowering stems require species- and season-specific pruning knowledge. Do not turn a bouquet harvest into unplanned pruning. If the appropriate cut is uncertain, use another plant or take only material already recommended for harvest by a reliable regional source.
Protect enough healthy foliage for the plant's normal growth and for the border's visual continuity. Do not strip a stem while it is still attached and leave a bare stalk simply to maximize vase length. A shorter interior stem may be more responsible, especially for a low vessel. If every usable stem would require cutting deeply into a weak or newly established plant, leave that plant unharvested.
Match harvest stage to the exact flower
Opening stage is species-specific. Some flowers are best gathered as buds begin to show color; others should be more open before cutting because they do not continue normally in water. Iowa State Extension provides examples and conditioning guidance, but the safe practice is to confirm the plant rather than generalize from one flower shape. Label unfamiliar ornamentals and keep a brief record of the stage that performed well in the vase.
Reject stems with active decline, extensive damage, or uncertain symptoms. A bouquet is not a place to hide material that should be diagnosed in the garden. Inspect undersides, junctions, and the cut path, but keep the article's task centered on plant condition and sanitation rather than naming a cause. If disease is suspected, isolate the tools and debris and use regional diagnostic advice before moving through healthy plants.
Consider the border's next stage as well as vase life. A flower near its garden peak may be an important visible note even if it is suitable for cutting, while an interior bud can open in the arrangement and leave the peak outside intact. Conversely, removing every future bud can make the border look full for a day and empty for the following week. Retain a mixture of stages on each source group.
Prepare water, tools, and route before cutting
Set a clean bucket with fresh water in shade as close to the border as practical. University guidance emphasizes prompt placement in water and clean handling for cut stems. The exact conditioning method can vary among plants, so prepare any species-specific treatment before harvest rather than leaving stems on a path while researching afterward. Keep the vessel, workspace, and cutting tools clean.
Use sharp hand pruners or snips suited to the stem diameter. Dull or oversized tools can crush tissue or tempt an awkward cut. Clean blades before beginning and between plants when disease is suspected, following current product and regional sanitation directions. Wear gloves or other protection when the identified plant has irritating sap, prickles, or known toxicity, and keep unknown plant material away from children and pets.
Plan a route that reaches source stems from firm ground. Do not step into crowns or lean across a tall foreground with an open blade. Move the bucket rather than carrying a cut stem around the entire bed. If rain, irrigation, or slope makes footing unsafe, postpone the harvest. A vase is optional; damaging a crown or losing balance is not an acceptable trade.
Cut across the border in deliberate rounds
Begin with the structural role that is hardest to replace, then set that stem directly in water. Step back and recheck the source plant. Continue with one supporting stem from each planned repeat rather than completing one clump at a time. This round-based method lets the arrangement grow while the border changes gradually, making a developing imbalance easier to see before it becomes a hole.
Make each cut cleanly at the species-appropriate position and keep the removed stem under control so it does not pull neighboring growth. Remove only lower foliage that would sit below the water line, using clean handling and leaving the source plant's remaining leaves intact. Do not lay harvested stems in sun or on warm paving. Return them to the shaded water container promptly.
After each round, view the border from its principal angle. Look for a broken color repeat, an exposed support, a sudden notch, or a visible crown. If one appears, stop taking from that zone. Do not try to correct a gap by shortening adjacent plants into a matching depression. The border's preserved variation is more natural than a larger, deliberately widened hollow.
Condition the vaseful without extending the harvest
Bring the bucket to a cool, clean workspace as soon as the planned cutting is complete. Recut and condition stems according to reliable guidance for the exact flowers. Iowa State and Illinois Extension both emphasize clean water and removal of foliage that would be submerged. Use a clean vessel and avoid contaminating the water with leaves or garden debris. Different flowers may need to be handled separately before final arranging.
Build the arrangement from what was budgeted rather than returning repeatedly for missing pieces. Turn the vessel as you work and allow negative space. A border-derived arrangement can feel generous through line, repetition, and foliage texture without being dense. If the vessel is too large, change the vessel. The garden should not be asked to solve a scale mistake made at the table.
Keep the arrangement away from conditions known to shorten vase performance and refresh care according to institutional guidance for the included plants. Do not use unverified homemade additives or mix products contrary to labels. Record which stems opened, wilted, or clouded water rapidly. That information improves the next selective harvest and may show that an attractive border flower is better left outdoors.
Repair the view with observation, not filler
Return to the border after arranging and remove only obvious severed debris. Check that no partial stem, stripped stalk, or damaged neighbor remains. Do not push surrounding foliage into the harvested spaces or tie plants together to conceal them. Natural movement will often close a small interior opening, while forced concealment can shade crowns, alter airflow, and create more work.
Water only from root-zone evidence and ordinary plant needs, not because flowers were removed. Fertilizer is not an automatic response to harvesting. A healthy established ornamental may continue its cycle without intervention, while a stressed plant may need diagnosis and relief from the original site problem rather than feeding. Keep mulch, soil, and cut material away from living crown tissue.
Photograph the border from the same position before harvest, immediately after, and several days later. The comparison reveals which cuts disappeared into the composition and which altered it for too long. Note source plant, stem position, flower stage, and visible recovery. These records turn restraint into a repeatable practice rather than relying on memory when the next vase is wanted.
Build future cutting into the planting design
If the household regularly wants cut flowers, repeat suitable ornamentals in more than one accessible group. Place some stems where they can be removed from the back or interior without defining the public silhouette. Use locally suitable plants that produce a useful succession and whose normal care permits the intended harvest. The border remains ornamental; the repetition simply gives it enough visual redundancy to share modestly with the house.
Provide narrow working bays beside taller groups and keep cutting candidates out of inaccessible pockets. Pair them with durable foliage that remains after a flower stem is removed. Avoid using one rare focal plant as the recurring source. A protected specimen can contribute an occasional naturally appropriate stem, but the main vase material should come from repeated, established plants whose loss is distributed across the design.
Review the season as a whole. If every harvest weakens late color, retain more buds; if the spring border offers nothing without damage, plan a separate small cutting patch or choose a different seasonal palette. The measure of success is two complete compositions: a vase proportionate to the available stems and a garden that still reads as a designed ornamental border after the bucket leaves.
Steps
- Level
- easy
- Time
- 30 to 60 minutes, plus species-specific conditioning time
- Tools
- Sharp clean hand pruners or floral snips suited to the stems, Clean water bucket, Clean vase, Plant labels or a harvest notebook, Gloves and eye protection when required by the identified plant
- Materials
- Fresh clean water, A modest selection of suitable ornamental stems, A clean towel for the work surface, Any species-appropriate conditioning material supported by institutional guidance and used exactly as directed
- 1Choose the vessel and write the stem budget
Select a vessel proportionate to the current border. List the few roles it needs—focal, supporting, linear or airy, and foliage—without assuming a fixed number. Reduce the plan if the border cannot supply a role without exposing a gap. Prepare the entire arrangement concept before entering the bed so the empty bucket does not determine the harvest.
- 2Map protected anchors and possible source groups
Walk the main viewpoints and protect flowering masses that terminate views, balance the composition, or provide the only repeat of a color. Mark established secondary groups, interior stems, and temporarily screened plants as possible sources. Confirm exact plant identification, health, suitable harvest stage, and any toxicity or handling limit before selecting a stem.
- 3Prepare clean water, tools, and a safe route
Place a clean bucket of fresh water in shade close to the work. Use sharp clean tools matched to stem diameter and bring required protective equipment. Plan firm access to each source without stepping in crowns or leaning with an open blade. Postpone if footing is unsafe or if species-specific handling and conditioning have not been confirmed.
- 4Trace the first stem before making the cut
Follow one candidate from flower to origin. Check its place in the plant outline, the foliage and side growth below it, and the cut appropriate to that species and growth habit. Choose an interior or visually redundant stem whose removal leaves a complete plant. If the only possible cut becomes structural pruning, leave it and select another source.
- 5Harvest one stem from each repeated group
Make a clean species-appropriate cut, control the stem as it comes free, remove only foliage that would be submerged, and place it promptly in water. Move to another repeated group before returning for a second stem. Protect outer shoulders, front edges, future buds, and all newly established or stressed plants from the routine harvest.
- 6Recheck the border after every round
Step back to the principal view after collecting one round of stems. Look for a missing color beat, exposed crown or support, flat notch, or weak silhouette. Stop taking from any changed zone and end the harvest when the vessel budget is met. Do not widen a small opening by cutting adjacent stems in an attempt to make the gap symmetrical.
- 7Condition and arrange only the planned material
Move to a cool clean workspace, recut and condition each identified flower according to reliable species-specific guidance, and keep foliage out of vase water. Build the arrangement with negative space and change to a smaller vessel if needed. Do not return to the border for impulsive filler after the planned visual budget has been reached.
- 8Inspect, photograph, and record the source plants
Remove severed debris, leave crown tissue visible, and avoid automatic watering or feeding. Photograph the same border view immediately and several days later. Record source group, stem position, flower stage, vase performance, and how quickly the garden view recovered. Use those observations to protect weak sources and repeat only cuts that disappeared gracefully.
Related reading
Sources
- Cut Flowers: Growing and Selection. Royal Horticultural Society. Source record · Accessed 2026-08-19.
- Bright Blooms: How to Care for Flower Bouquets. University of Illinois Extension. Source record · Accessed 2026-08-19.
- How to Harvest, Condition and Care for Cut Flowers. Iowa State University Extension and Outreach. Source record · Accessed 2026-08-19.