Grow · clean small greenhouse before winter plants
Clean a Small Greenhouse Before Bringing Plants In for Winter
Prepare a small greenhouse for overwintering plants by clearing debris, cleaning glazing safely, washing staging and floors, and restoring drainage and access.
Published Last updated
In this guide
- Clean the empty space before filling it for winter
- Make room for dirty work and a clean return
- Identify the glazing before choosing a cleaning tool
- Wash glazing and frames in a controlled order
- Clean staging before deciding whether more treatment is needed
- Clear the water routes and finish the floor
- Dry the house and keep ventilation usable
- Inspect plants before bringing them back inside
- Steps
Clean the empty space before filling it for winter
Empty a small greenhouse as far as practical, collect loose plant material and soil, then wash the glazing and structure with methods suited to their materials. Clean the staging and floor, restore water outlets, and let the space dry before returning equipment and inspected plants. For routine home-greenhouse cleaning, the RHS says warm water is generally sufficient. Removing dirt from the panes improves access to limited winter daylight; clearing residues also removes places where pests and plant pathogens can persist.
Schedule the work around the plants already present. A calm, mild day gives you time to move pots to suitable shelter and return them before colder conditions arrive. Early November can be a useful changeover point in mild Northern Hemisphere gardens, but frost-sensitive plants may need protection much earlier elsewhere. If winter plants are already inside, work in manageable sections while keeping them in appropriate shelter. Leaving tender plants outdoors overnight to finish a cosmetic cleaning job would defeat the purpose.
Start with a sound structure and an achievable reach. Walk around it to identify loose panes, cracked glass, damaged fixings and inaccessible roof areas. Restrict this routine to surfaces you can reach securely from the ground, using a suitable long-handled tool where needed. Stop at damaged glazing and arrange repair before washing that part. Glass and plastic panels are not working platforms; the RHS and Palram both caution against putting body weight on glazing.
Make room for dirty work and a clean return
Move plants first, retaining their labels and any notes about their winter needs. Choose a temporary position that provides the light and temperature each group requires. A sheltered outside wall may suit a short mild-weather move for some plants; a warm-growing tropical plant may need an indoor alternative. Check the forecast as well as the thermometer. Keep any plant with unexplained spots, pests or decline separate for assessment, so clearing the greenhouse does not mix a suspect pot through the whole collection.
Next remove portable staging, loose shelves, pots, trays, stakes and old ties. Set aside a washing area and a separate clean drying surface, leaving the greenhouse doorway clear. This simple arrangement prevents a washed shelf being laid back on the same soil-covered stack from which it came. For example, place outgoing equipment on one side of the path and a clean rack on the other; hold plants elsewhere, beyond the wash-water route. Adapt the layout to the space actually available.
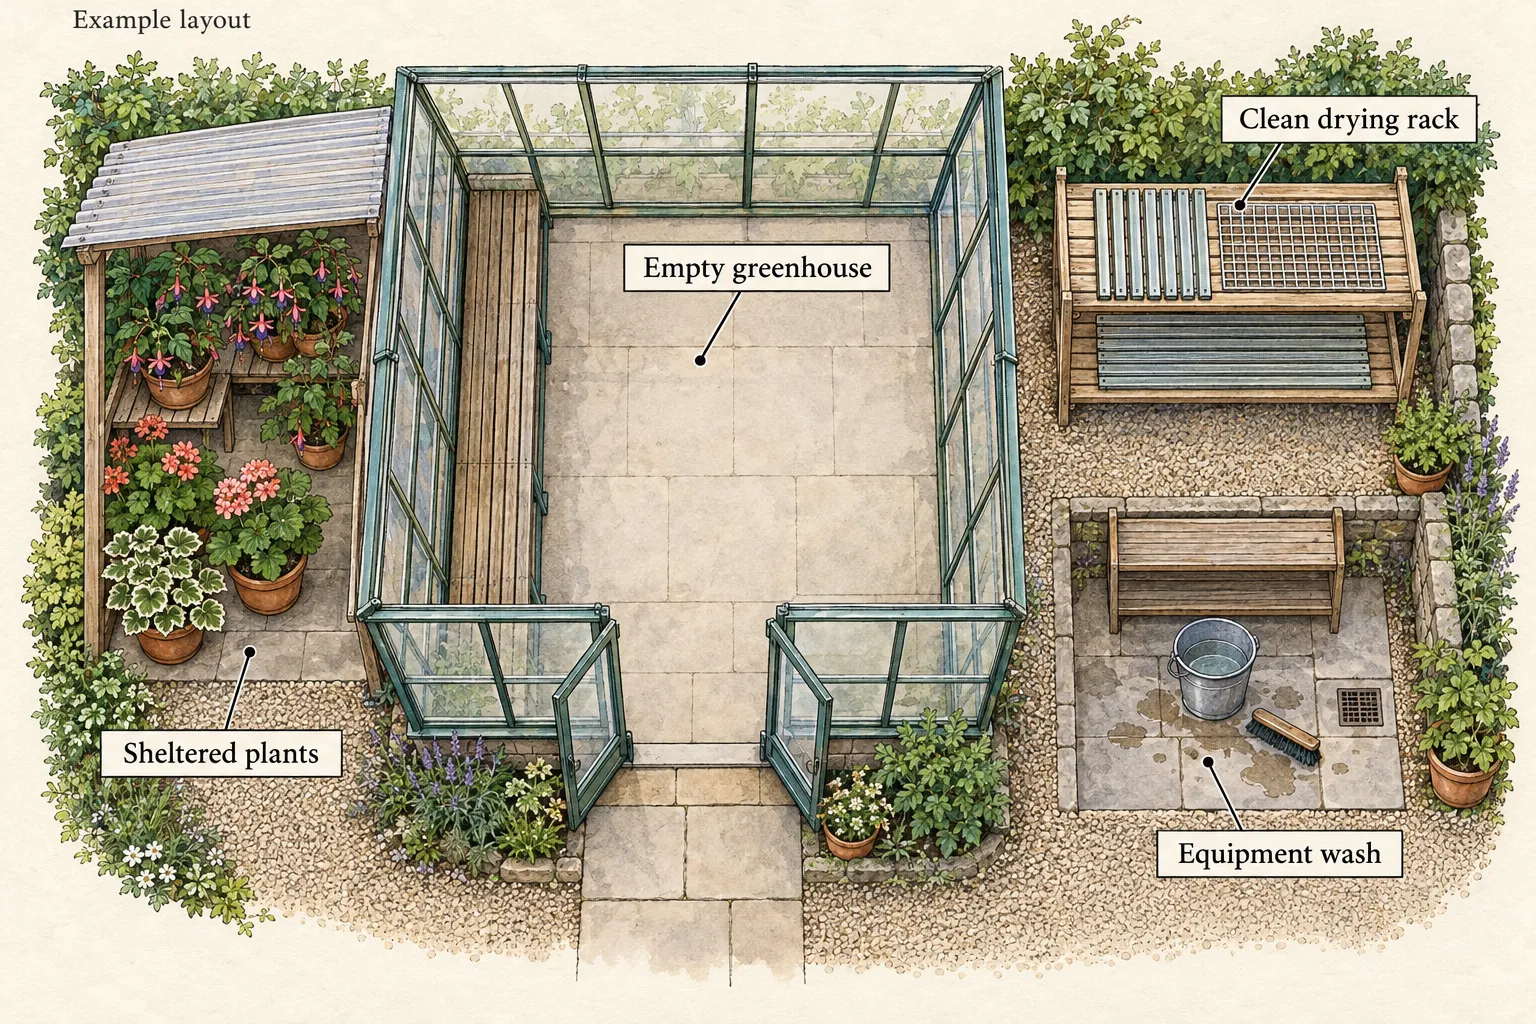
Gather leaves, spent plants, old roots, spilled mix and broken labels before wet cleaning begins. Reach under benches and into accessible corners, using a small brush for frame recesses and a broom for the floor. Collect residues with gentle movements that limit airborne dust. Separate healthy compostable material from plants associated with a known disease, using the appropriate local disposal route for the latter. Keep waste containers outside the cleaned space and empty them promptly.
Remove weeds inside the structure and close to its entrance. A weed rooted through floor fabric or beneath a shelf can remain unnoticed after the obvious pots have gone. Collect the roots and loose soil it releases, then inspect the mat or paving joint. The UC Master Gardener greenhouse guidance emphasizes keeping both the house and its immediate surroundings clear of weeds and debris. A clean doorway also reduces the mud carried back in on footwear during winter visits.
Identify the glazing before choosing a cleaning tool
Confirm whether each panel is ordinary glass, polycarbonate, acrylic or another plastic, and whether it has a special coating. Older structures may contain replacement panes of several materials. Consult the greenhouse or panel manufacturer's care instructions before using a scraper, detergent or polishing product. A tool suitable for clearing a glass-frame crevice may damage the surface of a plastic panel. Keep separate cloths for glazing and dirty frame work so trapped grit is not carried onto the next clear pane.
Palram's polycarbonate guidance illustrates why that identification matters. For its listed products, it specifies a soft sponge or cotton cloth, lukewarm water and a mild dishwashing detergent, followed by prompt rinsing. It warns against abrasive cleaners, sharp tools, squeegees and dry rubbing that can drag grit across the surface. It also identifies an exception: cleaning the inside face of SUNTUF Plus and SUNLITE Plus may diminish their anti-condensation coating. Find the exact panel instructions before treating both faces identically.
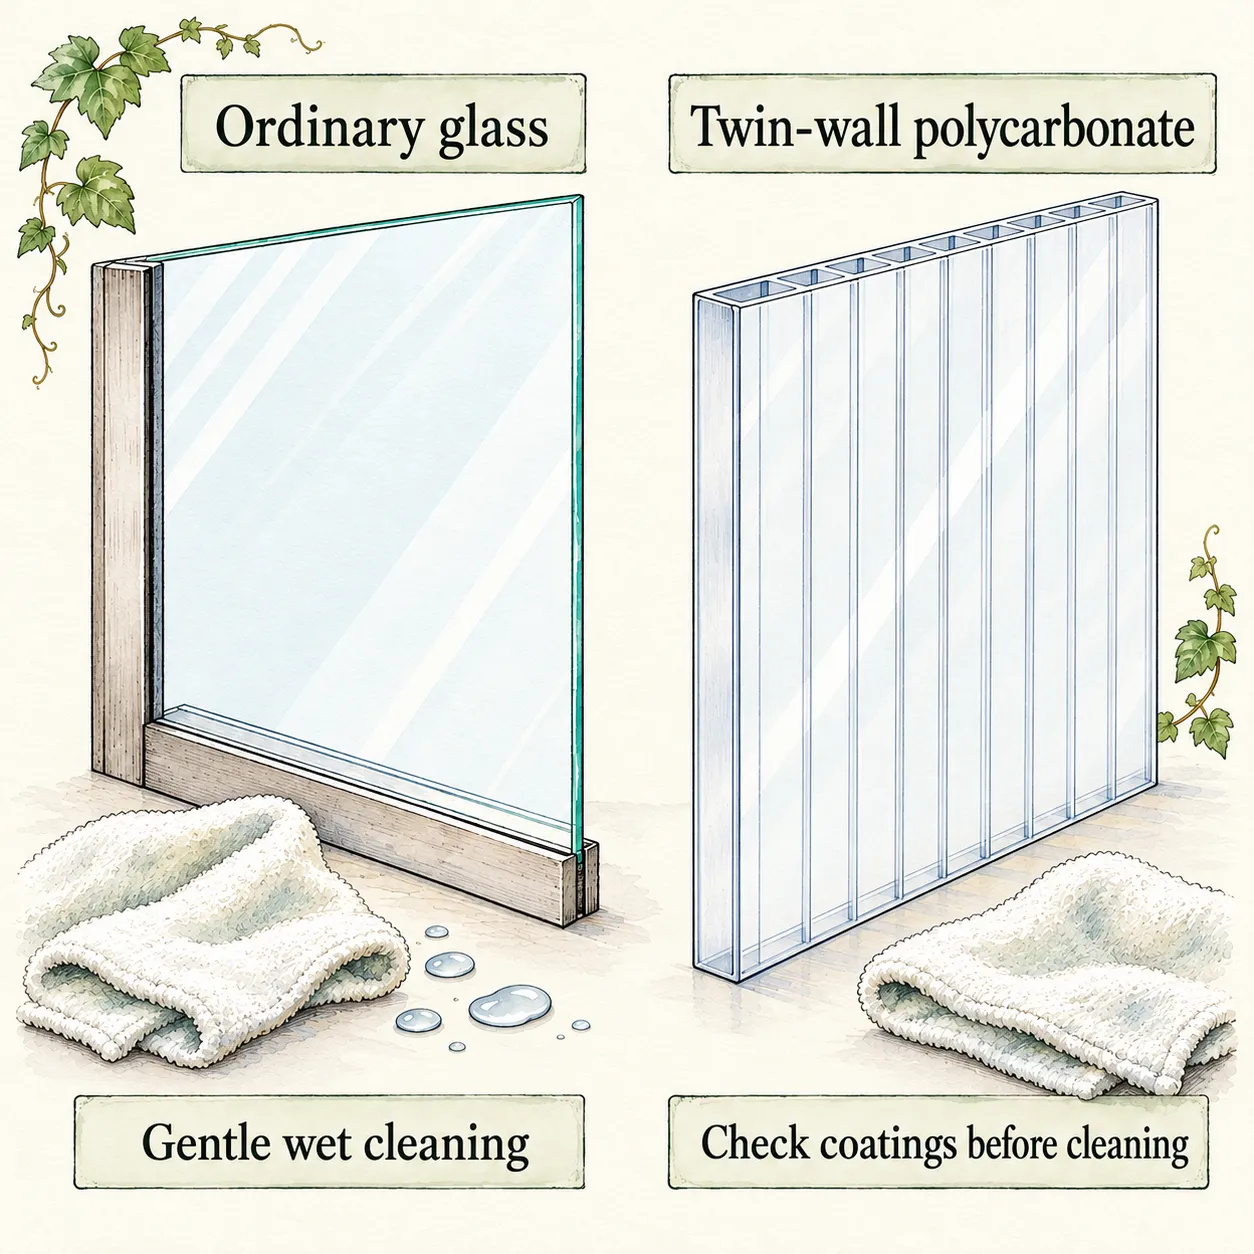
For ordinary glass, start with warm water and a soft cloth or sponge, as the RHS recommends. Loosen adhering dirt with moisture before wiping and use clean water as the bucket becomes dirty. The aim is to remove a film, not grind it into the surface. Persistent cloudiness may come from damage, deposits or a coating; further scrubbing may leave it unchanged. Pause and identify the material and residue if repeated gentle cleaning makes little difference; stronger pressure is a poor diagnostic test.
Wash glazing and frames in a controlled order
Remove loose material from the higher reachable structure before doing the final floor wash. Frame ledges and corners can release debris onto surfaces below as you work. In a home greenhouse, a useful order is to clear accessible frame recesses and panel edges, wash the panes, then finish with what has reached the floor. Keep plants and clean equipment outside the working zone throughout this sequence.
Wash the accessible outside and inside faces that the material instructions permit. Use manageable sections so dirty water can be rinsed away before drying into another film. Work a long-handled soft washing pad from stable ground only where it can be controlled gently. An unreachable panel belongs on the list for suitable assistance, not at the end of an improvised reach across the roof. Follow the panel's temperature and sunshine restrictions; Palram advises against applying cleaners in direct sun.
At ordinary glass overlaps, the RHS suggests a flexible plastic plant label to ease out trapped dirt or moss. Use it gently within the accessible gap, keeping pressure off the pane and its retaining clips. This is not an instruction to insert a blade into every type of glazing joint. Polycarbonate channels, taped edges, gaskets and coated surfaces need their manufacturer's treatment. If growth sits inside a sealed or multiwall panel, wiping the outside cannot reach it; seek maintenance advice before opening an edge.
Check door tracks, latches and vent joints while the frame is visible. Remove accumulated dirt and confirm that moving parts travel freely according to their instructions. Report loose or damaged components and replace them with suitable parts before plants depend on the space. Keep electrical heaters, fans, lights and controls out of the wet-cleaning operation, isolating and protecting them as their manuals direct. Cleaning is a useful moment to notice defects, while electrical work and structural repairs remain separate tasks.
Clean staging before deciding whether more treatment is needed
Wash empty staging on its top, underside, legs and between slats, using a brush suited to the bench material. Remove roots that have grown through pot drains onto the surface and collect the potting mix caught around supports. A shelf can look clean from standing height while retaining damp debris underneath. Turn removable pieces only where they can be handled securely, and inspect them on the drying surface before returning them to the greenhouse.
Distinguish visible cleanliness from disinfection. UC's greenhouse guidance first removes plants, weeds and debris, then addresses washing and any additional treatment. Warm-water washing can remove dirt and algae, but it does not establish that a surface is sterile or that every disease problem has been eliminated. Routine household cleanup and a response to a diagnosed greenhouse disease have different requirements. A shiny pane is evidence of a clearer surface, not a test of the health of every plant entering the house.
Where crop history calls for additional treatment, obtain current horticultural advice for the identified problem and the actual surface. UC Extension emphasizes product directions and appropriate protection; Palram separately warns that incompatible chemicals can damage its panels. Check both the treatment instructions and the surface manufacturer's requirements, including any contact, rinse and drying conditions. An old regional chemical example is not a universal home-greenhouse recipe. Replacement may be more sensible for badly deteriorated equipment than repeated attempts to make it serviceable.
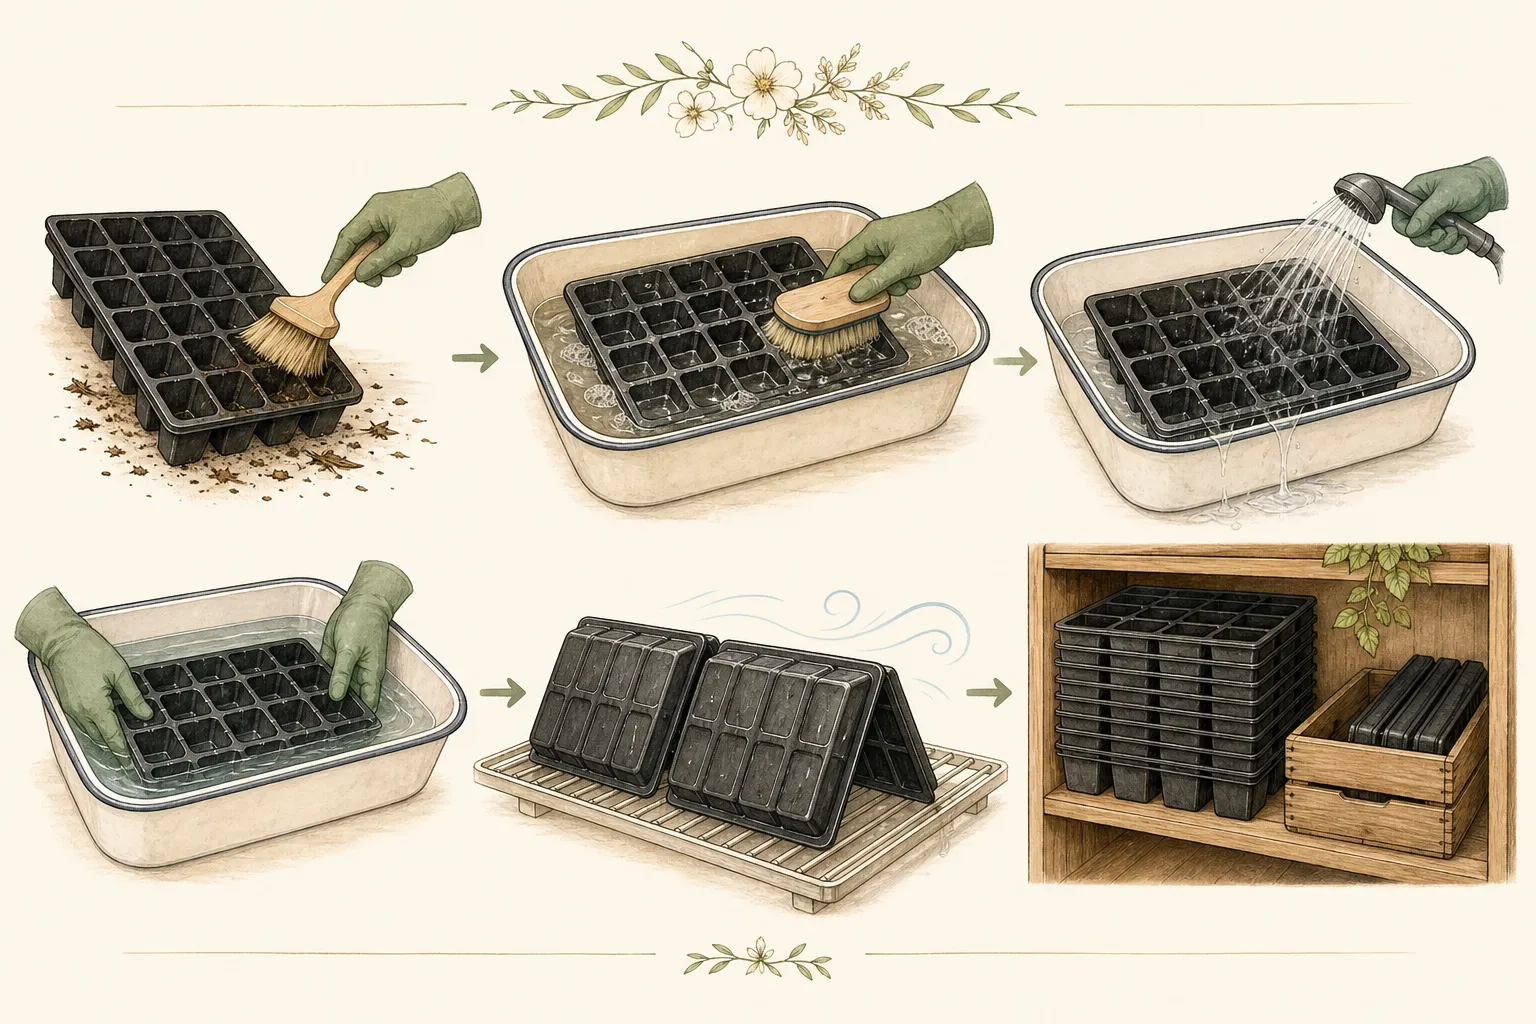
Keep pots and propagation trays on their own cleaning workflow. Sort damaged pieces before washing, clean drainage slots and undersides, and let sound reusable containers dry before stacking. Leave spare bags of potting mix, unused trays and unnecessary tools in suitable separate storage. UC's re-entry advice favors returning plants and the equipment actually needed to maintain them. Reducing stored clutter makes the next fallen leaf, leak or algal patch easier to see beneath the winter collection.
Clear the water routes and finish the floor
Collect leaves and moss from gutters only where they can be reached securely. Check accessible downpipe entrances for blockage, then rinse out loose dirt while watching where the water goes. Divert dirty gutter washings away from a rainwater tank used for plant watering. A water butt needs its own cleaning decision and a suitable wastewater route; flushing gutter debris straight into it transfers the cleanup to the next watering can. Handle that separate job before reconnecting the collection system.
On concrete or paving, scrub the remaining dirt and slippery green film with warm water and a suitable stiff brush, then remove the dirty water through the intended drainage route. Keep the exit usable as you work. Gravel and soil floors need debris collection, weeding and drainage attention, not an attempt to wash every particle into a drain. Inspect floor fabric for tears or places where loose soil has accumulated above it, and correct those pockets before replacing the benches.
Algae, liverworts and moss tend to reveal persistently damp places. The RHS describes algae as a green film, liverworts as flat growths and mosses as cushion-like patches, often around shaded corners or glazing bars. Clearing them improves the working surface, but their return can point to a leak, repeated runoff or poor drying. Mark the wet patch's source while the greenhouse is empty. Restoring a blocked outlet or changing where watering runoff lands can be more useful than repeatedly scrubbing the same corner.
Dry the house and keep ventilation usable
Allow the floor, frame recesses and staging to dry with doors and vents open when weather and plant protection permit. Inspect the underside of slats and the channels around the door, where water can remain after the broad surfaces look dry. Drying time changes with temperature, airflow, material and the amount of washing water used; a fixed number of hours would conceal those differences. Keep cleaned pieces separated from dirty tools until they are ready to return.
Test the door and vents before filling the space again. A pot placed in front of the only usable opening can make a well-cleaned greenhouse difficult to manage through mild winter days. Keep working clearances for handles, opening panels and automatic mechanisms, following their manuals. Give the thermometer a readable position among the plants. Clean glass improves light entry, but it supplies neither a guaranteed minimum temperature nor a complete ventilation plan for a crowded winter collection.
Arrange watering so excess is collected or drains away predictably. Where saucers or trays prevent runoff reaching the floor, empty them as needed for the plants' requirements. RHS algae guidance links better airflow and careful watering with drier surfaces. Keep foliage and pots arranged so you can inspect behind them, and leave access below benches. The useful result is a greenhouse that can continue drying and being checked after cleaning day, not a sealed space packed to its last corner.
Inspect plants before bringing them back inside
Return only the equipment required for the winter plants and place it on the clean, dry staging. Keep hose ends and watering tools off the floor when stored, as UC's greenhouse guidance advises. Clean mud from the access route and footwear, and remove plant debris promptly during later visits. These small habits preserve the benefit of the initial clear-out. Bringing an unwashed stack of old pots back beneath a clean bench immediately recreates a hidden storage area for dirt.
Inspect each plant and its pot before moving it into the winter group. Remove detached dead material and look for obvious pests, damaged growth or unexplained decline. Keep suspect plants separate for diagnosis and appropriate care; wiping the greenhouse does not treat an infestation already carried on a plant. Reconfirm the shelter each species needs, especially if a plant is still growing while another has entered dormancy. The cleaning schedule should finish before cold forces an unplanned mix of incompatible plants.
Over the following weeks, check the places identified during the wash: the leaking joint, wet corner, blocked track or patch beneath a regularly watered pot. If green film returns, review moisture and access before escalating treatment. If growth remains weak under clean panes, investigate the actual light, temperature and plant care. Record practical repairs and layout changes for the next empty period. A maintained greenhouse needs recurring observation as well as an occasional thorough wash.
Steps
- Level
- moderate
- Time
- Allow a mild day, including drying; repairs may require separate work
- Tools
- Buckets of warm water, Soft glazing cloths or sponges compatible with the panels, Small frame brush and suitable floor brush, Long-handled soft washing pad where controllable from the ground, Debris bucket and broom, Gloves appropriate to the work
- Materials
- Clean drying surface for staging and equipment, Temporary shelter suitable for the plants, Manufacturer-approved mild cleaner only where needed and compatible
- 1Choose the day and protect the plants
Check the forecast, the plants’ temperature requirements and a suitable temporary holding place. Inspect the structure from the ground and mark damaged or unreachable areas for separate attention. Move plants with their labels intact, keeping suspect stock apart. Leave a clear route for carrying equipment and for returning plants before conditions cool.
- 2Empty and collect before washing
Take portable staging and unused equipment out, then gather spent plants, roots, old ties, weeds and spilled mix. Reach under benches and into accessible frame corners. Establish separate dirty and clean equipment positions. Remove waste from the greenhouse and preserve any observations needed to assess a recurring plant-health problem.
- 3Match the wash to the glazing
Identify the panel material and any coating, then follow its care instructions. Use clean soft tools and gentle wet cleaning, working down from higher reachable areas. Wash only permitted faces and joints; stop where a sealed channel or damaged pane needs specialist attention. Rinse as directed and keep dirty runoff away from plants.
- 4Finish benches, water routes and floor
Clean staging on both sides and between slats before placing it on a clean drying surface. Clear safely accessible gutters and drainage outlets, diverting washings from stored irrigation water. Scrub suitable hard floors and collect residues from gravel or soil floors. Keep any disease-specific disinfection decision separate from routine washing.
- 5Dry and test access
Open doors and vents during suitable weather to help the empty space dry. Check channels and bench undersides for retained water. Test moving parts and keep their working clearances free when replacing equipment. Restore the intended water route and put the thermometer where it can be read among the returning plants.
- 6Return inspected plants and maintain the result
Bring back the required clean equipment and plants whose condition and winter requirements have been checked. Keep suspect pots separate. Store watering tools off the floor, remove fallen leaves promptly and inspect former wet patches after watering or rain. Correct the source of recurring moisture before the same algae film rebuilds.
Related reading
Sources
- Greenhouse cleaning. Royal Horticultural Society. Source record · Accessed 2026-10-21.
- Growing in a Greenhouse — Sanitation and Lighting, The Curious Gardener, Spring 2016. UC Cooperative Extension, Placer and Nevada Counties. Source record · Accessed 2026-10-21.
- Algae, liverworts and mosses on greenhouses. Royal Horticultural Society. Source record · Accessed 2026-10-21.
- Care and Maintenance: Polycarbonate Products. Palram Industries. Source record · Accessed 2026-10-21.