Grow · reused flower seed tray cleaning sanitation
Clean Reused Seed Trays Before the Next Flower Sowing
Remove old roots and film, wash every cell and drain, then use a label-directed disinfecting step only when the tray material and crop history warrant it.
Published Last updated
In this guide
- Separate cleaning from disinfection
- Make the cleaning decision before choosing a disinfectant
- Inventory the complete propagation system
- Remove debris while it is dry enough to release
- Wash before choosing a disinfecting step
- Apply only a current compatible disinfection method
- Dry completely before nesting or storage
- Rebuild the seed-starting station around prevention
- Steps
Separate cleaning from disinfection
Cleaning removes seed-starting mix, roots, algae, mineral film, dust, and other organic material from a tray. Disinfection is a later chemical or heat-based step intended to reduce microorganisms on an already clean surface. They are not interchangeable. Soil and plant debris shield organisms and consume some disinfectants, so soaking a visibly dirty tray in a strong solution wastes product and leaves the difficult corners unresolved.
Not every reused object deserves another crop. Sort trays by material, condition, and crop history before filling a sink. Keep containers from healthy seedlings separate from those associated with damping-off, root rot, unexplained collapse, or a confirmed disease. Quarantine uncertain material until a diagnosis or discard decision is made. Do not stack a diseased insert inside clean catch trays while waiting for wash day.
Read the current regional guidance and every product label before preparing a sanitation station. Household bleach concentration, commercial disinfectant formulations, approved surfaces, contact times, rinsing directions, and required protective equipment can change. The label governs the product in hand. A ratio remembered from an old article is not a safe substitute, and combining cleaning or disinfecting products can release dangerous gases. Work in a ventilated utility area away from food preparation, children, pets, seed, and living plants. Protect the surface and provide a route for lawful disposal of wash water and product solution. Wear the label-required protection. If the available space cannot safely separate chemicals from a kitchen or indoor propagation shelf, use a compatible nonchemical method from current guidance or replace inexpensive contaminated trays.
Make the cleaning decision before choosing a disinfectant
Sort out damaged containers and remove debris before considering disinfection. Crop history, tray material and the current product directions determine whether that later step is appropriate. Keep washed and treated pieces on the clean side through drying and storage. Repeated wet cells in the next crop call for drainage and tray-design review, not automatic escalation to a stronger chemical treatment.
Inventory the complete propagation system
Collect inserts, solid catch trays, humidity domes, cell packs, pots, labels, capillary material, bottom-watering reservoirs, dibbers, and any tools that touched the crop. Cleaning only the visible cell insert leaves algae and roots in the catch tray ready to contact new drainage water. Keep electrical lights and heat mats outside the wet station; wipe them only by the manufacturer’s safe method after disconnecting power.
Identify the plastic or other material where possible. Thin polystyrene, heavier polypropylene, fiber pots, silicone, metal, and wood tolerate different heat, scrubbing, and chemistry. A method suitable for rigid nursery pots can warp a thin insert or leave a porous fiber wall damaged. When the material is unknown or brittle, test a noncritical piece and follow product compatibility information rather than increasing concentration.
Discard trays with cracks that harbor roots, sharp broken rims, crushed drainage, severe warping, or cells that no longer release a plug. Repair tape creates another crevice and can fail in warmth and water. Recycling options depend on local rules and resin acceptance. Do not place horticultural plastic in a recycling stream that excludes it merely to avoid a discard decision. Preserve useful records before removing labels. Photograph the tray map and transfer cultivar, lot, sowing date, and disease notes to a clean notebook. A faded label can still explain why one row collapsed or whether a volunteer is desirable. Once records are secured, discard disposable labels that cannot be cleaned and keep durable labels with their corresponding group until washing begins.
Remove debris while it is dry enough to release
Empty used medium into the destination allowed by its crop history and local practice. Material from diseased seedlings should not be returned automatically to potting storage or a home compost pile. Bag or dispose of it according to diagnostic and municipal guidance. Healthy used mix still should not be treated as sterile seed-starting medium; its structure, nutrients, salts, and biological load have changed.
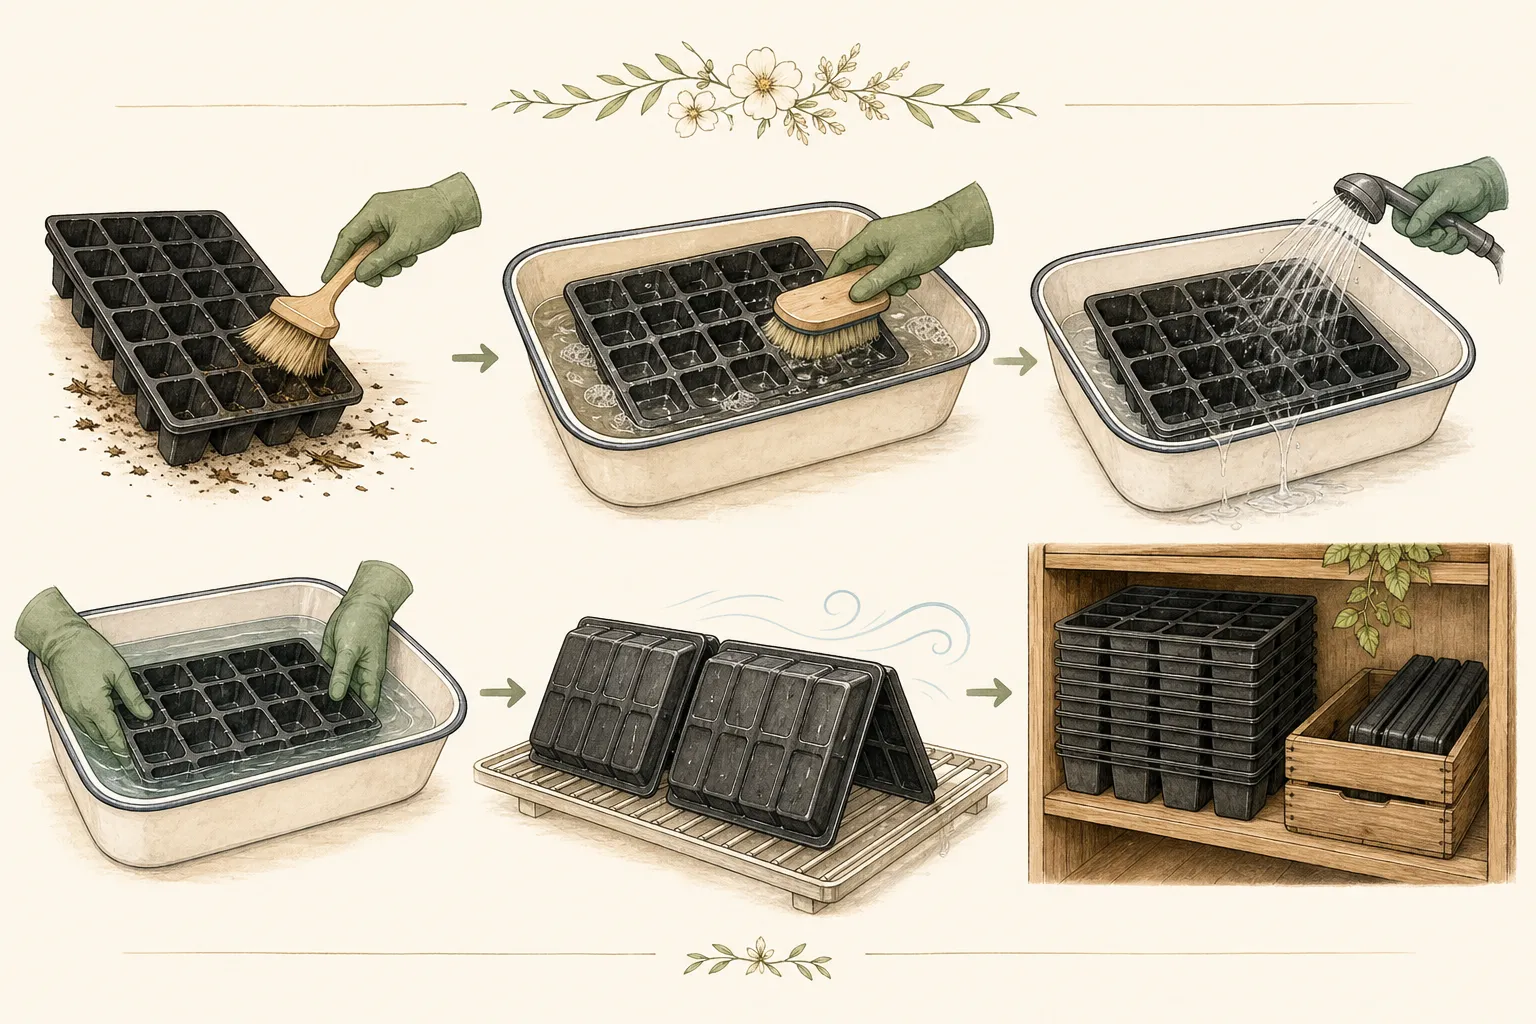
Let ordinary wet mix drain until it releases without smearing, but do not dry diseased material into airborne dust. Work gently with a stiff nylon brush, wooden label, or narrow nonmetal tool that reaches corners without gouging plastic. Remove roots from every drainage slot and capillary channel. A root thread can wick water between cells and a compacted plug can seal a hole completely.
Avoid high-pressure spraying that splashes contaminated debris across walls, clothing, and clean trays. Begin with mechanical removal into a contained area. For trays with heavy algae or mineral film, note which residue remains after debris is gone; it may require soaking in the cleaner approved for the material. Do not attack the surface with abrasives that leave scratches where future film becomes harder to remove.
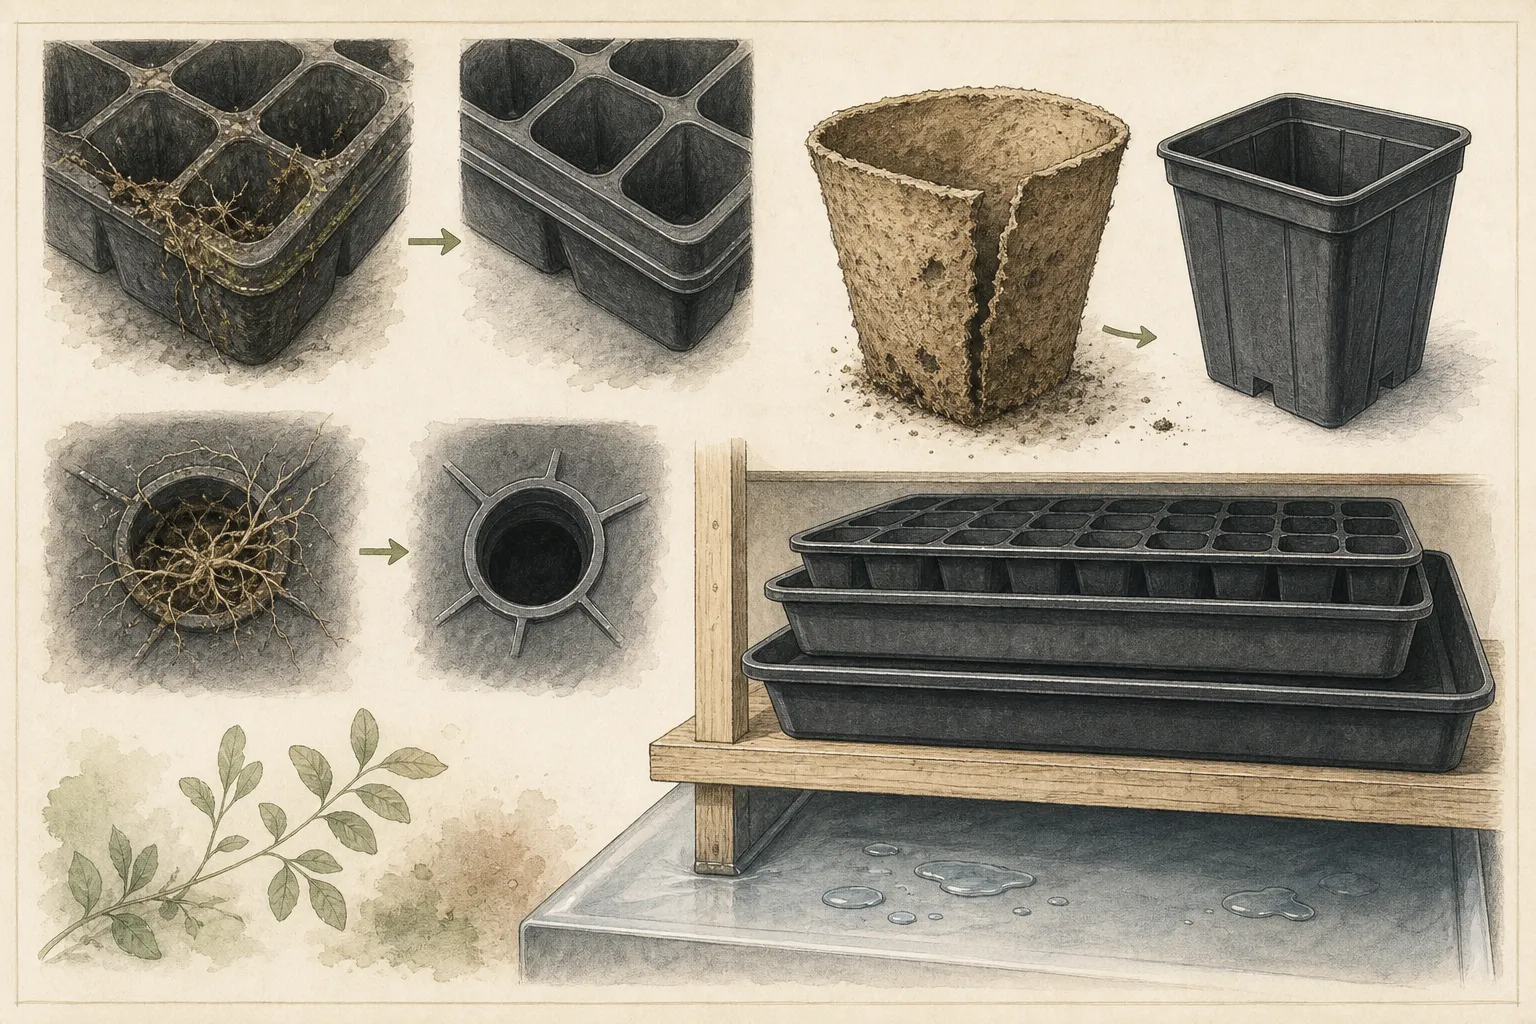
Inspect the empty tray against light. Hold cell bottoms above a contrasting surface so blocked drains, cracks, and thin spots are visible. Flex only as much as the material normally tolerates. If several holes are deformed, replace the tray rather than drilling an improvised pattern while dirty. A sound drainage profile is part of damping-off prevention and cannot be restored by chemical sanitation alone.
Wash before choosing a disinfecting step
Prepare warm water and a detergent or cleaner recommended by current Extension guidance and compatible with the tray. Fully wet every surface. Scrub cell walls, upper rims, drain openings, exterior feet, handles, dome grooves, and the underside of catch trays. Work from the healthiest known group toward higher-risk material, changing dirty wash water rather than turning it into a shared inoculation bath.
Use brushes sized to the geometry. A broad brush cleans a flat catch tray; a bottle or detail brush reaches tapered cells and dome channels. Keep separate brushes for propagation sanitation and label them. Do not use a food-dish brush or return it to household cleaning. Replace worn brushes whose bristles no longer contact corners or whose base holds permanent debris.
Rinse until visible soil and cleaner are gone, following the product direction. Inspect the rinse water and the tray under strong light. A surface can feel slick from remaining detergent, biofilm, or the plastic itself; compare with a known clean piece. Repeat the wash where film persists. Disinfection begins only after roots, crust, algae, and wash product have been removed to the extent the material allows. At this point, trays from healthy crops may be ready for complete drying if regional guidance and the intended use do not require more. Trays associated with disease, shared nursery material, or unknown history may warrant a disinfection step. Make that decision from risk and current guidance, not from the idea that stronger treatment always creates a healthier seedling.
Apply only a current compatible disinfection method
Select one method supported for containers and the actual material. Minnesota Extension describes several options and emphasizes cleaning first. If using a registered commercial product, verify that the label includes the surface and use. If using a bleach product under regional guidance, confirm its current active concentration and follow the exact dilution, contact, ventilation, protection, and rinsing instructions. Never estimate by color or odor.
Prepare only the amount needed in a labeled nonfood container. Add products in the order the label specifies, use an accurate measure, and keep the original package available. Never mix bleach with ammonia, acids, vinegar, alcohol, other cleaners, or another disinfectant. When earlier detergent remains, rinse it away before the next step. Stop immediately and seek fresh air and emergency guidance if unexpected fumes develop.
Keep every surface wet for the full directed contact time. A quick dip followed by immediate drying does not meet a ten-minute instruction; a tray protruding above solution is only partly treated. Use a timer and turn or wipe complex pieces by the approved method. Do not extend time or concentration in the belief that more is safer. Stronger exposure can damage plastic, skin, clothing, and future roots.
Rinse when required, using clean water, and dispose of spent solution exactly as the label and local rules direct. Do not pour it into garden soil, a storm drain, or a waterway. Clean measures and brushes as directed and remove protective equipment without touching contaminated surfaces. Keep treated trays separate from dirty ones; otherwise the careful contact period is undone at the drying rack.
Dry completely before nesting or storage
Stand trays so air reaches cells, undersides, and drainage channels. A flat nested stack traps water and keeps hidden surfaces damp. Use a clean rack in ventilation, protected from soil splash and pets. Sun can assist drying where material tolerance and guidance allow, but outdoor placement can also introduce dust, leaves, and animals. Dryness, not a prescribed number of hours, is the endpoint.
Inspect deep corners and dome rims before nesting. Tip each tray and watch for retained droplets. Smell can reveal trapped dirty water, but absence of odor does not prove sanitation. If a tray remains wet because of a sealed double wall or damaged rim, store it unnested until dry or retire it. A clean surface put away damp can develop new film before the next sowing.
Store by size and health status in a dry enclosed location. Keep trays off bare floors and away from potting-mix dust, rodents, fertilizer, fuel, and pesticides. Do not seal residual moisture inside plastic bags. Labels on the storage bin should identify container type and cleaning date, not imply sterility forever. Inspect again before sowing because storage conditions can recontaminate material.
Dry brushes, gloves, and the sanitation surface as deliberately as the trays. Wash hands and launder reusable clothing separately when the product label requires it. Close and store chemicals in original containers. Record method, product, concentration, contact time, and any material damage. That record prevents a future worker from repeating an incompatible treatment or inventing a stronger recipe.
Rebuild the seed-starting station around prevention
Clean trays cannot compensate for contaminated medium, crowded sowing, blocked drainage, excessive watering, dim light, or prolonged humidity covers. Use fresh seed-starting medium, clean water, sound seed, and containers whose drains remain open above the catch tray. Vent or remove covers as seedlings emerge. Damping-off organisms are favored by wet, poorly ventilated conditions, so prevention is a whole system.
Keep hose ends, watering-can roses, scoops, and hands from contacting dirty floors or used mix before touching the new batch. Separate newly sown trays from houseplants and quarantined seedlings. Empty standing water after bottom uptake. Arrange broad useful light before sowing so emerged plants do not remain warm and dim while fixtures are found. Sanitation supports these decisions; it does not replace them.
Monitor the first two weeks closely. Map cells that fail, collapse at the soil line, remain saturated, or develop algae. Isolate a suspect tray before handling others and consult a local diagnostic service for repeated or valuable losses. Do not respond to unidentified collapse by soaking all neighboring trays in a pesticide. Many products are not labeled for seedlings or the diagnosed problem, and environmental correction remains essential.
After the batch, compare outcomes with the cleaning record. If one tray style repeatedly holds water, roots, or film, remove it from the system even if it survived sanitation. Favor a small inventory of durable, inspectable containers over many irregular salvaged objects. Reuse succeeds when the same sound tray can be cleaned, measured, handled, and dried reliably without turning every sowing into a chemistry project.
Steps
- Level
- moderate
- Time
- 45–90 minutes per tray group, plus complete drying
- Tools
- Nylon brushes in several sizes, Nonfood measuring container, Timer, Clean drying rack, Current product labels and cleaning record
- Materials
- Compatible detergent or cleaner, One current guidance-supported disinfecting product when warranted, Clean rinse water, Label-required gloves and eye protection
- 1Sort by condition and history
Separate healthy-crop trays from disease-associated or unknown material. Discard cracked, sharp, warped, or blocked containers and preserve crop records before removing old labels.
- 2Remove roots and old medium
Empty material into a destination appropriate to its disease history, brush every cell and drain without spreading dust or splash, and inspect the empty tray against strong light.
- 3Wash every connected surface
Use a compatible cleaner and dedicated brushes on inserts, catch trays, domes, rims, undersides, and channels. Change dirty water and rinse until debris, film, and cleaner are gone.
- 4Decide whether disinfection is warranted
Use crop history, disease risk, intended use, tray material, current Extension guidance, and the exact product label. Cleaning is always first; stronger treatment is not automatically better.
- 5Measure one approved method
Prepare one compatible product in a nonfood container, follow concentration, protection, ventilation, contact time, rinse, and disposal directions exactly, and never mix chemicals.
- 6Dry every recess
Stand pieces unnested on a clean ventilated rack until cells, dome channels, undersides, and double rims contain no water. Keep clean trays away from the dirty station.
- 7Store and prevent recontamination
Keep the dry inventory enclosed above the floor, label the cleaning date and method, inspect before use, and pair clean trays with fresh medium, open drainage, useful light, and measured watering.
- 8Inspect the catch tray and dome
Treat solid bottoms, reservoirs, capillary grooves, and humidity-cover rims as part of the same crop system. Remove algae and roots, wash both sides, verify that inserts do not seal against the base, and reject a dome whose warped edge prevents safe ventilation after emergence.
- 9Separate clean and dirty traffic
Move tools, brushes, trays, and hands in one direction from debris removal through washing, optional disinfection, rinsing, and drying. Mark the clean rack and never return a treated insert to the dirty sink or nest it inside an unwashed catch tray.
- 10Audit the next seedling batch
Map poor emergence, saturated cells, algae, and collapse during the first weeks. Isolate suspect trays and compare their drainage, material, cleaning record, medium, watering, temperature, and light. Retire a format that repeatedly traps roots or water instead of escalating chemical strength.
- 11Close the sanitation record
Write the cleaner or disinfectant name, current label concentration, contact time, rinsing, date, tray material, and any warping or discoloration. Store the record with the dry container group so later reuse begins from a known compatible method rather than a remembered recipe.
Related reading
Sources
- Clean and Disinfect Gardening Tools and Containers. University of Minnesota Extension. Source record · Accessed 2026-08-19.
- How to Prevent Seedling Damping Off. University of Minnesota Extension. Source record · Accessed 2026-08-19.
- Guide to Starting Seed Indoors. Iowa State University Extension. Source record · Accessed 2026-08-19.