Grow · hardwood cutting outdoor nursery row
Build a Hardwood-Cutting Nursery Row for Deciduous Ornamental Shrubs
Sort dormant shrub wood by species and batch, prepare correctly oriented cuttings, and root suitable material in a labeled outdoor nursery row.
Published Last updated
In this guide
- Make the nursery row a different project from taking one cutting
- Confirm identity, ownership, and the propagation route
- Choose the row before the stems leave the shrub
- Select and sort wood before making cuttings
- Prepare each cutting so orientation cannot be lost
- Stick each batch as a traceable nursery row
- Manage winter moisture without forcing top growth
- Judge roots before assigning a permanent garden place
- Steps
Make the nursery row a different project from taking one cutting
A nursery row is useful when several deciduous ornamental shrubs will be propagated as separate, traceable batches. It is not merely a place to push spare twigs into the ground. The row has to keep species and source plants distinct, hold dormant cuttings at the correct orientation and depth, supply air and moisture through winter and spring, and remain accessible long enough to judge roots before any young shrub moves to a permanent border.
This approach suits shrubs that root reliably enough from dormant wood under local conditions. Iowa State lists dogwood, elderberry, forsythia, hydrangea, and viburnum among shrubs that can be propagated with hardwood cuttings, while also stressing that results vary by plant.
Washington State Extension organizes cutting type, timing, temperature, and preparation by species. Use those lists as a starting set of candidates, then confirm the exact species or cultivar through regional propagation guidance instead of assuming that every deciduous shrub belongs in one outdoor row.
The narrower intent matters. A container or warmed propagation bench can offer bottom heat, controlled medium, and closer observation for difficult material. The outdoor row described here is for appropriate, relatively straightforward dormant hardwood batches and a gardener prepared to monitor them through a full establishment cycle. Species requiring mist, precise heat, grafting, layering, or a different wood stage should be routed to that method before stems are collected.
Confirm identity, ownership, and the propagation route
Start a batch card for each source shrub. Record the botanical name if known, cultivar, garden location, identifying features photographed during bloom and leaf, the date, recent health, and the regional source supporting hardwood propagation. Dormant twigs can make related shrubs look alike, and a label written after ten bundles have accumulated is not dependable. Tie the card to the decision to collect, not to the end of the cutting session.
Check whether the plant is grafted. Iowa State warns that suckers arising from the base of a grafted plant may belong to the rootstock and will not reproduce the desired top. Choose stems whose connection to the intended shrub is visible. Exclude volunteer shoots that emerge through a neighboring crown, tissue with unexplained dieback or cankers, and any plant whose identity is uncertain. Vegetative propagation copies the selected material; it cannot correct a mistaken source.
In the United States, the USPTO explains that a plant patent gives its owner the right to exclude others from asexually reproducing the patented plant, and its examples of asexual reproduction include rooting cuttings. Check current status and license terms for a named selection before collecting, because a cultivar name alone does not show whether protection is active. Use unprotected material that you own or are authorized to propagate. This is a practical screening step, not a substitute for legal advice in a commercial or uncertain situation.
Choose the row before the stems leave the shrub
Select a sheltered position with open light, workable free-draining soil, convenient water, and a route that can be used without stepping on saturated ground. The site should not sit in a roof drip, winter ponding basin, frost pocket that repeatedly heaves, or root competition beneath established woody plants. An outdoor row needs seasonal moisture but also enough drainage and pore space to keep buried stem tissue aerated. Test the site during rain before committing valuable batches.
Make the row narrow enough to reach from a path. A small home project can use one prepared strip with a separate block for each source plant; the batch boundaries matter more than a prescribed commercial spacing. Florida's propagation reference notes that leafless hardwood cuttings can be placed closely in a propagation bed, yet crowding should not make labels unreadable or roots impossible to lift. Leave a hand's width or the species-specific distance needed to inspect and lift one cutting without disturbing the next batch.
Prepare the entire strip to a uniform depth while soil is crumbly, removing perennial weeds and large debris without creating a rich isolated trench. Break compacted clods, then settle the surface so planting depth will remain readable. Put mulch on the access path or between rows, not against the cutting bases. Install the first permanent row label before collection begins and keep spare labels and pencil at the bed so no cutting ever has to wait unidentified.
Select and sort wood before making cuttings
Collect only after the source shrub is fully dormant and before active bud break, using regional timing for the species. The Iowa guide defines hardwood material as the previous season's growth that has hardened and gives late February to early March as its preferred collection window. It also permits fully dormant late-fall or early-winter collection when material will receive appropriate cool storage. Oregon State's autumn guidance reflects the milder Pacific Northwest calendar. These are regional schedules, so the biological state of the shrub and local method control the date.
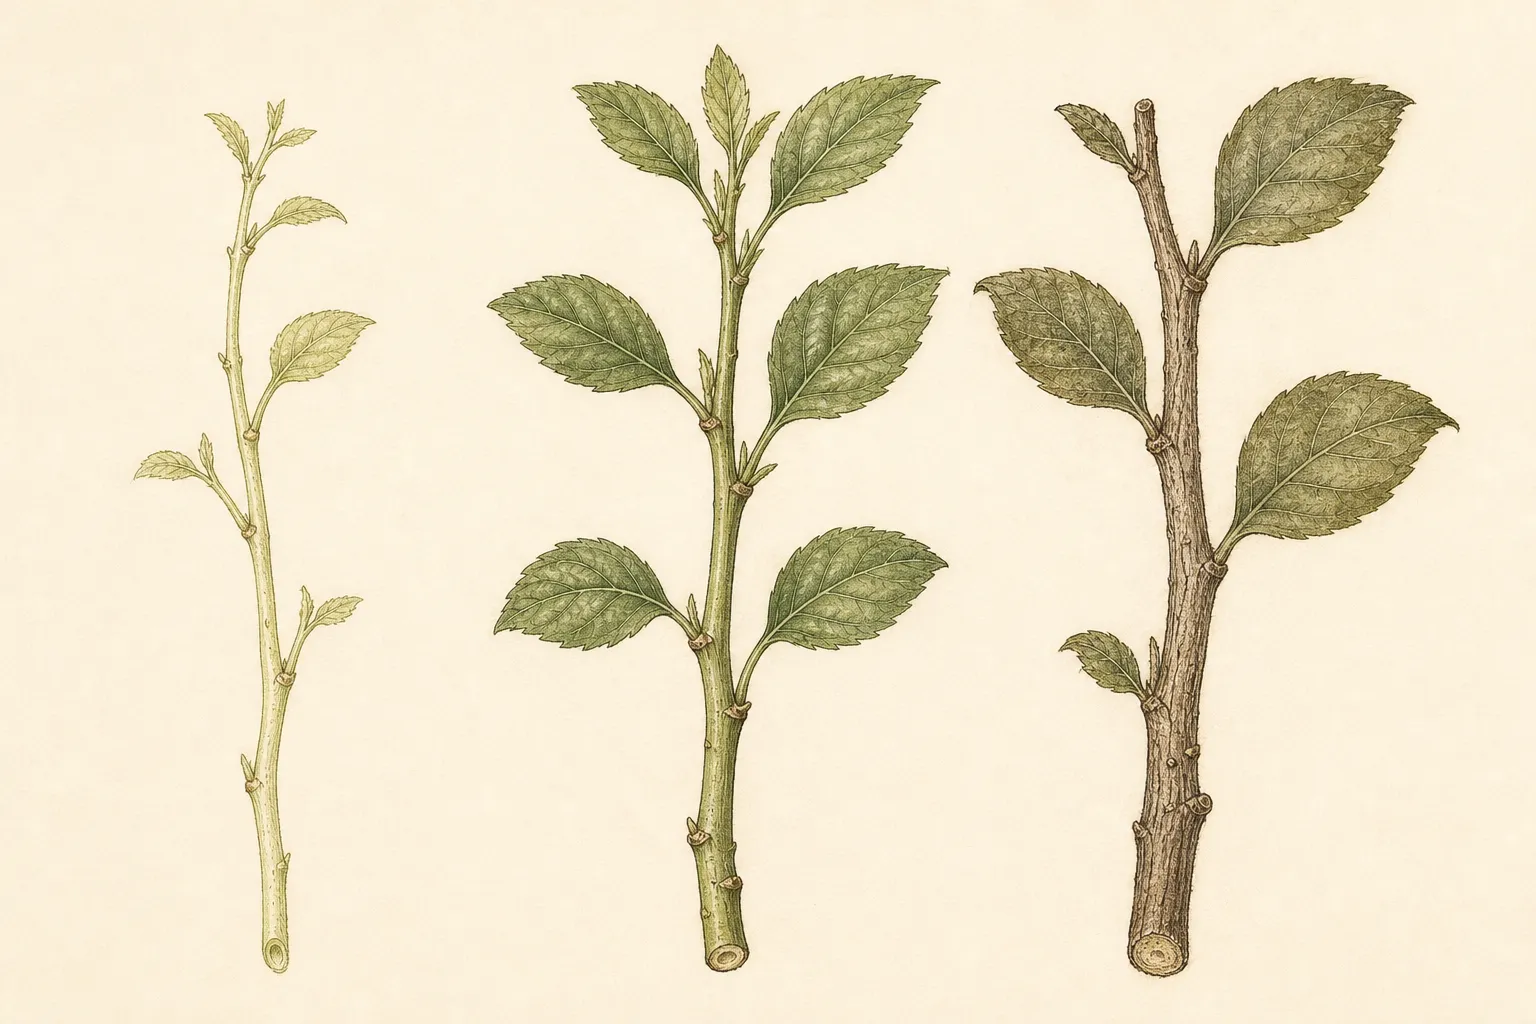
Choose vigorous, healthy shoots of the age recommended for the plant. One-year wood is common, but Iowa State notes that some plants, including willow in certain uses, may root from older wood. Narrow vegetative buds and sound internodes are generally more useful than weak shoots crowded with plump flower buds. On a grafted plant, follow the shoot to its origin. Keep questionable, damaged, diseased, very thin, and identity-uncertain wood out of the accepted bundle instead of hoping the row will sort it out later.
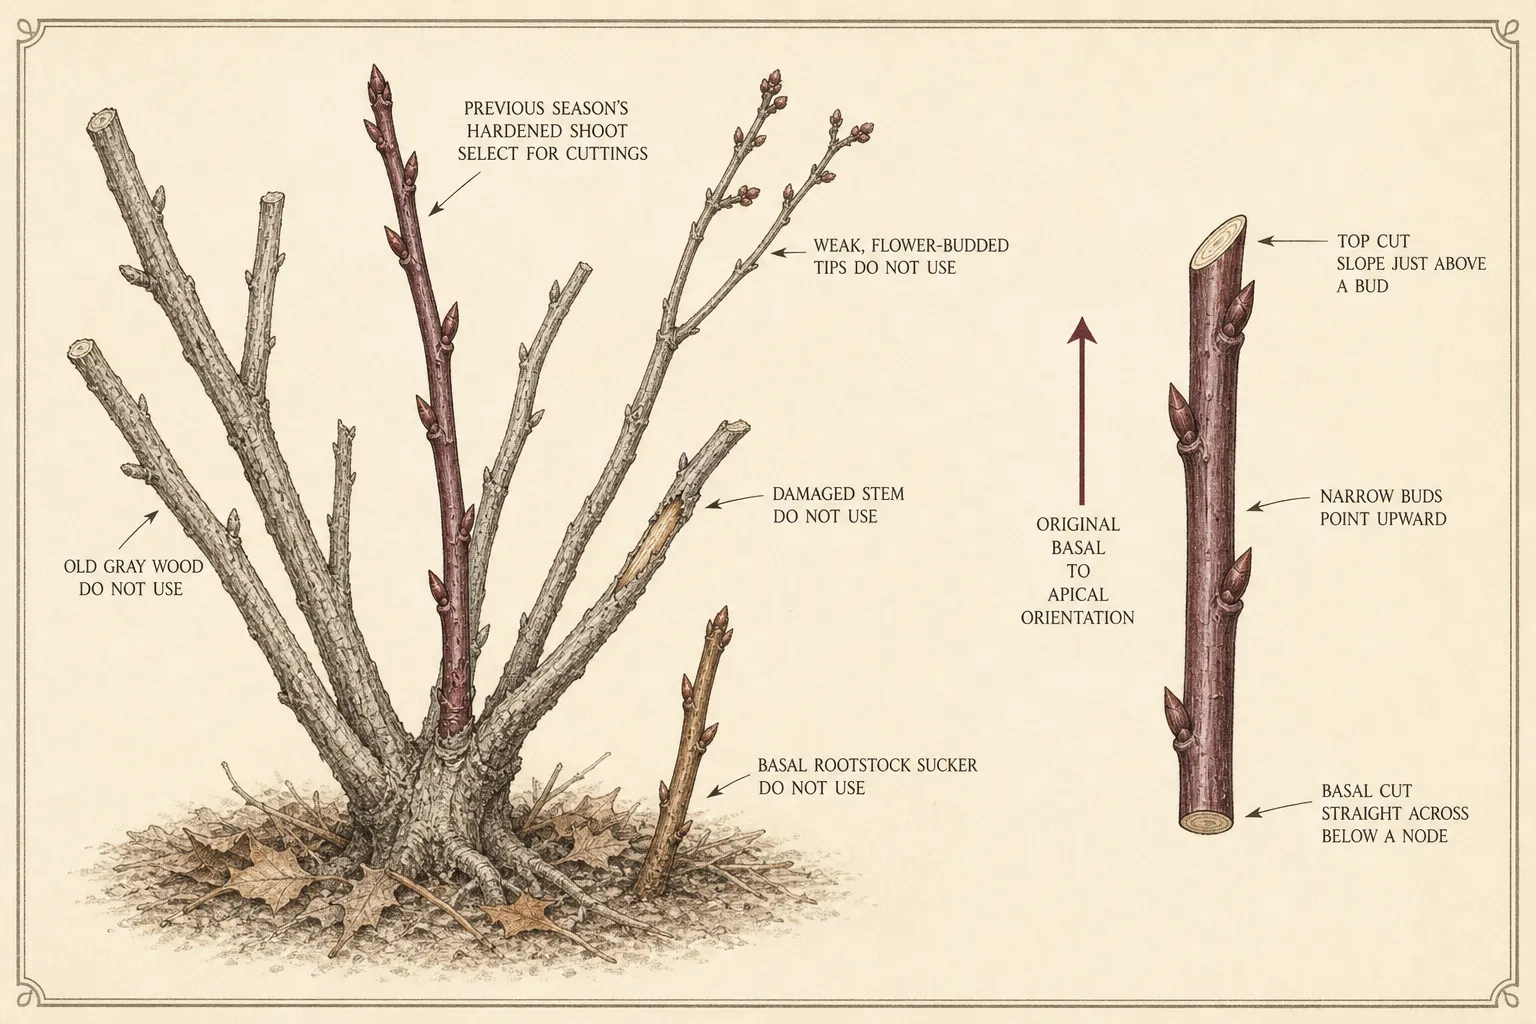
Make a temporary source-branch bundle with every tip pointing the same direction, attach its label, and place it in a clean bag protected from wind and sun. Finish one source plant before moving to the next. If collection and preparation cannot happen in one session, use the storage method specified by the regional source. The Iowa procedure calls for barely moist packing around bundled material at roughly 32 to 40 degrees Fahrenheit and separation from stored fruit; this is a cool dormant holding method, not long-term wet storage.
Prepare each cutting so orientation cannot be lost
The useful length and diameter depend on species and rooting system. Iowa State describes hardwood cuttings broadly from about three to twelve inches and one-quarter to one inch in diameter, while Washington State's reference spans a much wider range across tip, heel, and mallet methods. For this straight-cutting nursery row, follow the narrow species-specific instruction rather than choosing an average. A cutting needs the required nodes, sound stored tissue, and enough length to be deeply inserted while leaving the prescribed upper buds exposed.
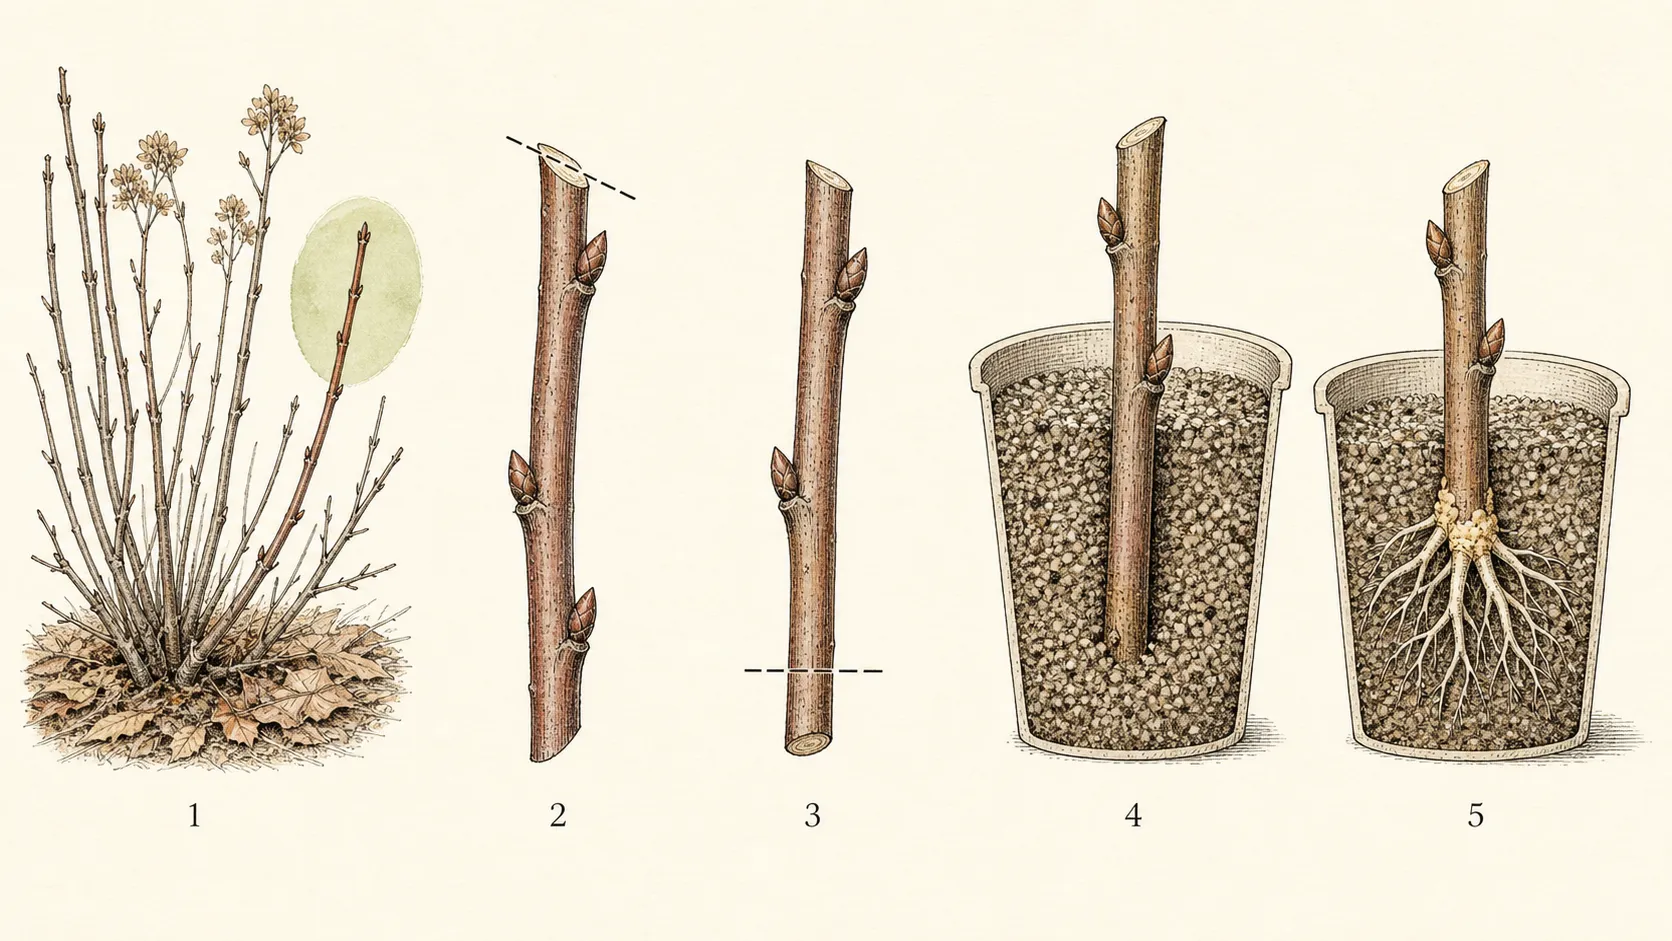
Preserve polarity with two visibly different cuts. For straight sections without a terminal bud, the Iowa procedure places a flat basal cut about one-half to one inch below the lowest node and an angled cut about one-half to one inch above the top node. Keep that convention consistent through the whole project: flat base, sloping top. Buds point toward the tip, as Oregon State's deciduous-cutting guidance notes. Put finished cuttings immediately into the labeled batch tray with every base aligned.
Use heel or mallet cuttings only when species guidance calls for them; Washington State distinguishes those forms from straight tip cuttings. Likewise, wounding and rooting products are method decisions, not automatic additions. Iowa State explains that easy-to-root plants with preformed root initials behave differently from material that must form callus and adventitious roots. Applying the most aggressive treatment to every batch erases the comparison and can injure tissue or confuse the record.
Stick each batch as a traceable nursery row
Carry one finished batch and its duplicate label to the prepared strip. Open a slit or planting line that accepts the cutting without scraping off tissue or forcing the base against compacted soil. Set every cutting upright. Iowa State's outdoor method buries cuttings deeply, leaving only the top one or two inches near the upper bud above ground. Apply the exact species guidance, but keep the same principle: multiple lower nodes enter the rooting zone and the identifiable top remains above grade.
Firm soil around each stem so there is close contact without crushing the bark. Water once to settle the row, then check whether frost-softened soil or flow has tilted stems or exposed buried nodes. Place a permanent label at both ends of the batch with the source-plant code and sticking date. A simple plan on paper should repeat the order of batches from left to right; if one label fails, the row position preserves identity.
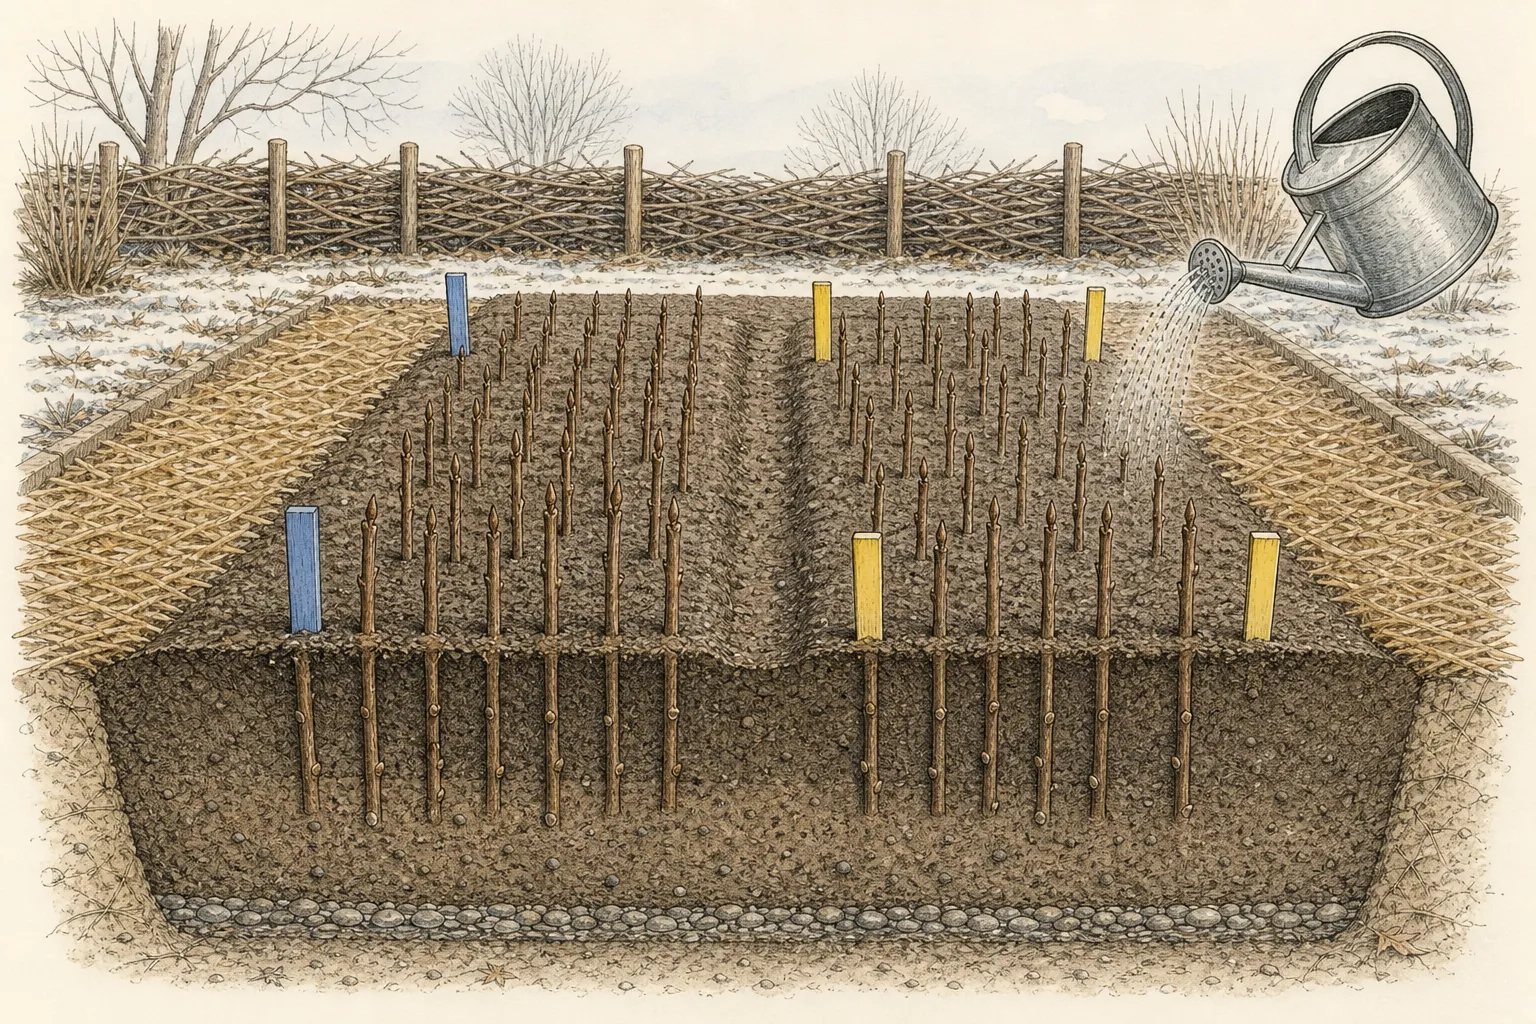
Leave a visible gap before the next batch. Clean soil and plant residue from tools as appropriate, change the working label, and confirm the first and last cutting against the map. This small pause prevents an easy-rooting forsythia from being mixed with a slower hydrangea or an unknown border shrub. It also makes later rooting percentages meaningful because each group retains one source, one preparation, one date, and one treatment.
Manage winter moisture without forcing top growth
Dormant cuttings have little foliage loss, so an outdoor row does not need the enclosed humidity used for leafy softwood material. It still must not dry completely. Check moisture below the surface with a finger or narrow probe at the edge of a batch and water when the rooting zone is becoming dry, choosing a thawed period when water can enter and drain. Standing winter water is not protective moisture; it reduces aeration and can loosen or rot the buried tissue.
Watch frost heave, animal disturbance, wind rocking, washout, and lost labels. Press lifted soil back when conditions are workable and re-firm a tilted cutting without reversing or repeatedly pulling it out. A distant permeable windbreak may reduce drying, but plastic wrapped tightly over the row can trap heat and moisture unpredictably. Keep the actual method consistent with regional guidance and record any batch that receives a different treatment.
Bud break is not proof of rooting. A dormant stem can use stored reserves to open buds before it has enough roots to support leaves. Maintain even moisture and protect the row from competition while allowing time for callus and roots. Washington State describes bottom heat and controlled temperatures for some difficult material; if a batch needs those conditions, it should have been routed to a bench system rather than expected to behave like an easy outdoor-row shrub.
Judge roots before assigning a permanent garden place
Inspect a small sample at the species-appropriate time instead of tugging every cutting. Loosen soil beside an edge cutting and lift enough to see whether callus, root initials, or a branching root system has formed. Callus is not the same as a finished root system, and new shoots supported only by stored stem energy remain vulnerable. Return an insufficient cutting promptly at the same depth and keep the batch moist.
Move rooted material when roots can hold a small soil volume and the seasonal window supports recovery. Lift with a trowel from below rather than pulling on the stem. Pot or line out the young shrubs with their source identity intact, water to settle, and provide the light and winter protection appropriate to that species. Some material benefits from another nursery season before facing permanent-border competition. The finished plant should be judged by roots, sturdy new growth, and retained identity, not by the speed of the first leaves.
Close the record with numbers: cuttings stuck, callused, rooted, failed, and moved on. Note desiccation, rot, heave, label loss, or species differences. One source plant may root well while another of the same species does not, which is useful information for the next dormant season. Remove failed wood, clean the row, and keep successful young plants separate until their identity can be confirmed in leaf and, eventually, flower.
Steps
- Level
- moderate
- Time
- Half a day to prepare and stick a small row, followed by winter and spring monitoring
- Tools
- Clean sharp bypass pruners, Knife reserved for propagation work, Measuring rule, Garden fork and hand trowel, Watering can with a rose, Weatherproof pencil or nursery marker, Camera or phone for source-plant records
- Materials
- Permanent weatherproof labels, Twine or loose rubber ties for temporary bundles, Clean bags and barely moist packing material if storage is necessary, Locally suitable free-draining nursery-row soil or propagation medium, Coarse mulch for paths between rows, Rooting product only when species guidance supports it and used exactly as labeled
- 1Approve each source plant and method
Confirm botanical identity, ownership, graft status, health, regional hardwood-cutting guidance, and any current propagation restrictions. Create a source code before collecting. Route species that need mist, bottom heat, grafting, layering, or another wood stage to the appropriate method instead of placing every dormant shrub in the same outdoor system.
- 2Prepare a sheltered, draining row
Choose open light, reliable access, workable free-draining soil, and convenient water outside roof-drip and ponding routes. Prepare a narrow reachable strip, remove perennial weeds, establish a firm level surface, and install the first permanent label. Put coarse mulch on the path between rows while keeping cutting bases clear.
- 3Collect one labeled batch at a time
During full dormancy, select the species-appropriate age of sound hardened wood from a traceable part of the intended shrub. Exclude damaged, weak, flower-heavy, diseased, rootstock, and identity-uncertain shoots. Bundle with all tips aligned, attach the source label immediately, and protect material from drying during transfer.
- 4Cut to the published species specification
Use the length, diameter, node count, and straight, heel, or mallet form supported for that shrub. For straight sections, keep a consistent polarity convention such as a flat basal cut below a node and a sloping top cut above a bud. Return every finished cutting to the labeled batch with bases aligned.
- 5Apply only the treatment the batch needs
Use wounding, a rooting product, cool storage, or direct sticking only when the source for that species and system supports it. Follow product labels exactly. Record treatment on the batch card so different results remain interpretable, and keep untreated or differently treated groups physically separate in the plan.
- 6Insert upright and deeply in the row
Open a slit that accepts the stem without scraping, place the basal end down, and insert to the supported depth with the upper bud or buds above grade. Firm soil for close contact, water to settle, label both ends of the batch, and copy its position onto the row map before starting another source.
- 7Protect the record through winter and spring
Monitor moisture below the surface, drainage, frost heave, wind rocking, animals, weeds, and labels. Re-firm only when soil is workable. Treat early bud break as stored-energy growth until roots are confirmed, and keep every departure from the standard moisture or protection routine in the batch record.
- 8Lift only after roots can support the move
Inspect an edge sample gently at the species-appropriate time. Distinguish callus from a functional branching root system, lift rooted plants from beneath, and pot or line them out without losing identity. Record rooting and failure counts, then grow young shrubs until roots and sturdy new growth suit their permanent destination.
Related reading
Sources
- Propagation of Trees, Shrubs, and Vines from Hardwood Cuttings. Iowa State University Extension and Outreach. Source record · Accessed 2026-08-20.
- Propagating Shrubs, Vines, and Trees from Stem Cuttings. Washington State University Extension. Source record · Accessed 2026-08-20.
- Hardwood Cuttings. University of Florida Environmental Horticulture. Source record · Accessed 2026-08-20.
- Turn Fall Cuttings into Free Plants by Spring. Oregon State University Extension Service. Source record · Accessed 2026-08-20.
- General Information About 35 U.S.C. 161 Plant Patents. United States Patent and Trademark Office. Source record · Accessed 2026-08-20.