Grow · propagate shrubs hardwood cuttings
Take Hardwood Cuttings from Dormant Ornamental Shrubs
Prepare correctly oriented dormant stem cuttings, place them in a draining medium, and wait for roots before treating shoots as new plants.
Published Last updated
In this guide
- Confirm the shrub and the right to propagate it
- Use dormancy and stem structure to select wood
- Read the site and the whole plant together
- Prepare a batch with polarity visible
- Carry out the central operation in a controlled sequence
- Judge rooting by roots, not by spring shoots
- Use strike rate to choose next winter's method
- Steps
Confirm the shrub and the right to propagate it
Hardwood cuttings suit many deciduous shrubs, but success begins with a species known to respond to this method. RHS lists dogwood, forsythia, mock orange, flowering currant, rose, snowberry, viburnum, and several other woody plants. Iowa State includes hydrangea and elderberry among its examples. A shrub absent from reliable propagation guidance deserves a small trial, because dormant stems from poor-rooting taxa can stay green for months without becoming independent plants.
Confirm the exact stock plant before cutting. A named cultivar may carry patent or other propagation restrictions; Iowa State specifically warns that vegetative propagation of some patented cultivars is prohibited. Check the current plant label and applicable rights before multiplying it. If identity is uncertain, use the session for observation and pruning records, leaving propagation until the name and permission are clear.
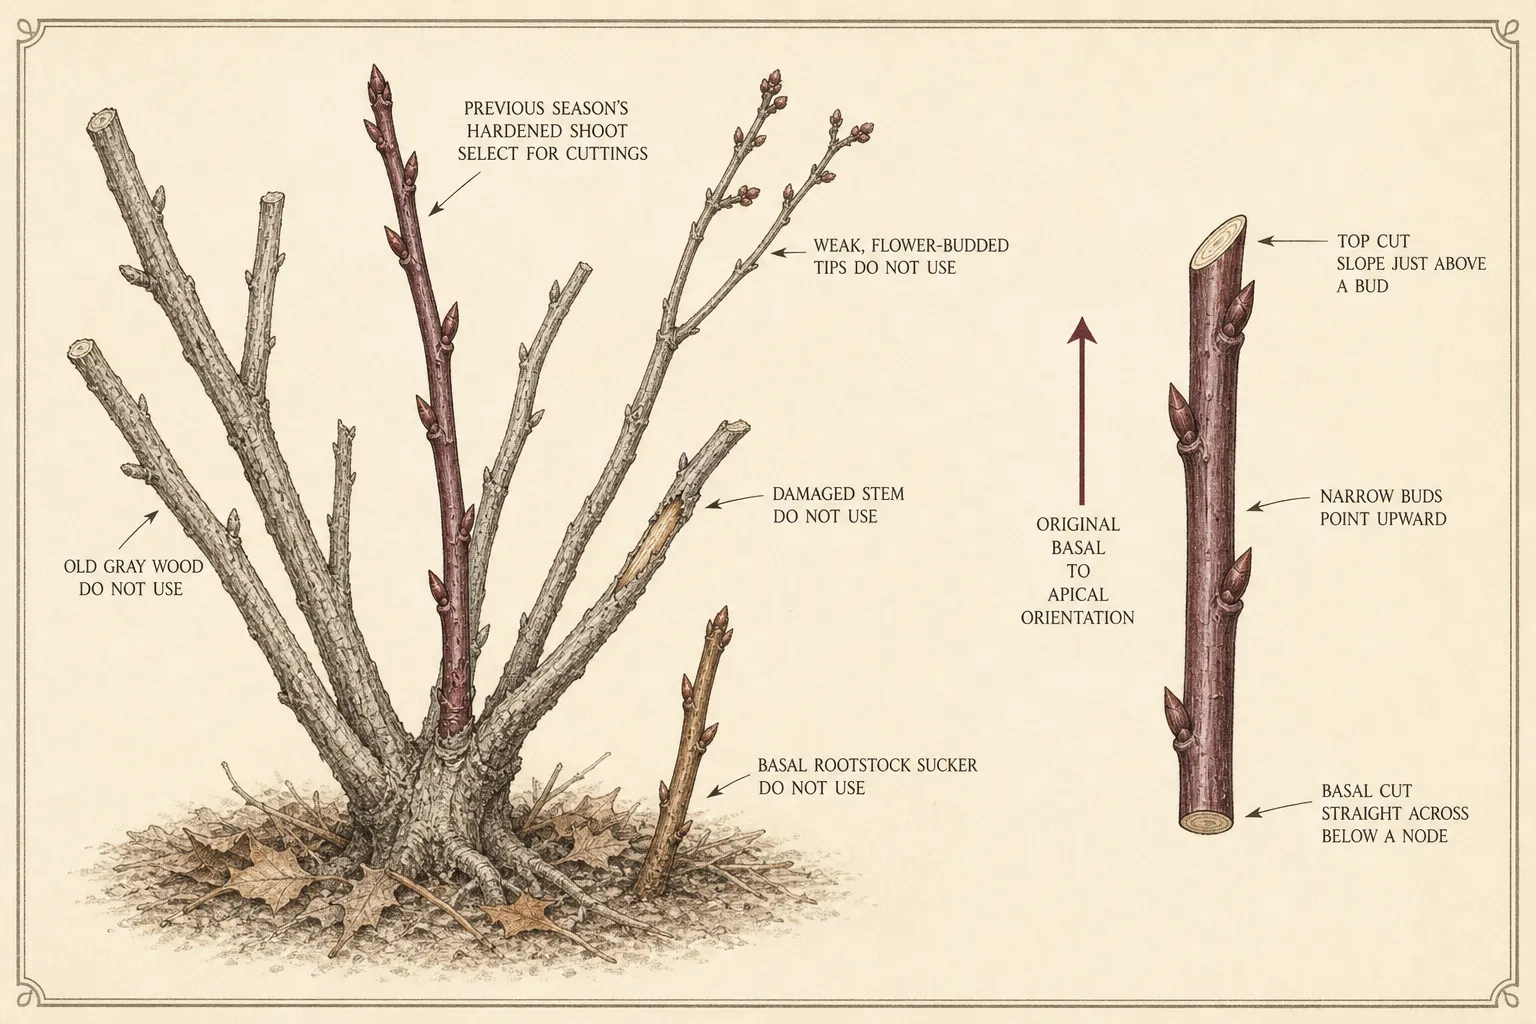
Grafted plants require another identity check. Iowa State notes that a sucker from below a graft is likely to be rootstock, even though juvenile tissue may root readily. Trace the candidate shoot back to its point of origin. A cutting from the wrong side of a graft can succeed biologically and still fail the goal of reproducing the ornamental cultivar.
Set a trial quantity that the parent shrub can spare within its normal pruning needs. Ten well-labeled sections from one healthy plant are enough to reveal polarity, moisture, and protection problems. Large batches make sense only after the species and local method have shown an acceptable strike rate. Keep each parent plant in a separate row or container group so one result does not hide another.
Use dormancy and stem structure to select wood
Collect during dormancy after leaf fall and before spring bud break. RHS places the general window from mid-autumn through late winter and excludes periods of severe frost, which it defines below −5°C (23°F). Iowa State’s Iowa schedule favors late February or early March, while fully dormant material can also be collected earlier and held cool and moist. Use the timing that keeps both the parent wood and receiving medium workable.
Choose vigorous shoots from the previous growing season that have hardened into woody but still pliable stems. Reject cankered, discolored, split, frost-damaged, or weak shaded growth. On flowering shrubs, Iowa State favors well-grown shoots with narrow vegetative buds over poorly grown sections with thick flower buds. Healthy buds along the intended length matter more than a perfectly straight cane.
Most of this method uses one-year wood. Exceptions belong to their own technique: Iowa State notes that willow may use thicker two-year wood for live staking, where long stakes enter field soil directly. Keep that method separate from ordinary nursery cuttings because its dimensions, insertion depth, and moisture exposure differ. A useful willow live stake is not a model for a container-grown forsythia section.
If material is collected in late fall or early winter for later insertion, Iowa State specifies moist medium at roughly 32–40°F and warns against storage near fruit because ethylene can be harmful. Bundle no more stems than can stay correctly oriented and labeled. Inspect stored sections before spring insertion and discard those with shrivelled bark, spreading lesions, or soft basal tissue.
Read the site and the whole plant together
Preserve polarity as soon as a long shoot leaves the shrub. For ordinary sections, RHS makes a sloping top cut just above a bud and a straight basal cut below a bud or bud pair. Iowa State adds that a bud sits above its leaf scar, which identifies the apical direction after leaves are gone. These two cues keep the base facing the rooting medium through every later handling step.
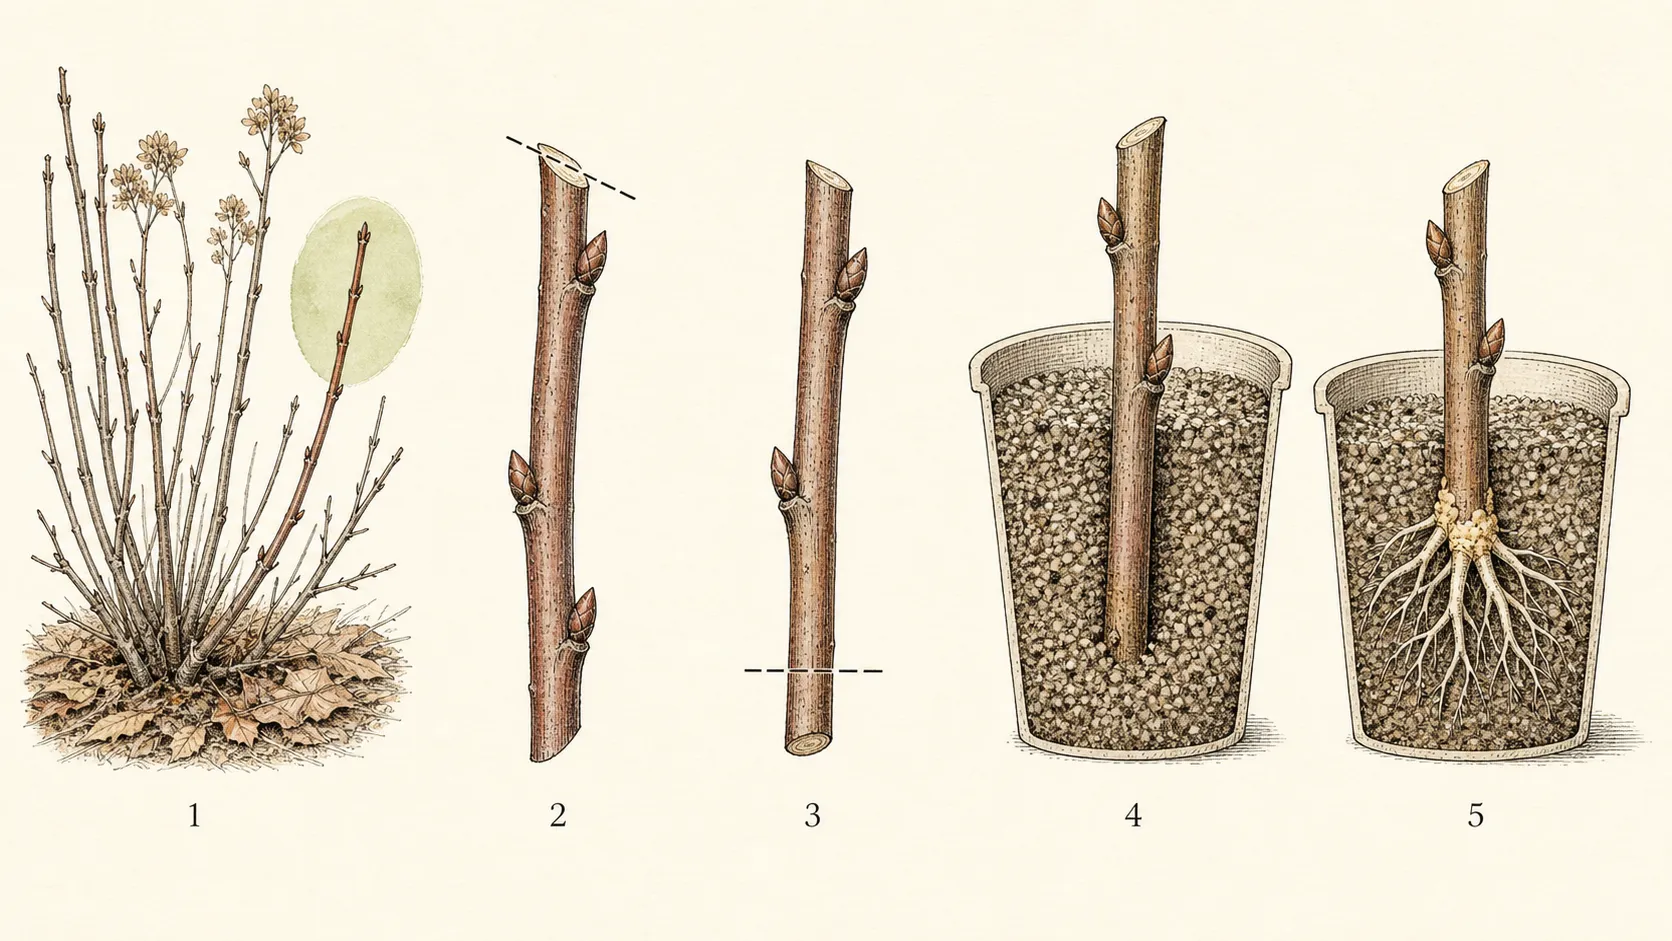
RHS gives 6–12 inches as a general outdoor cutting length; Iowa State describes a wider species-dependent range of 3–12 inches for container work. Select a length that retains sound nodes and fits the chosen system. Remove the soft unripened tip. A terminal section can be valuable, but easy-rooting plants such as elderberry or hydrangea may also root from lower one-year stem pieces.
Choose a sheltered, well-drained trench for an outdoor batch that can remain until the following autumn. Use deep containers for a small batch or a site without a suitable nursery row. RHS suggests a gritty container medium, while Iowa State calls for a moisture-retentive, freely draining mix such as coir or peat with coarse perlite. Every container needs clear bottom holes and enough depth to keep buried nodes above its wettest layer.
Lay out labels, row markers, and browsing protection before cutting begins. Mark cultivar, parent plant, collection date, and number of sections. Position the nursery area where frost heave can be checked and summer water can reach it without disturbing other beds. A row likely to be cultivated, trampled, or browsed before autumn is not a safe holding site for an invisible developing root system.
Prepare a batch with polarity visible
Clean and sharpen bypass pruners, then make the receiving holes or trench before the first stem is collected. Cut one parent plant at a time. Place every long shoot on the bench with its base toward the same labeled end, divide it into sections, and move the finished group directly to its marked tray. This order keeps a leafless pile from losing both identity and orientation.
Make the top cut on a slope far enough above the upper bud to protect it, and place the flat basal cut close below the lowest chosen bud. Keep the two cut shapes consistent across the batch. For a pithy species, follow the species-specific heel-cut guidance; a generic basal wound is not automatically beneficial to every shrub.
Rooting hormone is optional and product-specific. Iowa State reports that a light application may raise rooting percentage or root number for difficult material, while excess can reduce success. Treat one labeled group under the product label and keep an untreated comparison when the species’ need is uncertain. The basal end alone enters the compound, and loose excess is tapped away before insertion.
Carry out the central operation in a controlled sequence
Choose the rooting system by the time and protection available. A sheltered trench suits a sizeable batch that can remain untouched through the growing season. Deep pots suit a small group, a garden without nursery space, or material needing cold-frame shelter. Switching a batch between systems halfway through rooting adds disturbance and makes its moisture history harder to interpret.
Polarity and buried-node position are the first diagnostic checks when a section stays loose or fails to leaf. An inverted cutting places its buds and wound response in the wrong relationship to gravity and moisture. A shallow outdoor section can dry or heave; a container base set in the wettest lower layer can lose oxygen. Compare failed pieces with a correctly oriented edge sample before changing care across the group.
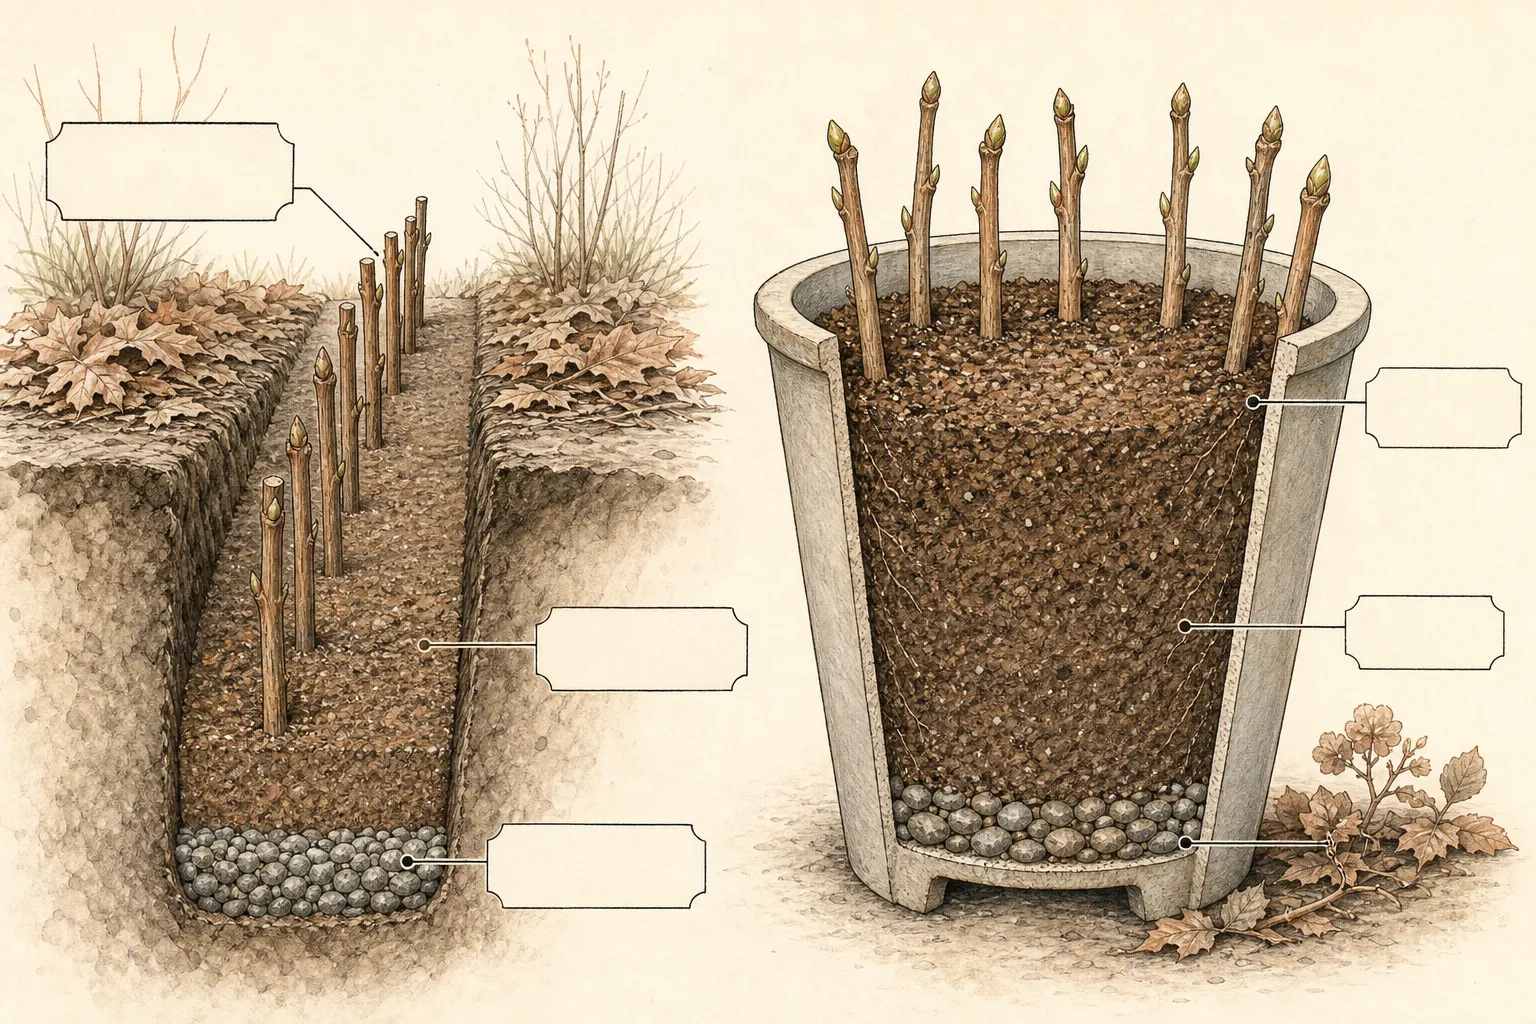
Surface behavior reveals the next problem. A stem that rocks after watering lacks continuous medium contact around buried nodes. A glossy surface that drains slowly, blackening at the base, or a sour smell indicates excess water and poor aeration. Frost heave creates a clean gap around an otherwise firm outdoor stem. Each sign points to a physical correction, while added fertilizer leaves the cause in place.
Some source-backed exceptions deserve separate labels. RHS allows only one bud above ground when a single-stemmed result is wanted and uses a heel on pithy elder stems. It also holds bundles of slow-rooting material in moist sand until spring when outdoor conditions are unsuitable. Apply an exception only to the named plant and objective; keep the ordinary shrub batch on its standard layout for a readable comparison.
Judge rooting by roots, not by spring shoots
Bud break proves that a stem retained enough stored energy to grow; it does not prove that roots can support the shoot. Iowa State describes callus as whitish wound tissue from which many woody plants later form roots, while species such as willow may possess preformed root initials. Callus, leaves, and roots are separate observations. Keep a fresh green stem in the rooting environment until the appropriate test shows independence.
The expected timeline depends on the system. Iowa State says container cuttings may root in roughly 6–8 weeks and suggests examining a few after 4–5 weeks. RHS leaves outdoor trench cuttings until the following autumn and notes that some slow-rooting species need longer protection. Applying the container timeline to an outdoor winter trench can sacrifice viable sections before their normal rooting season is complete.
A controlled propagator can favor roots by holding the medium 5–10°F warmer than the air, a differential Iowa State says can speed rooting while cooler air delays bud break. This is an optional container technique, not a requirement for a winter trench. Measure both zones before adding bottom heat, keep the medium within the species’ supported range, and maintain drainage. Warm air around the buds defeats the purpose by accelerating shoots before the basal wound has developed roots. Use a thermostatically controlled mat and record air and medium readings with the same treated batch; an unmeasured warm bench provides no usable comparison.
Test an edge or designated sample first. A gentle pull that meets resistance suggests roots, but visible roots give stronger evidence. Lift the sample with medium attached and return it if it shows only callus or short fragile initials. Repeatedly tugging every stem tears new roots and converts an inspection into the cause of failure.
Container cuttings are ready for the next stage when roots reach the medium edge and hold the plug together. Iowa State then hardens new foliage gradually to brighter light, wind, and changing moisture before individual potting. Outdoor RHS cuttings commonly remain in the nursery row through the growing season. Support the roots during lifting and keep the new plant in a grow-on bed if it is still too small for its final landscape site.
Use strike rate to choose next winter's method
Count each cultivar as rooted, callused only, alive without callus, rotted, desiccated, or lost to damage. Add collection date, wood position, cutting length, trench or container, hormone treatment, and the date roots were first confirmed. A percentage based only on spring bud break overstates success and hides the point at which the method failed.
Interpret clusters of loss. Shriveled tops across an exposed row suggest dry medium or wind; black soft bases in a heavy pot suggest saturation; isolated upside-down sections reveal a polarity lapse; one diseased parent group points back to stock selection. Correct the implicated stage while keeping successful groups unchanged for comparison.
A strong result supports another winter batch from the same type of wood and system. A low result may justify better drainage, a protected container, a different collection date, or a softwood or semi-ripe method suited to that taxon. Record the parent identity with the rooted plants so the propagation result remains attached to the ornamental trait it was meant to preserve.
Steps
- Level
- moderate
- Time
- One focused session, followed by scheduled checks
- Tools
- Sharp bypass pruners, Propagation knife, Dibber, Weatherproof labels
- Materials
- Dormant healthy shoots, Free-draining propagation medium, Deep pot or prepared trench
- 1Verify the stock and method
Confirm that direct guidance supports hardwood cuttings for the shrub. Trace shoots on grafted plants to ensure they arise above the graft, and check propagation rights for a named cultivar. Set a small labeled trial when identity or rooting performance is uncertain. Prepare the receiving trench or deep containers before removing any wood.
- 2Collect fully dormant one-year shoots
Work after leaf fall and before bud break, outside severe frost. Select vigorous previous-season wood with sound narrow buds and mature pliable bark. Leave cankered, split, weak, or poorly ripened shoots on the discard pile. Label the parent and align every basal end before long stems reach the cutting bench.
- 3Make polarity unmistakable
Cut sections within the species range, using the RHS 6–12 inch outdoor guide where it applies. Remove the soft tip. Make a sloping cut above the upper bud and a flat cut below the basal bud; confirm that each bud sits above its leaf scar. Bundle immediately with all flat bases facing the same labeled end.
- 4Insert for the chosen system
Open pilot holes and set every flat base down. For an RHS trench, expose the upper third and mark centers 4–6 inches apart. In a container, leave one bud above and one below the mix while keeping the basal cut above the wet bottom third. Close the medium around each stem, water once to drainage, and tag the completed group.
- 5Protect the rooting interval
Keep buried nodes evenly moist and aerated, restore soil around frost-heaved stems, and maintain browsing guards. Use an edge sample for inspections. Treat spring leaves as stored-energy growth until resistance or visible roots confirms rooting. Apply the 6–8 week expectation to Iowa State’s container context; outdoor trench material commonly stays until autumn.
- 6Move proven rooted plants
Lift a designated sample with medium attached. Return callused or weakly rooted sections to the propagation bed. When roots reach the container edge or hold an outdoor cutting firmly at the suitable season, harden new foliage and lift with the roots supported. Record rooted and failed counts by parent, treatment, and system before planning another batch.
Related reading
Sources
- Hardwood cuttings. Royal Horticultural Society. Source record · Accessed 2026-08-30.
- Propagation of Trees, Shrubs, and Vines from Hardwood Cuttings. Iowa State University Extension and Outreach. Source record · Accessed 2026-08-30.
- Hardwood Cuttings. University of Florida IFAS. Source record · Accessed 2026-08-30.