Gardens · layered bulb perennial container
Layer Spring Bulbs and Durable Perennials in One Large Container
Design one large draining container as a shared root zone, layering spring bulbs around durable perennials while preserving mature crowns and post-bloom foliage.
Published Last updated
In this guide
- Design for the weeks after the flowers
- Make the complete root-ball and bulb dry fit the purchase gate
- Choose a container that can remain functional
- Match plants before matching colors
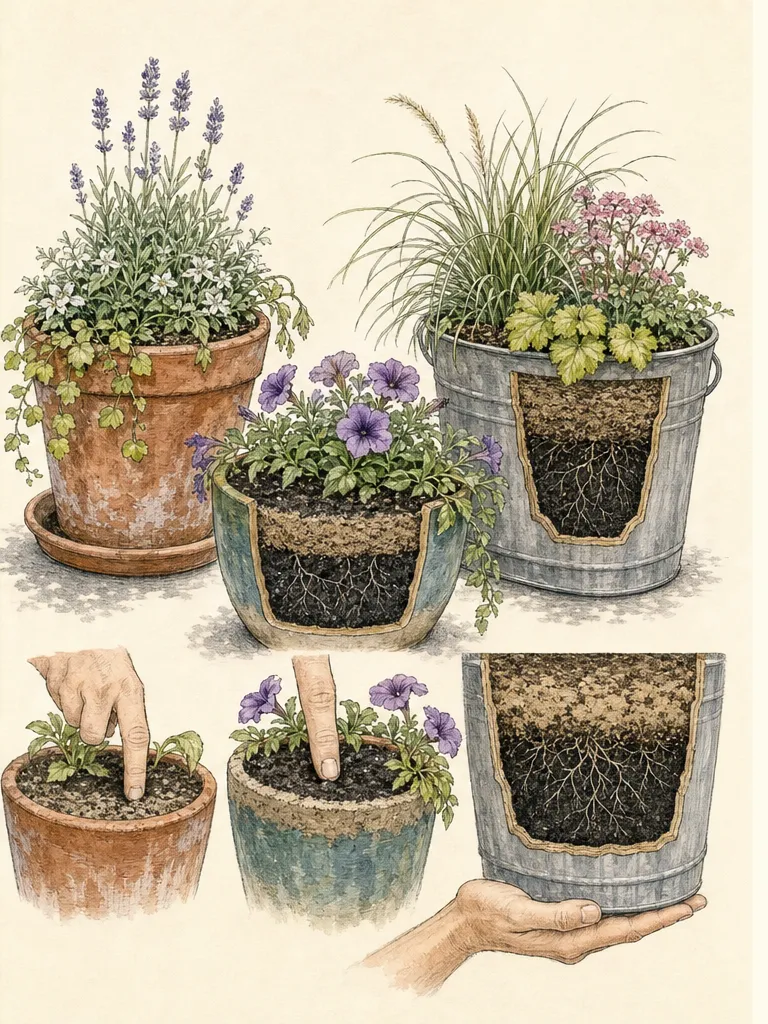
- Map one shared root zone in section
- Build rhythm with openings, not crowding
- Plant without burying crowns or closing drainage
- Let spring reveal the real sequence
- Keep the container credible after bloom
- Carry the perennial framework through summer
- Review winter limits before repeating the design
- Design ideas
Design for the weeks after the flowers
A layered spring container is convincing only if it remains a healthy composition after the petals fall. Bulbs supply a concentrated early display, but their green leaves must stay attached until they yellow naturally. Durable perennials can carry the pot into summer, yet they cannot be asked to smother those working leaves or occupy every route to the surface. Begin with the post-bloom state: visible bulb foliage, expanding perennial crowns, open drainage and enough access to inspect the mix.
Define durable in relation to the site. A perennial that survives reliably in open ground may be less secure when its roots spend winter above grade in a container. Hardiness, heat, wind exposure, summer moisture and the exact cultivar all affect whether it can stay in the pot. Use regional guidance for container overwintering and select only plants whose eventual care can be supplied. If protection or seasonal replacement is required, put that decision in the plan rather than describing the planting as permanent.
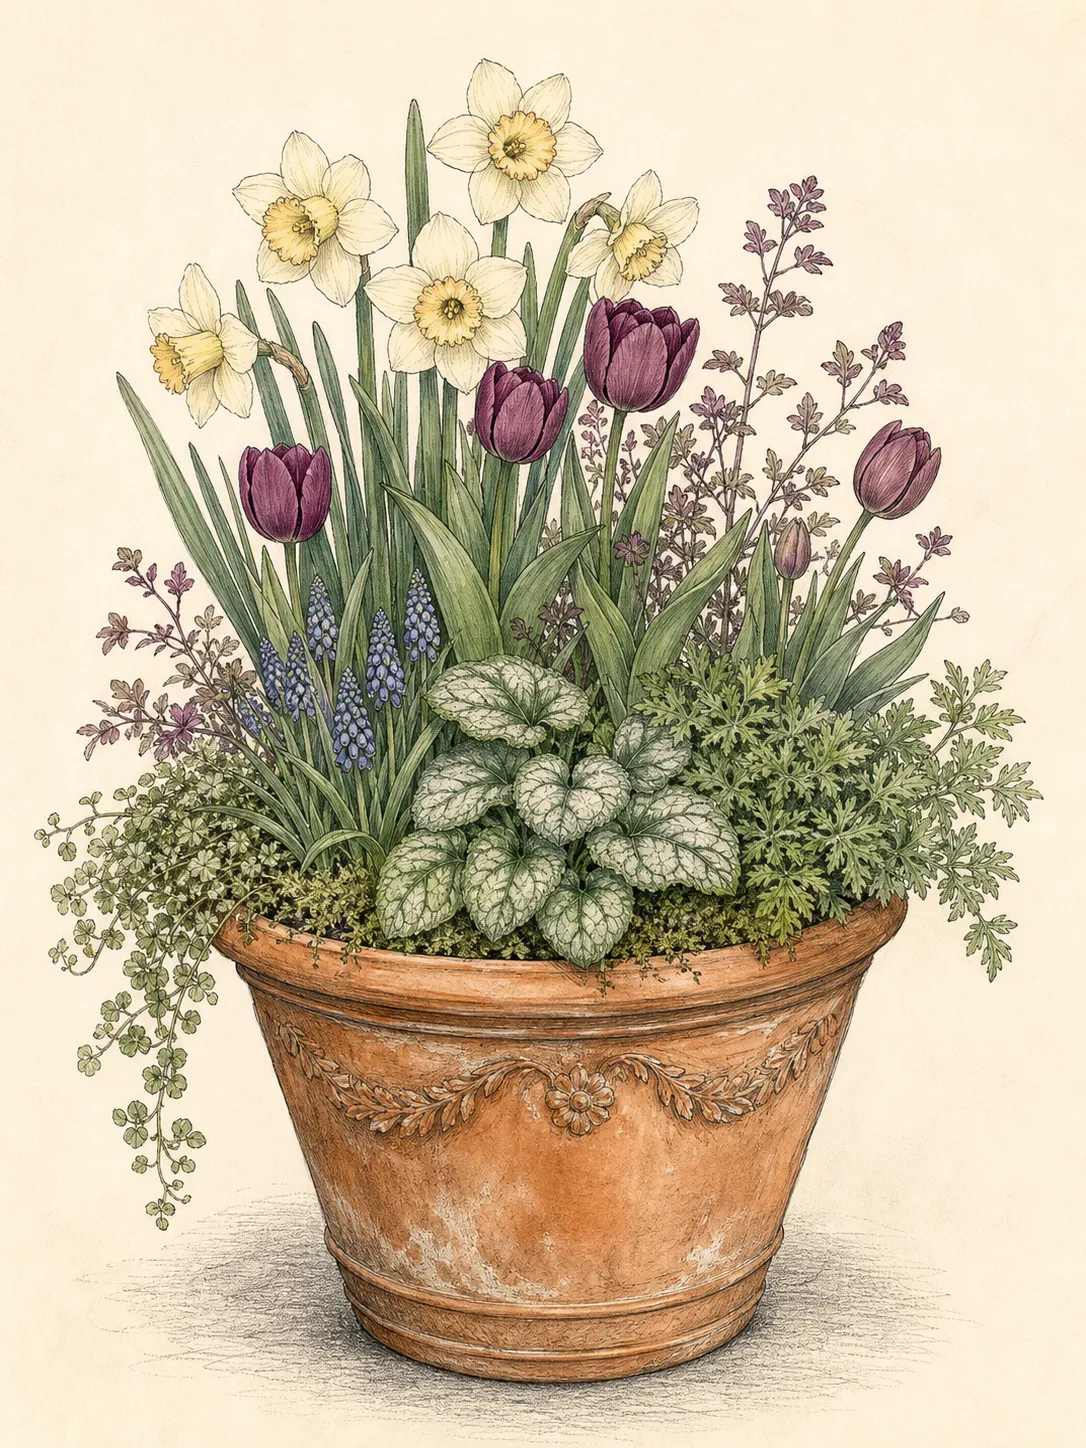
Set one visual hierarchy. Choose a perennial framework that supplies a principal leaf mass, a contrasting finer or more upright form, and a restrained edge. Bulbs then appear through deliberate openings rather than filling every exposed patch. The framework should look balanced at mature perennial size, not only when nursery plants are small. Spring flowers are the first scene within that structure, not a separate arrangement placed on top of it.
Photograph the intended position at the hours it is used. Record direct light, reflected heat, roof shelter, wind and the route for watering. The same pot may be cool and dim in early spring but hot and dry after nearby trees leaf out or the sun angle changes. Plant suitability must cover the active seasons that each component experiences; an appealing April combination is incomplete if its perennial framework cannot tolerate July in the same location.
Make the complete root-ball and bulb dry fit the purchase gate
Check the named recipe in both section and plan before planting. The intact perennial root ball, bulb layers, emergence windows, cover depth and watering rim must all fit at once. If they do not, choose a larger suitable pot or separate coordinated containers. Keep annual moisture and winter protection compatible; a successful initial arrangement does not prove that all components can remain together indefinitely.
Choose a container that can remain functional
Use a large, stable container with unobstructed holes in its base. RHS bulb-container guidance starts with a large pot and drainage holes because confined bulbs do not have another route away from saturated mix. Confirm that water can leave after the pot is set in position: a flat base pressed against paving, a decorative cachepot or a saucer that remains full can defeat holes that looked adequate on the bench.
Match the container to the mature planting rather than an arbitrary diameter. Draw the eventual crowns and leaf arcs, then allow enough root volume for the chosen plants without creating a vast unused reservoir around tiny starts. A broad base resists wind and supports a layered section, while a usable rim gap lets water enter without carrying mix over the edge. Check the filled weight before choosing a balcony, roof or raised structure; obtain qualified load advice where the support capacity is uncertain.
Select a container mix intended for pots and compatible with every occupant. Do not improve drainage by placing a deep false layer of coarse material beneath fine mix; the dependable controls are open outlets, suitable media and a position that lets excess water escape. Cover only an unusually large hole as needed to retain mix without sealing it. Recheck the outlet after planting and after winter, when roots, debris or a shifted pot can change how it drains.
Make service possible without rotating a heavy planted pot. Keep the water entry point, surface, labels and drainage outlet visible from a safe side. Leave space to put fingers or a narrow probe into the mix without tearing leaves. If the container must be moved for winter protection, decide how it will travel before filling it; a wheeled support must be rated for the completed load and remain stable when the pot is watered.
Match plants before matching colors
Iowa State's container guidance gives the essential compatibility test: plants sharing a pot must share workable light and soil-moisture requirements. One root zone receives one rain event and one watering decision. A perennial that wants consistently moist mix cannot be paired responsibly with bulbs that require a distinctly drier rest simply because both flower in the same palette. Compare the whole annual moisture cycle, not only spring growth.
Make a table for each named plant: active light, ordinary moisture, drainage sensitivity, mature crown spread, mature leaf spread, bloom window, foliage duration, dormancy and local winter plan. Keep full botanical and cultivar names because size and behavior can change within a familiar common name. Reject any pairing that depends on repeatedly wetting one plant while withholding water from its neighbor; no surface arrangement can divide the root zone into dependable private climates.
Build one source-bounded sunny recipe in a draining container at least 70 cm wide and 50 cm deep. Those are working dimensions for this mixed composition, not a size claimed by the bulb supplier: they exceed the RHS minimum of 30 cm wide and deep and allow a practical margin around the roughly 0.5 m ultimate spread documented for Hylotelephium telephium (Atropurpureum Group) 'Xenox'. Dry-fit one nursery-sized 'Xenox' off center at its nursery crown level and mark the intact root-ball footprint. Around that footprint, use the retained Crocus collection exactly as supplied: seven Tulipa 'Golden Apeldoorn', ten Narcissus 'Ice Follies' and ten Narcissus 'Tête-à-Tête'. If all 27 bulbs cannot fit outside the root ball with the spacing and drainage route below, move the complete recipe to a wider pot; do not cut the root ball, bury the crown or compress the collection into the 30 cm minimum.
Mark the planned finished surface at least 2 cm below the rim, then measure every bulb from that line. Crocus directs planting each bulb at approximately three times its own depth with one bulb-width gap; use the actual bulbs in hand rather than inventing one centimetre depth for all three cultivars. Following the RHS layer sequence, start over at least 10 cm of mix and place the seven larger, later 'Golden Apeldoorn' tulips in the lowest open crescent, pointed ends up. Cover them completely, offset the ten 'Ice Follies' narcissi in the middle layer, cover again, then offset the ten smaller 'Tête-à-Tête' narcissi uppermost. Finish with the RHS 5–10 cm top layer while preserving the measured planting ratio and the 2 cm watering rim. Set the intact 'Xenox' root ball into its marked sector when the fill reaches its base; no bulb belongs beneath or inside that root ball.
Keep this exact recipe to full sun and a moderately fertile, well-drained container mix. The bulb supplier describes moist but well-drained conditions during active growth, while the RHS describes 'Xenox' as a drought-resistant, clump-forming perennial reaching roughly 0.5 m high and wide in full sun and well-drained neutral-to-alkaline soil, with pink flowers in mid- to late summer. Their workable overlap is sun and free drainage, not a permanently wet or permanently dry pot: water the bulbs during active growth and for at least six weeks after flowering as the supplier directs, never leave the crown waterlogged, and reassess moisture after the bulb leaves yellow. The RHS H7 rating refers to UK conditions rather than exposed container roots in every climate, and the supplier expects the tulips to be replaced annually. In acid media, wet or humid summers, severe container winters, or regions where any named plant behaves differently, use a locally documented substitute with the same mature envelope and water pattern or coordinate separate pots.
Map one shared root zone in section
Draw the pot from the side and from above. In section, mark the drainage outlet, finished mix level, perennial root balls, perennial crowns and every proposed bulb layer. In plan, draw mature crown circles and leaf arcs. The two drawings answer different questions: the section prevents underground collisions, while the plan keeps expanding foliage from closing the bulb emergence windows.
Give each perennial crown an open surface collar. Keep bulbs outside the root ball and away from the crown rather than wedging them underneath a plant that will be lifted or divided later. Roots will eventually intermingle, but installation can still preserve coherent starting positions. A bulb shoot needs a direct route upward; a perennial needs its crown at the correct grade; the gardener needs to recognize both after labels fade and foliage changes.
Layer bulbs without stacking one directly over another. Offset upper and lower bulbs so a shoot is not forced through another bulb and future lifting has a readable pattern. Follow planting depth for the exact bulb, measuring from its base to the finished surface rather than from the container floor. Leave a clear upper layer for roots, watering and surface inspection instead of using every vertical inch as storage.
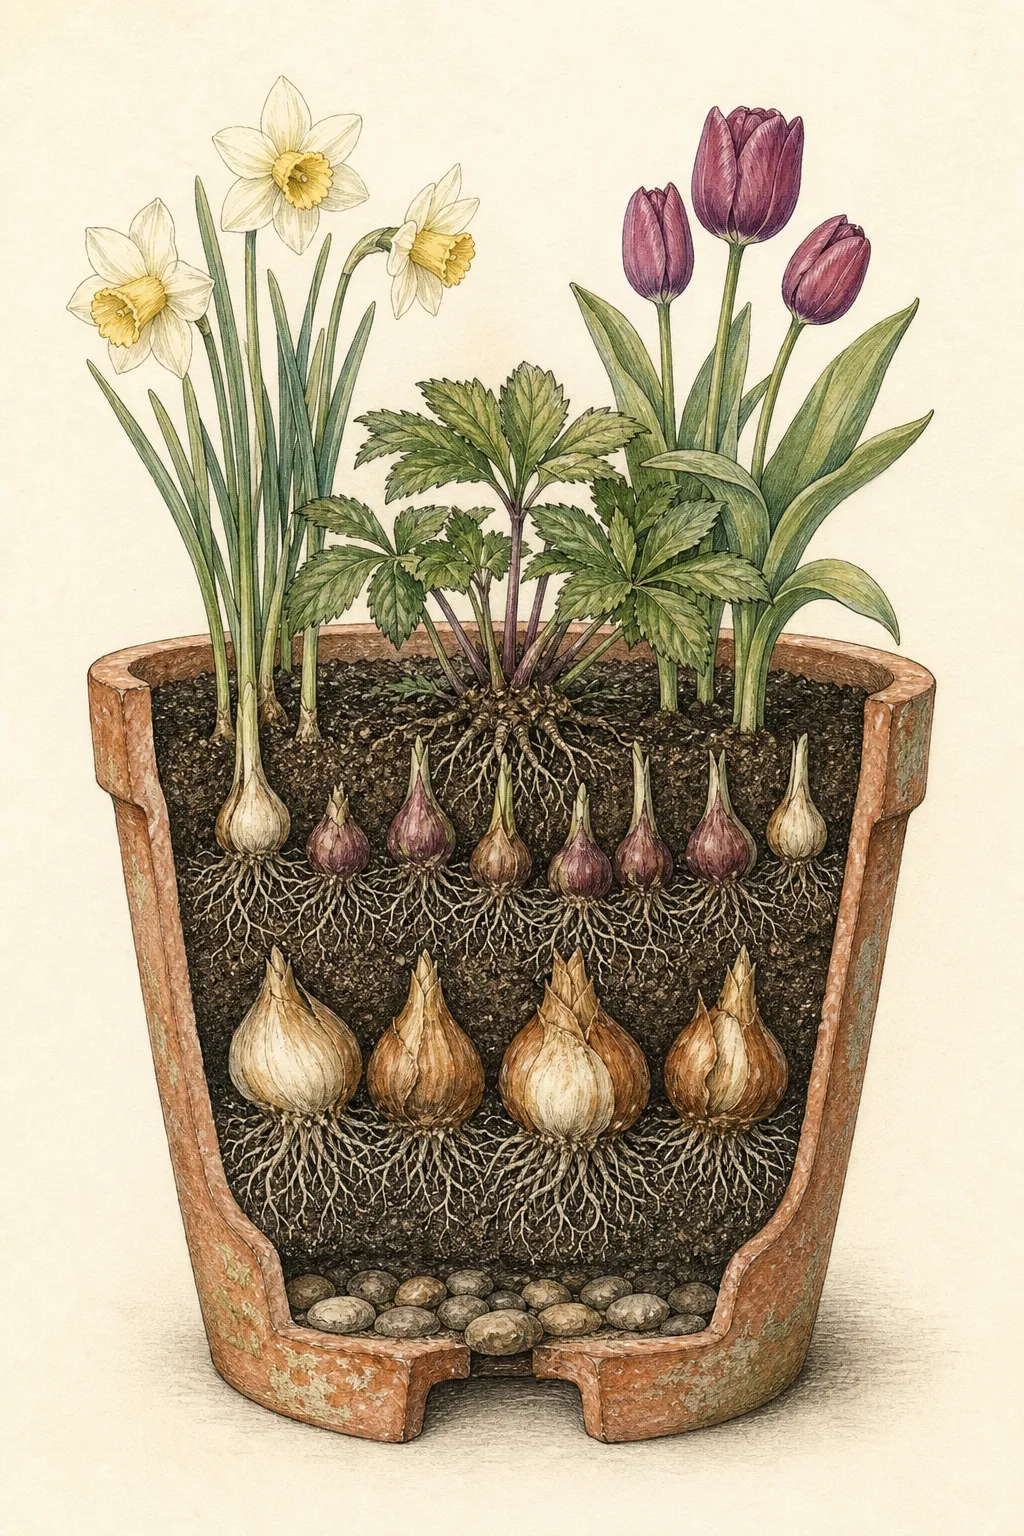
If a dense plan closes every reachable patch of mix, leave one narrow unplanted access opening from the rim toward the center. Keep it available for a moisture check and later edits, and align a discreet label with it. It need not be a geometric wedge, and it is unnecessary when several surface openings are already reachable; define this once as a construction detail rather than repeating it as a design motif.
Build rhythm with openings, not crowding
Arrange bulbs in separated groups that can still be read when only leaves remain. One principal group can carry the main spring moment, with smaller echoes around the perennial framework. Avoid a rigid ring at the rim, where relaxed foliage will spill into circulation and be trimmed. Also avoid uniform scattering, which produces isolated yellowing leaves after bloom. A bounded group makes aftercare and later mapping far easier.
Repeat one relationship: a bulb flower rising beside a particular leaf shape, a pale flower against a dark mound, or a narrow leaf crossing a broad one. Repetition gives order without requiring identical plants in every position. Keep the bulb foliage footprint visible in the drawing. The relationship must remain attractive as flowers disappear, leaves lengthen and perennial shoots expand.
Use the mature perennial outlines to establish negative space. The open intervals are not unfinished soil; they are emergence windows, water-entry points and future work areas. Temporary surface accents can be added only if they do not root aggressively, hide crowns or encourage watering incompatible with the permanent occupants. Gravel used decoratively must not be read as a substitute for drainage below.
View the arrangement from its normal approach before planting. Set empty nursery pots and labeled bulb markers on a paper circle matching the container rim. Move whole groups until the principal mass, secondary texture and bulb windows are legible. A top-down nursery-bench view tends to overvalue symmetry; the actual eye-level view reveals whether flowers will be hidden behind a crown or whether one leaf arc blocks the display.
Plant without burying crowns or closing drainage
Prepare every component before the first root ball enters the pot. Hydrate dry root balls according to the plant's needs, inspect bulbs and reject soft or seriously damaged material. Place the container in its working position or on its rated mobile base. Confirm that outlets are open, then add enough mix to establish the lowest required planting level without tamping it into a dense layer.
Set lower bulbs at their verified depth and orientation, offsetting them from future perennial root balls. Add mix gently and place the next layer only when the measured cover is correct. Keep a simple diagram as each level disappears. The drawing should show which group occupies each sector, because the finished surface cannot reveal whether a later spade or probe will strike a bulb.
Set perennial root balls so their crowns or stem bases retain the nursery-grade relationship appropriate to the plant. Do not sink a crown to make foliage look shorter or perch roots to gain room for bulbs. Backfill around roots while preserving the mapped upper bulb positions. Firm only enough to remove large voids; compaction sacrifices the air and drainage that the entire concept requires.
Finish below the rim, water slowly across the surface and watch the outlet. Initial runoff alone does not prove the whole root zone is moist, especially if dry mix has pulled from the pot wall. Pause, allow water to distribute and test the center with a narrow probe inserted from a clear edge. Correct a blocked outlet or dry channel before adding decoration, labels or more plants.
Let spring reveal the real sequence
Mark emergence and bloom by relative order rather than judging the design against a catalog date. Weather, cultivar, exposure and region shift the sequence. Photograph the same view when the first shoots appear, at each principal bloom and as foliage begins to dominate. The record shows whether upper bulbs shaded lower shoots, whether one group disappeared behind a perennial and whether the container received the light assumed on the plan.
Water from observed mix condition and active growth, not from the presence of flowers alone. Check below the surface at more than one reachable point and compare plant posture with the container's recent rain exposure. Apply water slowly enough to wet the occupied root zone, then allow excess to leave. A sheltered pot may miss rain; an exposed pot may stay wet after a storm. One spring schedule cannot represent both conditions.
Keep fertilizer decisions species-specific and modest. A mixed container is not improved by pushing lush perennial growth that shades bulbs or by trying to force a second spring bloom. Follow local guidance and product labels where feeding is needed, accounting for any nutrients already present in the mix. Pale or weak growth should reopen light, root, moisture and temperature questions before fertilizer is treated as the default correction.
Edit only what the sequence proves. If one bulb group is hidden, mark it for appropriate later relocation rather than excavating among active roots. If a perennial expands earlier than expected, guide an undamaged leaf aside temporarily but do not cut the crown into a smaller artificial outline. Spring observation is the commissioning period for a long-lived container, not a demand that every element be perfected while it is growing.
Keep the container credible after bloom
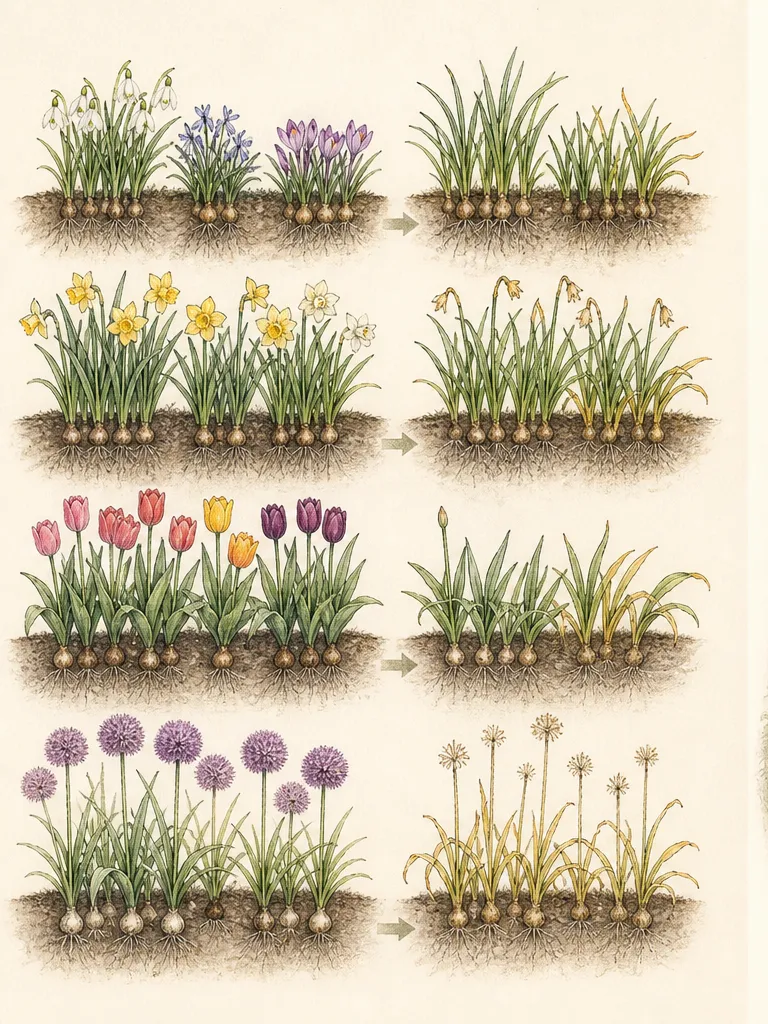
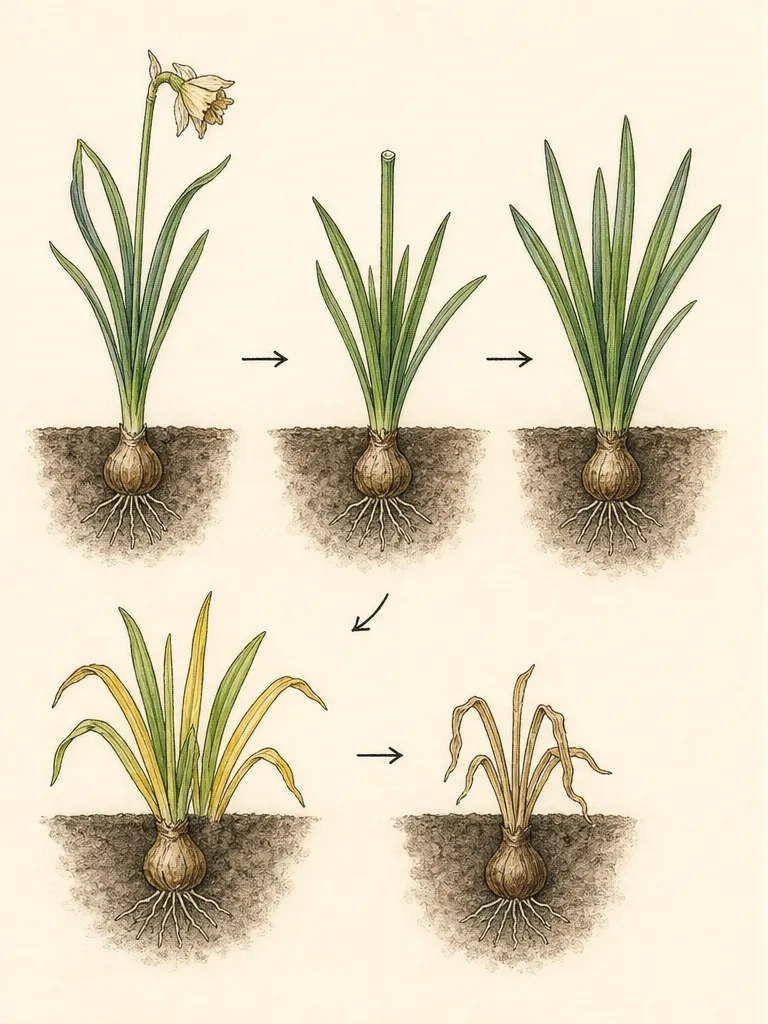
Separate the spent flower from the still-working leaf. Where seed is not wanted, remove the faded flower according to the bulb's guidance while leaving healthy foliage attached. University of Illinois Extension explains that the leaves continue photosynthesis and support future bulbs; premature removal can weaken return. The design must therefore host green leaves until they yellow and die back naturally rather than using a cleanup date as permission to cut.
Do not tie, braid or fold bulb leaves into bundles. Those treatments reduce the leaf area exposed to useful light and turn aftercare into concealed damage. Let leaves rest through the open intervals planned around perennial crowns. A low discreet support may keep long foliage away from a walking route without compressing it, but a container repeatedly obstructing circulation belongs in a different position.
Use perennial foliage to share attention, not to cover the bulb leaves completely. A compact mound can frame the base and a fine texture can soften the transition while the bulb leaves remain open to light and air. If the perennial canopy closes above them, the mature-spread plan was too dense. Record the conflict and remove or relocate a component in its suitable season rather than thinning leaves every spring.
Read yellowing by condition. Natural senescence progresses through the foliage until it becomes yellow, straw-like and no longer functional. An isolated collapse, sharply marked injury or soft base is not an aftercare cue. Keep abnormal tissue separate from the ordinary sequence and seek plant-specific diagnosis. When foliage is genuinely finished, remove it without pulling resistant bulbs upward and refresh the map before the position disappears.
Carry the perennial framework through summer
Once bulb foliage finishes, the perennial framework becomes the whole visible container. Reassess balance at mature summer spread. The principal mass should still leave a readable edge and visible crowns; fine texture should remain distinct rather than weaving into a solid mat. If the design depends on dormant bulbs to fill a visual hole, move the existing masses only through plant-appropriate pruning or division, not by inserting an incompatible thirsty filler.
Continue watering the shared root zone according to its active occupants while respecting the bulbs' documented summer needs. This is where compatibility is tested most strongly. A perennial requiring frequent wet conditions may make a dry-rest bulb pairing untenable. If observed care repeatedly favors one component at the expense of another, accept the evidence and separate them at the appropriate time.
Keep outlets open and remove standing water from outer containers or saucers. Large foliage can hide the mix while shedding rain toward the rim, so probe the center and compare it with the edge. During heat, inspect more often without assuming every inspection requires water. Root growth, wind and exposure can shorten the interval over the season; a fixed weekly routine cannot account for those changes.
Retain labels and a sectional record through dormancy. Mark any bulb group intended for lifting and any perennial approaching its allotted crown line. The aim is not to freeze the arrangement. It is to make future edits selective, so one correction does not require emptying a heavy container and damaging every established root.
Review winter limits before repeating the design
At the end of the active season, decide whether the container stays, moves or receives regional protection. The answer depends on pot material, exposure, drainage, plant hardiness and local winter patterns. Do not assume an in-ground hardiness rating transfers unchanged to an above-ground root zone. Use local institutional guidance for the exact perennial and bulb selections, and keep drainage functional through freeze-thaw or rainy dormant periods.
Remove only failed or species-appropriate dormant tops. Leave evergreen or persistent perennial foliage when the plant normally retains it, and avoid piling protective material over crowns without guidance. A pot that moves under cover may receive less rain and need occasional moisture checks; a pot outdoors may receive too much. Winter storage is another environment with its own light, temperature and watering conditions, not a neutral pause.
In the next spring, compare return with the installation record. Weak bulbs may reflect early foliage removal, wet summer conditions, unsuitable winter exposure, crowding or cultivar persistence. A perennial loss may reflect container hardiness rather than poor summer design. Diagnose the layer that failed before adding replacements, and do not repeat the same combination in multiple pots until one complete annual cycle has shown compatible care.
A successful layered container has three honest phases: bulbs emerge through planned openings, their foliage remains functional after bloom, and durable perennials carry the later display without monopolizing the shared root zone. Drainage and access are visible parts of that design. When the underground section, mature surface and seasonal care all agree, the pot feels abundant without being overfilled.
Design ideas
- Style
- Layered spring display held by a durable foliage framework
- Space
- Large outdoor container on a stable patio, terrace or doorstep
- Climate
- Use this scheme only where the selected bulbs and named perennial cultivars share workable light, drainage and annual moisture conditions. Container hardiness may be narrower than in-ground hardiness, so verify local overwintering needs and provide a realistic move or protection plan. Bulb planting depth, sequence, summer rest and persistence vary by species and cultivar; retain labels and follow current regional guidance rather than applying one layered recipe universally.
- 1Build one crown with three bulb windows
Place one compact, durable perennial crown off center and reserve three separated bulb openings around it. Give the openings different relative bloom windows while keeping every shoot route outside the perennial root ball. Repeat one flower color or leaf relationship across the openings. Draw the perennial at mature spread first; if its future leaves close all three windows, choose a smaller named cultivar or reduce the number of bulb groups.
- 2Pair a broad mound with a fine vertical
Use two locally suitable perennials with compatible moisture needs: one broad but bounded foliage mass and one finer upright or arching counterpoint. Keep both crowns visible and leave clear separation between them. Let bulbs rise in the negative space rather than through either crown. The contrast should remain legible in summer after bulb foliage disappears, so compare mature height, spread and seasonal persistence before selecting cultivars.
- 3Draw a three-level bulb section
Map larger, later bulbs in an offset lower group, a middle group with its own clear shoot paths and smaller earlier bulbs above, following exact planting guidance for each. Do not stack bulbs directly or sacrifice the upper root zone. Number each level on a section drawing and align it with a discreet rim marker so later probing, perennial division or bulb lifting can avoid the hidden groups.
- 4Plant the amber-to-burgundy worked recipe
In a draining pot at least 70 cm wide and 50 cm deep—well above the RHS 30 cm minimum—set one nursery-sized Hylotelephium telephium (Atropurpureum Group) 'Xenox' off center with its root ball intact. Use the complete 27-bulb Crocus collection: seven Tulipa 'Golden Apeldoorn' lowest, ten Narcissus 'Ice Follies' in the middle and ten Narcissus 'Tête-à-Tête' uppermost. Offset the layers, keep one bulb-width gap and set each bulb at approximately three times its own depth; start above at least 10 cm of mix and finish the upper layer with 5–10 cm of cover and a 2 cm watering rim. Keep the combination in full sun and free-draining mix, allow green bulb foliage to finish, replace the tulips annually, and verify container winter exposure locally. If the intact root ball and all 27 bulbs do not pass a dry fit, use a wider pot rather than compressing the recipe.
- 5Make foliage decline a visible sequence
Place the principal bulb group where its post-flowering leaves can lie against calm perennial foliage without entering a path. Let a nearby mound take more visual weight as the bulb leaves yellow, while a fine texture keeps the transition loose. The companions do not cover, tie or shorten green leaves. Photograph all stages and move a bulb group later if its natural foliage arc remains incompatible with the pot's position.
- 6Coordinate separate pots when care diverges
If a desired perennial and bulb group do not share summer moisture or winter treatment, separate their roots. Place a bulb pot beside a perennial container and connect them with repeated rim profiles, color or leaf scale. The visual relationship remains while each pot drains, moves and receives water independently. This is the responsible version of a combination whose plants look compatible in spring but cannot occupy one annual care regime.
Related reading
Sources
- How to Plant Bulbs in a Pot. Royal Horticultural Society. Source record · Accessed 2026-08-19.
- Caring for Spring-Blooming Bulbs After Flowering. University of Illinois Extension. Source record · Accessed 2026-08-19.
- All About Container Gardening. Iowa State University Extension and Outreach. Source record · Accessed 2026-08-19.
- Bulb Lasagne Collection for Pots – Creams & Yellows. Crocus. Source record · Accessed 2026-08-19.
- Hylotelephium telephium (Atropurpureum Group) 'Xenox'. Royal Horticultural Society. Source record · Accessed 2026-08-19.