Plant problems · flower seedling mix algae surface crust
Diagnose Algae and Surface Crust on Flower Seedling Mix
Distinguish harmless staining from a wet sealed surface that interferes with ornamental seedlings, then correct moisture, airflow, light, mix, and watering method without damaging roots.
Published Last updated
In this guide
Identify what covers the surface
Start with color and texture. Algae usually makes a green, slippery film over areas that stay illuminated and wet. Fungi on potting media more often appear white to gray, and the two can occur together. A white or tan crystalline coating on the mix, container rim, or drainage hole points instead to minerals from irrigation water or soluble fertilizer. Let the surface dry enough to examine it, then use a hand lens on an empty patch; algae smears, fungal threads lift, and mineral deposits remain granular or brittle.
A thin green stain with upright seedlings is often an environmental clue rather than the injury itself. University of Maryland Extension notes that algae and surface fungi are usually not detrimental until growth becomes excessive. A thick mat can dry into a crust that slows water entry, while the wet conditions that produced it may also favor fungus gnats and seedling disease. Judge the plants separately from the film: note emergence, leaf color, stem firmness, root color, and whether irrigation still enters the mix evenly.
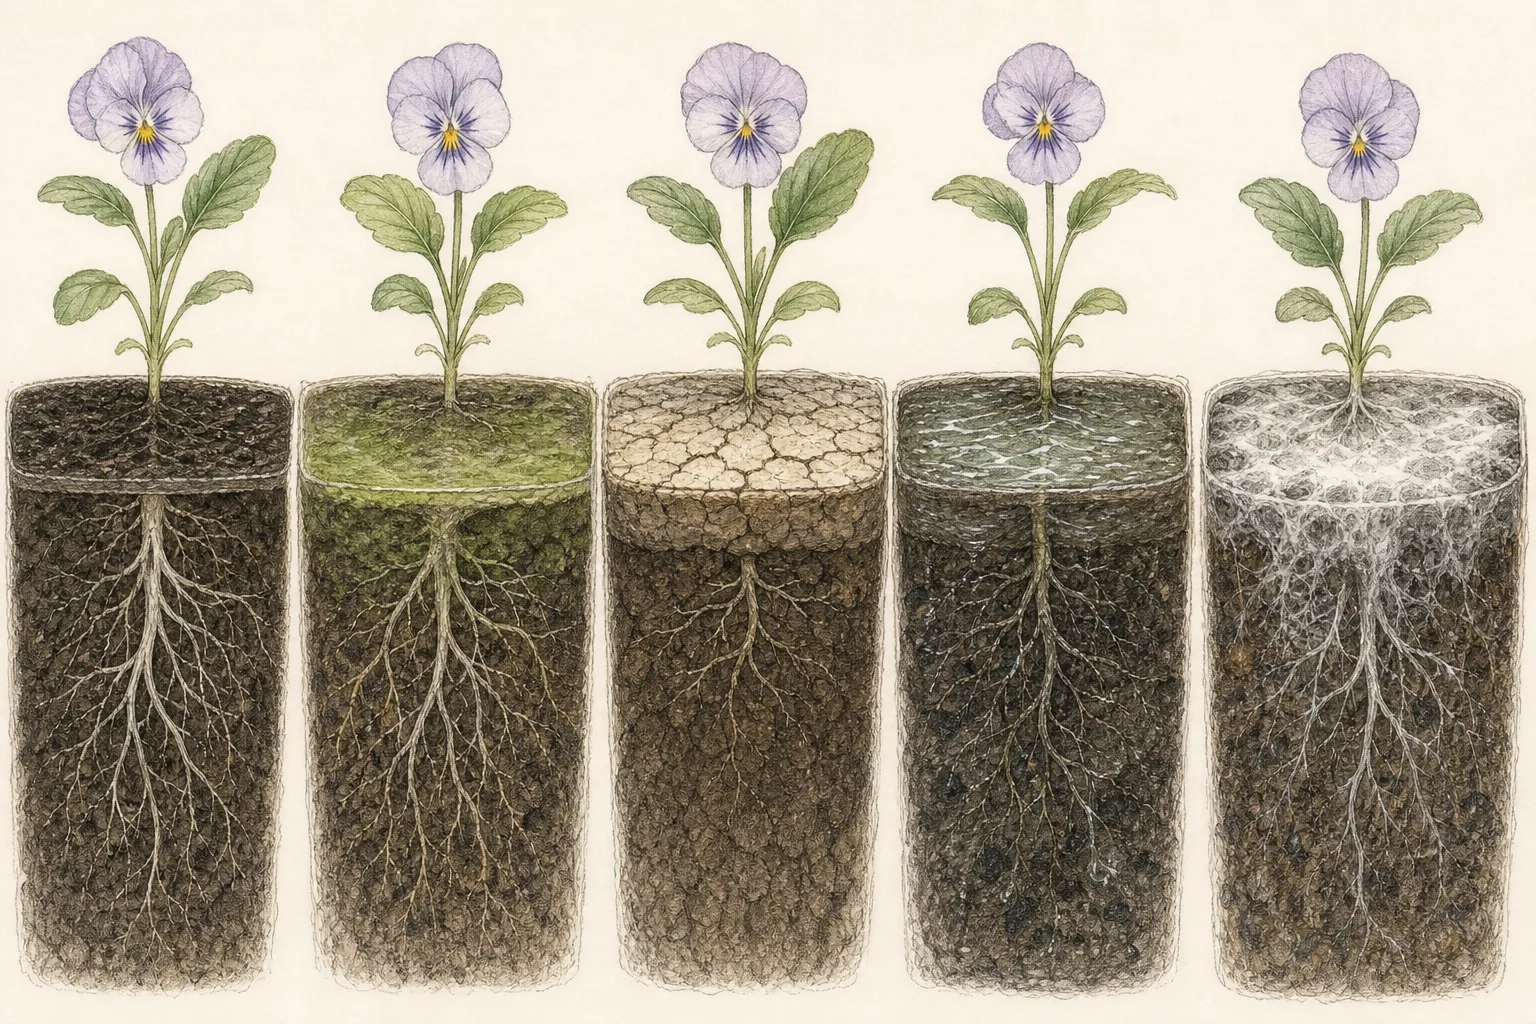
Do not call every fuzzy patch damping-off. Damping-off is diagnosed from the seedling: seed may rot before emergence, or a young stem becomes water-soaked, narrow, gray to brown, and unable to hold the plant upright. Roots may be absent, stunted, or marked by sunken gray-brown lesions. Surface fungal growth can exist without those symptoms. Photograph the tray before scraping anything, and keep a fallen seedling with its roots and stem base intact if a diagnostic service may need to examine it.
Check whether seedlings are actually harmed
First test infiltration in an unseeded corner or empty cell. Apply a small amount of water and watch whether it enters promptly, beads on the film, or runs sideways into another cell. A crust that sheds water can leave the surface looking saturated while the root zone beneath remains unevenly moist. Where germination is still underway, compare emergence on greened cells with clear cells from the same seed lot. Delayed or patchy emergence is meaningful only when sowing depth, temperature, and watering were otherwise alike.
Next inspect living tissue without pulling the whole tray apart. Healthy roots are firm and usually pale; decayed roots are soft, discolored, or missing. At the soil line, a firm stem of normal diameter argues against damping-off, whereas a threadlike constriction, water-soaked tissue, or rapid collapse is urgent. A sour odor and consistently heavy tray suggest prolonged saturation. Leaf-tip burn beside a white crust raises concern about soluble salts, especially after frequent fertilizer use or irrigation with mineral-rich water.
The distribution can identify the faulty input. Algae limited to the mist-facing edge implicates uneven irrigation. A green center with drier perimeter cells suggests trapped water or poor drainage in the middle of the flat. Growth beneath a clear humidity cover indicates that light, water, and retained humidity remained together too long. Similar coating in every tray supplied by the same water or fertilizer calls for checking those inputs; one isolated tray is more likely to have a local drainage, media, or sanitation problem.
Escalate when plant loss advances, not merely when the surface looks untidy. Remove a tray from shared drainage if stems are collapsing, roots are rotting, or fluffy growth is attached to living tissue. Damping-off pathogens can move through contaminated media, tools, splashing water, and shared irrigation. A stable thin film on otherwise vigorous seedlings allows time for cultural correction. Rapid death across adjacent cells warrants prompt removal of failed seedlings and consultation with a university plant clinic before any pesticide is considered.
Trace the moisture and air pathway
Reconstruct one complete watering cycle. Note the tray's weight before watering, the amount applied, where water first lands, how much drains, and whether the flat sits in runoff afterward. Clear blocked holes and separate a cell pack from a watertight decorative tray for the test. Check the mix below the surface with a clean skewer or finger at an empty edge. Algae on top of mix that is also wet at depth confirms chronic excess; a green surface over a dry core points to shallow, frequent watering or a crust that is diverting water.
Covers and nested trays can keep the surface wet long after germination. Condensation dripping from a dome repeatedly rewets the same cells, while a capillary mat or standing water can keep the entire profile saturated. Vent or remove a germination cover when the seed species and emergence stage permit, then let the flat drain freely after each irrigation. The goal is not to dry tiny roots; it is to restore a brief surface-drying interval while the root zone remains evenly moist.
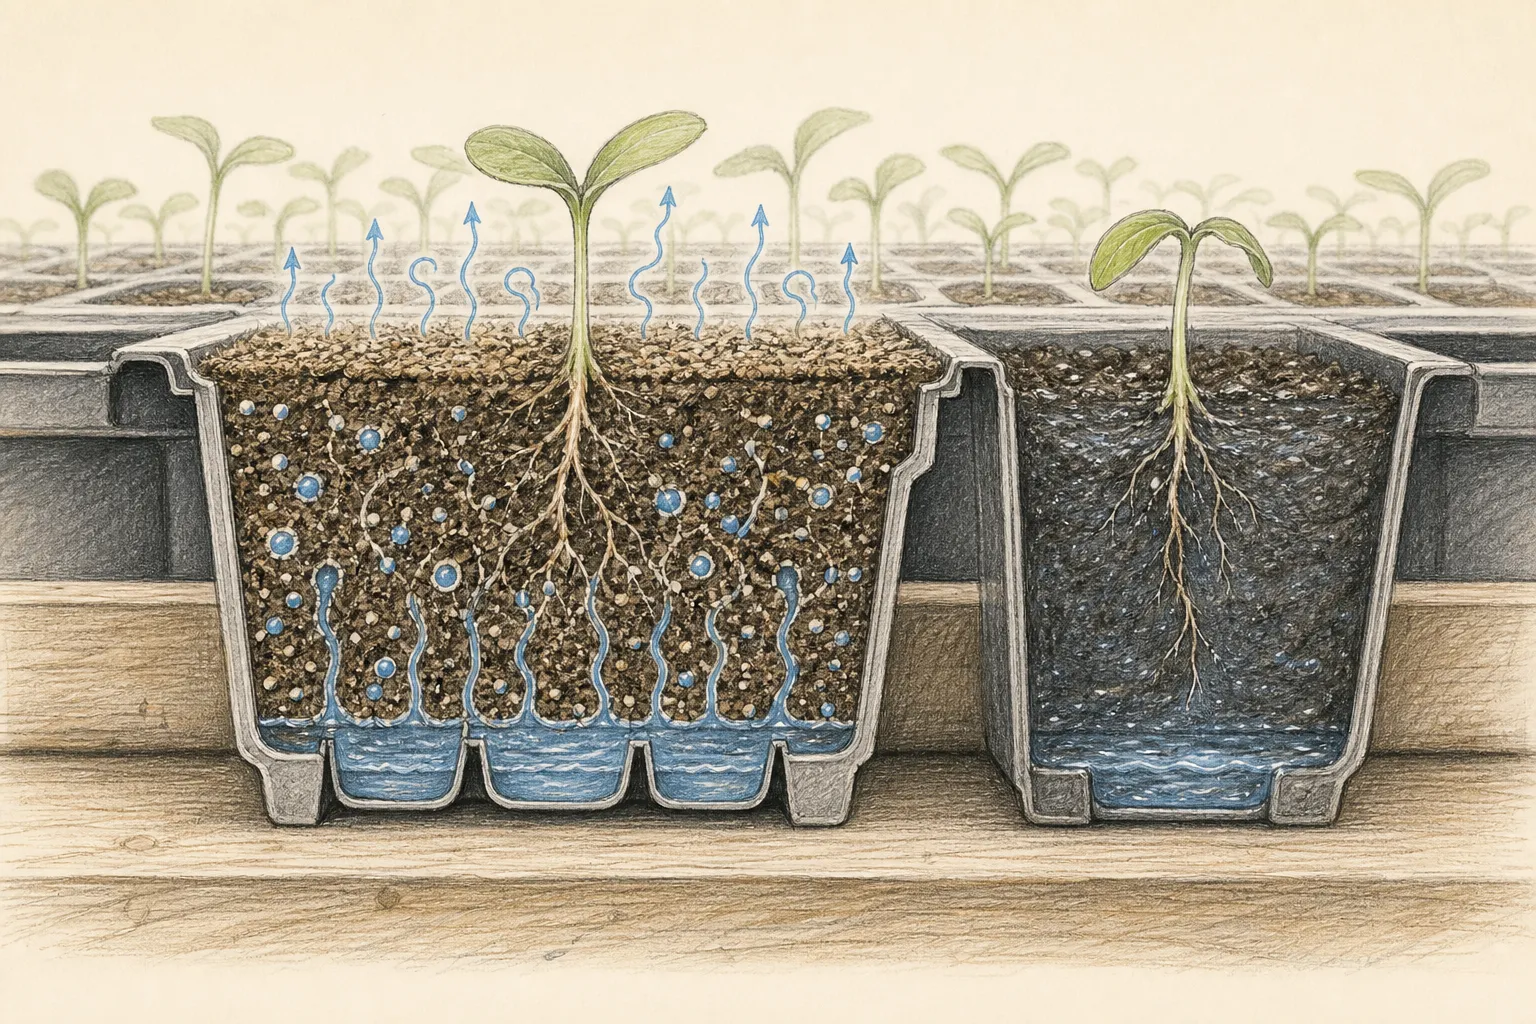
Air movement should remove humid boundary air without bending seedlings or drying one edge much faster than the other. UConn Extension identifies ventilation, horizontal airflow, proper drainage, and reduced excess irrigation as core algae controls in propagation. At home scale, space flats so air can pass between them, keep foliage clear of cold wet glass, and aim a gentle fan across the growing area rather than directly at one tray. Recheck moisture at the center and corners after the change because airflow can create a new dry zone.
Watering from below is not automatically corrective. It can reduce splash and keep foliage dry, but a flat left soaking continues to draw water upward and may concentrate salts near the surface as evaporation proceeds. Let the mix absorb what the crop needs, then remove the tray and drain it. If several pots share a reservoir, separate any diseased tray immediately. Use tray weight and subsurface moisture, not a fixed daily schedule, to decide when another watering is due.
Review light, mix, and soluble salts
Algae requires water, light, and mineral nutrients, so a bright wet media surface greens readily. This does not justify dimming seedlings: inadequate light slows sturdy growth and is associated with damping-off risk. Keep the crop at the light duration and intensity recommended for its species, then solve surface wetness through irrigation, drainage, and ventilation. A lamp that heats one strip of cells can increase evaporation there while the cooler center stays wet, so measure temperature and moisture across the tray rather than only beneath the fixture center.
A white crystalline crust needs a different response from algae. Mineral-rich water and soluble fertilizers leave deposits as water evaporates; high concentrations can make water harder for roots to absorb and can burn root or leaf tissue. Review the water source, fertilizer product, dilution, and application dates. Matching crystals on rims, saucers, or irrigation equipment strengthen the salt diagnosis. If germination is poor across a newly opened bag of mix, compare with a fresh known mix or submit the propagation medium for an electrical-conductivity test before blaming the seed.
Do not leach fragile newly sown cells with a forceful volume of water. For established seedlings with sound roots and open drainage, gentle top watering that produces free drainage may reduce salts when institutional crop guidance supports it. Empty the runoff so it cannot be reabsorbed. Severe crusting, root burn, or an unsuitable mix may make transplanting viable seedlings into fresh propagation medium safer than repeated flushing. Stop fertilizer until active growth and the product label justify resuming it; extra feed does not correct low light or damaged roots.
Correct the environment without injuring roots
Make the correction in an order the seedlings can tolerate. Drain standing water, clear blocked holes, vent obsolete covers, and improve gentle cross-airflow first. Then lengthen the watering interval only enough for the upper surface to lose its sheen while moisture remains available below. Maintain crop-appropriate light and temperature so seedlings keep growing instead of lingering in cool, wet mix. Reweigh or recheck the tray before the next irrigation; if the center remains heavy while edges dry, improve delivery or tray level rather than drying every cell equally.
Where a thick mat blocks infiltration, University of Maryland Extension advises breaking it up or removing the affected upper layer. Apply that guidance only to bare areas where no seed or fine root will be torn. Use a clean fork tip to open a few channels, or lift the mat from an empty cell, then restore the moisture cycle. Do not bury the mat under more mix, scrape around newly emerging stems, or dust the tray with an improvised household remedy. Established plugs with sealed, degraded media may be transplanted intact into fresh open mix if their roots are firm.
Separate sanitation from unnecessary treatment
Sanitation prevents a recurrence but cannot turn a collapsed seedling healthy. Remove dead seedlings and loose debris without scattering them across the bench. Keep affected trays out of shared runoff, wash hands after handling them, and clean tools before moving to another seed lot. For the next sowing, use fresh propagation mix and clean containers with working drainage. University of Minnesota Extension specifically warns that reused media, garden soil, dirty pots, tools, and contaminated water can introduce damping-off organisms.
Clean and disinfect empty equipment according to current Extension or manufacturer instructions. Reserve tray disinfectants for empty equipment and keep them off living seedlings. UConn's greenhouse guidance also distinguishes structural disinfectants and algaecides from direct plant treatments, noting that many products are not labeled for use on plants and may suppress or injure them. Cinnamon, peroxide, bleach, and a fungicide are not interchangeable diagnoses. If a registered product is genuinely needed, the label must include the plant, site, target organism, rate, and application method.
Fungicide will not remove mineral salts, and an algaecide will not rescue a stem already girdled by damping-off. Begin with the tissue signs and water pathway, then choose a response. When only the media surface is green, cultural correction is usually the relevant action. When roots or stem bases are diseased, preserve a complete sample and the sowing history for a plant clinic. A useful submission includes the seed species, mix, tray sanitation, temperature, lighting, watering method, fertilizer history, onset date, and photographs of the whole pattern.
Discard a tray when disease is spreading faster than sound seedlings can be separated, roots are broadly decayed, or the mix remains structurally waterlogged after drainage is restored. Salvage only firm, symptom-free plugs, and keep them isolated in clean containers. Do not compost suspect seedlings or reuse their medium for propagation. Clean the shelf, saucer, and watering equipment before the next batch. The loss of one flat is less consequential than carrying contaminated debris or shared water into every later sowing.
Prevent the same surface in the next batch
Begin with a fresh, fine but well-aerated propagation mix and containers whose drainage matches the cell depth. Pre-moisten the mix evenly, fill cells without compressing them into dense blocks, and sow at the depth stated for the flower species. A seed that needs light should not be buried merely to hide the wet surface. Label each lot and keep one tray's water from draining through another. Clean benches and remove plant debris before sowing so algae and damping-off organisms have fewer wet nutrient sources.
Plan the humidity transition before germination. A cover can keep seed evenly moist, but write down the crop-specific cue for venting or removal and put the emerging tray under adequate light promptly. Water only after tray weight and moisture below the surface show a need, then drain completely. Delay fertilizer until the seedlings have reached the stage recommended for the crop and measure every dilution. UConn's algae guidance links excessive irrigation and fertilizer with surface growth; preventing both is more reliable than repeatedly scraping a green mat.
Audit the growing area after watering, not only when it is dry. Look for puddles, a tilted shelf, blocked holes, cold corners, fixture hot spots, and condensation that falls on one row. Compare germination, stem firmness, root color, and growth rate along with surface appearance. A perfectly bare surface is not the objective; vigorous seedlings in evenly moist, freely draining mix are. If green film returns first in the same location, correct that location's water or air pattern before changing the care of every tray.
Diagnosis
A thin green film appears on illuminated, damp mix, but seedlings remain upright, normally colored, and firmly rooted. Irrigation still enters the medium instead of beading or running sideways, and the coating does not climb the stems or coincide with missing plants.
- Check
- Touch an empty patch with a clean tool, inspect the film with a hand lens, and test whether a small watering enters the mix. Compare stem firmness, root color, emergence, and growth in greened and clear cells from the same seed lot.
- Cause
- Ordinary algae is using light, dissolved nutrients, and a persistently moist surface without forming a mat thick enough to impede infiltration. The film is an indicator of the watering environment, while the seedlings show no direct tissue injury or root decline.
- Action
- Keep roots evenly moist while allowing the upper surface a brief drying interval. Improve gentle cross-airflow and free drainage, empty all runoff, and leave an otherwise harmless thin film undisturbed where scraping would tear fine roots or dislodge newly germinating seed.
A dark green mat has become thick, slick, or dry-crusted. Water penetrates slowly, runs toward neighboring cells, or pools before soaking in, and newly emerging seedlings may be physically surrounded where the layer has closed over the media surface.
- Check
- Apply a small measured watering to an empty cell and watch for beading, lateral runoff, or delayed entry. Inspect moisture at depth, drainage holes, tray level, covers, capillary contact, and standing water beneath the flat before disturbing living seedlings.
- Cause
- Excess irrigation, retained humidity, weak ventilation, poor drainage, or fine compacted media has supported dense algal growth. As the mat dries into a crust, it reduces surface permeability and makes later watering less uniform across shallow seedling root zones.
- Action
- Drain the flat, vent or remove an obsolete humidity cover, and correct irrigation frequency, tray level, and airflow. Open or lift the impermeable mat only from bare areas where seed and roots cannot be damaged, then confirm that water enters evenly.
White or tan crystalline material occurs on the mix, pot rim, or drainage hole. Seedlings may also show slow growth, wilt despite moist media, browned leaf tips, or damaged roots, especially after repeated fertilizer applications or use of mineral-rich irrigation water.
- Check
- Review the irrigation-water source, fertilizer product, dilution, and application dates. Look for matching crystals on containers or equipment, inspect roots and leaf tips, and request a propagation-media electrical-conductivity test when symptoms make salt injury plausible.
- Cause
- Dissolved calcium, sodium, iron, or other minerals from hard water, or salts supplied by soluble fertilizer, have accumulated at the evaporating surface. At sufficient concentration, those salts compete with roots for water and can desiccate sensitive seedling tissue.
- Action
- Pause unnecessary fertilizer, use a lower-mineral water source when water quality is confirmed, and prevent runoff from being reabsorbed. Leach only established seedlings with sound roots and open drainage, or transplant viable plugs into fresh mix when salt damage is severe.
White-to-gray surface growth lies on the potting mix while stems remain firm and roots retain normal color. The coating may occur beside green algae, yet there is no threadlike stem constriction, water-soaked seedling tissue, or rapid wave of collapse.
- Check
- Lift a small amount only from a seed-free edge and check whether it is filamentous white-gray growth or a smeared green film. Then inspect nearby stem bases, cotyledons, and roots for lesions, constriction, softening, or discoloration that would indicate plant disease.
- Cause
- Surface fungi are using moist organic material in the potting mix and may be largely saprophytic. Their presence still identifies prolonged moisture, and that environment can simultaneously favor fungus gnats or seedling pathogens even when the visible coating is not attacking plants.
- Action
- Remove loose fungal growth only from empty cells, reduce persistent wetness and humidity, clear fallen organic debris, and keep air moving between flats. Monitor living tissue for new lesions instead of applying a fungicide solely because the media surface appears fuzzy.
Seeds fail to emerge or seedlings collapse with water-soaked, threadlike, gray-brown stem bases, soft tissue, or stunted discolored roots. Fluffy growth may touch damaged plant parts, and losses often enlarge from several adjacent cells rather than remaining cosmetic.
- Check
- Isolate the flat, examine complete seedlings from roots through cotyledons, photograph the tray-wide distribution, and preserve fresh symptomatic plants. Contact a university plant clinic promptly when losses advance or when stem and root signs do not separate the likely pathogens.
- Cause
- Damping-off fungi or water molds have infected susceptible seed, roots, or stem bases under wet conditions. The green algae shares the favorable environment but is not the organism causing the water-soaked constriction, root lesions, failed emergence, or collapse.
- Action
- Remove failed seedlings, separate the tray from shared irrigation, and clean tools, pots, shelves, and watering equipment. Use fresh propagation mix for replacement sowings, and follow the diagnosis and current institutional or product-label guidance before applying any registered treatment.
Algae or crust is concentrated in one tray row, center, shelf edge, or mist path, and seedling vigor changes across the same pattern. The affected zone may stay visibly wet after the rest of the flat has drained or may receive repeated condensation.
- Check
- Map affected cells against nozzle direction, capillary-mat contact, shelf slope, fan path, lamp heat, condensation, and drainage. Weigh or probe the center and four corners after watering to identify where moisture persists longest and which physical input matches the damage.
- Cause
- Uneven watering, an unlevel tray, blocked drainage, a cool stagnant zone, concentrated fixture heat, or repeated condensation has created a bench-scale moisture gradient. Algae develops first where water persists, while adjacent seedlings respond differently to the same uneven root-zone conditions.
- Action
- Level and separate trays, clear the specific drainage obstruction, redirect uneven irrigation, and moderate the fan or fixture pattern. Recheck center and edge cells through a full watering cycle to verify that each zone now drains and dries at a comparable crop-safe rate.
Related reading
Sources
- Algae and Fungal Growth on the Soil of Indoor Plants. University of Maryland Extension. Source record · Accessed 2026-08-30.
- Managing Algae in the Greenhouse. UConn Extension. Source record · Accessed 2026-08-30.
- How to prevent seedling damping off. University of Minnesota Extension. Source record · Accessed 2026-08-30.
- Mineral and Fertilizer Salt Deposits on Indoor Plants. University of Maryland Extension. Source record · Accessed 2026-08-30.