Grow · train winter jasmine garden wall
Plant and Train Winter Jasmine on a Garden Wall
Establish winter jasmine as a tied wall shrub: plant clear of the wall base, spread flexible stems, preserve winter flowering wood and prune after bloom.
Published Last updated
In this guide
- Support the stems now and save pruning for after bloom
- Confirm winter jasmine and allow for its trained size
- Choose light, usable soil and a reachable wall
- Install a tying framework before planting
- Plant at the nursery soil level and water the root ball
- Spread flexible stems and make each tie accessible
- Prune after flowering and train the replacement growth
- Keep rooted tips, shade and dry soil from undoing the plan
- Steps
Support the stems now and save pruning for after bloom
Plant winter jasmine beside a suitable wall support, spread its flexible stems into an open framework and secure them with loose, inspectable ties. Jasminum nudiflorum is a scrambling shrub, so its stems need help to remain on a vertical surface. During autumn setup, retain sound growth that can carry the coming winter flowers. Routine pruning belongs immediately after flowering, when replacement shoots have time to develop for the next display.
RHS recommends autumn and winter planting for winter jasmine in its UK growing guidance. That makes November a useful planning and planting period where the soil is workable, but the local weather still decides the day. Frozen or saturated ground is unsuitable for seating a nursery root ball properly. Prepare the support first so a newly planted shrub does not wait unsupported while its wall space is organized.
Flowers appear on growth from the preceding season. Cutting every long green stem short during a pre-winter tidy can therefore remove the display you bought the plant to provide. Tying and pruning solve different problems: ties place a sound stem where it can be supported; cuts remove growth and change what remains to flower. Start by asking which of those actions is actually needed.
Confirm winter jasmine and allow for its trained size
Look for the name Jasminum nudiflorum. Its long, angular green stems carry small bright yellow flowers on largely bare growth in winter or early spring. NC State describes the flowers as non-fragrant, with six lobes, and the leaves as opposite and divided into three leaflets. Oregon State also records green, square stems and a deciduous habit. A leafless nursery plant can be showing its normal seasonal structure.
This is different from the fragrant white-flowered summer jasmine, J. officinale, and the tender indoor jasmine, J. polyanthum. A yellow flower alone is also insufficient identification: NC State distinguishes winter jasmine from the related evergreen primrose jasmine, J. mesnyi. Keep the nursery label with the plant so the support plan and pruning date stay attached to the correct species.
Winter jasmine can make a low spreading mound when left unsupported, but training it upward changes its footprint. NC State records supported plants reaching about 10–15 ft, roughly 3–4.5 m, in height. That is a reason to reserve a substantial, maintainable wall area, not a requirement to train every specimen to the top of a building. Plan the upper and side limits before the stems reach windows, gutters or access routes.
Flowering time varies. RHS describes winter and early spring, NC State commonly places bloom in January or February, and Oregon State records early-winter flowering in its context. The autumn task is to preserve and position suitable wood. It cannot promise a wall of flowers on a particular November date, and a young plant may need time to build its framework.
Choose light, usable soil and a reachable wall
Choose sun or partial shade with well-drained soil. Both NC State and Oregon State say winter jasmine tolerates heavier shade but flowers less well there. A dark wall may still support green stems, yet produce a reduced winter display. Judge the position during the season when flowers matter, including shade from buildings and evergreen planting.
Inspect the ground at the base of the wall. Roof overhangs and masonry can create a dry planting strip, while a downpipe can create a wet pocket nearby. The RHS climber-planting method places the planting hole 30–60 cm, about 1–2 ft, away from the wall base, where conditions should be better. Use that as the starting location for the root ball, then lead the stems back toward the support.
Leave enough accessible soil around the base to water and check the original nursery ball. A narrow hole between paving and foundations may offer little useful rooting space even when the wall above is large. Choose another position if the available bed cannot provide drainage and room for roots. The plant's tolerance of poor soil is not tolerance of every confined construction gap.
Select a wall area you can maintain safely. Keep doors, vents, windows and service fittings clear as the plant grows. A sound trellis or wire system must be suitable for the wall and eventual shrub; installation of anchors is a separate structural decision. Once a support is in place, you should be able to inspect ties and remove a stem from the front while the framework remains intact.
Install a tying framework before planting
Use trellis, wires or another suitable support that offers repeated places to tie the arching stems. RHS's general climber-planting guide, linked from its jasmine guidance, recommends putting the support in place before planting. Winter jasmine needs that support for a wall-trained form even though it grows perfectly well as an unsupported mound elsewhere.
An open arrangement is easier to understand than a tight mesh filled with tangled branches. Horizontal runs give you places to hold stems at several heights, while a trellis can provide both upright and crosswise contacts. The choice of wire, posts and anchors depends on the structure and site. The botanical diagram shows a training relationship, not an engineering specification for fastening into masonry.
Keep room between the wall and the working support so stems and ties can be handled. Use the support manufacturer's fixing system and clearance instructions. Pressing every shoot flat against masonry makes later inspection awkward and can leave stems rubbing at contact points. There is no benefit in choosing an almost invisible support if its ties become impossible to reach.
Have soft tying material ready before releasing the nursery canes. RHS recommends loose soft twine for new shoots and warns that unsuitable wire or plastic can damage stems and leaves. Keep the knot or fastening on the accessible side. A tie's job is to support the stem at that point while leaving space for it to thicken, not to clamp the bark tightly against the wire.
Plant at the nursery soil level and water the root ball
Water a dry nursery pot before planting and slide the root ball out while supporting it. Check for roots that have become congested around the outside; RHS recommends gently loosening some of these before planting. Keep the ball sufficiently intact to place it accurately. A plant loose in its pot or with seriously damaged roots needs assessment before it becomes the permanent occupant of the wall bed.
Make the hole two to three times wider than the pot and approximately the depth of the root ball, following the RHS climber method. Set winter jasmine at the level it occupied in its nursery container. The deeper planting sometimes used for certain clematis is a different instruction and does not belong here. Check the surface level with a cane laid across the hole before backfilling.
Place the root ball 30–60 cm from the wall base and arrange a gentle route for the stems back to the support. A retained nursery cane can serve as a temporary bridge. Adjust that bridge to the plant; forcing the stems into a sharp bend at the soil line can damage them. The planting section shows the root ball away from the wall while the shoots are guided toward it.
Return the excavated soil around the ball, firm gently and water thoroughly to settle it. Then check for sinking or exposed roots. Spread organic mulch over the surrounding root area while leaving the stem base clear; RHS's jasmine guide specifies a gap of about 7.5 cm, or 3 in. The mulch should help retain moisture and discourage weeds while the original planting level remains visible.
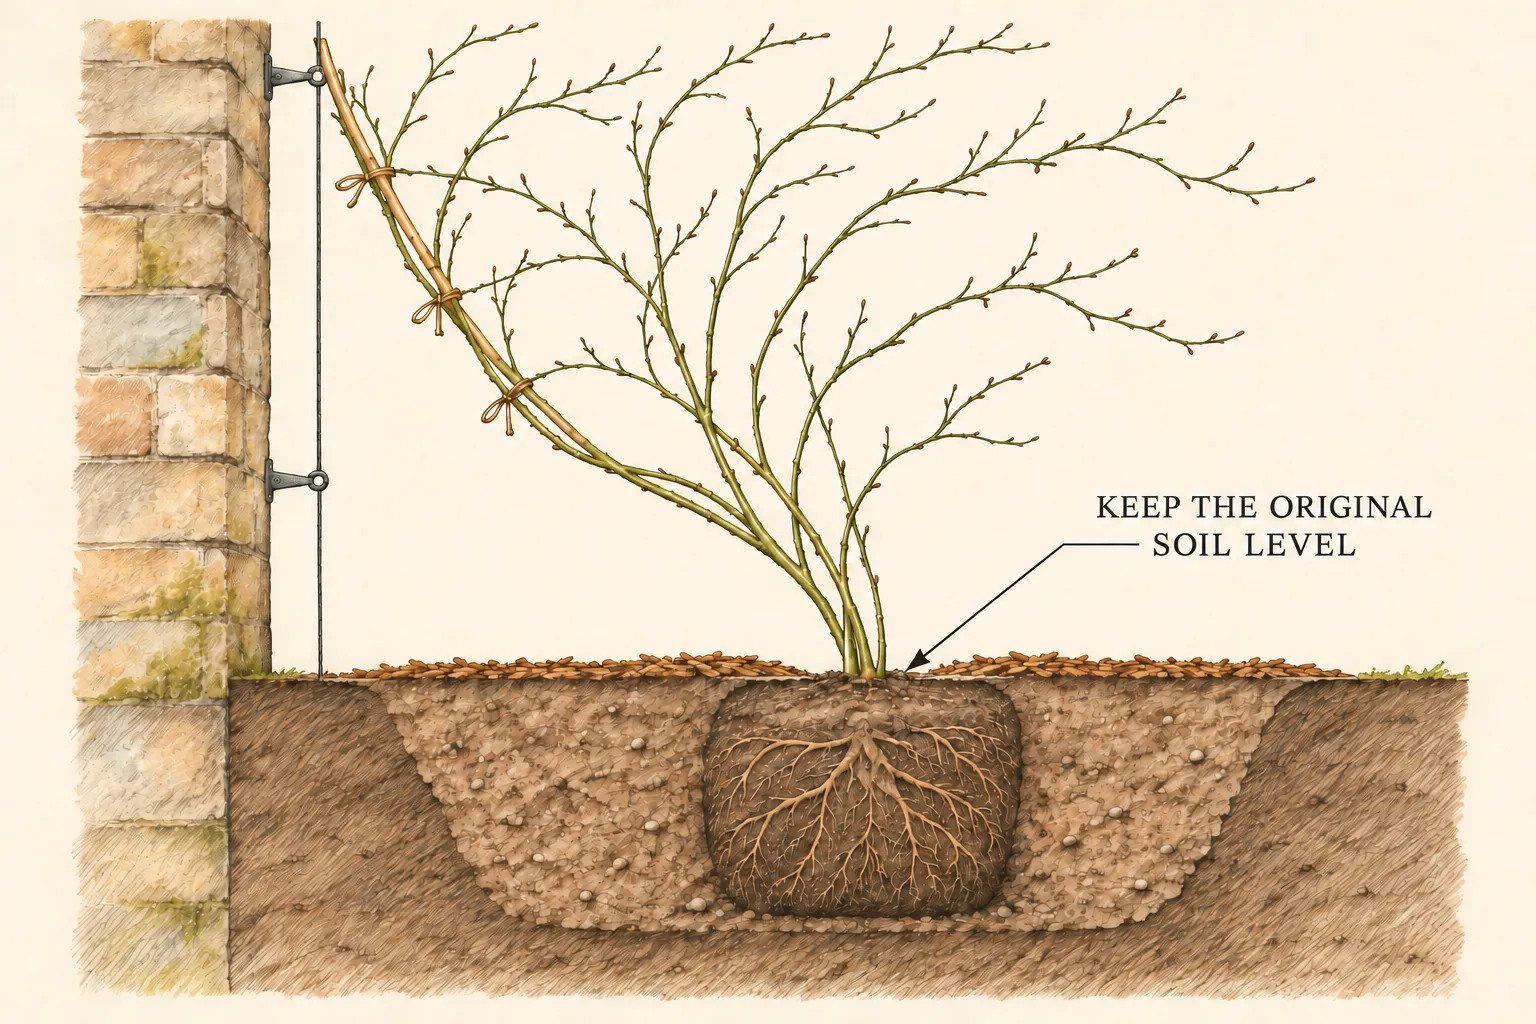
Continue watering according to the root ball's condition during establishment. RHS advises regular watering for at least the first year until jasmines are well rooted, with later watering mainly needed in summer dry spells. A wall-side root ball can dry while nearby open ground appears moist. Check both the nursery medium and the surrounding soil; rain may not have reached them equally.
Spread flexible stems and make each tie accessible
Start with the sound stems that already reach the support. Ease them away from a tight nursery bundle one at a time, preserving buds and side shoots. Arrange their natural curves into an open fan, spreading growth toward the left, middle and right of the intended area. The fan is a practical way to distribute stems; it does not require an identical number of branches on each side.
Choose the route a stem can take comfortably. Young flexible shoots can usually be guided more readily than older woody branches. Keep a resistant stem in its natural direction and plan a later replacement if its position is unsuitable. A hard bend that starts to split or crease a stem is a reason to stop, not evidence that the tie simply needs tightening.
Tie at several useful support points along a long stem so the load is shared and the tip can extend naturally. Leave room for growth and keep ties clear of buds where possible. The diagram's loose loops illustrate the principle; check the actual material and stem as you work. One tight tie at the top leaves the rest of a long branch free to rub or whip.
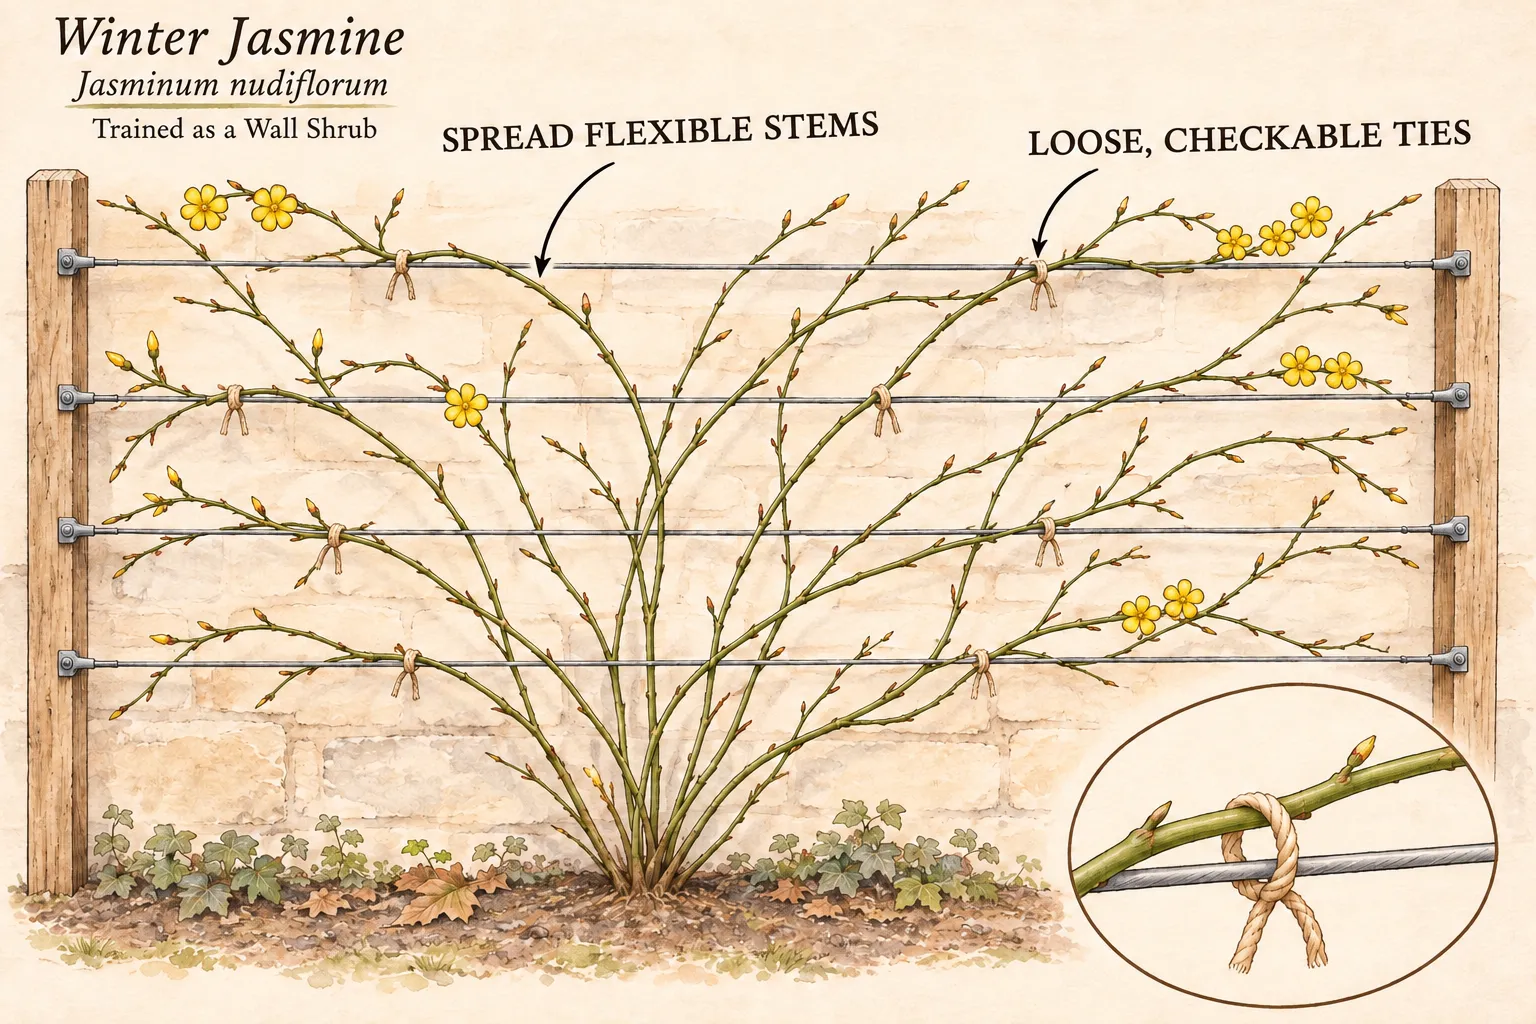
Winter jasmine is not secured to a wall merely because a stem has reached it. Continue guiding new extensions to the intended support and check them after wind. Keep the main framework legible from the base upward, with enough separation to distinguish a principal stem from its smaller side growth. This makes the spring pruning decision much easier than trying to trace branches through a dense knot.
A newly planted specimen does not need to cover the whole wall immediately. Leave open support visible while it establishes and produces more suitable shoots. Filling every gap by crossing stems repeatedly can hide constriction and create a congested center. The useful first result is a stable plant with a few well-placed routes for future growth.
Prune after flowering and train the replacement growth
Wait until the winter display has finished, then prune in spring as RHS recommends. Cut flowered stems back to a strong side shoot lower down, and thin overcrowded, damaged, weak or badly directed growth as needed. Follow each branch before cutting so the remaining side shoot belongs to the stem you intend to keep. Check for active birds' nests first and postpone pruning if one is present, as RHS advises.
The timing preserves a full growing season for replacement shoots to mature before the next flowers. NC State also emphasizes that flowers form on the previous season's growth. This is why a general late-autumn haircut is a poor companion to winter flowering. Remove clearly damaged material when necessary, but keep ordinary size control tied to the post-flowering window.
Retie the retained framework and guide new growth into the space released by pruning. Inspect old ties as stems thicken and replace those that are becoming tight or frayed. Choose a few useful new routes and guide them clear of the center of the fan. The aim is a framework that can be renewed from visible, accessible branches.
Hard renovation is a different job from annual pruning. RHS says an overgrown winter jasmine can be cut back to around 60 cm, or 2 ft, from the base, but flowering may take two or three years to resume after such treatment. Reserve that option for a plant that needs rebuilding, and plan it around the post-bloom pruning period. It is not an autumn shortcut for making a young wall plant neat.
Keep rooted tips, shade and dry soil from undoing the plan
Both NC State and Oregon State note that arching stems can root where they touch the ground. This can be useful when deliberately propagating a plant, but it can also turn a wall specimen into a spreading patch. Lift and tie wandering tips before they remain in contact with soil, and inspect shoots that have already taken root before separating or removing them.
Keep the base of the wall visible enough to find those contacts. Dense underplanting or a pile of fallen leaves can hide new rooted points. A small amount of routine checking is easier than later untangling several established plants that grew from one shrub. Leave planned layers only where you actually want another rooted plant.
If flowering is sparse, check light and pruning history before adding fertilizer. Shade reduces flowering in both university profiles, and pre-bloom cutting can remove the relevant wood. RHS says in-ground jasmines generally need no feeding beyond annual mulching. Extra feed cannot replace a removed branch or change a deeply shaded position.
After the first winter and growing season, review whether the wall area still suits the plant. Check the root ball through dry spells, keep access clear and correct ties that rub or constrict. If the only way to retain access is repeated hard cutting before bloom, the support or site may be too small. Adjust the arrangement while the framework is still understandable.
Steps
- Level
- moderate
- Time
- About an hour to plant and tie in a young shrub once support is installed
- Tools
- Spade or trowel, Watering can, Soft twine, Clean secateurs for necessary cuts, Measuring tape
- Materials
- Labelled container-grown Jasminum nudiflorum, Sound suitable wall support already installed, Organic mulch, Temporary cane if needed to guide stems
- 1Confirm the species and wall space
Read the label for Jasminum nudiflorum and check that the plant suits local winter conditions. Choose sun or partial shade and a bed that drains, with room for the eventual trained shrub. Reserve clear access to windows, doors and services. Put a suitable support in place before planting; its structure and fixings must suit the actual wall.
- 2Prepare the root-ball position
Water a dry nursery ball, remove the container and gently loosen congested outer roots as needed. Position the planting hole 30–60 cm from the wall base. Make it two to three pot-widths across and about root-ball depth. Check that the old growing-medium surface will finish level with the surrounding soil, with the stems clear above it.
- 3Plant and establish soil contact
Set the root ball at the checked level and return the excavated soil around it. Firm gently and water thoroughly, then correct any settlement or exposed roots. Add mulch around the root area, leaving about 7.5 cm clear beside the stem base. Check the original nursery medium as well as the adjacent soil during the first year.
- 4Fan and tie the available stems
Release suitable stems from the nursery bundle carefully, leaving buds and side growth intact. Spread flexible stems along comfortable routes across the support and attach them with loose soft ties at useful intervals. Keep fastenings reachable and allow room for thickening. Stop if a branch resists or creases; build the framework gradually and leave room for later growth.
- 5Preserve the display and check winter movement
Retain sound flowering wood during autumn setup and inspect ties after wind. Redirect loose tips to their intended support and keep wandering stems from settling onto soil where they can root. Maintain access to the root ball for moisture checks. Sparse coverage on a young plant is acceptable while its roots and useful framework become established.
- 6Prune and renew after flowering
Once the display finishes in spring, cut flowered stems back to strong lower side shoots and thin unsuitable growth as needed. Check and replace old ties, then train replacement shoots into the cleared space. Treat severe renovation as a separate decision with a possible two-to-three-year flowering delay. Review shade, spread and access before deciding that more cutting is the answer.
Related reading
Sources
- How to grow jasmine. Royal Horticultural Society. Source record · Accessed 2026-11-05.
- How to plant a climber. Royal Horticultural Society. Source record · Accessed 2026-11-05.
- Jasminum nudiflorum (Winter Jasmine). NC State Extension Gardener Plant Toolbox. Source record · Accessed 2026-11-05.
- Jasminum nudiflorum. Oregon State University. Source record · Accessed 2026-11-05.
- How to grow jasmine. Suttons Horticultural Team. Source record · Accessed 2026-11-05.