Grow · thinning root crop seedlings
Thin Direct-Sown Root Crops Without Disturbing the Keepers
Thin carrots, beets, parsnips, and radishes in deliberate passes so each remaining seedling has room to form a straight, full root without avoidable disturbance.
Published Last updated
In this guide
- Confirm that crowding is the problem
- Identify keepers before making the second spacing pass
- Choose cool, workable conditions
- Make the first pass a rescue, not a final layout
- Read the row below the leaf line
- Complete the second pass cleanly
- Settle the keepers without burying them
- Use small harvests to verify the spacing
- Record what the row teaches for the next sowing
- Steps
Confirm that crowding is the problem
A dense green line is normal after sowing small seed, but it becomes a root problem when several seedlings share the same thumb-width of soil. Carrots and parsnips produce one primary storage root; beets swell a stem-and-root structure near the surface; radishes expand quickly and reveal crowding first. In each case, leaf competition is only the visible part. Underground, close seedlings deflect one another, divide available moisture, and make harvest size less uniform.
Do not thin a patch merely because emergence looks irregular on the first warm afternoon. Seedlings can appear over several days as moisture and planting depth vary. Wait until the plants can be distinguished from weeds and handled without mistaking a folded cotyledon for a failed plant. Where crusted soil, flea-beetle feeding, damping-off, or a washed-out row has reduced the stand, solve that loss before removing more seedlings from the surviving pockets.
Identify the crop before choosing the final distance. A baby carrot does not need the same shoulder room as a large storage beet, and a round salad radish finishes before a long parsnip has made much mass. Use the cultivar packet or local Extension spacing as the final authority. The method here protects the keepers; it does not replace the mature dimensions attached to a particular crop and variety.
Identify keepers before making the second spacing pass
Use the crop and cultivar's mature spacing to decide which seedlings remain, opening the densest clusters without repeatedly disturbing retained roots. Return only for the necessary final spacing and correct exposed crowns gently. Keep the row label until harvest so crowding, root shape and yield can be compared with the spacing actually used.
Choose cool, workable conditions
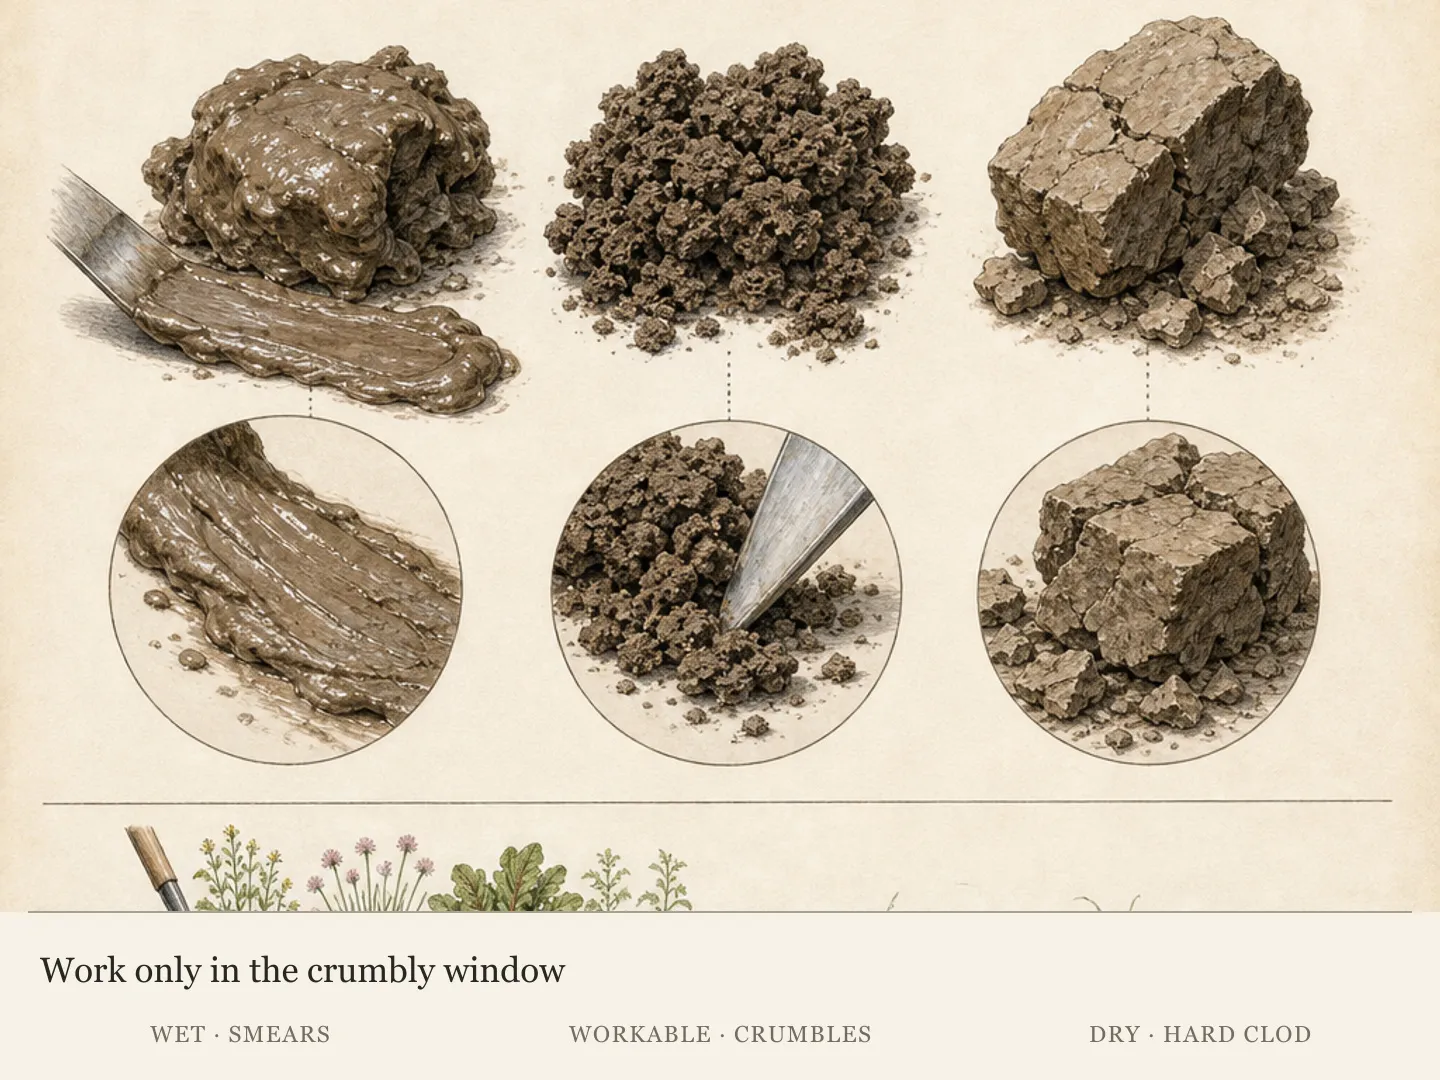
Thin when the soil is slightly moist and crumbly, not baked hard and not saturated. In hard ground, pulling one seedling can lever the neighbor sideways; in mud, the same pull can lift a plug containing both roots. Water a dry row the previous evening, then work after the surface has drained. A cool morning or overcast interval also reduces the time an exposed keeper must recover while sun and wind draw water from its small leaf area.
Have a fine snip available even if you expect to pull. Pulling is quick where seedlings are loose and clearly separated. Cutting at soil level is safer inside a fused cluster, around a valued keeper, or in soil that resists a straight lift. A cut seedling may occasionally resprout depending on the crop and cut height, but that modest follow-up risk is preferable to wrenching the primary root of the plant you intend to harvest.
Mark the row edge before beginning if weeds mingle with crop seedlings. Carrot cotyledons are narrow and grasslike at first; beet cotyledons are broader and may carry red stems; the first true leaves provide the more reliable confirmation. Move slowly enough to make identification part of the job. A perfectly spaced row of the wrong plants is not an improvement.
Make the first pass a rescue, not a final layout
Begin with clusters in which stems touch or leaves stack directly over one another. Choose the seedling that is upright, undamaged, and best aligned with the row. Do not assume the tallest plant owns the best root; a stretched seedling can simply have won a light race. Preserve a healthy individual whose crown sits at grade and whose stem is not kinked, then remove the nearest competitors before judging the next cluster.
Hold adjacent leaves aside with one hand. With the other, pull an unwanted seedling straight up by its base only when the soil releases easily. If the roots are braided or the keeper moves, stop and snip the unwanted stem at the soil surface. Work along one side of the row so your fingers, knees, and harvest basket never press the newly opened soil around plants already thinned.
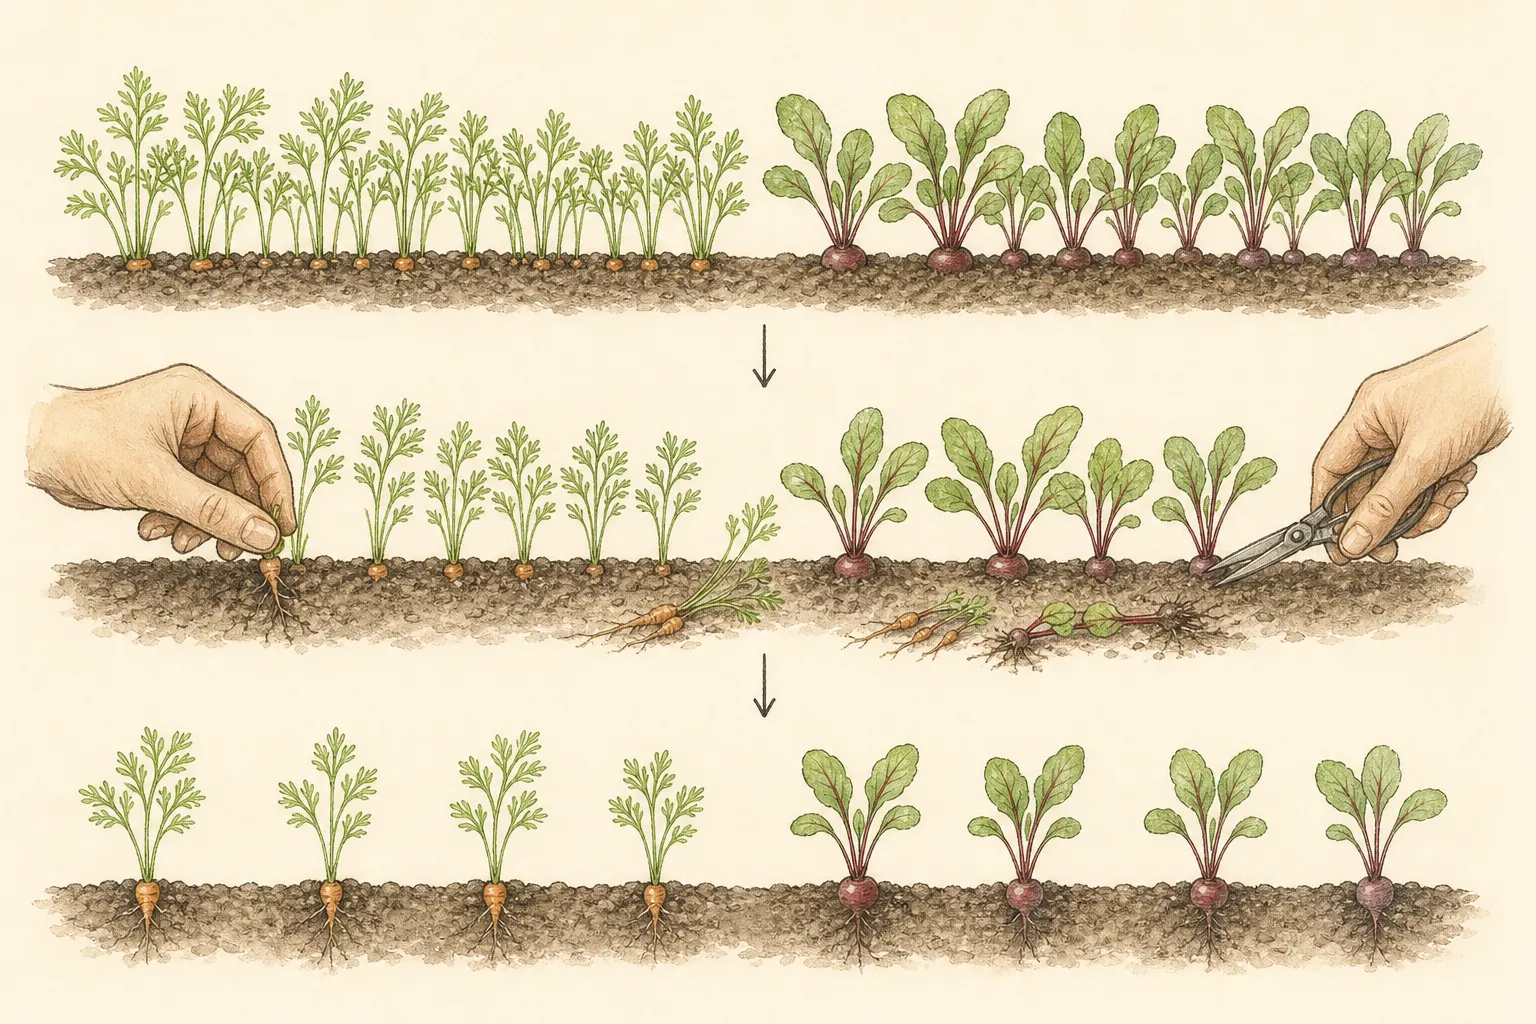
The first pass should convert knots into distinguishable plants, not force every seedling immediately to mature spacing. This is especially useful after uneven germination. A second candidate left nearby is insurance while the selected keeper reorients; two seedlings separated by some soil are less urgent than five emerging from one point. Remove the obvious excess, water gently if roots were exposed, and let the row settle.
Read the row below the leaf line
Return when the first pass has held and true leaves show which plants are establishing. Look down the row, then imagine the mature root rather than the current foliage. A carrot needs an unobstructed vertical lane; a beet needs lateral room at the soil surface; a long radish needs both. Two leaf rosettes can appear politely separated while their crowns emerge from nearly the same point, so make the decision at the stem bases.
Keep the plant whose position creates the most even sequence of root zones, not the one that makes the leaf tops form the straightest line. A slightly offset seedling can remain if it occupies open soil and will be easy to harvest. Remove plants growing into the path edge, against a board, or directly beneath a drip emitter where repeated mechanical disturbance will compromise the row later.
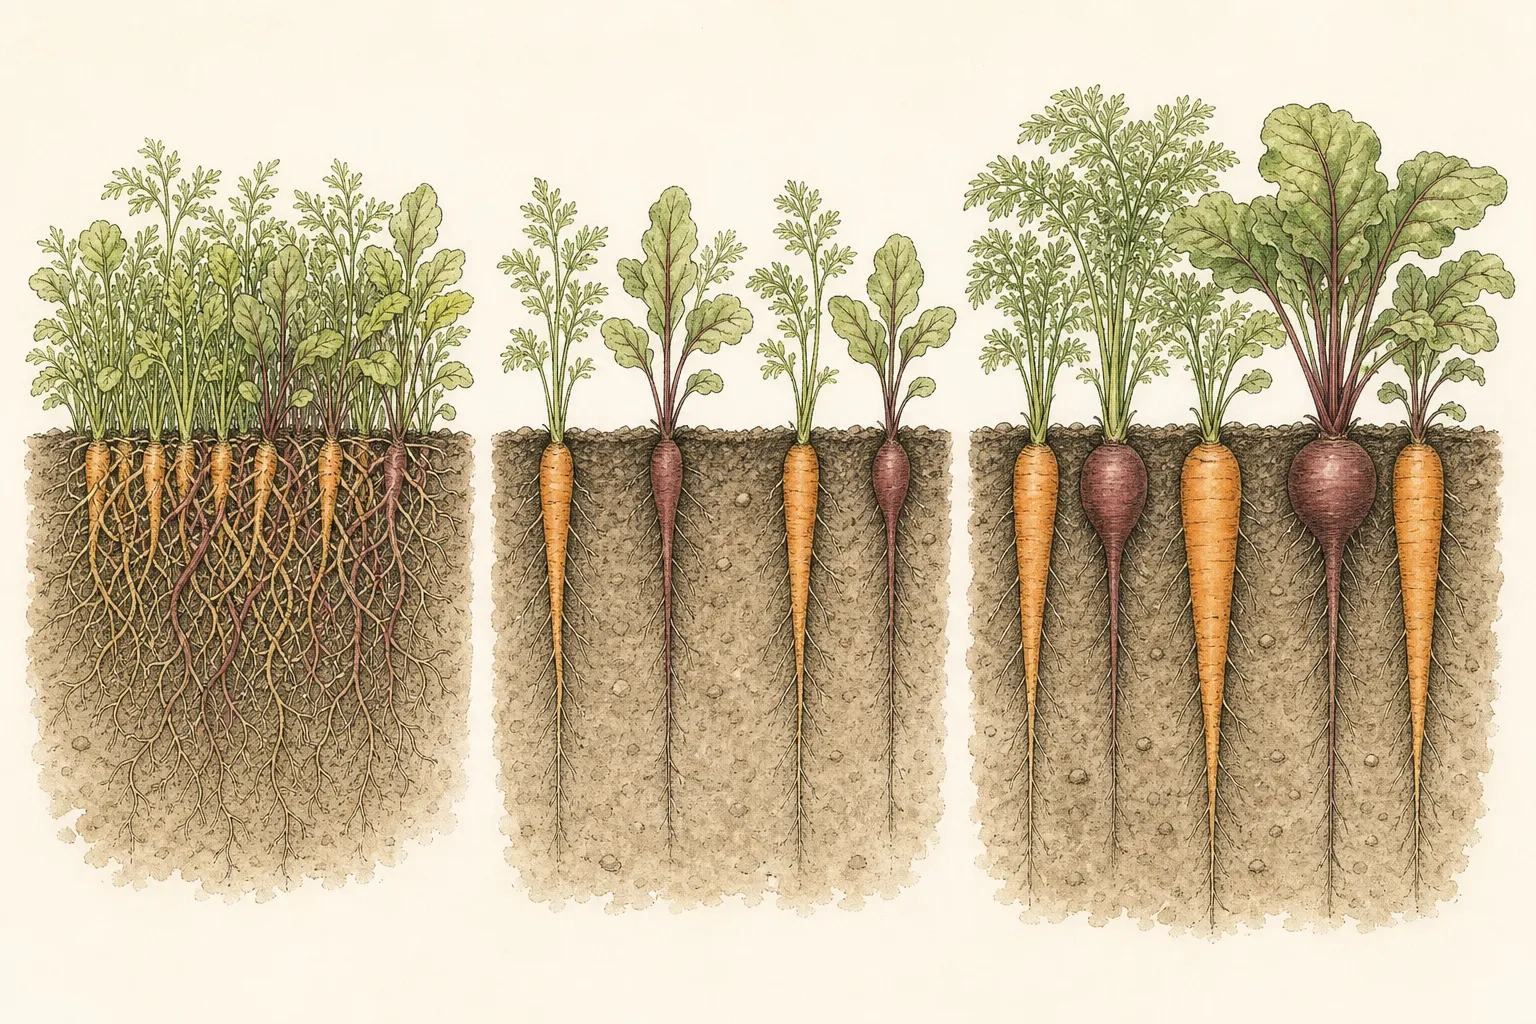
Treat forked roots as a soil-history clue rather than proof that thinning failed. Stones, compacted layers, fresh uncomposted organic matter, root injury, and uneven moisture can all alter shape. Thinning removes competition; it cannot rebuild a dense seedbed after emergence. If many roots later fork at the same depth, inspect that layer before the next sowing instead of responding by leaving future rows wider and wider.
Complete the second pass cleanly
Use the packet spacing now, measured at the crowns. Where two good plants fall within one mature root width, keep the better anchored one and cut the other. Work in short sections and look backward from several feet away. That wider view catches a common mistake: preserving perfect local pairs while leaving a long section with no room for either plant to reach its intended size.
Remove severed tops from the row so they do not mat against tiny crowns. Healthy carrot and beet thinnings may be edible when positively identified and raised without a treatment that forbids harvest, but food use is optional, not a reason to delay the work until the roots are large. Discard anything diseased, contaminated with soil splash from an unsafe source, or too wilted to handle cleanly.
Do not transplant the surplus as a routine rescue. Beets tolerate movement better than taproot crops when very young, yet transplanting still adds work and can distort roots. Carrots and parsnips are particularly unforgiving once the primary root is disturbed. If a gap matters, a small resowing within the appropriate seasonal window is usually more coherent than filling it with extracted seedlings of uncertain root condition.
Settle the keepers without burying them
After thinning, press loose soil lightly back around any exposed crown without packing it into a hard collar. Water with a fine rose or gentle hose breaker so soil closes around the root rather than washing the row into new clusters. The aim is contact, not saturation. If the surface crusts after every watering, break that cycle with gentler application and a very light, crop-appropriate surface mulch once seedlings are established.
Keep moisture even during the next several days. Small roots occupy a shallow volume, and newly opened soil loses water faster than the original green mat. Check below the surface rather than watering from the color of the crust. Repeated flooding followed by deep drying encourages stress and can contribute to irregular growth; steady moisture supports the uninterrupted cell expansion that makes straight, tender roots.
Inspect once more after rain or irrigation. A cut competitor may resprout, a pulled seedling may have loosened its neighbor, and birds can disturb newly opened soil. Correct those small failures now. Once the remaining plants hold upright and new leaves expand, stop handling the row. The successful end state is not visibly manicured soil; it is a series of undisturbed root zones that can mature without another thinning event.
Use small harvests to verify the spacing
A thinning plan becomes more useful when the first roots harvested are treated as evidence. Pull one plant from the edge of a representative section when the crop reaches an early usable stage. Compare the root diameter, length, branching, and tenderness with the open soil around it. A narrow root beside untouched loose soil suggests that time or cultivar size, not crowding, is still the limiting factor. Several flattened shoulders pressed together indicate that the final pass left too little lateral room.
Sample from more than one part of the row. The end nearest an emitter may have different moisture, and the end beside a path may be compacted by feet or edging work. One perfect carrot cannot describe a twenty-foot row. Two or three carefully chosen samples can reveal whether irregularity follows spacing, soil texture, shade, or the irrigation pattern. Keep the remaining plants intact while making that comparison; the purpose is to improve the next decision, not repeatedly excavate the crop.
Where baby roots are edible, progressive harvesting can become the last thinning pass. Remove every second beet or radish only when the remaining crowns will receive the intended mature distance. Do not call random harvesting a spacing strategy. If the largest plants are always removed from one pocket, weak neighbors may inherit the space too late to use it. Choose the harvest sequence while looking at the root zones that will remain.
Record what the row teaches for the next sowing
At harvest, sort defects by pattern before changing the next seed rate. Uniformly small roots can reflect late sowing, poor light, low fertility, heat, or inadequate season length. Forking concentrated at one depth points toward stones, a compacted layer, or incorporated undecomposed material. Cracking often follows uneven water availability. Crowding usually produces competition and irregular size, but it should not be blamed for every misshapen root merely because the stand began dense.
Note the seeding method as well as the final distance. Pelleted seed, seed tape, a hand seeder, and loose seed pinched from the palm create different starting patterns. A method that costs more but reduces fused clusters may save time in a small intensively managed bed. In a longer row, a two-pass thinning routine may remain faster. The useful comparison includes seed cost, emergence, labor, and harvest uniformity rather than judging the row only by how tidy it looked in July.
Finish the record with the cultivar, sowing date, weather during emergence, thinning dates, and the spacing that produced the preferred harvest size. Those details make the next sowing more precise than a generic memory that the carrots were crowded. Keep the record short enough to use. One line about the successful interval and one line about the recurring defect are often sufficient to turn this season’s careful handwork into a better first sowing.
Steps
- Level
- easy
- Time
- 20 to 40 minutes per short home-garden row, plus one follow-up pass
- Tools
- Fine garden snips, Small watering can or hose breaker, Plant marker
- Materials
- Clean water, Cultivar packet or local spacing guidance
- 1Identify the crop and its mature spacing
Wait until true leaves make crop seedlings distinguishable from weeds, then read the cultivar packet or local Extension recommendation. Use the mature root or swollen crown—not the current leaf width—to define final spacing, and postpone removal where emergence is still incomplete.
- 2Moisten hard soil in advance
Water dry ground the previous evening and work after the surface drains. Soil should release a seedling without lifting its neighbor. If a keeper shifts when you test a pull, switch immediately to cutting the unwanted stem at grade.
- 3Open the densest clusters first
Choose one upright, sound seedling in each fused cluster. Hold its leaves aside and remove only the closest competitors. Leave a temporary second candidate where emergence is uneven rather than forcing the entire row to final spacing in one disruptive pass.
- 4Return for mature-root spacing
After the first-pass keepers resume growth, measure between crowns and imagine the full root zone. Remove pairs that still share the same space, plants aimed into path edges, and stems that emerge from nearly the same point despite separate foliage.
- 5Settle exposed crowns gently
Draw loose soil back around shifted plants, keep the crown at its original grade, and use a fine stream to close air gaps. Do not bury the foliage, tamp a hard collar around the stem, or flood the row until soil moves.
- 6Verify once, then stop disturbing
Check after the next watering for loosened keepers, resprouting cut stems, or animal disturbance. Correct those failures and then leave the root zones alone. Further handling adds injury after the spacing problem has already been solved.
- 7Sample the row without reopening it
Harvest one early root from two or three representative zones and compare shape, size, and surrounding soil. Use a consistent pattern across the row. If progressive harvesting will provide the last thinning, remove plants in a sequence that leaves deliberate mature root zones instead of taking only the largest roots from one pocket.
- 8Write a two-line harvest record
Record cultivar, sowing and thinning dates, the final crown spacing, and the most common defect. Separate crowding from compaction, stones, water fluctuation, or insufficient season length. Use that evidence to adjust seed placement or thinning timing at the next sowing rather than simply widening every future row.
- 9Close the job at harvest
At the first representative harvest, compare roots from the emitter end, middle, and path edge. Note whether crowding, compaction, stones, or moisture fluctuation follows a repeatable pattern. Preserve the deliberate spacing of the remaining crop when taking baby roots, and record the cultivar, final interval, harvest size, and dominant defect in terms specific enough to guide the next sowing. Photograph one representative root beside a ruler when shape is difficult to describe. Keep that image with the sowing record, not as proof that every plant matched it. The next adjustment should answer the repeated pattern seen across the row and remain specific to that crop, cultivar, bed, weather, and complete season.
- 10Retain the row label
Keep cultivar and sowing date visible through the complete final harvest.
Related reading
Sources
- Growing carrots and parsnips in home gardens. University of Minnesota Extension. Source record · Accessed 2026-08-19.
- Carrots. University of Illinois Extension. Source record · Accessed 2026-08-19.
- Mid-August is prime planting time for fall garden crop carrots and beets. University of Illinois Extension. Source record · Accessed 2026-08-19.
- How to Grow Carrots in Your Garden. Utah State University Extension. Source record · Accessed 2026-08-19.