Grow · propagate lily bulb scales late autumn
Propagate Purchased Lily Bulbs by Scaling in Late Autumn
Take a few scales from healthy purchased lily bulbs in late autumn, develop bulblets with gentle warmth, and plan chilling and shallow nursery potting.
Published Last updated
In this guide
- Take a few sound scales and keep the parent bulb useful
- Select healthy stock before multiplying it
- Keep the basal end intact when removing a scale
- Prepare a lightly damp bag with room around the scales
- Use warmth to develop bulblets, then check their actual stage
- Provide the winter interval that the new bulbs need
- Pot tiny bulblets at their own scale
- Grow the young lilies through their first seasons
- Steps
Take a few sound scales and keep the parent bulb useful
A firm, plump lily bulb bought for autumn planting can supply a few outer scales for propagation. Detach them close to their base, enclose them in slightly damp medium and keep them around 21°C, or 70°F, while small bulbs form at the basal end. Plant the remaining parent promptly. The new bulblets then need appropriate winter treatment and a period of growing on; this is a way to increase a favourite lily over several seasons.
Late November suits a small indoor batch made from bulbs already out of the ground. The propagation teaching resource maintained by the University of Florida says scaling can succeed in winter as well as after summer flowering. The North American Lily Society describes taking scales before purchased bulbs are planted. These are useful distinctions from the RHS routine of lifting established lilies in late summer or early autumn. A frozen garden is no reason to dig up a thriving clump for this project.
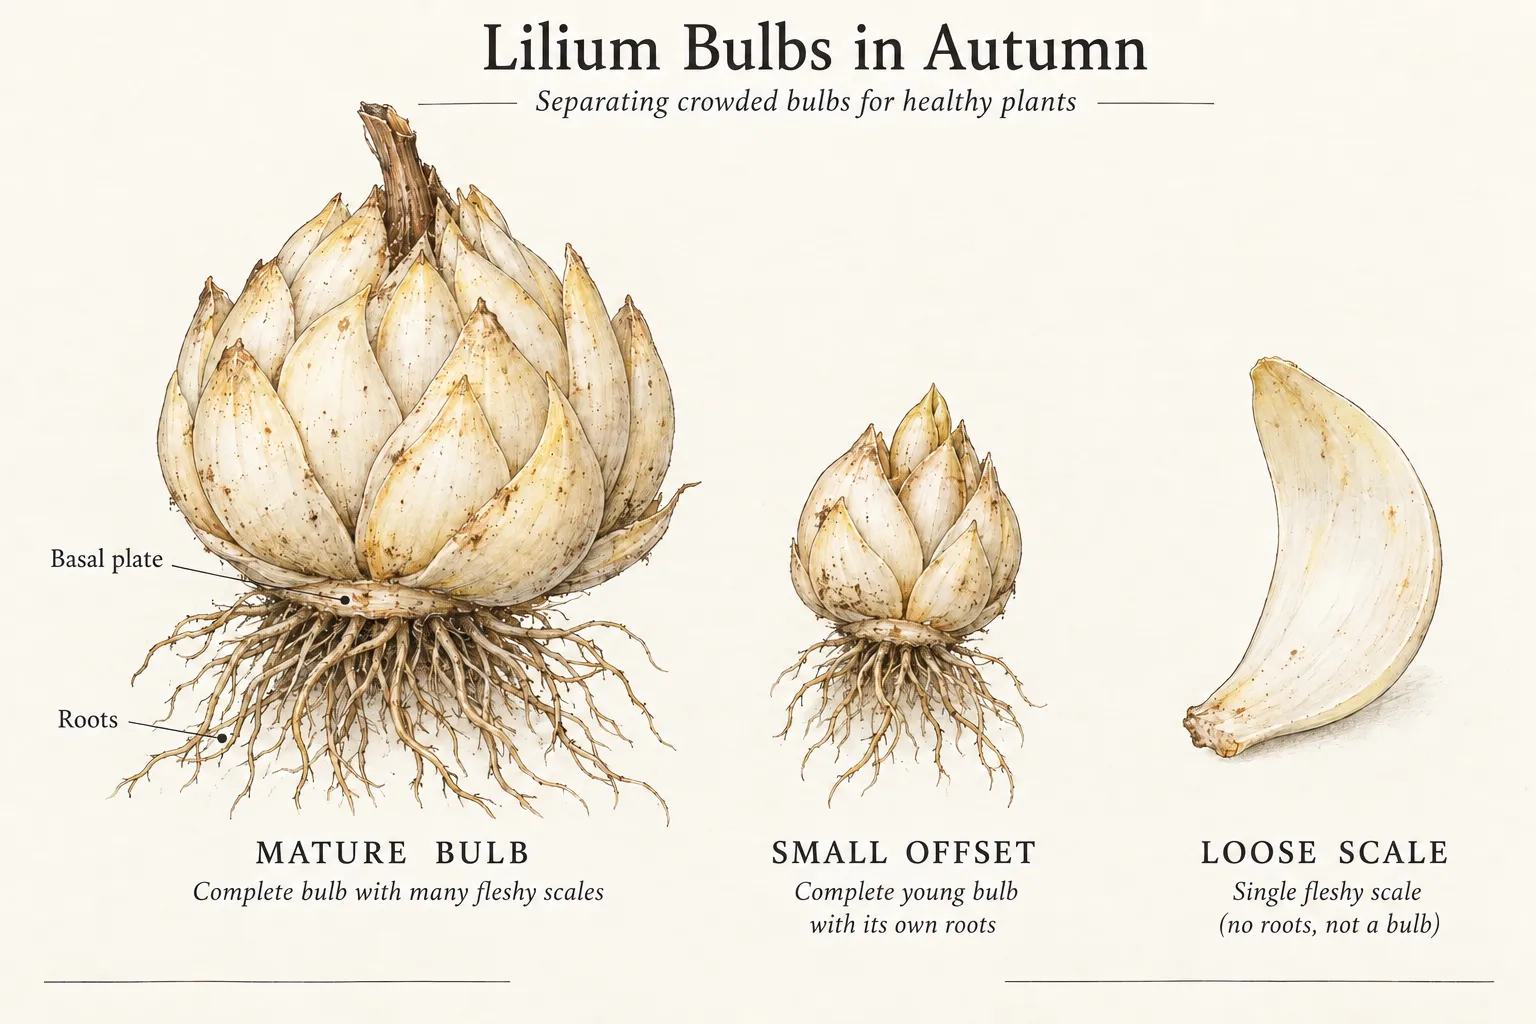
Use labelled, ordinary garden Lilium hybrids for a first attempt and keep their names with each batch. The overlapping fleshy scales of a true lily are individual storage leaves. A daylily crown, calla rhizome or amaryllis bulb needs a different propagation method. Scaling also differs from separating complete lily offsets: the piece you remove initially has to produce a new bulb before it can be treated as a young plant.
Select healthy stock before multiplying it
Choose a substantial bulb with firm scales and a sound base. Retain its supplier label and inspect it as soon as the package arrives. Loose packing can conceal damaged scales or a softened basal area, so turn the bulb gently and look beneath it as well as at the pointed top. A small, shrivelled or depleted bulb is better reserved for recovery or returned to the supplier if its condition is unacceptable.
Scaling clones the parent, including problems that travel with vegetative material. The RHS Lily Group emphasises healthy, virus-free stock for these methods. A clean-looking dormant bulb alone cannot establish that it is virus free. Use a reputable source and any available growing history; set aside material from a plant that showed unexplained streaking, distortion or abnormal growth. Seek diagnosis or supplier advice before multiplying a suspect batch and passing its offspring to other gardeners.
Resolve cat access before opening the bulbs. FDA and ASPCA identify true lilies as a serious poisoning risk to cats, with all parts implicated and small exposures capable of causing severe kidney injury. Choose another propagation project in a home where cats could reach the material. Where the work can be securely isolated, keep bulbs, scales, bags and discarded pieces inaccessible throughout. Suspected exposure calls for immediate veterinary contact, including when symptoms are absent.
Keep the basal end intact when removing a scale
Look at the parent bulb before pulling anything away. The pointed ends of its scales face upward; their lower ends attach around the basal plate, from which roots extend beneath the bulb. A useful detached scale retains its full fleshy length and its basal end. New bulblets form at that lower end. Breaking a scale across its middle loses the clean anatomical relationship that makes the process easy to follow.
Support the bulb in one hand and ease a sound outer scale outward from its attachment with the other. Break it off as close to the basal plate as possible. Leave the main basal plate and the rest of the bulb intact. This is not the chipping operation used for some tunicate bulbs, where a knife divides the entire bulb into wedges. A lily already offers separate fleshy scales that can be detached individually.
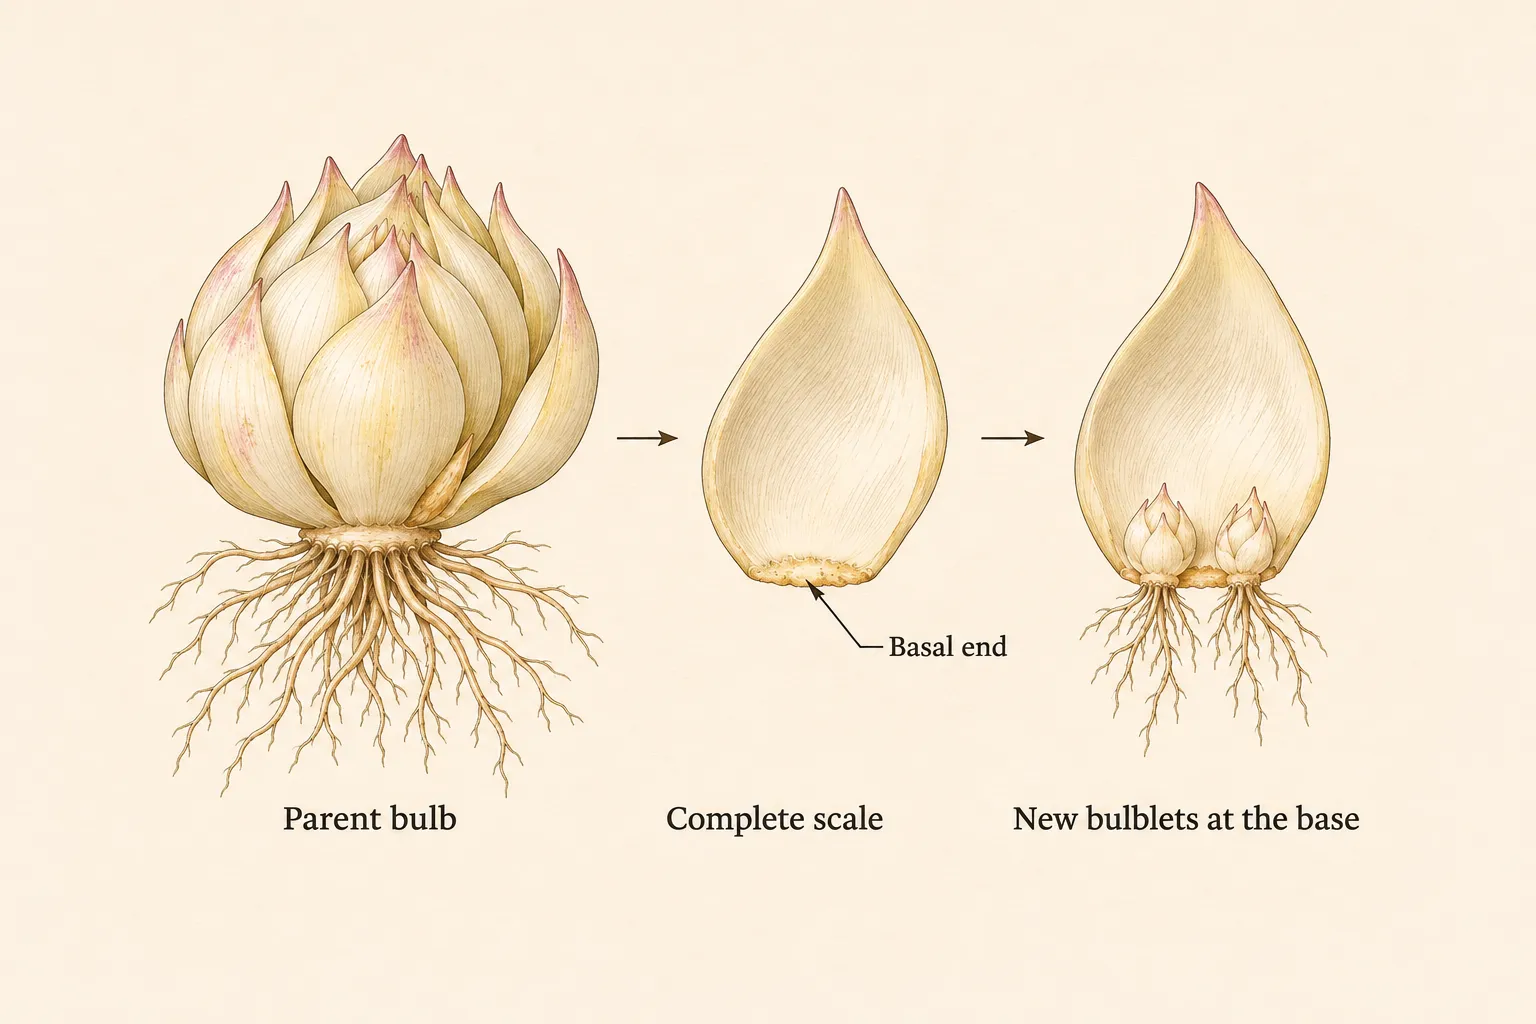
The North American Lily Society suggests roughly four to eight scales from a firm, well-filled bulb. Treat that as an indication of a small harvest, with the bulb's condition deciding how many it can spare. Start at the lower end for a first batch and leave the majority of the scales attached. Each one removed is part of the parent's stored food. A fixed quota makes little sense if the bulb is small or already missing pieces.
Discard damaged outer material and keep only sound propagation pieces. A few scales accidentally loosened during planting can be used if their bases are intact and their tissue is healthy. Set each cultivar on its own labelled tray, then deal with the parent while its roots and remaining scales are still fresh. Keep it protected from drying during the work and plant or pot it promptly according to its normal lily planting requirements.
Prepare a lightly damp bag with room around the scales
For a peat-free incubation medium, the RHS gives equal parts potting compost and grit, slightly dampened. The North American Lily Society and Iowa State describe vermiculite as another option. Choose one clean medium that you can keep lightly moist. The purpose is to surround the scales with moisture and air while the new bulbs develop. A bag of saturated compost provides a different environment, especially once it is warmed.
Moisten the medium before adding the scales, mixing it thoroughly so dry patches and wet pockets are less likely. Use just enough moisture to dampen it, with no water collecting at the bottom of the bag. Keep the scale pieces distributed through the loose material and leave air space above it. The RHS method fills the bag with air before sealing. A tightly compressed parcel makes the bases harder to inspect and the delicate new growth harder to release later.
Label the bag with the lily name, the date and the number of scales. Add the chosen medium and planned warm period to a notebook or second label. Keep different cultivars in separate bags even when their bulbs look alike. Once several small cream-coloured bulblets have formed, a forgotten label is difficult to reconstruct from appearance. Record the original scale count separately from the eventual bulblet count.
Start with clean containers, fresh medium and sound stock, then inspect during incubation. Some propagation sources include fungicide or peroxide treatments, but their general directions are not a complete product-specific recipe. A chemical dip cannot establish that a bulb is free of systemic disease. Keep routine handling careful and use current local advice if a particular disease problem requires treatment; visibly rotting pieces belong outside the propagation batch.
Use warmth to develop bulblets, then check their actual stage
Place the labelled bag in a dark position around 21°C, or 70°F. Measure the space with a thermometer, particularly if it is an airing cupboard or a shelf near heating equipment. The target is gentle, reasonably steady warmth. Direct contact with a radiator or an uncontrolled hot surface can produce a much higher temperature than the room reading. Choose somewhere that remains accessible for a quick inspection.
The RHS uses six weeks for this warm phase, while the University of Florida resource describes bulblets forming in about two months. These are useful inspection windows, not promises that every cultivar reaches the same size on a particular day. At a weekly check, look through the clear bag at the base of each scale and note any change. Open it when inspection or correction is needed, handling the pieces gently.
Small, firm bulblets developing at the basal end are the result you are looking for; roots may follow or develop alongside them. A pale swelling is an early stage, not yet a replacement for a flowering-size bulb. Keep the parent scale and its new growth together while inspecting. Repeatedly lifting a tiny bulblet to measure it creates damage at exactly the place where the new plant is attached.
Remove a scale that becomes soft and rotten before it has usable offspring. If medium is visibly wet or water pools in the bag, correct the excess and reassess the remaining tissue. If it has dried substantially, restore slight moisture carefully. Condensation on the plastic alone gives an incomplete picture of the medium. Firm scales with no bulblets at the first checkpoint can remain under observation; slower development is different from soft, collapsing tissue.
Provide the winter interval that the new bulbs need
Warm incubation creates new bulblets; it does not necessarily produce immediate leaves. The North American Lily Society recommends six to twelve weeks of refrigerator chilling for scale bulblets that have not spent winter outdoors before they make top growth. Its sequence is a practical route for a winter indoor batch: keep the developing bulbs in slightly damp packing, label the start of chilling and use a refrigerator compartment that remains above freezing.
There are taxon-specific differences. RHS specifically gives Lilium martagon a further six weeks at 5°C, or 41°F, after its warm phase. That example is not a reason to treat every lily as a martagon or to promise leaves at week six. Use the identity supplied with the bulbs to check any special requirements. For ordinary hybrids following the Lily Society route, retain its six-to-twelve-week interval and monitor the actual bulbs as well as the calendar.
Keep the labelled propagation bags separate from food and secure from pets and children. A freezer is unsuitable for the described refrigerator stage. Check that the packing remains slightly damp and that bulblets remain firm. Record whether there has already been an outdoor winter interval, because adding another full artificial winter automatically can confuse the sequence. Keep cold treatment and warm incubation as distinct dated stages in the same batch record.
If leaves begin to emerge, they need light and space for continued growth. Pot the developing plants carefully and move them into suitable bright, protected growing conditions. A leafy shoot should have room to extend; a sealed bag in darkness is no longer its growing position. For a batch still showing only sound bulblets and roots, continue the planned stage and review it against the named lily's requirements.
Pot tiny bulblets at their own scale
Prepare small, draining pots with a suitable free-draining potting mix before opening the batch. Gently ease the scale and its offspring out of the incubation material. Several bulblets may occupy one scale base, so support the whole unit as you free the roots. The size of the new bulb, the strength of its roots and whether the parent scale is still firm determine how much separation is sensible.
RHS advises retaining a firm scale, particularly when roots arise from its base, and removing a soft scale from the new bulbs before potting. Leave a sound supporting scale attached as the young bulbs establish. Detach a spent, soft piece only as gently as the junction allows. A firm scale is still useful plant tissue; forcing every youngster into a perfectly bare, separate specimen can sacrifice more than it gains.
Use the RHS instruction to cover each new bulblet with its own depth of compost. For example, a bulblet 5 mm tall receives about 5 mm of compost above its top. This is a measured soil-cover example, not a universal 5 mm rule: adjust to the actual bulb. Set the bulblet's base and roots downward, with the associated scale supported in the mix. Keep the small roots spread naturally and fill around them gently.
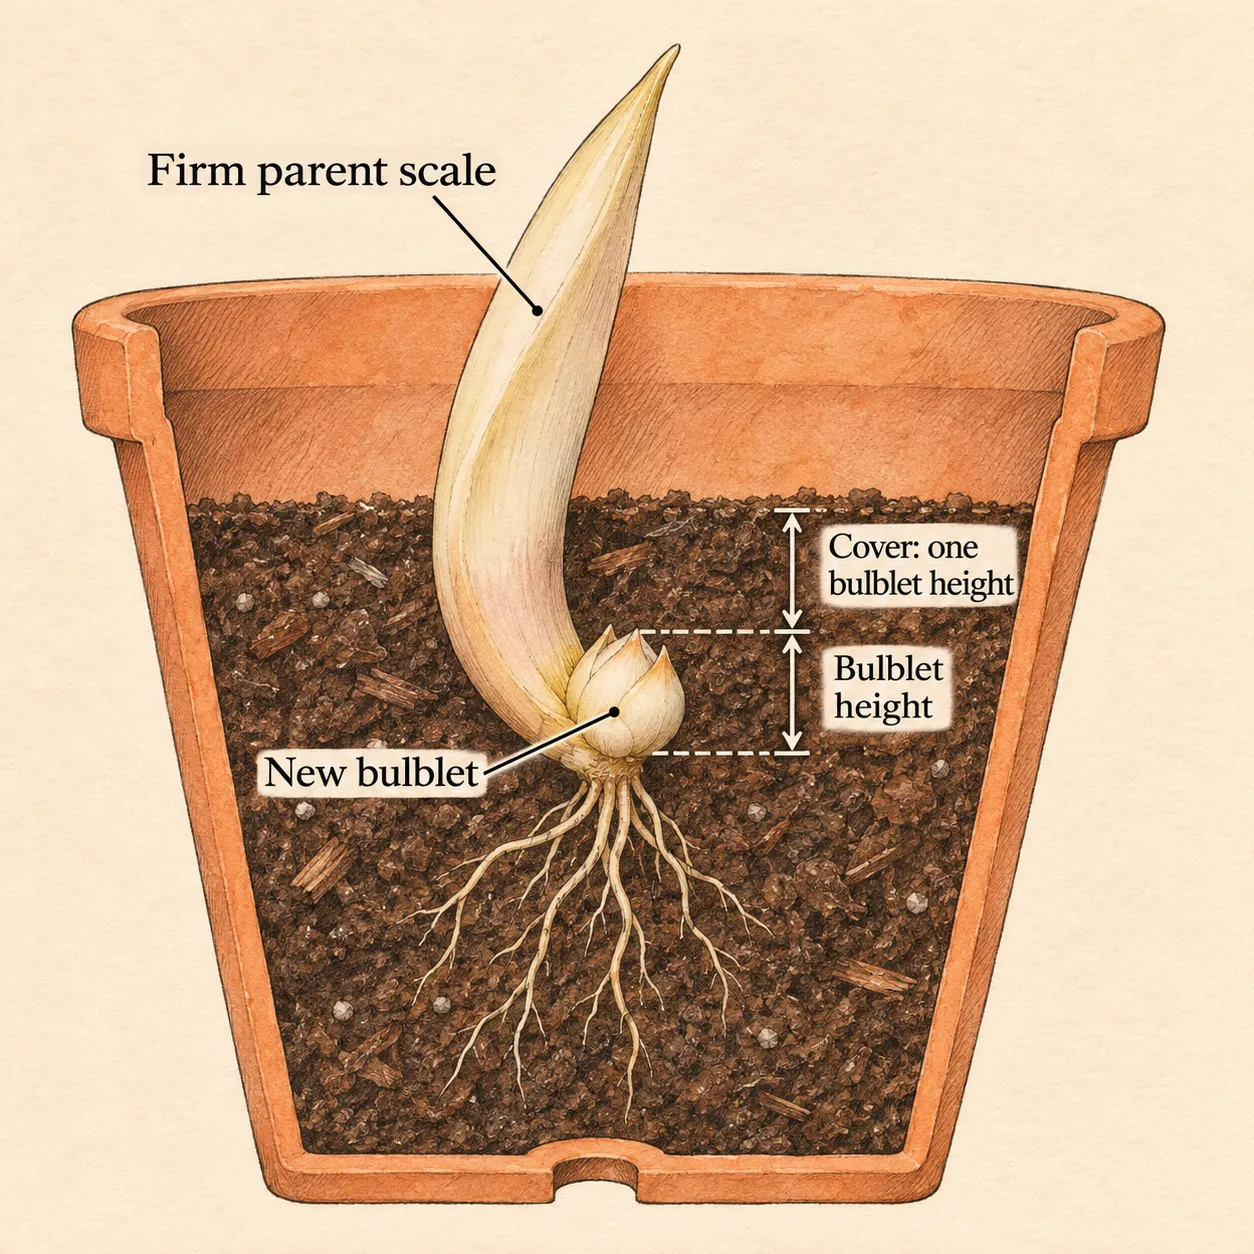
These tiny bulbs belong in a nursery stage. The deeper planting directions for a mature garden lily are for a different size of plant. Label the pot as scale-grown stock and include the cultivar and date. Water gently to settle the mix, let surplus drain and then maintain appropriate moisture as the young plant grows. A pot that remains saturated needs its drainage and watering assessed before another application.
Grow the young lilies through their first seasons
Once leaves are present, give the plants good light in a protected growing space and keep them clear of hard frost while they establish. Introduce outdoor conditions gradually when locally suitable weather arrives. Small nursery pots dry and cool differently from the established lily bed, so inspect them as a separate group. Keep the labels with the roots when moving pots or replacing a cracked container.
Expect a growing-on project measured in years. The North American Lily Society describes flowering-size bulbs after a couple of years or so, while the University of Florida resource allows several years. Both place flowering beyond the initial bag experiment. A single leaf or small shoot in the first season can be useful progress. The immediate goal is a sound larger bulb with retained foliage, not a flower stem by the following holiday.
Let green leaves finish naturally after each growing season so the new bulb can build reserves. Keep small stock in nursery pots or a carefully managed nursery bed until it is large enough for the intended border position. When moving it, protect roots and preserve its name. A mature lily's eventual height and space requirements still apply, even though the current plant fits into a very small pot.
Compare the batch record with the result: how many scales remained sound, how many formed bulbs, when chilling began and when leaves appeared. A failure during warm incubation calls for a different review from a healthy bulb that remained leafless during cold treatment. Use those observations to refine the next small batch. Keep any questionable material out of plant exchanges until its health is clear; multiplying a cultivar is worthwhile only when its offspring are worth growing.
Steps
- Level
- moderate
- Time
- About 30 minutes to prepare a small batch, then several months of staged care
- Tools
- Clean labelled trays, Permanent marker and notebook, Thermometer, Small pots with drainage holes
- Materials
- Healthy labelled garden lily bulbs, Clear sealable bags, Peat-free potting compost and grit, or vermiculite, Free-draining potting mix for growing on
- 1Check the bulb and prepare the batch label
Confirm a labelled Lilium garden hybrid with firm scales and a sound base. Set aside weak or disease-suspect stock. Arrange a secure work area where cats cannot reach any plant material. Write the cultivar, date and intended propagation method on a bag before separating pieces. Prepare the parent bulb’s planting destination so it can be returned to suitable growing conditions promptly.
- 2Detach a few complete scales
Support the parent bulb and ease a small number of sound outer scales away close to the basal plate. Retain the basal end of each scale and leave most of the parent intact. Keep different cultivars on separate trays. Plant or pot the parent promptly, preserving its remaining scales and roots. Count the accepted propagation pieces and update the label.
- 3Begin the warm incubation
Distribute the scales through slightly damp medium in a clear bag, leaving air space and no pooled water. Seal and place it in darkness around 21°C. Check the actual temperature and inspect the batch regularly. Look for firm bulblets at the scale bases over roughly six to eight weeks, correcting excess moisture and removing rotting pieces when needed.
- 4Record the winter treatment
After bulblets form, follow the appropriate cold stage for the named lily. For the Lily Society’s indoor winter route, allow six to twelve weeks in a refrigerator above freezing if the bulbs have not wintered outdoors. Mark the start date and maintain slightly damp packing. Monitor for deterioration or emerging leaves, which need potting and light.
- 5Pot and retain the nursery record
Ease out each scale-bulblet unit carefully, preserving roots and firm supporting scales. Remove soft spent scale tissue gently. Cover each tiny bulblet with its own depth of compost, water lightly to settle and drain the pot. Label the young stock and grow it on in protected conditions, allowing several seasons for flowering size. Record emergence separately from eventual bloom.
Related reading
Sources
- Bulbs: propagation. Royal Horticultural Society. Source record · Accessed 2026-11-13.
- Propagation. North American Lily Society. Source record · Accessed 2026-11-13.
- Scaling. University of Florida, University of Kentucky and Texas A&M University. Source record · Accessed 2026-11-13.
- How to Propagate Garden Lilies. Iowa State University Extension and Outreach. Source record · Accessed 2026-11-13.
- Increasing your stock. RHS Lily Group. Source record · Accessed 2026-11-13.
- Lovely Lilies and Curious Cats: A Dangerous Combination. U.S. Food and Drug Administration. Source record · Accessed 2026-11-13.
- Which Lilies Are Toxic to Pets?. ASPCA. Source record · Accessed 2026-11-13.