Grow · plant freesia corms pots cool greenhouse
Plant Freesia Corms in Pots for a Cool Greenhouse
Plant autumn freesia pots using a clear container method, then manage the cool start, brighter growing stage, stem support and corm aftercare.
Published Last updated
In this guide
- Start with two growing temperatures and suitable corms
- Choose a pot that accommodates roots and future stems
- Set the corm tips at the surface of a draining mix
- Give the planted pots a measured cool start
- Move into bright growth and add support early
- Water through growth and feed when buds appear
- Finish flowering before deciding whether to keep the corms
- Steps
Start with two growing temperatures and suitable corms
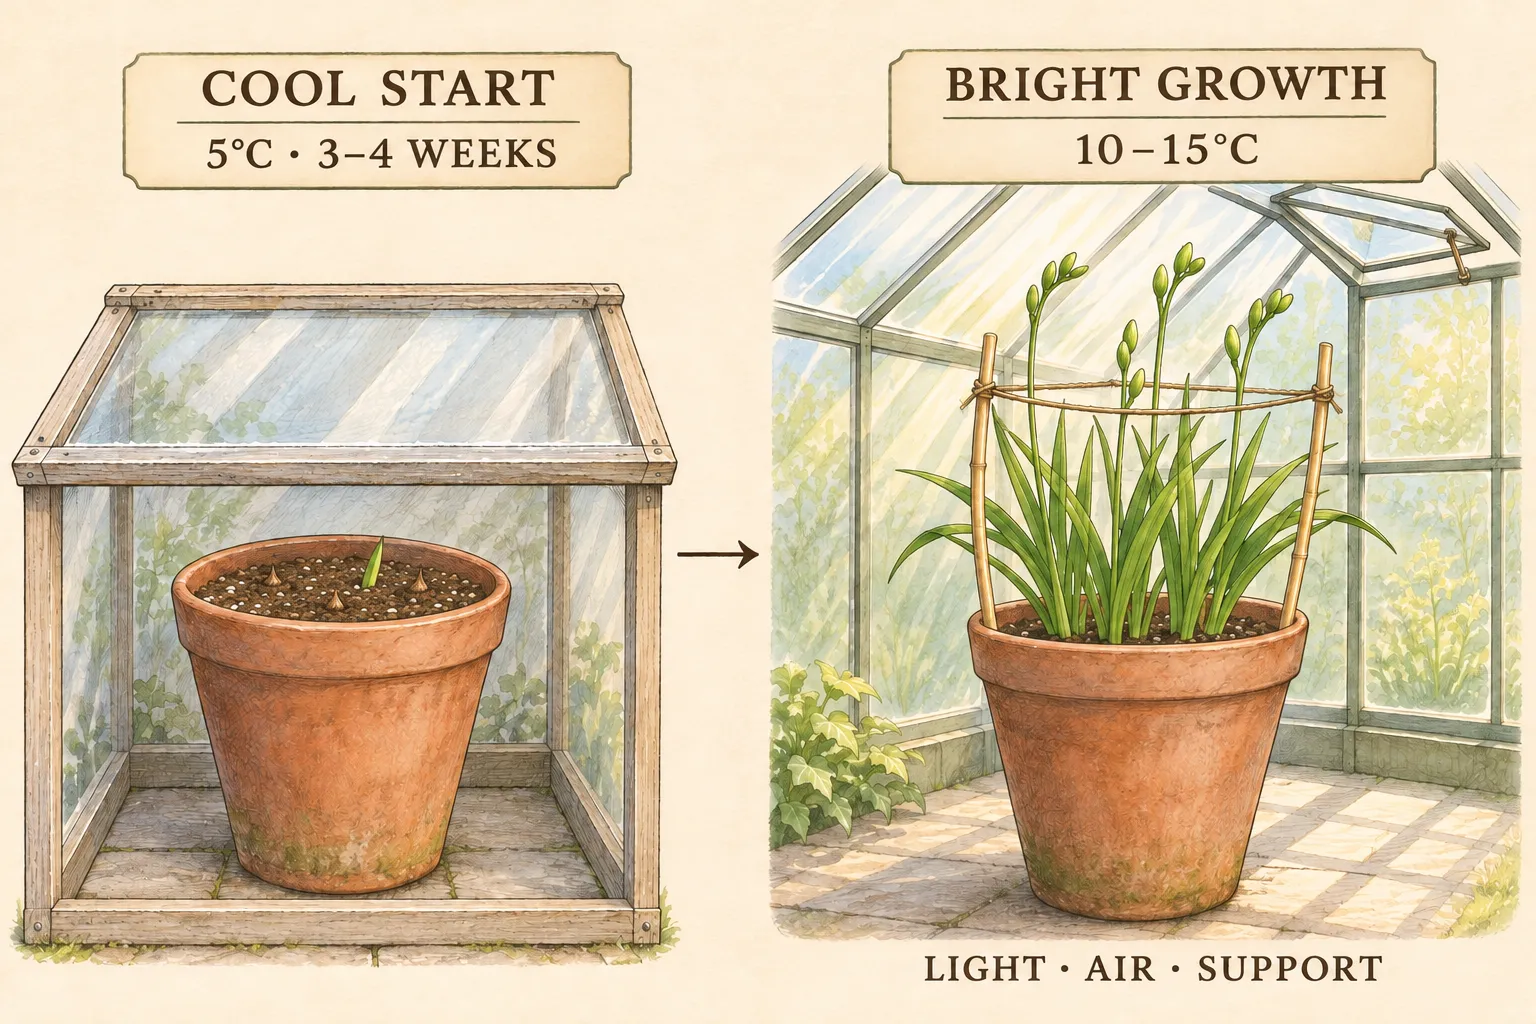
Plant autumn freesia pots in a freely draining mix, give them a cool frost-free start, then move them into brighter growing conditions. In the RHS container method, corm tips sit just above the compost, spaced 5–8 cm apart. Keep the planted pots at about 5°C for three to four weeks, followed by 10–15°C in a bright, ventilated greenhouse or conservatory. Water according to growth and moisture, and install support before the flower stems lean.
The RHS places indoor or greenhouse planting between August and December, so late November remains within that UK container window. Sarah Raven also includes September to November planting under cover for spring flowers. These timings describe a protected crop. A pot left on a freezing patio has a different environment, even when its planting date is correct. Reserve both the cool starting position and the later growing space before opening the corm packet.
Choose fresh, sound corms sold as suitable for the intended autumn planting. Freesia packets may describe prepared or unprepared stock. Prepared corms have received a temperature treatment before sale; the RHS describes spring-sold prepared stock for summer flowering outdoors, while specialist suppliers also offer autumn planting material. Keep the batch instructions, cultivar name and recommended season together. The word prepared alone cannot tell you that a bag bought for one schedule is ready for another.
Treat the flowering date as conditional. The RHS gives October planting followed by March flowering as an example under ideal conditions; Sarah Raven gives an approximate four-month interval in its own guidance. Those are planning estimates, not interchangeable guarantees. A November start is a later-winter or spring project with conditions to manage along the way. Choose it for the growing process and eventual fragrant display, with a flexible date for the first open flower.
Choose a pot that accommodates roots and future stems
Freesias grow from conical corms, which are swollen underground stems. A pointed upper end and broader base give the planting orientation. NC State describes their narrow, sword-like leaves in an iris-like fan and flowers carried along one side of a wiry stem. Garden hybrids are common, including single and double forms. Single flowers have six petal-like tepals joined into a tube. Retain the label because colour alone gives little information about the corm’s treatment history or the mature height of the chosen plant.
Use a deep container with functioning drainage holes. NC State specifically calls for depth to accommodate freesia roots. Check the usable depth inside the vessel: measure the space below the rim and above the thick base. The corms in the shallow RHS layout still need a substantial volume beneath them. A low saucer filled with grit may look like a bulb display but leaves little growing medium for the roots that must support the shoots.
Select the number of corms after choosing the pot. Lay them out at the intended spacing before filling around them, with room between the outer corms and the pot wall. Keep one cultivar and treatment batch together for the simplest first attempt. Several small labelled pots can be moved or assessed separately when their growth differs. A dense mixed bowl commits every corm to the same watering and temperature change, even if one batch starts much earlier.
Allow space above the pot as well. NC State describes flower stems commonly reaching 1–2 feet, roughly 30–60 cm, and Sarah Raven stresses the need for support. A shelf that fits the planted corms may later place the flowering stems against glazing or another shelf. Put the pot where its leaves can receive light and its developing stems can rise through a support. Make sure that the drainage tray remains accessible when foliage begins to spread.
Set the corm tips at the surface of a draining mix
For the RHS container recipe, mix two parts peat-free John Innes No. 2 potting compost with one part horticultural grit. Sarah Raven independently recommends the same two-to-one balance of loam-based compost and grit for pots. Mix the grit through the compost so the root zone has a consistent texture. Keep the vessel’s drainage openings clear and leave a practical watering space below its rim. The mixture and an open outlet have to work together.
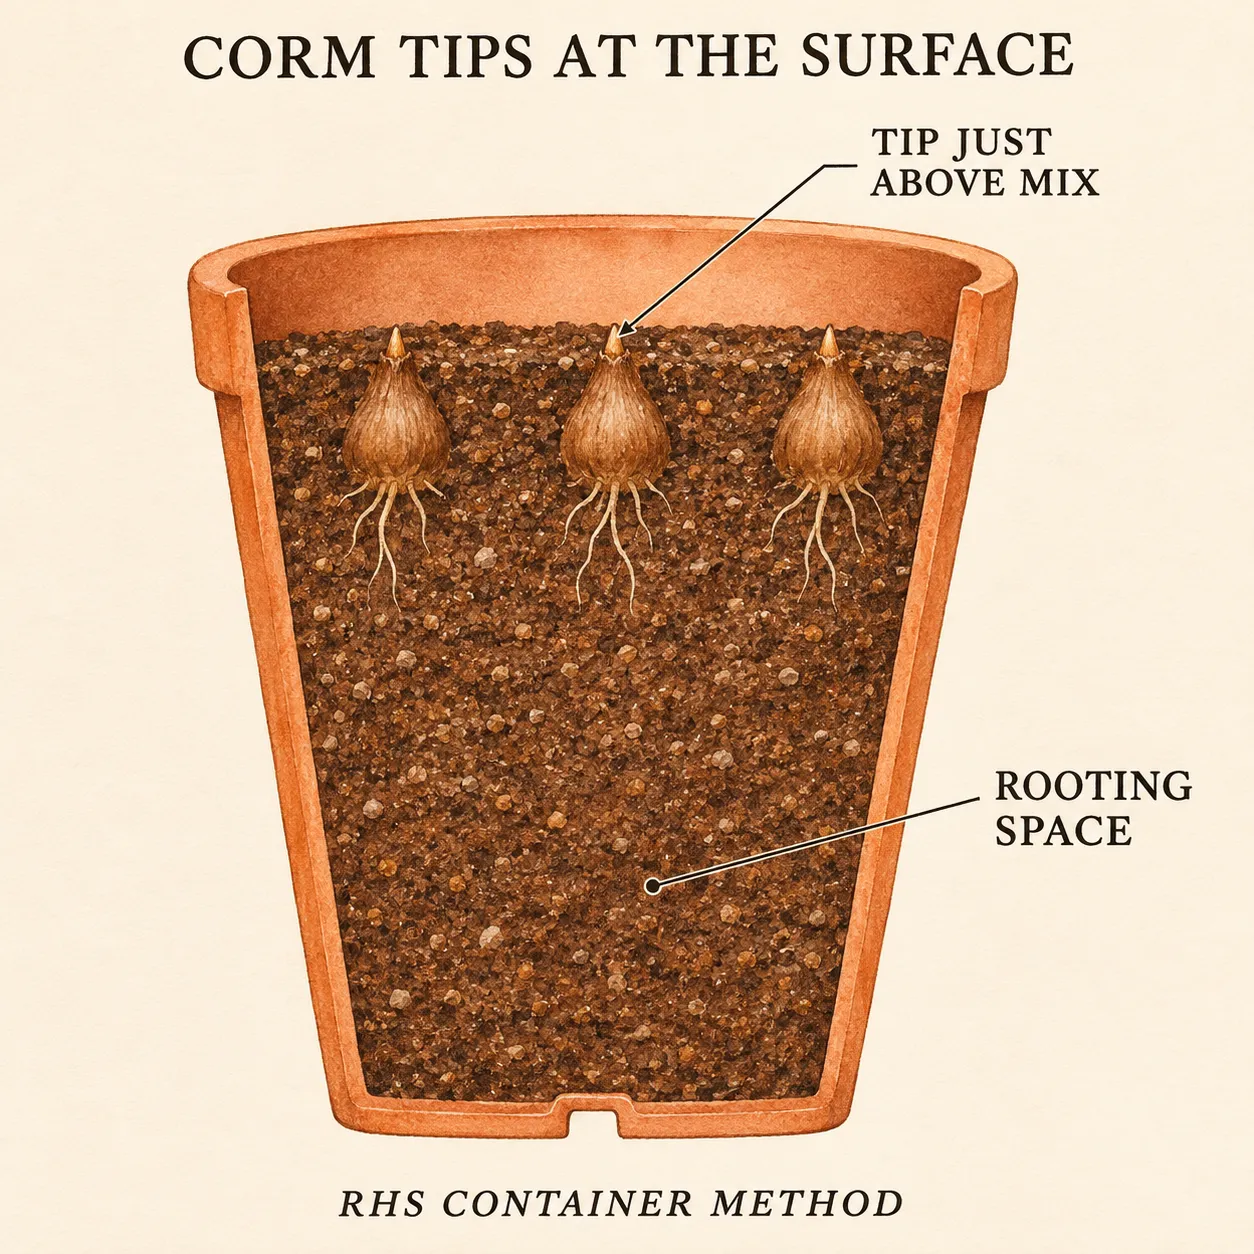
Part-fill the pot, then rest each corm base-down on the supporting mix. Add compost around its sides while leaving the pointed tip just above the final surface. The corm body belongs within the mix; only its tip remains exposed. Keep the 5–8 cm spacing as you work, and adjust the supporting layer if one corm sits too high. Fill gently around the bases, preserving the corms and any emerging growth.
Container depth recommendations differ. NC State describes corms covered by about an inch of mix, while Sarah Raven uses a 2.5–5 cm planting depth in its pot guidance. The exposed-tip arrangement here follows the RHS’s specific container method. If your supplier gives a complete protocol for its stock, keep that protocol intact. Combining a depth from one recipe with a guessed planting density from another makes the eventual result harder to interpret.
Check the finished pot at surface level before watering: upright corms, tips visible, bodies supported, space below the rim and rooting mix beneath the bases. Label it immediately with cultivar, supplier and planting date. Water gently to settle the mix, allow the excess to drain, then check for gaps left around the corms. Add a little mix where needed while preserving the chosen surface relationship. Empty the tray before moving the pot into its starting position.
Give the planted pots a measured cool start
Keep the pots at about 5°C, or 41°F, for the first three to four weeks in this method. The RHS suggests a frost-free cold frame as one possible setting. The important property is the measured temperature, not the name of the structure. A frame that freezes overnight needs a different arrangement. Place a thermometer beside the pots and check the actual minimum as autumn weather turns colder.
For a worked calendar, a pot planted on November 22 reaches three weeks on December 13 and four weeks on December 20. Mark that interval as the time to assess the next stage. It is a schedule for checking temperature history and growth, not a promised bloom window. If the pot has spent much of that period in an unsuitable environment, elapsed days alone give an incomplete account of its progress.
Keep the starting mix moist enough to support development, checking the pot before watering. The corms should stay seated while you inspect the surface and drainage. Emerging shoots need clearance above the pot; repeated lifting of corms to look beneath them disturbs the developing roots. If one pot fails to start, compare its corm condition, recorded temperature and moisture with the others before assuming that the whole batch needs extra heat.
This short cool start has its own purpose within the freesia sequence. A hyacinth forcing schedule can involve many more weeks of cold treatment, while a freesia corm may already have had a warm pre-planting treatment supplied by the grower. Keep those stages distinct. Save the packet beside the planting record so the treatment already received by the dry corm remains separate from the three-to-four-week period given to the planted pot.
Move into bright growth and add support early
After the cool starting period, move the pots to the RHS growing range of 10–15°C, approximately 50–59°F, with as much light and ventilation as practical. A cool greenhouse or conservatory gives you control over this stage. Check sunny afternoon temperatures as well as night minima. A closed glasshouse can become much warmer than the surrounding air, while a warm, dim living room supplies a poor combination for steady freesia growth.
The temperature figures belong to this particular winter container method. NC State describes a different day-and-night range in its cultivation guidance, so 15°C should not be read as a universal boundary beyond which every freesia is injured. For this batch, use the selected range as a management target and watch the plant. The RHS associates excessive warmth with weak growth and rapidly fading blooms, making ventilation and placement more useful than trying to hurry the display with heat.
Install support while the corm positions are still easy to locate. Sarah Raven suggests a triangle of canes, a circular support or twiggy sticks to hold foliage and flowering stems upright. Place supports carefully toward the pot edge, keeping them clear of the planted corms, and provide a loose structure through which growth can rise. Supporting the entire group is easier than trying to straighten a flower stem after it has fallen across a neighbour.
Give the developing flower spike room for its natural shape. Freesia flowers sit along a one-sided, often arching raceme; that bend is part of the plant’s form. Support the upright stem below the flowering section and keep the blooms free of tight ties. Check from the viewing side and from behind so a hidden stem is also supported. Adjust the arrangement as growth rises, maintaining access to the compost for the next watering.
Water through growth and feed when buds appear
Keep the growing pots from drying out, while allowing excess water to leave. The RHS calls for watering as needed during growth, and NC State cautions that excessive watering can rot corms. Check the mix and the drainage tray together. A dry-looking patch at the rim is insufficient reason to soak a pot whose lower compost remains wet; equally, an actively growing pot can use more water as its leaf area increases.
In the RHS container method, begin a high-potassium liquid fertilizer every two weeks when the first flower buds are visible, using the product’s dilution directions. The bud stage is the trigger for that recommendation. Other growers start feeding earlier or use a different routine, so keep your chosen recipe and the product label together. Feeding more frequently cannot correct poor drainage, insufficient light or a greenhouse that is consistently too warm.
Use the plant’s condition to investigate changes. A wilted freesia may be too dry, too wet or affected by a disease; Sarah Raven discusses all three possibilities. Check moisture and drainage before adding more water. Grey, translucent leaves that collapse after freezing suggest a different history, described in RHS frost-damage guidance. Record what happened and separate a deteriorating pot for assessment. A symptom alone gives too little evidence for a chemical treatment or a claim that every corm has failed.
Inspect shoots and leaf undersides for pests while checking the pots. Aphids and mites are among the problems listed by the RHS, while slugs or snails can damage foliage in protected growing spaces. Keep the growing area tidy and identify a suspected problem before choosing a response. Remove loose dead debris that conceals the soil surface, but retain healthy leaves. The flowers are the display; the green foliage remains important to the corm beneath.
Finish flowering before deciding whether to keep the corms
Remove spent flower stems when seed is not wanted, keeping the leaves intact. Continue watering and feeding while foliage remains active, then reduce and stop watering as it withers naturally. The RHS and Sarah Raven both emphasise retaining foliage until it has yellowed or browned. Clearing green leaves as soon as the last flower fades cuts short the period in which the plant rebuilds its underground reserves.
Keeping freesia corms for another display involves more than placing them beside other stored bulbs. The RHS describes a warm conditioning period for lifted, dry corms: about 26°C, or 79°F, at 75–80% relative humidity for 14–20 weeks, in a paper bag. NC State likewise gives warm storage at 25–30°C. These conditions apply to dry dormant corms after the growing cycle; they are separate from the cool conditions supplied to the planted pots in winter.
Sarah Raven also describes cool, dry holding for lifted corms, while noting that its prepared sale stock has received warm storage. Holding a corm and preparing it for dependable flowering are distinct considerations. Keep the treatment instructions for the batch and use a measured, ventilated setup if attempting the RHS conditioning method. Dry corm tissue is still required; a warm bag of damp material is a different situation, and the RHS lists blue mould among storage problems.
Buying fresh, suitably prepared stock for the next planting is a reasonable alternative when those conditioning conditions are impractical. Retain healthy corms only with a clear plan for their next cycle. Keep the useful record from this pot: the batch and planting date, actual starting and growing temperatures, first buds, flowering and natural leaf decline. It will make another autumn planting easier to plan while leaving the next flowering date appropriately flexible.
Steps
- Level
- moderate
- Time
- About 30 minutes to plant a small batch, followed by staged greenhouse care
- Tools
- Plant labels and pencil, Minimum–maximum thermometer, Small scoop, Watering can with a gentle flow, Secateurs for spent flower stems
- Materials
- Freesia corms suitable for autumn container planting, Deep containers with drainage holes, Peat-free John Innes No. 2 potting compost, Horticultural grit, Canes, a pot support or twiggy sticks, High-potassium liquid fertilizer for the bud stage
- 1Choose the batch and reserve both growing positions
Read the corm packet for treatment history and planting season. Select sound stock suitable for autumn pots and keep the cultivar label. Test a frost-free starting place near 5°C and a later bright, ventilated position at 10–15°C. Allow room for a deep container and supported flower stems, with access to the tray and compost.
- 2Fill and arrange the container
Mix two parts peat-free John Innes No. 2 compost with one part horticultural grit. Provide rooting mix beneath the corms, set their bases down and space them 5–8 cm apart. For this RHS container layout, fill around the bodies with tips just above the surface. Keep watering space below the rim and record the planting date.
- 3Water gently and begin the cool stage
Settle the mix with a gentle watering, let excess drain and empty the tray. Hold the pots near 5°C for three to four weeks, checking moisture and actual temperatures. Give emerging shoots clearance and leave developing roots undisturbed. Mark a review window on the label so the next move follows both the schedule and the pot’s condition. If development is absent, check the recorded temperatures, drainage and corm condition before changing stages. Keep a suspect pot separate for closer assessment.
- 4Grow on in light with support
Move to the 10–15°C growing position after the starting stage. Ventilate as conditions allow and monitor sunny-day warmth. Fit a loose support clear of corm positions before stems lean. Keep the mix supplied with moisture and drainage, then begin the selected high-potassium feed every two weeks when the first buds are visible.
- 5Retain foliage and choose the next corm cycle
Remove finished flower stems while keeping green leaves. Continue care until foliage naturally withers, then let the corms become dormant. Decide whether to provide the measured warm conditioning described by the RHS or obtain fresh stock next season. Keep storage conditions for dry corms distinct from the cool temperatures used for planted pots.
Related reading
Sources
- How to grow freesias. Royal Horticultural Society. Source record · Accessed 2026-11-08.
- Freesia. NC State Extension. Source record · Accessed 2026-11-08.
- How to plant, grow & care for freesias. Sarah Raven. Source record · Accessed 2026-11-08.
- Freesia alba × Freesia leichtlinii: Weeds of Australia fact sheet. Identic — Weeds of Australia. Source record · Accessed 2026-11-08.